2018 NISSAN ROGUE SPORT battery
[x] Cancel search: batteryPage 446 of 512
JVM0415X
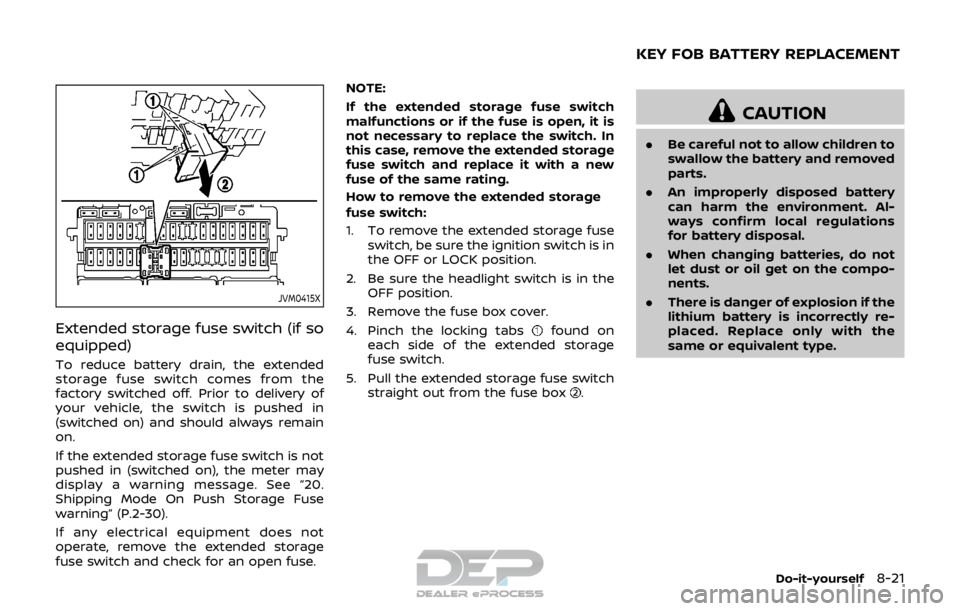
Extended storage fuse switch (if so
equipped)
To reduce battery drain, the extended
storage fuse switch comes from the
factory switched off. Prior to delivery of
your vehicle, the switch is pushed in
(switched on) and should always remain
on.
If the extended storage fuse switch is not
pushed in (switched on), the meter may
display a warning message. See “20.
Shipping Mode On Push Storage Fuse
warning” (P.2-30).
If any electrical equipment does not
operate, remove the extended storage
fuse switch and check for an open fuse.NOTE:
If the extended storage fuse switch
malfunctions or if the fuse is open, it is
not necessary to replace the switch. In
this case, remove the extended storage
fuse switch and replace it with a new
fuse of the same rating.
How to remove the extended storage
fuse switch:
1. To remove the extended storage fuse
switch, be sure the ignition switch is in
the OFF or LOCK position.
2. Be sure the headlight switch is in the OFF position.
3. Remove the fuse box cover.
4. Pinch the locking tabs
found on
each side of the extended storage
fuse switch.
5. Pull the extended storage fuse switch straight out from the fuse box
.
CAUTION
.Be careful not to allow children to
swallow the battery and removed
parts.
. An improperly disposed battery
can harm the environment. Al-
ways confirm local regulations
for battery disposal.
. When changing batteries, do not
let dust or oil get on the compo-
nents.
. There is danger of explosion if the
lithium battery is incorrectly re-
placed. Replace only with the
same or equivalent type.
Do-it-yourself8-21
KEY FOB BATTERY REPLACEMENT
Page 447 of 512
8-22Do-it-yourself
JVM0381X
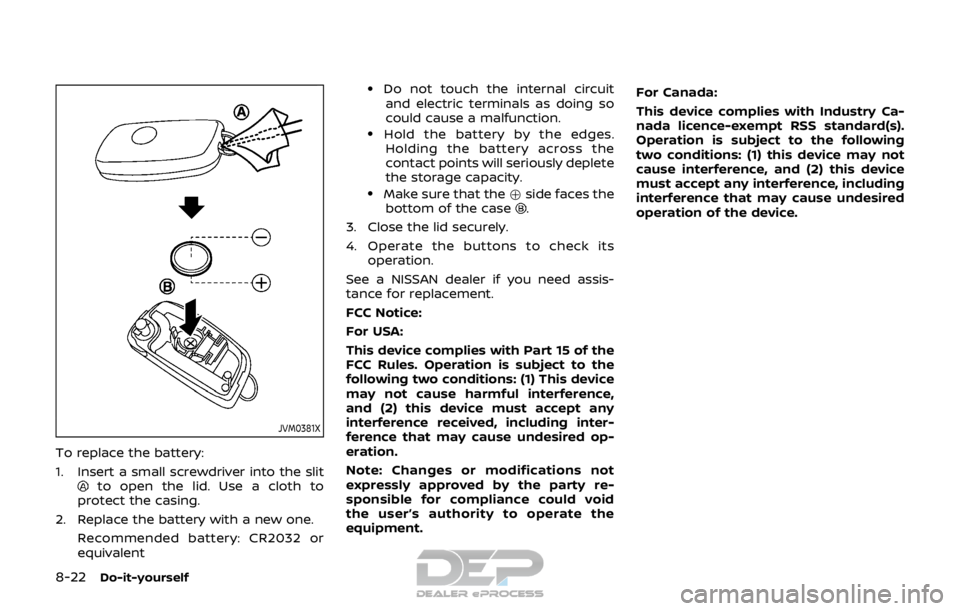
To replace the battery:
1. Insert a small screwdriver into the slit
to open the lid. Use a cloth to
protect the casing.
2. Replace the battery with a new one. Recommended battery: CR2032 or
equivalent
.Do not touch the internal circuitand electric terminals as doing so
could cause a malfunction.
.Hold the battery by the edges.Holding the battery across the
contact points will seriously deplete
the storage capacity.
.Make sure that the +side faces the
bottom of the case.
3. Close the lid securely.
4. Operate the buttons to check its operation.
See a NISSAN dealer if you need assis-
tance for replacement.
FCC Notice:
For USA:
This device complies with Part 15 of the
FCC Rules. Operation is subject to the
following two conditions: (1) This device
may not cause harmful interference,
and (2) this device must accept any
interference received, including inter-
ference that may cause undesired op-
eration.
Note: Changes or modifications not
expressly approved by the party re-
sponsible for compliance could void
the user’s authority to operate the
equipment. For Canada:
This device complies with Industry Ca-
nada licence-exempt RSS standard(s).
Operation is subject to the following
two conditions: (1) this device may not
cause interference, and (2) this device
must accept any interference, including
interference that may cause undesired
operation of the device.
Page 448 of 512
CAUTION
.Be careful not to allow children to
swallow the battery and removed
parts.
. An improperly disposed battery
can harm the environment. Al-
ways confirm local regulations
for battery disposal.
. When changing batteries, do not
let dust or oil get on the compo-
nents.
. There is danger of explosion if the
lithium battery is incorrectly re-
placed. Replace only with the
same or equivalent type.
SDI2451
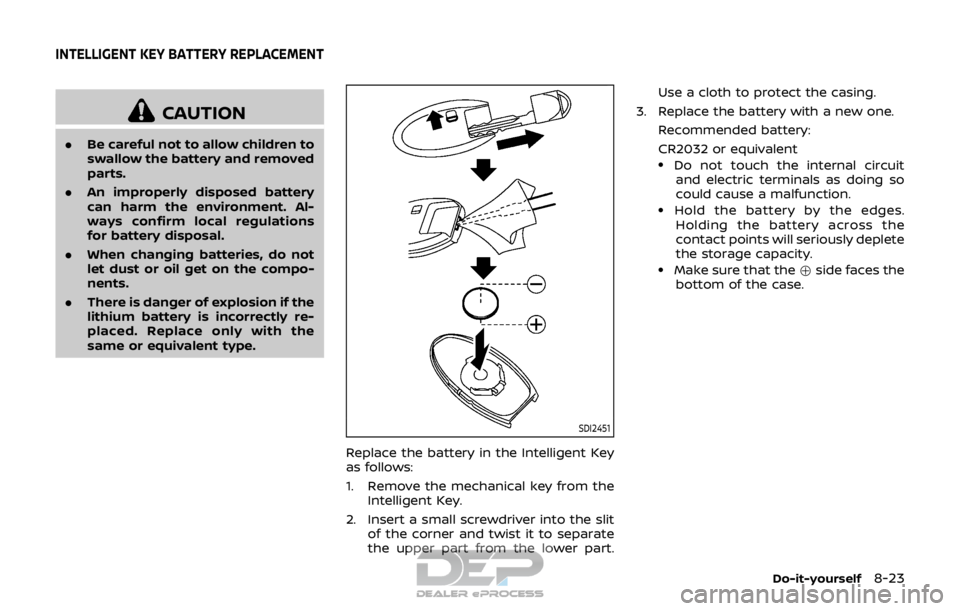
Replace the battery in the Intelligent Key
as follows:
1. Remove the mechanical key from the
Intelligent Key.
2. Insert a small screwdriver into the slit of the corner and twist it to separate
the upper part from the lower part. Use a cloth to protect the casing.
3. Replace the battery with a new one. Recommended battery:
CR2032 or equivalent
.Do not touch the internal circuitand electric terminals as doing so
could cause a malfunction.
.Hold the battery by the edges.
Holding the battery across the
contact points will seriously deplete
the storage capacity.
.Make sure that the +side faces the
bottom of the case.
Do-it-yourself8-23
INTELLIGENT KEY BATTERY REPLACEMENT
Page 451 of 512
8-26Do-it-yourself
Replacing
LED headlight model:
If LED headlight replacement is required,
it is recommended that you visit a NISSAN
dealer for this service.
Halogen headlight model:
The headlight is a semi-sealed beam type
which uses a replaceable headlight (halo-
gen) bulb.
CAUTION
.Do not leave the bulb out of the
headlight reflector for a long
period of time. Dust, moisture,
smoke, etc. entering the head-
light body may affect bulb per-
formance.
. High pressure halogen gas is
sealed inside the halogen bulb.
The bulb may break if the glass
envelope is scratched or the bulb
is dropped.
. Only touch the base when hand-
ling the bulb. Never touch the
glass envelope. Touching the
glass envelope could significantly
affect bulb life and/or headlight
performance. .
Aiming is not necessary after
replacing the bulb. When aiming
adjustment is necessary, it is
recommended you visit a NISSAN
dealer for this service.
Use the same number and wattage as
originally installed as shown in the chart.
JVM0395X
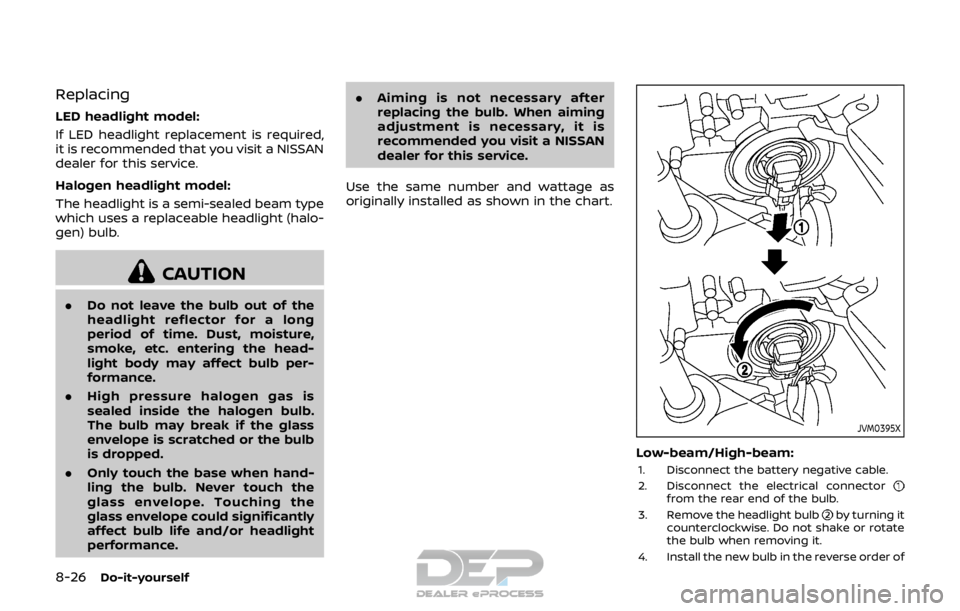
Low-beam/High-beam:
1. Disconnect the battery negative cable.
2. Disconnect the electrical connector
from the rear end of the bulb.
3. Remove the headlight bulb
by turning it
counterclockwise. Do not shake or rotate
the bulb when removing it.
4. Install the new bulb in the reverse order of
Page 471 of 512
9-4Maintenance and schedules
Steering wheel:Check for changes in the
steering conditions, such as excessive
free play, hard steering or strange noises.
Warning lights and chimes: Make sure
that all warning lights and chimes are
operating properly.
Windshield defroster: Check that the air
comes out of the defroster outlets prop-
erly and in sufficient quantity when oper-
ating the heater or air conditioner.
Windshield wiper and washer*: Check
that the wipers and washers operate
properly and that the wipers do not
streak.
Under the hood and vehicle
The maintenance items listed here should
be checked periodically (for example,
each time you check the engine oil or
refuel).
Battery*: Check the fluid level in each cell.
It should be between the MAX and MIN
lines. Vehicles operated in high tempera-
tures or under severe condition require
frequent checks of the battery fluid level.
NOTE:
Care should be taken to avoid situations
that can lead to potential battery dis-
charge and potential no-start condi-
tions such as: 1.
Installation or extended use of elec-
tronic accessories that consume
battery power when the engine is
not running (Phone chargers, GPS,
DVD players, etc.)
2. Vehicle is not driven regularly and/
or only driven short distances.
In these cases, the battery may need to
be charged to maintain battery health.
Brake and clutch fluid level*: Make sure
that the brake and clutch fluid level is
between the MAX and MIN lines on the
reservoir.
Engine coolant level*: Check the coolant
level when the engine is cold.
Engine drive belt*: Make sure that the
drive belt is not frayed, worn, cracked or
oily.
Engine oil level*: Check the level after
parking the vehicle on a level surface and
turning off the engine. Wait more than 10
minutes for the oil to drain back into the
oil pan.
Exhaust system: Make sure there are no
loose supports, cracks or holes. If the
sound of the exhaust seems unusual or
there is a smell of exhaust fumes, im-
mediately have the exhaust system in-
spected. It is recommended you visit a
NISSAN dealer for this service. (See “Pre-
cautions when starting and driving” (P.5- 4) for exhaust gas (carbon monoxide).)
Fluid leaks:
Check under the vehicle for
fuel, oil, water or other fluid leaks after the
vehicle has been parked for a while. Water
dripping from the air conditioner after use
is normal. If you should notice any leaks
or if gasoline fumes are evident, check for
the cause and have it corrected immedi-
ately.
Radiator and hoses: Check the front of
the radiator and clean off any dirt, insects,
leaves, etc., that may have accumulated.
Make sure the hoses have no cracks,
deformation, rot or loose connections.
Underbody: The underbody is frequently
exposed to corrosive substances such as
those used on icy roads or to control
dust. It is very important to remove these
substances, otherwise rust will form on
the floor pan, frame, fuel lines and around
the exhaust system. At the end of winter,
the underbody should be thoroughly
flushed with plain water, being careful to
clean those areas where mud and dirt
may accumulate. For additional informa-
tion, see “Cleaning exterior” (P.7-2).
Windshield washer fluid*: Check that
there is adequate fluid in the reservoir.
Page 478 of 512
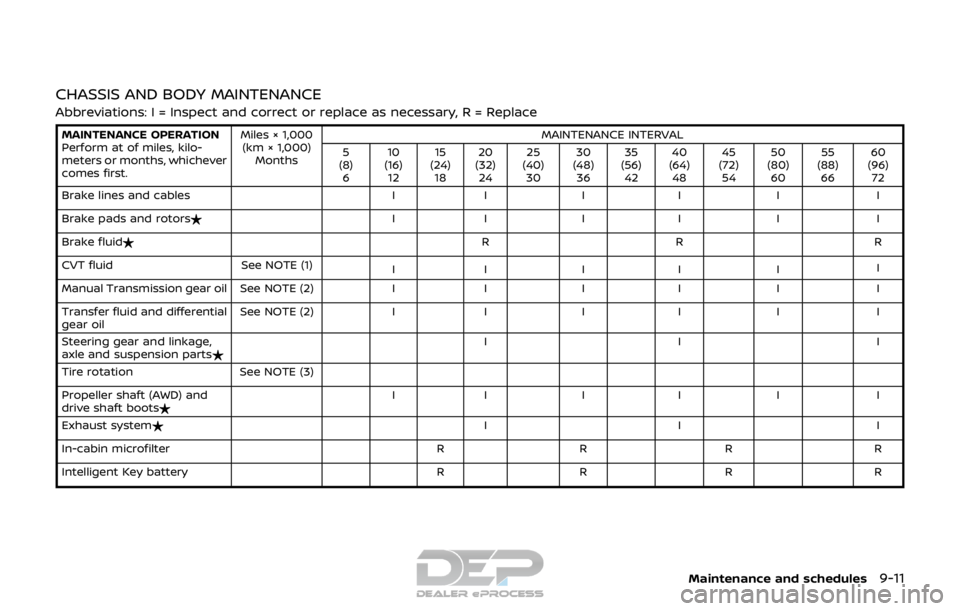
CHASSIS AND BODY MAINTENANCE
Abbreviations: I = Inspect and correct or replace as necessary, R = Replace
MAINTENANCE OPERATION
Perform at of miles, kilo-
meters or months, whichever
comes first.Miles × 1,000
(km × 1,000) Months MAINTENANCE INTERVAL
5
(8) 6 10
(16) 12 15
(24) 18 20
(32) 24 25
(40) 30 30
(48) 36 35
(56) 42 40
(64) 48 45
(72) 54 50
(80) 60 55
(88) 66 60
(96) 72
Brake lines and cables II II I I
Brake pads and rotors$ II I I I I
Brake fluid$ RR R
CVT fluid See NOTE (1)
II I I I I
Manual Transmission gear oil See NOTE (2) II II I I
Transfer fluid and differential
gear oil See NOTE (2)
II II I I
Steering gear and linkage,
axle and suspension parts$ II I
Tire rotation See NOTE (3)
Propeller shaft (AWD) and
drive shaft boots$ II I I I I
Exhaust system$ II I
In-cabin microfilter RR R R
Intelligent Key battery RR R R
Maintenance and schedules9-11
Page 479 of 512
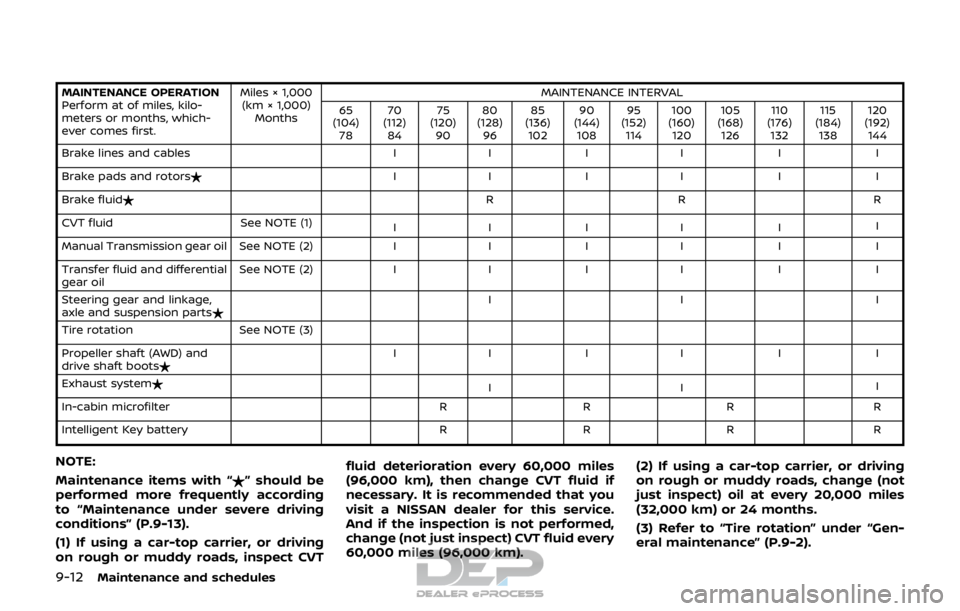
9-12Maintenance and schedules
MAINTENANCE OPERATION
Perform at of miles, kilo-
meters or months, which-
ever comes first.Miles × 1,000
(km × 1,000) Months MAINTENANCE INTERVAL
65
(104) 78 70
(112) 84 75
(120) 90 80
(128) 96 85
(136) 102 90
(144) 108 95
(152) 114 100
(160) 120 105
(168) 126 110
(176) 132 115
(184) 138 120
(192) 144
Brake lines and cables II II I I
Brake pads and rotors$ II II I I
Brake fluid$ RR R
CVT fluid See NOTE (1)
II II I I
Manual Transmission gear oil See NOTE (2) II II I I
Transfer fluid and differential
gear oil See NOTE (2)
II II I I
Steering gear and linkage,
axle and suspension parts$ II I
Tire rotation See NOTE (3)
Propeller shaft (AWD) and
drive shaft boots$ II II I I
Exhaust system$ III
In-cabin microfilter RRR R
Intelligent Key battery RRR R
NOTE:
Maintenance items with “$” should be
performed more frequently according
to “Maintenance under severe driving
conditions” (P.9-13).
(1) If using a car-top carrier, or driving
on rough or muddy roads, inspect CVT fluid deterioration every 60,000 miles
(96,000 km), then change CVT fluid if
necessary. It is recommended that you
visit a NISSAN dealer for this service.
And if the inspection is not performed,
change (not just inspect) CVT fluid every
60,000 miles (96,000 km).
(2) If using a car-top carrier, or driving
on rough or muddy roads, change (not
just inspect) oil at every 20,000 miles
(32,000 km) or 24 months.
(3) Refer to “Tire rotation” under “Gen-
eral maintenance” (P.9-2).
Page 501 of 512
10-18Technical and consumer information
wwwapps.tc.gc.ca/Saf-Sec-Sur/7/
PCDB-BDPP/fc-cp.aspx?lang=fra
(French speakers).
Additional information concerning
motor vehicle safety may be ob-
tained from Transport Canada’s
Road Safety Information Centre at
1-800-333-0371 or online at www.
tc.gc.ca/roadsafety (English speak-
ers) or www.tc.gc.ca/securiterou-
tiere (French speakers).
To notify NISSAN of any safety
concerns please contact our Con-
sumer Information Centre toll free
at 1-800-387-0122.
WARNING
A vehicle equipped with All-Wheel
Drive (AWD) should never be tested
using a two wheel dynamometer
(such as the dynamometers used by
some states for emissions testing),
or similar equipment. Make sure you
inform test facility personnel that
your vehicle is equipped with AWD
before it is placed on a dynam-
ometer. Using the wrong test equip-
ment may result in transmission
damage or unexpected vehicle
movement which could result in
serious vehicle damage or personal
injury.
Due to legal requirements in some states/
areas or provinces, your vehicle may be
required to be in what is called the “ready
condition” for an Inspection/Maintenance
(I/M) test of the emission control system.
The vehicle is set to the “ready condition”
when it is driven through certain driving
patterns. Usually, the “ready condition”
can be obtained by ordinary usage of
the vehicle.
If a powertrain system component is
repaired or the battery is disconnected,
the vehicle may be reset to a “not ready condition”. Before taking the I/M test,
check the vehicle’s inspection/mainte-
nance test readiness condition. Place the
ignition switch in the ON position without
starting the engine. If the Malfunction
Indicator Light (MIL) comes on steady for
20 seconds and then blinks for 10 sec-
onds, the I/M test condition is “not ready”.
If the MIL does not blink after 20 seconds,
the I/M test condition is “ready”.
It is recommended you visit a NISSAN
dealer to set “ready condition” or to
prepare the vehicle for testing.
READINESS FOR INSPECTION/
MAINTENANCE (I/M) TEST