Page 242 of 370

– When installing a spare tire, makesure that it is the proper size and
type as specified on the Tire and
Loading Information label. For ad-
ditional information, refer to “Tire
and Loading Information label” in
the “Technical and consumer infor-
mation” section of this manual.
– For additional information, refer to “Wheels and tires” in the “Do-it-
yourself ” section of this manual.
The ABS controls the brakes so the wheels
do not lock during hard braking or when
braking on slippery surfaces. The system
detects the rotation speed at each wheel
and varies the brake fluid pressure to pre-
vent each wheel from locking and sliding.
By preventing each wheel from locking, the
system helps the driver maintain steering
control and helps to minimize swerving
and spinning on slippery surfaces.
Using the system
Depress the brake pedal and hold it down.
Depress the brake pedal with firm steady
pressure, but do not pump the brakes. The
Anti-lock Braking System will operate to
prevent the wheels from locking up. Steer
the vehicle to avoid obstacles.
Page 251 of 370

DRAINING OF COOLANT WATER
If the vehicle is to be lef t outside without
anti-freeze, drain the cooling system, in-
cluding the engine block. Refill before oper-
ating the vehicle. For additional informa-
tion, refer to “Changing engine coolant” in
the “Do-it-yourself ” section of this manual.
TIRE EQUIPMENT
1. SUMMER tires have a tread designed toprovide superior performance on dry
pavement. However, the performance
of these tires will be substantially re-
duced in snowy and icy conditions. If
you operate your vehicle on snowy or
icy roads, NISSAN recommends the use
of MUD & SNOW or ALL SEASON TIRES
on all four wheels. It is recommended
that you visit a NISSAN dealer for the tire
type, size, speed rating and availability
information.
2. For additional traction on icy roads, studded tires may be used. However,
some U.S. states and Canadian prov-
inces prohibit their use. Check local,
state and provincial laws before install-
ing studded tires. Skid and traction capabilities of studded
snow tires on wet or dry surfaces may be
poorer than that of non-studded snow
tires.
3. Tire chains may be used. For additional information, refer to “Tire chains” in the
“Do-it-yourself ” section of this manual.
SPECIAL WINTER EQUIPMENT
It is recommended that the following items
be carried in the vehicle during winter:
∙ A scraper and stiff-bristled brush to re- move ice and snow from the windows
and wiper blades.
∙ A sturdy, flat board to be placed under the jack to give it firm support.
∙ A shovel to dig the vehicle out of snow- drif ts.
∙ Extra washer fluid to refill the windshield-washer fluid reservoir.
DRIVING ON SNOW OR ICE
Page 252 of 370
∙ Do not use the cruise control (if soequipped) on slippery roads.
∙ Snow can trap dangerous exhaust gases under your vehicle. Keep snow
clear of the exhaust pipe and from
around your vehicle.
ENGINE BLOCK HEATER (if so
equipped)
Engine block heaters are used to assist
with cold temperature starting.
The engine block heater should be used
when the outside temperature is 20°F (-7°C)
or lower.
Page 257 of 370
A. Blocks
B. Flat tire
Blocking wheels
Place suitable blocks at both the front and
back of the wheel diagonally opposite the
flat tire to prevent the vehicle from moving
when it is jacked up.
Page 259 of 370
7. Open the back door.
8. Loosen the bolt
�1counterclockwise
approximately 40 turns to lower the
spare. Be careful not to excessively
loosen the bolt because the basket
may fall abruptly. 9. Stop turning the bolt when the spare is
lowered to the point where the tire bas-
ket
�2can be removed from the hook
�3.
10. Remove the wheel basket by pushing the basket upward.
11. Lower the tire basket to the ground and take out the spare.
12. Reverse steps 8–11 to return the basket to its position under the vehicle.
Spare wheel basket bolt tightening
torque:
20 f t-lb (27 N-m)
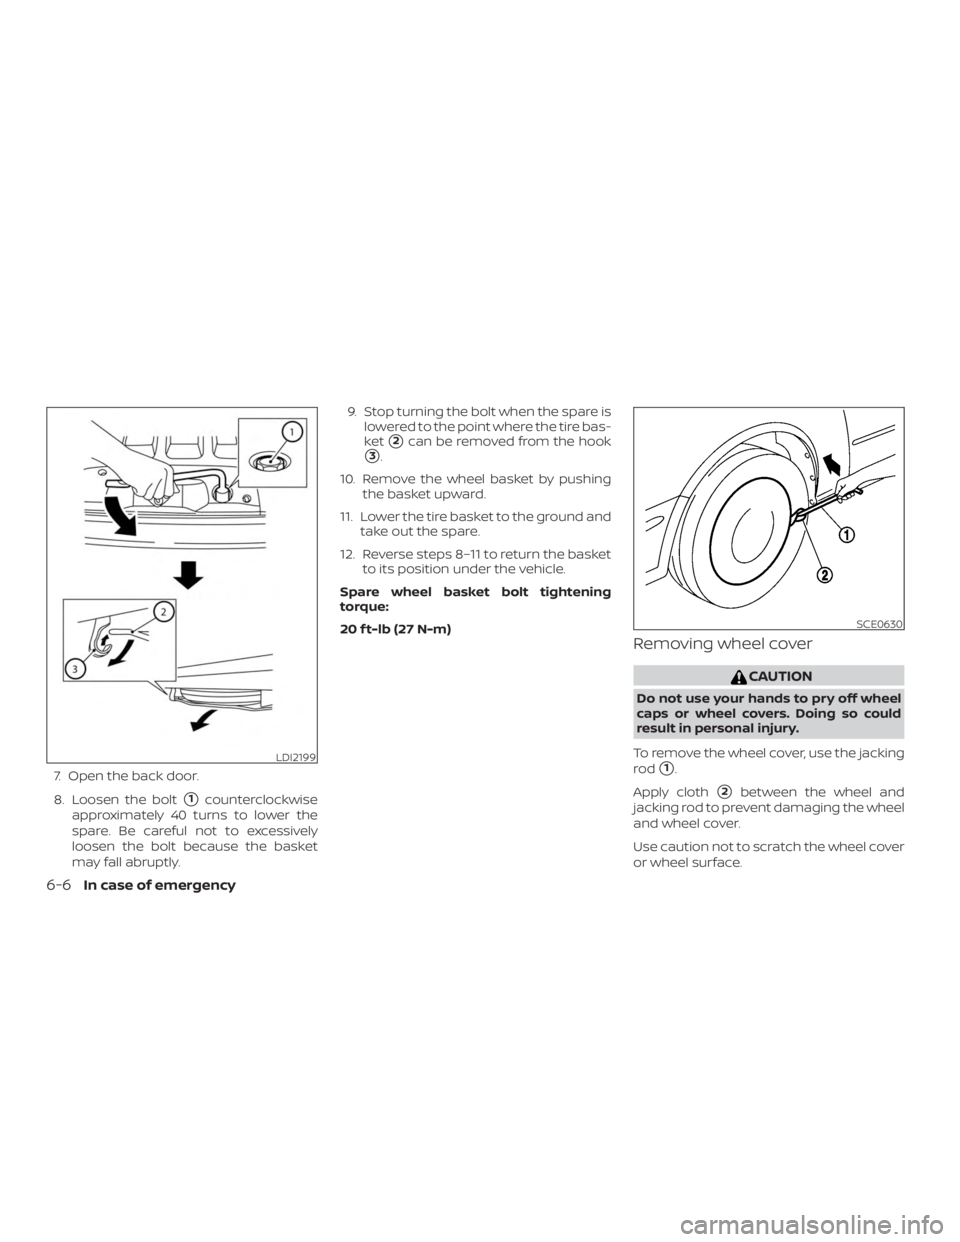
Removing wheel cover
Page 285 of 370
CHANGING ENGINE OIL
1. Park the vehicle on a level surface andapply the parking brake. 2. Start the engine and let it idle until it
reaches operating temperature, then
turn it off.
3. Remove the oil filler cap
�Bby turning it
counterclockwise.
4. Place a large drain pan under the drain plug
�A.
5. Remove the drain plug
�Awith a
wrench by turning it counterclockwise
and completely drain the oil.
If the oil filter is to be changed, remove
and replace it at this time. For addi-
tional information, refer to “Changing
engine oil filter” in this section.
∙ Waste oil must be disposed of prop-
erly.
∙ Check your local regulations.
Page 286 of 370
8. Start the engine. Check for leakagearound the drain plug and oil filter. Cor-
rect as required.
9. Turn the engine off and wait more than 10 minutes. Check the oil level with the
dipstick. Add engine oil if necessary.
CHANGING ENGINE OIL FILTER
1. Park the vehicle on a level surface and
apply the parking brake.
2. Turn the engine off. 3. Place a large drain pan under the oil
filter
�B.
4. Loosen the oil filter with an oil filter wrench by turning it counterclockwise.
Then remove the oil filter by turning it
by hand.
Page 299 of 370
How to replace the extended storage
switch:1. To remove the extended storage switch, be sure the ignition switch is in
the OFF or LOCK position.
2. Be sure the headlight switch is in the OFF position.
3. Remove the fuse box cover.
4. Pinch the locking tabs
�1and�2found
on each side of the storage switch.
5. Pull the storage switch straight out from the fuse box
�3.
 on slippery roads.
∙ Snow can trap dangerous exhaust gases under your vehicle. Keep snow
clear of the exhaust pipe and from
around your vehicle.
ENG")