Page 222 of 370
∙ If the low tire pressure warning lightilluminates while driving, avoid sud-
den steering maneuvers or abrupt
braking, reduce vehicle speed, pull off
the road to a safe location and stop
the vehicle as soon as possible. Driv-
ing with under-inflated tires may per-
manently damage the tires and in-
crease the likelihood of tire failure.
Serious vehicle damage could occur
and may lead to an accident and could
result in serious personal injury.
Check the tire pressure for all four
tires. Adjust the tire pressure to the
recommended COLD tire pressure
shown on the Tire and Loading Infor-
mation label to turn the low tire pres-
sure warning light off. If you have a flat
tire, replace it with a spare tire as soon
as possible. For additional informa-
tion, refer to “Flat tire” in the “In case of
emergency ” section of this manual. ∙ When replacing a wheel without the
TPMS such as the spare tire, when a
spare tire is mounted or a wheel is
replaced, tire pressure will not be indi-
cated, the TPMS will not function and
the low tire pressure warning light will
flash for approximately 1 minute. The
light will remain on af ter 1 minute.
Have your tires replaced and/or TPMS
system reset as soon as possible. It is
recommended that you visit a NISSAN
dealer for this service.
∙ Replacing tires with those not origi- nally specified by NISSAN could affect
the proper operation of the TPMS.
∙ Do not inject any tire liquid or aerosol tire sealant into the tires, as this may
cause a malfunction of the tire pres-
sure sensors.
Page 224 of 370
5. If there is nothing in the way, steer thevehicle to follow the road while vehicle
speed is reduced. Do not attempt to
drive the vehicle back onto the road
surface until vehicle speed is reduced.
6. When it is safe to do so, gradually turn the steering wheel until both tires re-
turn to the road surface. When all tires
are on the road surface, steer the ve-
hicle to stay in the appropriate driving
lane.
∙ If you decide that it is not safe to re- turn the vehicle to the road surface
based on vehicle, road or traffic con-
ditions, gradually slow the vehicle to a
stop in a safe place off the road.
RAPID AIR PRESSURE LOSS
Rapid air pressure loss or a “blow-out” can
occur if the tire is punctured or is damaged
due to hitting a curb or pothole. Rapid air
pressure loss can also be caused by driving
on under-inflated tires.
Rapid air pressure loss can affect the han-
dling and stability of the vehicle, especially
at highway speeds. Help prevent rapid air pressure loss by
maintaining the correct air pressure and
visually inspecting the tires for wear and
damage. For additional information, refer
to “Wheels and tires” in the “Do-it-yourself ”
section of this manual. If a tire rapidly loses
air pressure or “blows-out” while driving,
maintain control of the vehicle by following
the procedure below. Please note that this
procedure is only a general guide. The ve-
hicle must be driven as appropriate based
on the conditions of the vehicle, road and
traffic.
Page 239 of 370
WARNING
∙ Do not stop or park the vehicle overflammable materials such as dry
grass, waste paper or rags. They may
ignite and cause a fire. ∙ Safe parking procedures require that
both the parking brake be set and the
transmission placed into P (Park). Fail-
ure to do so could cause the vehicle to
move unexpectedly or roll away and
result in an accident. Make sure the
shif t lever has been pushed as far for-
ward as it can go and cannot be
moved without depressing the foot
brake pedal.
∙ Never leave the engine running while the vehicle is unattended. ∙ To help avoid risk of injury or death
through unintended operation of the
vehicle and/or its systems, do not
leave children, people who require the
assistance of others or pets unat-
tended in your vehicle. Additionally,
the temperature inside a closed ve-
hicle on a warm day can quickly be-
come high enough to cause a signifi-
cant risk of injury or death to people
and pets.
1. Firmly apply the parking brake.
2. Move the shif t lever to the P (Park) po- sition.
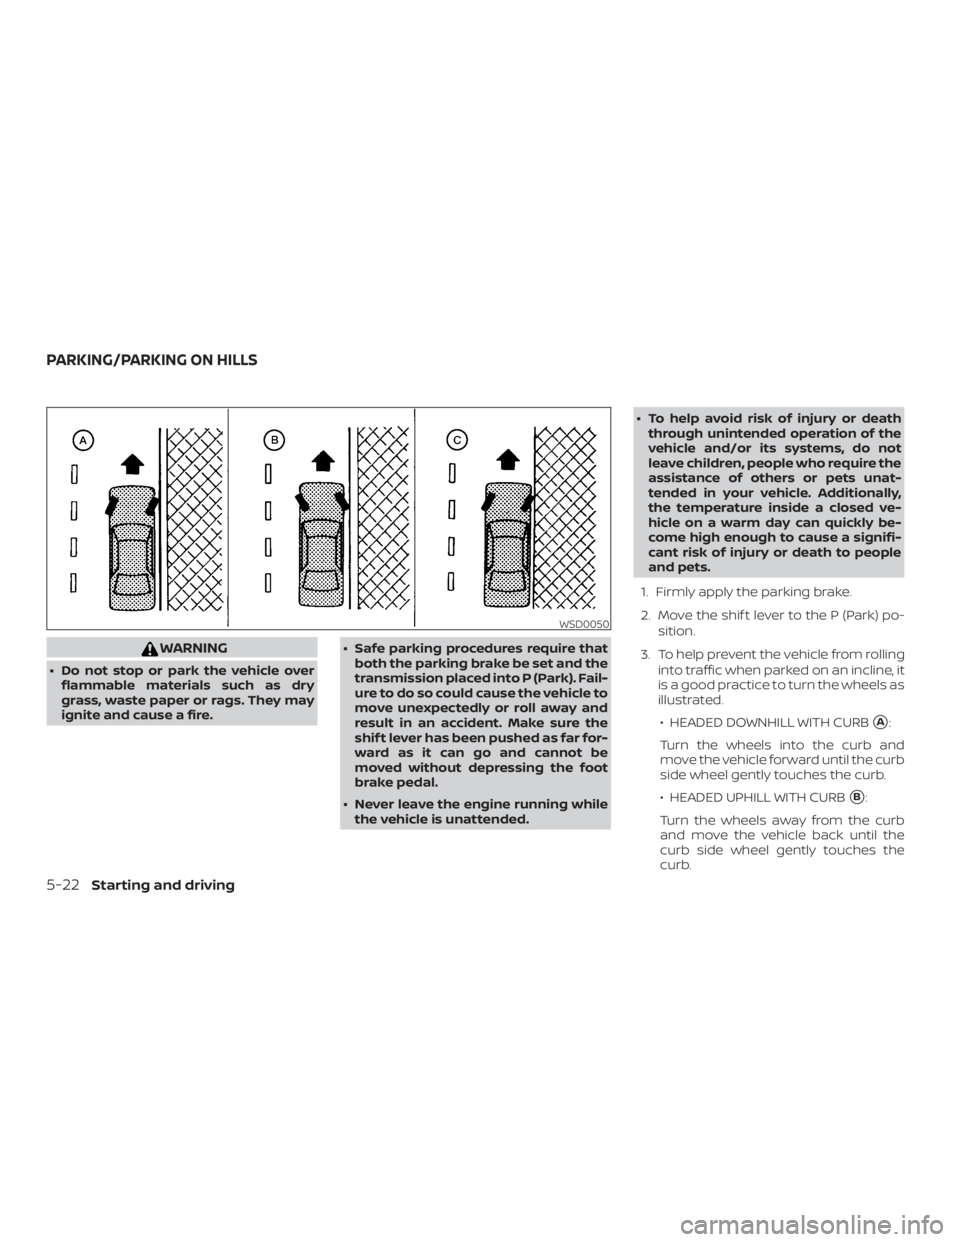
3. To help prevent the vehicle from rolling into traffic when parked on an incline, it
is a good practice to turn the wheels as
illustrated.
∙ HEADED DOWNHILL WITH CURB
�A:
Turn the wheels into the curb and
move the vehicle forward until the curb
side wheel gently touches the curb.
∙ HEADED UPHILL WITH CURB
�B:
Turn the wheels away from the curb
and move the vehicle back until the
curb side wheel gently touches the
curb.
Page 240 of 370
∙ HEADED UPHILL OR DOWNHILL, NOCURB
�C:
Turn the wheels toward the side of the
road so the vehicle will move away
from the center of the road if it moves.
4. Place the ignition switch in the LOCK position.
Page 241 of 370
The brake system has two separate hy-
draulic circuits. If one circuit malfunctions,
you will still have braking at two wheels.
BRAKE PRECAUTIONS
Vacuum assisted brakes
The brake booster aids braking by using
engine vacuum. If the engine stops, you
can stop the vehicle by depressing the
brake pedal. However, greater foot pres-
sure on the brake pedal will be required to
stop the vehicle and stopping distance will
be longer.
Using the brakes
Avoid resting your foot on the brake pedal
while driving. This will overheat the brakes,
wear out the brake pads faster, and reduce
gas mileage.
To help reduce brake wear and to prevent
the brakes from overheating, reduce speed
and downshif t to a lower gear before going
down a slope or long grade. Overheated
brakes may reduce braking performance
and could result in loss of vehicle control.
Page 242 of 370
– When installing a spare tire, makesure that it is the proper size and
type as specified on the Tire and
Loading Information label. For ad-
ditional information, refer to “Tire
and Loading Information label” in
the “Technical and consumer infor-
mation” section of this manual.
– For additional information, refer to “Wheels and tires” in the “Do-it-
yourself ” section of this manual.
The ABS controls the brakes so the wheels
do not lock during hard braking or when
braking on slippery surfaces. The system
detects the rotation speed at each wheel
and varies the brake fluid pressure to pre-
vent each wheel from locking and sliding.
By preventing each wheel from locking, the
system helps the driver maintain steering
control and helps to minimize swerving
and spinning on slippery surfaces.
Using the system
Depress the brake pedal and hold it down.
Depress the brake pedal with firm steady
pressure, but do not pump the brakes. The
Anti-lock Braking System will operate to
prevent the wheels from locking up. Steer
the vehicle to avoid obstacles.
Page 243 of 370
WARNING
The brake assist is only an aid to assist
braking operation and is not a collision
warning or avoidance device. It is the
driver’s responsibility to stay alert, drive
safely and be in control of the vehicle at
all times.The VDC system uses various sensors to
monitor driver inputs and vehicle motion.
Under certain driving conditions, the VDC
system helps to perform the following
functions:
∙ Controls brake pressure to reduce wheel slip on one slipping drive wheel
so power is transferred to a non-
slipping drive wheel on the same axle.
∙ Controls brake pressure and engine output to reduce drive wheel slip based
on vehicle speed (traction control func-
tion).
∙ Controls brake pressure at individual wheels and engine output to help the
driver maintain control of the vehicle in
the following conditions:
– Understeer (vehicle tends to not fol- low the steered path despite in-
creased steering input)
– Oversteer (vehicle tends to spin due to certain road or driving conditions)
The VDC system can help the driver to
maintain control of the vehicle, but it can-
not prevent loss of vehicle control in all driv-
ing situations. When the VDC system operates, the
Page 244 of 370
to prevent one drive wheel from slipping by
transferring power to a non-slipping drive
wheel. The