2018 NISSAN NV PASSENGER VAN manual radio set
[x] Cancel search: manual radio setPage 111 of 426
TPMS malfunction
If the TPMS is not functioning properly, the
low tire pressure warning light will flash for
approximately 1 minute when the ignition
switch is placed in the ON position. The
light will remain on af ter 1 minute. Have the
system checked. It is recommended that
you visit a NISSAN dealer for this service.
The "TIRE PRES" warning does not appear if
the low tire pressure warning light illumi-
nates to indicate a TPMS malfunction. In-
stead, “TPMS ERROR” will appear in the trip
computer.
For additional information, refer to “Tire
Pressure Monitoring System (TPMS)” in the
“Starting and driving” section and “Tire
pressure” in the “Do-it-yourself ” section of
this manual.
WARNING
∙Radio waves could adversely affect elec-
tric medical equipment. Those who use
a pacemaker should contact the electric
medical equipment manufacturer for
the possible influences before use.
∙If the light does not illuminate with the
ignition switch placed in the ON position,
have the vehicle checked as soon as
possible. It is recommended that you
visit a NISSAN dealer for this service.
∙ If the light illuminates while driving, avoid sudden steering maneuvers or
abrupt braking, reduce vehicle speed,
pull off the road to a safe location and
stop the vehicle as soon as possible.
Driving with under-inflated tires may
permanently damage the tires and in-
crease the likelihood of tire failure. Se-
rious vehicle damage could occur and
may lead to an accident and could re-
sult in serious personal injury or
death. Check the tire pressure for all
four tires. Adjust the tire pressure to
the recommended COLD tire pressure
show on the Tire and Loading Infor-
mation label located in the driver’s
door opening to turn the low tire pres-
sure warning light off. If the light still
illuminates while driving af ter adjust-
ing the tire pressure, a tire may be flat
or the TPMS may be malfunctioning. If
you have a flat tire, replace it with a
spare tire as soon as possible. If no tire
is flat and all tires are properly in-
flated, have the vehicle checked. It is
recommended that you visit a NISSAN
dealer for this service. ∙ When replacing a wheel without the
TPMS such as the spare tire, the TPMS
will not function and the low tire pres-
sure warning light will flash for ap-
proximately 1 minute. The light will re-
main on af ter 1 minute. Have your
tires replaced and/or TPMS system
reset as soon as possible. It is recom-
mended that you visit a NISSAN dealer
for these services.
∙ Replacing tires with those not origi- nally specified by NISSAN could affect
the proper operation of the TPMS.
CAUTION
∙ The TPMS is not a substitute for theregular tire pressure check. Be sure to
check the tire pressure regularly.
∙ If the vehicle is being driven at speeds of less than 16 mph (25 km/h), the
TPMS may not operate correctly.
∙ Be sure to install the specified size of tires to the four wheels correctly.
2-22Instruments and controls
Page 164 of 426
4 Monitor, climate, audio, phone and
voice recognition systems
Control panel buttons — color screen with
Navigation System (if so equipped)..............4-4
How to use the touch-screen .................4-5
HowtousetheBACKbutton .................4-7
How to use the
button.................4-7
button................................. 4-10
How to use the ON-OFF button/
VOL (volume) control knob ..................4-10
How to use the CAMERA button .............4-10
RearView Monitor ............................... 4-11
RearView Monitor system operation .........4-12
How to read the displayed lines ..............4-13
Difference between predicted and
actual distances ............................. 4-13
Adjusting the screen ........................ 4-15
RearView Monitor system limitations ........4-16
System maintenance ........................ 4-17
Vents ........................................... 4-18
Heater and air conditioner (manual)
(if so equipped) ................................. 4-19Controls
..................................... 4-21
Heater operation ............................ 4-22
Air conditioner operation ....................4-23
Air flow charts ............................... 4-24
Heater and air conditioner (automatic)
(if so equipped) ................................. 4-27
Controls ..................................... 4-28
Automatic operation ........................ 4-28
Manual operation ........................... 4-29
Operating tips ............................... 4-31
Rear seat air conditioner ....................4-31
Controls ..................................... 4-31
Servicing air conditioner ........................4-32
Audio system ................................... 4-32
Radio ........................................ 4-32
FM radio reception .......................... 4-33
AM radio reception .......................... 4-33
Satellite radio reception (if so equipped) .....4-33
Audio operation precautions ................4-34
FM/AM radio with compact disc (CD)
player (if so equipped) .......................4-42
Page 165 of 426
FM/AM/SAT radio with compact disc
(CD) player (Type A) (if so equipped)..........4-47
FM/AM/SAT radio with compact disc
(CD) player (Type B) (if so equipped) ..........4-53
USB (Universal Serial Bus) Connection
Port (models without Navigation
System) (if so equipped) .....................4-60
USB (Universal Serial Bus) Connection
Port (models with Navigation System)
(if so equipped) .............................. 4-62
iPod®* player operation without
Navigation System (if so equipped) ..........4-64
iPod®* player operation with Navigation
System (if so equipped) ......................4-66
Bluetooth® streaming audio without
Navigation System (if so equipped) ..........4-69
Bluetooth® streaming audio with
Navigation System (if so equipped) ..........4-70
CD care and cleaning ........................ 4-72
Steering wheel switch for audio control
(if so equipped) .............................. 4-72
Antenna ..................................... 4-73
NissanConnect® Mobile Apps (if so equipped). . . 4-74
Car phone or CB radio ..........................4-74 Bluetooth® Hands-Free Phone System
without Navigation System (if so equipped)
.....4-75
Regulatory information ......................4-77
Using the system ............................ 4-77
Control buttons ............................. 4-79
Connecting procedure ......................4-79
Voice commands ........................... 4-80
Making a call ................................ 4-81
Receiving a call .............................. 4-82
During a call ................................. 4-82
Ending a call ................................. 4-83
Text messaging (if so equipped) .............4-83
Bluetooth® settings ......................... 4-85
Manual control .............................. 4-86
Bluetooth® Hands-Free Phone System with
Navigation System (if so equipped) .............4-86
Regulatory information ......................4-88
Voice commands ........................... 4-89
Connecting procedure ......................4-89
Vehicle phonebook .......................... 4-89
Making a call ................................ 4-90
R
eceiving a call .............................. 4-90
During a call ................................. 4-90
Ending a call ................................. 4-90
Page 172 of 426
Menu itemResult
Display Mode Touch this key to select the touch-screen display mode (day, night, or automatic).
Brightness Adjust touch-screen brightness.
Contrast Adjust touch-screen contrast.
Color Adjust touch-screen color.
Temperature Unit Touch this key to change the temperature unit being displayed (Fahrenheit or Celsius).
Touchscreen click Toggles the touch-screen click feature on or off. When activated a click sound will be heard every time a key on the
screen is touched.
System Beeps Toggle the system beep tones feature on or off. When activated, a beep sound will be heard when a pop-up message
appears on the screen or a button on the unit (such as the
button) is pressed and held for two seconds.
Return to Factory Settings/
Clear Memory Touch this key to return all settings to default and to clear the memory.
Sof tware Licenses Touch this key to display sof tware licensing information.
Traffic Touch this key to display traffic settings. For additional information, refer to the separate NissanConnect® Owner’s
Manual.
SXM Touch this key to start SiriusXM® radio. For SXM setup, refer to “Audio system” in this section.
Monitor, climate, audio, phone and voice recognition systems4-9
Page 195 of 426
When the temperature control dial is
turned all the way to the cold setting, the air
flows only from the ceiling vents. When the
temperature control dial is turned all the
way to the hot setting, the air flows only
from the floor vents beneath the second
and third row of seats. When the tempera-
ture control dial is turned to a point be-
tween the coldest and hottest settings, the
air flows from both the floor and ceiling
vents.The air conditioner system in your NISSAN
vehicle is charged with a refrigerant de-
signed with the environment in mind.
This refrigerant does not harm the
earth’s ozone layer.
Special charging equipment and lubricant
is required when servicing your NISSAN air
conditioner. Using improper refrigerants or
lubricants will cause severe damage to
your air conditioner system. For additional
information, refer to “Air conditioner sys-
tem refrigerant and oil recommendations”
in the “Technical and consumer informa-
tion” section of this manual.
It is recommended that you visit a NISSAN
dealer to service your “environmentally
friendly” air conditioner system.
WARNING
The air conditioner system contains
refrigerant under high pressure. To
avoid personal injury, any air condi-
tioner service should be done only by
an experienced technician with proper
equipment.
RADIO
With the ignition placed in the ACC or ON po-
sition, press the
(power) or ON•OFF but-
ton to turn the radio on. If you listen to the
radio with the engine not running, the ignition
should be placed in the ACC position.
Radio reception is affected by station sig-
nal strength, distance from radio transmit-
ter, buildings, bridges, mountains and other
external influences. Intermittent changes
in reception quality normally are caused by
these external influences.
Using a cellular phone in or near the vehicle
may influence radio reception quality.
Radio reception
Your NISSAN radio system is equipped with
state-of-the-art electronic circuits to en-
hance radio reception. These circuits are
designed to extend reception range, and to
enhance the quality of that reception.
However, there are some general charac-
teristics of both FM and AM radio signals
that can affect radio reception quality in a
moving vehicle, even when the finest
equipment is used. These characteristics
are completely normal in a given reception
area and do not indicate any malfunction
in your NISSAN radio system.
SERVICING AIR CONDITIONER AUDIO SYSTEM
4-32Monitor, climate, audio, phone and voice recognition systems
Page 206 of 426
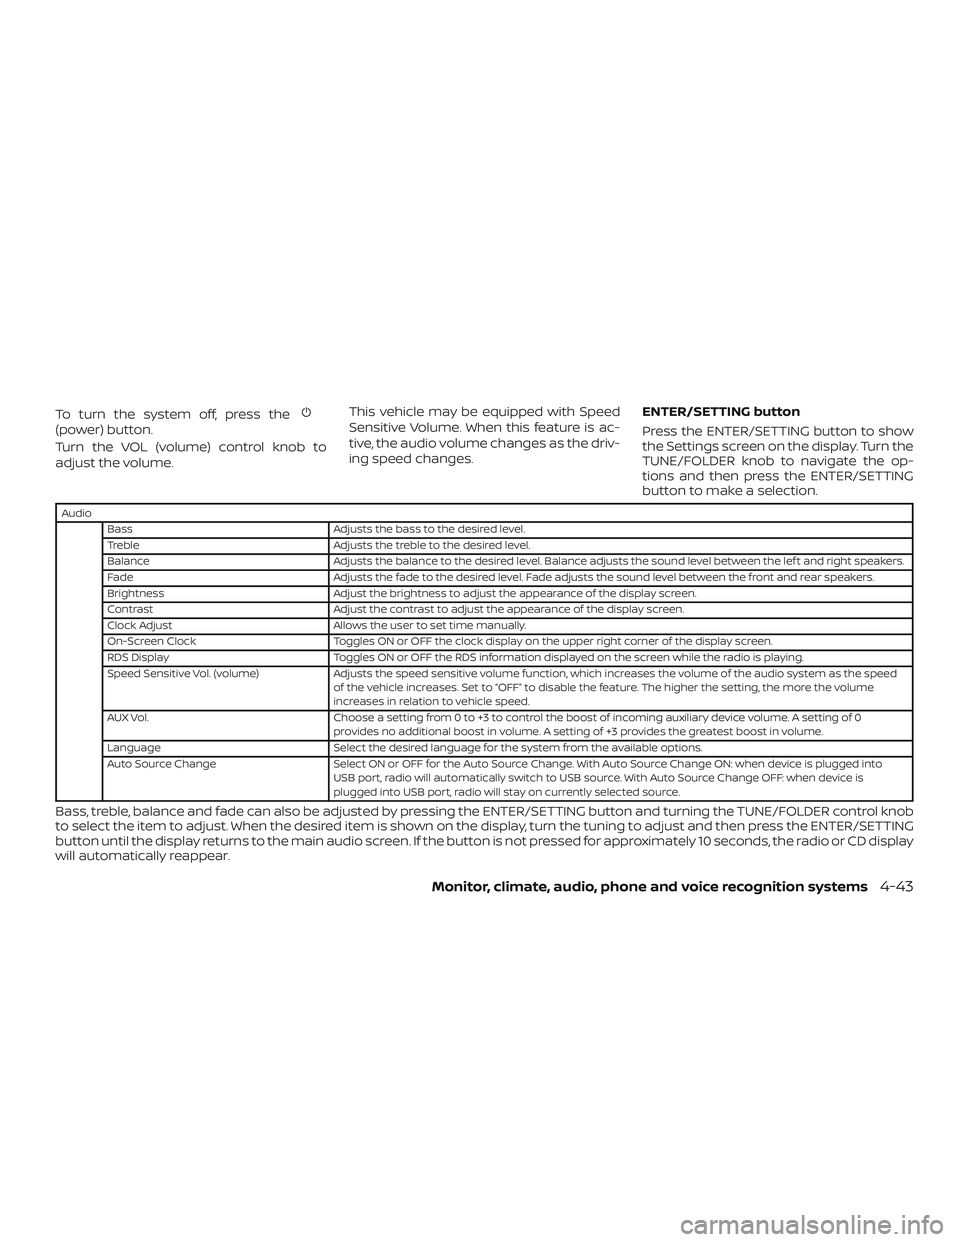
To turn the system off, press the(power) button.
Turn the VOL (volume) control knob to
adjust the volume.This vehicle may be equipped with Speed
Sensitive Volume. When this feature is ac-
tive, the audio volume changes as the driv-
ing speed changes.
ENTER/SETTING button
Press the ENTER/SETTING button to show
the Settings screen on the display. Turn the
TUNE/FOLDER knob to navigate the op-
tions and then press the ENTER/SETTING
button to make a selection.
Audio
Bass Adjusts the bass to the desired level.
Treble Adjusts the treble to the desired level.
Balance Adjusts the balance to the desired level. Balance adjusts the sound level between the lef t and right speakers.
Fade Adjusts the fade to the desired level. Fade adjusts the sound level between the front and rear speakers.
Brightness Adjust the brightness to adjust the appearance of the display screen.
Contrast Adjust the contrast to adjust the appearance of the display screen.
Clock Adjust Allows the user to set time manually.
On-Screen Clock Toggles ON or OFF the clock display on the upper right corner of the display screen.
RDS Display Toggles ON or OFF the RDS information displayed on the screen while the radio is playing.
Speed Sensitive Vol. (volume) Adjusts the speed sensitive volume function, which increases the volume of the audio system as the speed
of the vehicle increases. Set to “OFF” to disable the feature. The higher the setting, the more the volume
increases in relation to vehicle speed.
AUX Vol. Choose a setting from 0 to +3 to control the boost of incoming auxiliary device volume. A setting of 0
provides no additional boost in volume. A setting of +3 provides the greatest boost in volume.
Language Select the desired language for the system from the available options.
Auto Source Change Select ON or OFF for the Auto Source Change. With Auto Source Change ON: when device is plugged into
USB port, radio will automatically switch to USB source. With Auto Source Change OFF: when device is
plugged into USB port, radio will stay on currently selected source.
Bass, treble, balance and fade can also be adjusted by pressing the ENTER/SETTING button and turning the TUNE/FOLDER control knob
to select the item to adjust. When the desired item is shown on the display, turn the tuning to adjust and then press the ENTER/SETTING
button until the display returns to the main audio screen. If the button is not pressed for approximately 10 seconds, the radio or CD display
will automatically reappear.
Monitor, climate, audio, phone and voice recognition systems4-43
Page 207 of 426
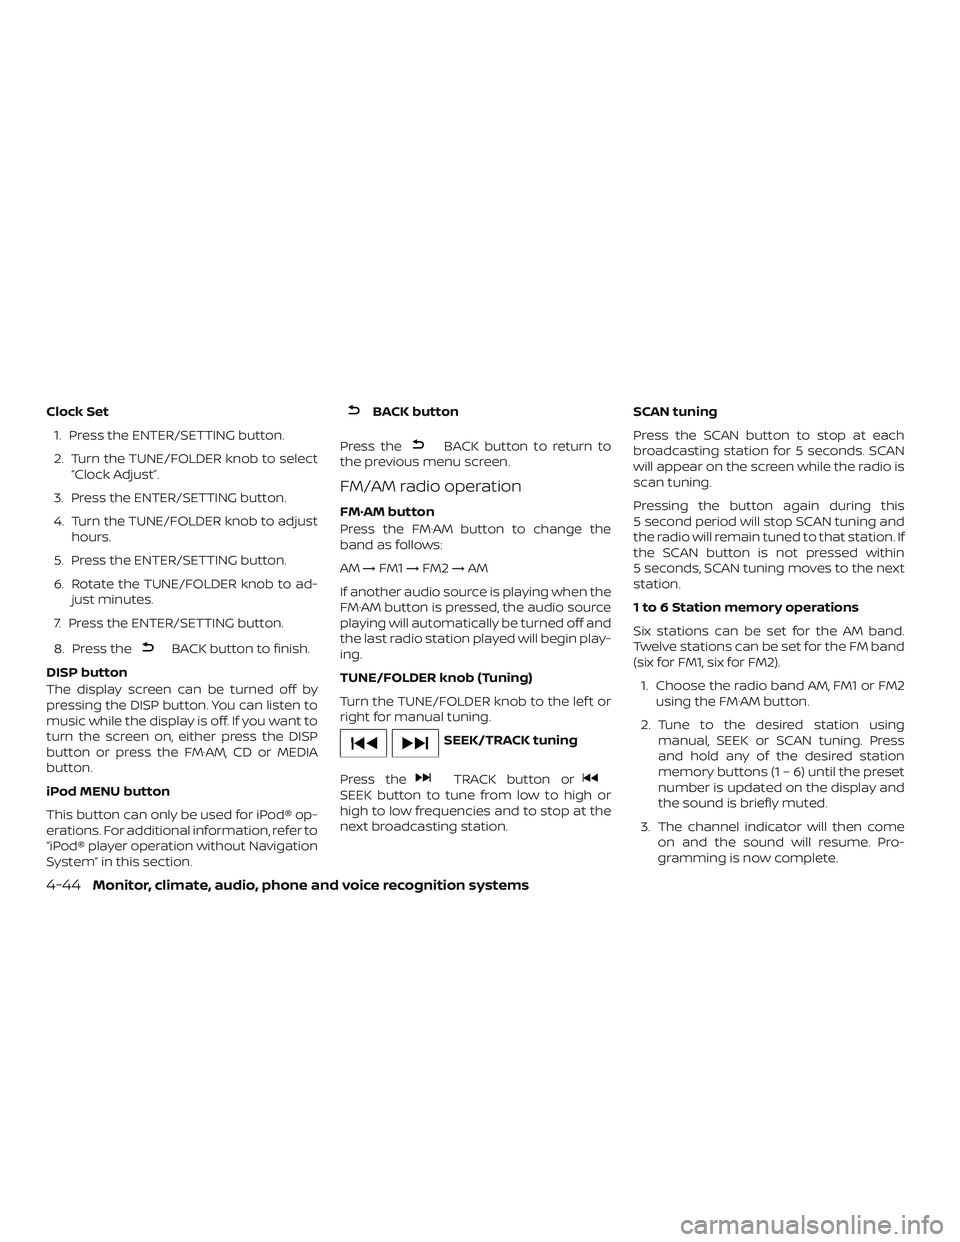
Clock Set1. Press the ENTER/SETTING button.
2. Turn the TUNE/FOLDER knob to select “Clock Adjust”.
3. Press the ENTER/SETTING button.
4. Turn the TUNE/FOLDER knob to adjust hours.
5. Press the ENTER/SETTING button.
6. Rotate the TUNE/FOLDER knob to ad- just minutes.
7. Press the ENTER/SETTING button.
8. Press the
BACK button to finish.
DISP button
The display screen can be turned off by
pressing the DISP button. You can listen to
music while the display is off. If you want to
turn the screen on, either press the DISP
button or press the FM·AM, CD or MEDIA
button.
iPod MENU button
This button can only be used for iPod® op-
erations. For additional information, refer to
“iPod® player operation without Navigation
System” in this section.
BACK button
Press the
BACK button to return to
the previous menu screen.
FM/AM radio operation
FM·AM button
Press the FM·AM button to change the
band as follows:
AM →FM1 →FM2 →AM
If another audio source is playing when the
FM·AM button is pressed, the audio source
playing will automatically be turned off and
the last radio station played will begin play-
ing.
TUNE/FOLDER knob (Tuning)
Turn the TUNE/FOLDER knob to the lef t or
right for manual tuning.
SEEK/TRACK tuning
Press the
TRACK button orSEEK button to tune from low to high or
high to low frequencies and to stop at the
next broadcasting station. SCAN tuning
Press the SCAN button to stop at each
broadcasting station for 5 seconds. SCAN
will appear on the screen while the radio is
scan tuning.
Pressing the button again during this
5 second period will stop SCAN tuning and
the radio will remain tuned to that station. If
the SCAN button is not pressed within
5 seconds, SCAN tuning moves to the next
station.
1 to 6 Station memory operations
Six stations can be set for the AM band.
Twelve stations can be set for the FM band
(six for FM1, six for FM2).
1. Choose the radio band AM, FM1 or FM2 using the FM·AM button.
2. Tune to the desired station using manual, SEEK or SCAN tuning. Press
and hold any of the desired station
memory buttons (1 – 6) until the preset
number is updated on the display and
the sound is briefly muted.
3. The channel indicator will then come on and the sound will resume. Pro-
gramming is now complete.
4-44Monitor, climate, audio, phone and voice recognition systems
Page 212 of 426
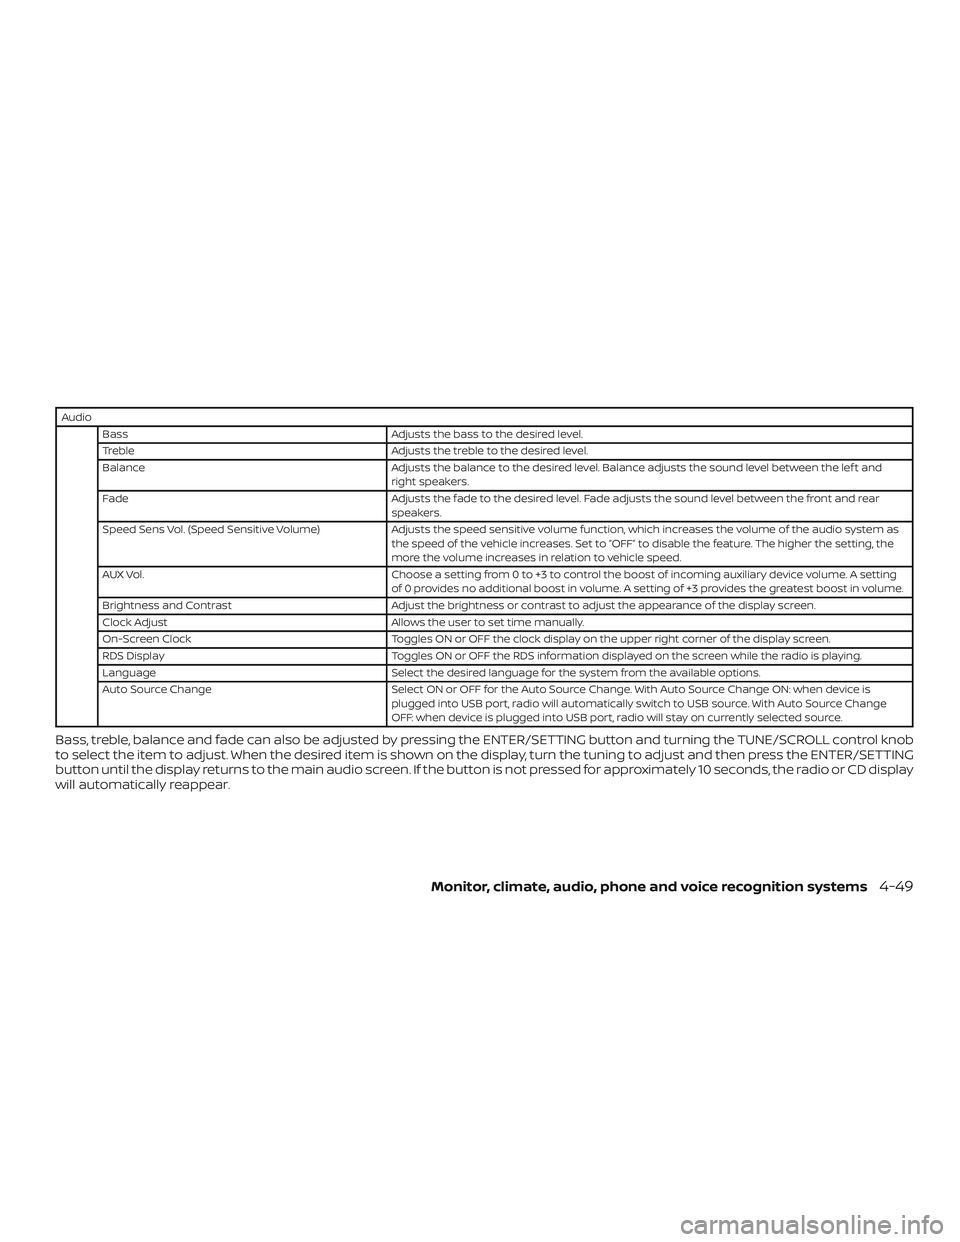
AudioBass Adjusts the bass to the desired level.
Treble Adjusts the treble to the desired level.
Balance Adjusts the balance to the desired level. Balance adjusts the sound level between the lef t and
right speakers.
Fade Adjusts the fade to the desired level. Fade adjusts the sound level between the front and rear
speakers.
Speed Sens Vol. (Speed Sensitive Volume) Adjusts the speed sensitive volume function, which increases the volume of the audio system as
the speed of the vehicle increases. Set to “OFF” to disable the feature. The higher the setting, the
more the volume increases in relation to vehicle speed.
AUX Vol. Choose a setting from 0 to +3 to control the boost of incoming auxiliary device volume. A setting
of 0 provides no additional boost in volume. A setting of +3 provides the greatest boost in volume.
Brightness and Contrast Adjust the brightness or contrast to adjust the appearance of the display screen.
Clock Adjust Allows the user to set time manually.
On-Screen Clock Toggles ON or OFF the clock display on the upper right corner of the display screen.
RDS Display Toggles ON or OFF the RDS information displayed on the screen while the radio is playing.
Language Select the desired language for the system from the available options.
Auto Source Change Select ON or OFF for the Auto Source Change. With Auto Source Change ON: when device is
plugged into USB port, radio will automatically switch to USB source. With Auto Source Change
OFF: when device is plugged into USB port, radio will stay on currently selected source.
Bass, treble, balance and fade can also be adjusted by pressing the ENTER/SETTING button and turning the TUNE/SCROLL control knob
to select the item to adjust. When the desired item is shown on the display, turn the tuning to adjust and then press the ENTER/SETTING
button until the display returns to the main audio screen. If the button is not pressed for approximately 10 seconds, the radio or CD display
will automatically reappear.
Monitor, climate, audio, phone and voice recognition systems4-49