2018 NISSAN NV PASSENGER VAN brake
[x] Cancel search: brakePage 17 of 426
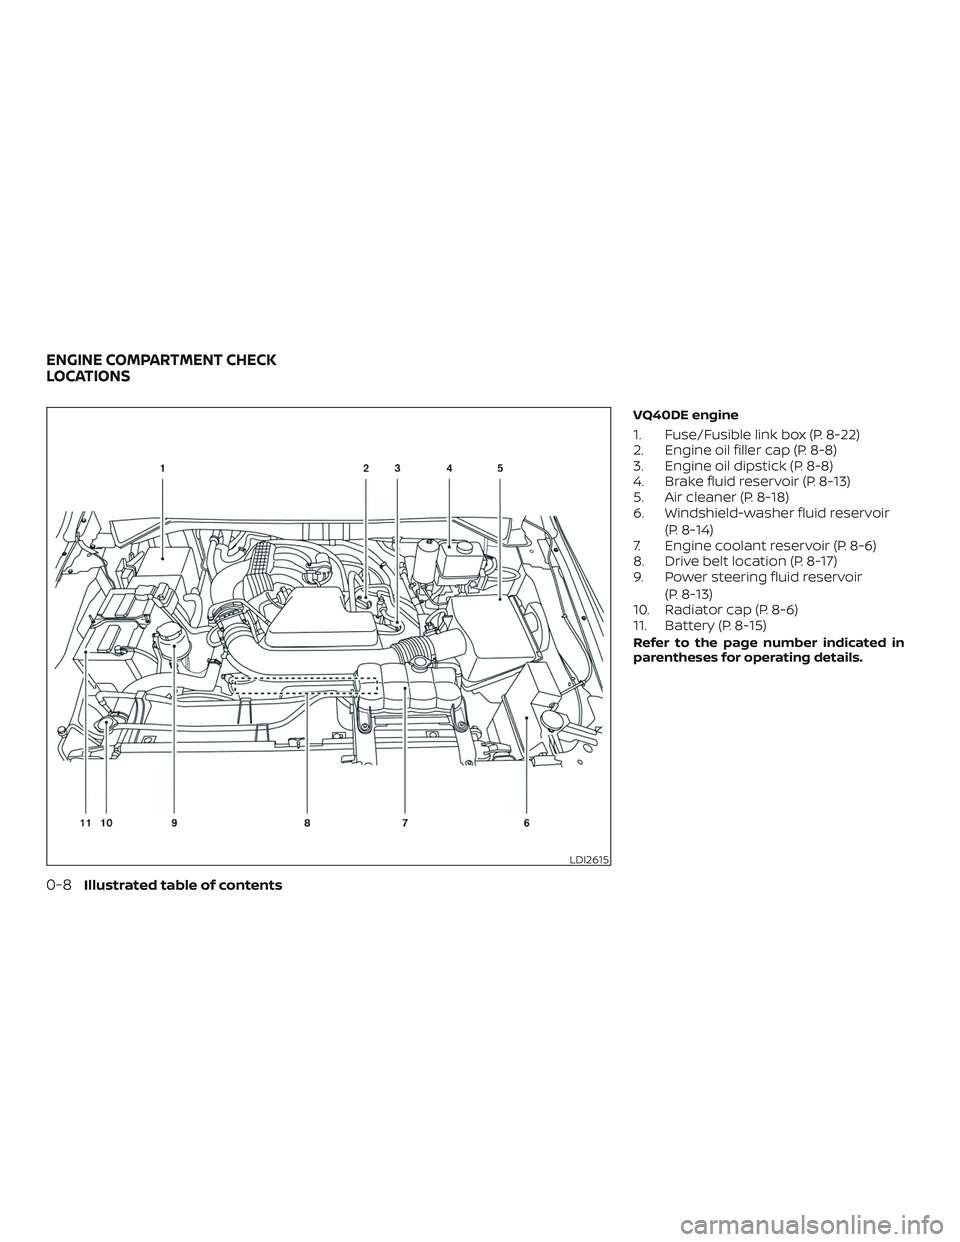
VQ40DE engine
1. Fuse/Fusible link box (P. 8-22)
2. Engine oil filler cap (P. 8-8)
3. Engine oil dipstick (P. 8-8)
4. Brake fluid reservoir (P. 8-13)
5. Air cleaner (P. 8-18)
6. Windshield-washer fluid reservoir(P. 8-14)
7. Engine coolant reservoir (P. 8-6)
8. Drive belt location (P. 8-17)
9. Power steering fluid reservoir
(P. 8-13)
10. Radiator cap (P. 8-6)
11. Battery (P. 8-15)
Refer to the page number indicated in
parentheses for operating details.
LDI2615
ENGINE COMPARTMENT CHECK
LOCATIONS
0-8Illustrated table of contents
Page 18 of 426
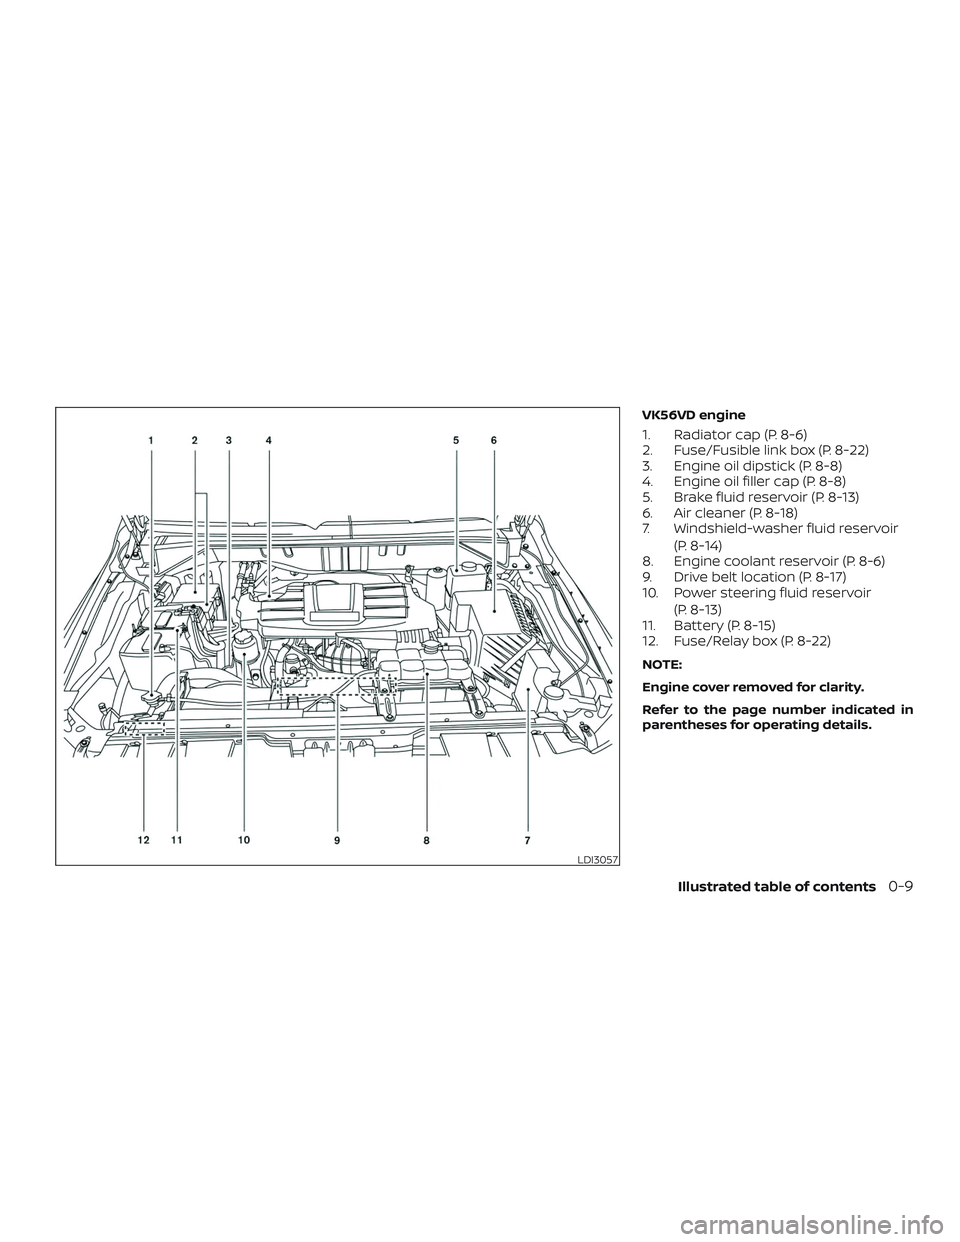
VK56VD engine
1. Radiator cap (P. 8-6)
2. Fuse/Fusible link box (P. 8-22)
3. Engine oil dipstick (P. 8-8)
4. Engine oil filler cap (P. 8-8)
5. Brake fluid reservoir (P. 8-13)
6. Air cleaner (P. 8-18)
7. Windshield-washer fluid reservoir(P. 8-14)
8. Engine coolant reservoir (P. 8-6)
9. Drive belt location (P. 8-17)
10. Power steering fluid reservoir
(P. 8-13)
11. Battery (P. 8-15)
12. Fuse/Relay box (P. 8-22)
NOTE:
Engine cover removed for clarity.
Refer to the page number indicated in
parentheses for operating details.
LDI3057
Illustrated table of contents0-9
Page 19 of 426
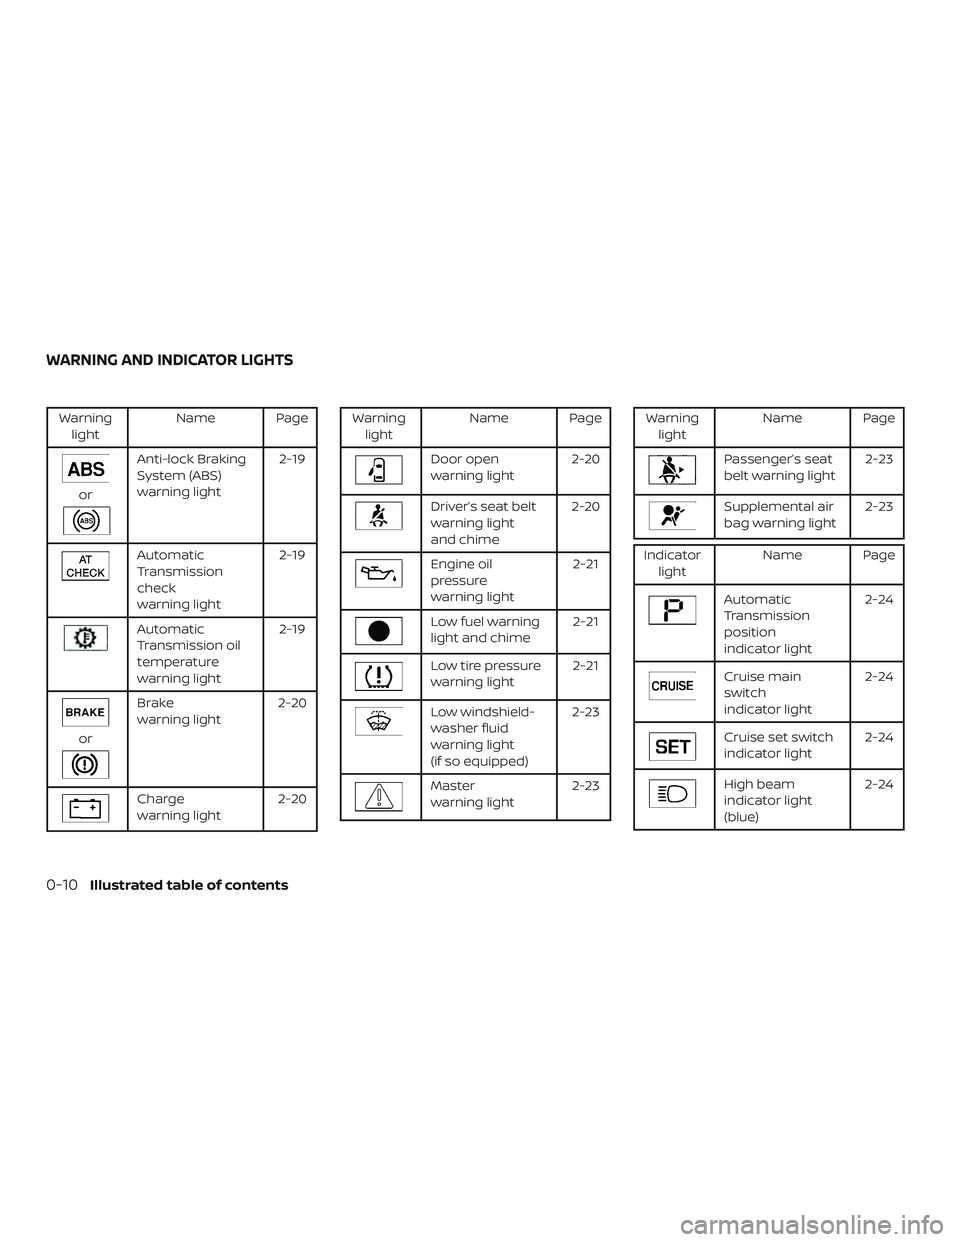
Warninglight Name Page
or
Anti-lock Braking
System (ABS)
warning light 2-19
Automatic
Transmission
check
warning light2-19
Automatic
Transmission oil
temperature
warning light2-19
or
Brake
warning light
2-20
Charge
warning light2-20
Warning
light Name Page
Door open
warning light 2-20
Driver’s seat belt
warning light
and chime2-20
Engine oil
pressure
warning light 2-21
Low fuel warning
light and chime
2-21
Low tire pressure
warning light2-21
Low windshield-
washer fluid
warning light
(if so equipped)2-23
Master
warning light
2-23
Warning
light Name Page
Passenger’s seat
belt warning light 2-23
Supplemental air
bag warning light2-23
Indicator
light Name Page
Automatic
Transmission
position
indicator light 2-24
Cruise main
switch
indicator light
2-24
Cruise set switch
indicator light
2-24
High beam
indicator light
(blue)2-24
WARNING AND INDICATOR LIGHTS
0-10Illustrated table of contents
Page 102 of 426
WARNING
The tire rotation indicator is not a sub-
stitute for regular tire checks, including
tire pressure checks. For additional in-
formation, refer to “Changing wheels
and tires” in the “Do-it-yourself ” section
of this manual. Many factors including
tire inflation, alignment, driving habits
and road conditions affect tire wear and
when tires should be replaced. Setting
the tire replacement indicator for a cer-
tain driving distance does not mean
your tires will last that long. Use the tire
replacement indicator as a guide only
and always perform regular tire checks.
Failure to perform regular tire checks,
including tire pressure checks could re-
sult in tire failure. Serious vehicle dam-
age could occur and may lead to a colli-
sion, which could result in serious
personal injury or death.4. Other indicator This indicator and REMINDER message
appears when the customer’s set dis-
tance is achieved. This reminder can be
used for other maintenance items
such as air filter, brakes, or washer fluid.
You can set or reset the distance for
this reminder. For additional informa-
tion, refer to “Setting mode” in this sec- tion. For scheduled maintenance items
and intervals, refer to the “Maintenance
and schedules” section of this manual.
TPMS menu
From the setting mode screen rotate the
INFO knob to select RESET TPMS. For addi-
tional information, refer to “TPMS sensor
reset” in the “Do-it-yourself ” section of this
manual.
TRIP COMPUTER WARNINGS
This vehicle has various warnings that will
appear in the trip computer to indicate a
potential problem.
PARK BRAKE warning
This warning illuminates in the message
area of the trip computer when the parking
brake is set and the vehicle is driven.
LOW FUEL warning
This warning illuminates in the message
area of the trip computer when the fuel
level in the fuel tank is getting low. Refuel as
soon as it is convenient, preferably before
the fuel gauge reaches E (Empty).
There
will be a small reserve of fuel in the tank
when the fuel gauge needle reaches E
(Empty).
TIRE PRES warning
This warning appears in the trip computer
if low tire pressure is detected while driving
and each time the ignition switch is placed
in the ON position. The low tire pressure
warning light will also illuminate. The TIRE
PRES warning will appear and automati-
cally advance to the next screen af ter a
period of time or by pushing the INFO knob
to show the location(s) and pressure(s) of
the under-inflated tires.
Example:
CHECK TIRE →RL 38 PSI →RR 39 PSI →
CHECK TIRE
If this warning appears, stop the vehicle
and adjust the tire pressure to the recom-
mended COLD tire pressure shown on the
Tire and Loading Information label. For ad-
ditional information, refer to “Low tire pres-
sure warning light” in this section and “Tire
Pressure Monitoring System (TPMS)” in the
“Starting and driving” section of this
manual.
TPMS ERROR warning
This warning appears in the message area
of the trip computer if the TPMS is not func-
tioning properly. Have the system checked.
Instruments and controls2-13
Page 107 of 426
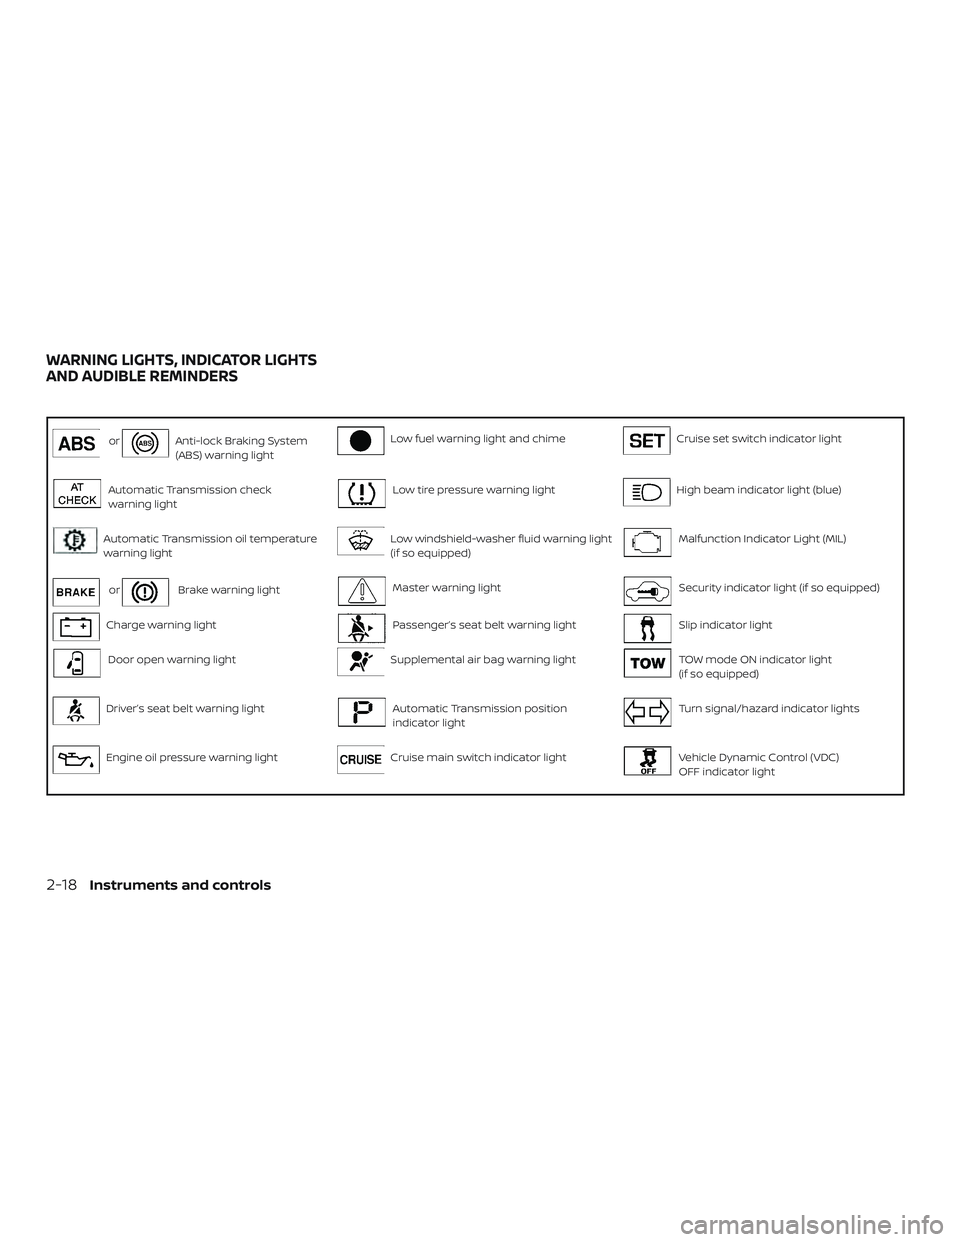
orAnti-lock Braking System
(ABS) warning lightLow fuel warning light and chimeCruise set switch indicator light
Automatic Transmission check
warning lightLow tire pressure warning lightHigh beam indicator light (blue)
Automatic Transmission oil temperature
warning lightLow windshield-washer fluid warning light
(if so equipped)Malfunction Indicator Light (MIL)
orBrake warning lightMaster warning lightSecurity indicator light (if so equipped)
Charge warning lightPassenger’s seat belt warning lightSlip indicator light
Door open warning lightSupplemental air bag warning lightTOW mode ON indicator light
(if so equipped)
Driver’s seat belt warning lightAutomatic Transmission position
indicator lightTurn signal/hazard indicator lights
Engine oil pressure warning lightCruise main switch indicator lightVehicle Dynamic Control (VDC)
OFF indicator light
WARNING LIGHTS, INDICATOR LIGHTS
AND AUDIBLE REMINDERS
2-18Instruments and controls
Page 108 of 426
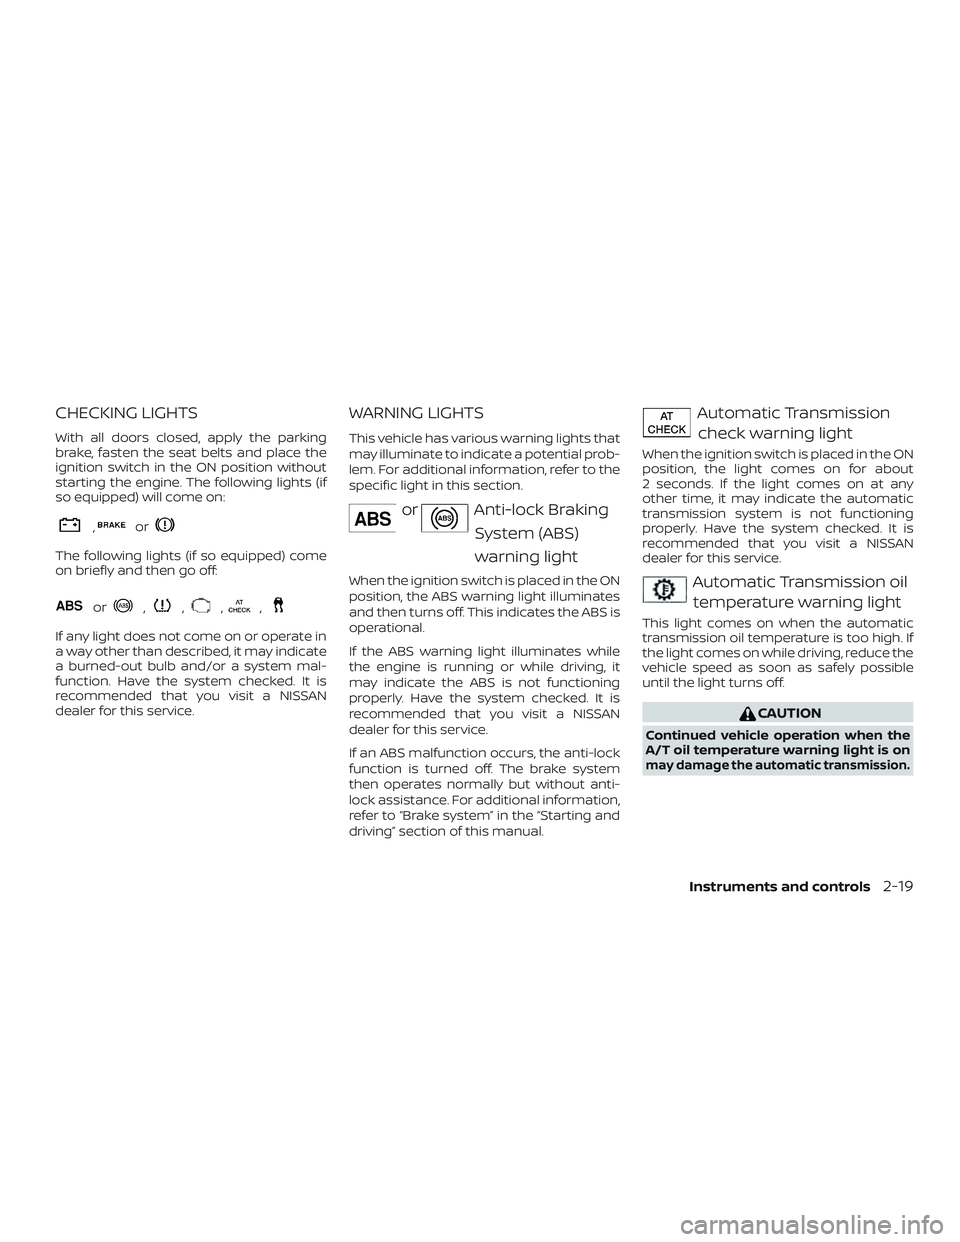
CHECKING LIGHTS
With all doors closed, apply the parking
brake, fasten the seat belts and place the
ignition switch in the ON position without
starting the engine. The following lights (if
so equipped) will come on:
,or
The following lights (if so equipped) come
on briefly and then go off:
or,,,,
If any light does not come on or operate in
a way other than described, it may indicate
a burned-out bulb and/or a system mal-
function. Have the system checked. It is
recommended that you visit a NISSAN
dealer for this service.
WARNING LIGHTS
This vehicle has various warning lights that
may illuminate to indicate a potential prob-
lem. For additional information, refer to the
specific light in this section.
orAnti-lock BrakingSystem (ABS)
warning light
When the ignition switch is placed in the ON
position, the ABS warning light illuminates
and then turns off. This indicates the ABS is
operational.
If the ABS warning light illuminates while
the engine is running or while driving, it
may indicate the ABS is not functioning
properly. Have the system checked. It is
recommended that you visit a NISSAN
dealer for this service.
If an ABS malfunction occurs, the anti-lock
function is turned off. The brake system
then operates normally but without anti-
lock assistance. For additional information,
refer to “Brake system” in the “Starting and
driving” section of this manual.
Automatic Transmissioncheck warning light
When the ignition switch is placed in the ON
position, the light comes on for about
2 seconds. If the light comes on at any
other time, it may indicate the automatic
transmission system is not functioning
properly. Have the system checked. It is
recommended that you visit a NISSAN
dealer for this service.
Automatic Transmission oiltemperature warning light
This light comes on when the automatic
transmission oil temperature is too high. If
the light comes on while driving, reduce the
vehicle speed as soon as safely possible
until the light turns off.
CAUTION
Continued vehicle operation when the
A/T oil temperature warning light is on
may damage the automatic transmission.
Instruments and controls2-19
Page 109 of 426
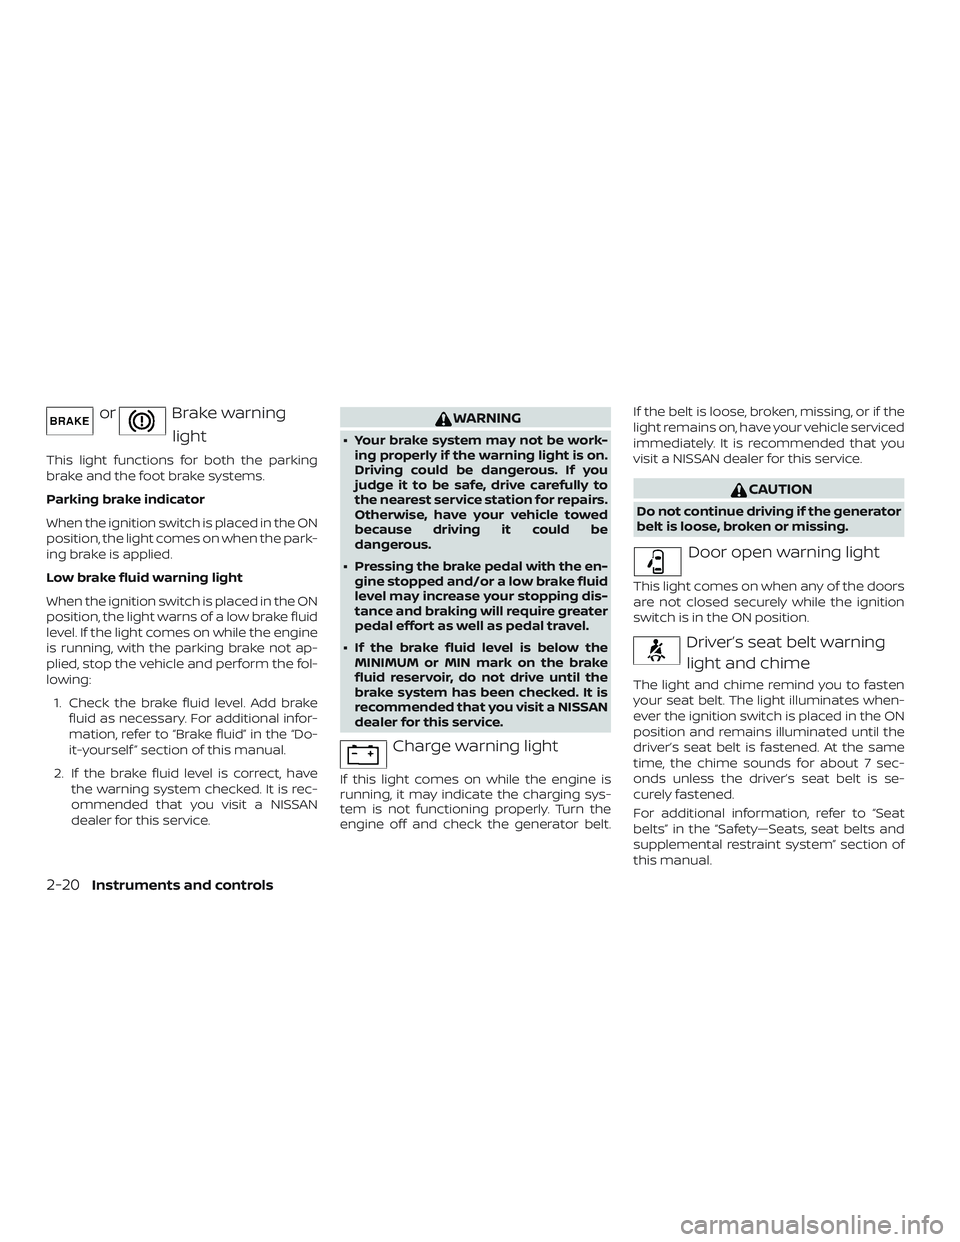
orBrake warninglight
This light functions for both the parking
brake and the foot brake systems.
Parking brake indicator
When the ignition switch is placed in the ON
position, the light comes on when the park-
ing brake is applied.
Low brake fluid warning light
When the ignition switch is placed in the ON
position, the light warns of a low brake fluid
level. If the light comes on while the engine
is running, with the parking brake not ap-
plied, stop the vehicle and perform the fol-
lowing:
1. Check the brake fluid level. Add brake fluid as necessary. For additional infor-
mation, refer to “Brake fluid” in the “Do-
it-yourself ” section of this manual.
2. If the brake fluid level is correct, have the warning system checked. It is rec-
ommended that you visit a NISSAN
dealer for this service.
WARNING
∙ Your brake system may not be work-ing properly if the warning light is on.
Driving could be dangerous. If you
judge it to be safe, drive carefully to
the nearest service station for repairs.
Otherwise, have your vehicle towed
because driving it could be
dangerous.
∙ Pressing the brake pedal with the en- gine stopped and/or a low brake fluid
level may increase your stopping dis-
tance and braking will require greater
pedal effort as well as pedal travel.
∙ If the brake fluid level is below the MINIMUM or MIN mark on the brake
fluid reservoir, do not drive until the
brake system has been checked. It is
recommended that you visit a NISSAN
dealer for this service.
Charge warning light
If this light comes on while the engine is
running, it may indicate the charging sys-
tem is not functioning properly. Turn the
engine off and check the generator belt. If the belt is loose, broken, missing, or if the
light remains on, have your vehicle serviced
immediately. It is recommended that you
visit a NISSAN dealer for this service.
CAUTION
Do not continue driving if the generator
belt is loose, broken or missing.
Door open warning light
This light comes on when any of the doors
are not closed securely while the ignition
switch is in the ON position.
Driver’s seat belt warning
light and chime
The light and chime remind you to fasten
your seat belt. The light illuminates when-
ever the ignition switch is placed in the ON
position and remains illuminated until the
driver’s seat belt is fastened. At the same
time, the chime sounds for about 7 sec-
onds unless the driver’s seat belt is se-
curely fastened.
For additional information, refer to “Seat
belts” in the “Safety—Seats, seat belts and
supplemental restraint system” section of
this manual.
2-20Instruments and controls
Page 115 of 426
The VDC indicator light also comes on
when you place the ignition switch in the
ON position. The light will turn off af ter
about 2 seconds if the system is opera-
tional. If the light stays on or comes on
along with the
indicator light while
you are driving, have the VDC system
checked. It is recommended that you visit a
NISSAN dealer for this service.
While the VDC system is operating, you
might feel a slight vibration or hear the sys-
tem working when starting the vehicle or
accelerating, but this is normal.
AUDIBLE REMINDERS
Brake pad wear warning
The disc brake pads have audible wear
warnings. When a disc brake pad requires
replacement, it makes a high pitched
scraping sound when the vehicle is in mo-
tion, whether or not the brake pedal is de-
pressed. Have the brakes checked as soon
as possible if the warning sound is heard.
Key reminder chime
A chime sounds if the driver’s door is
opened while the key is lef t in the ignition
switch. Remove the key and take it with you
when leaving the vehicle.
Light reminder chime
With the ignition switch placed in the OFF
position, a chime sounds when the driver’s
door is opened if the headlights or parking
lights are on.
Turn the headlight control switch off before
leaving the vehicle.
Parking brake reminder chime
A chime sounds if the parking brake is set
and the vehicle is driven. Your vehicle may have one of the following
security systems:
∙ Vehicle security system
∙ NISSAN Vehicle Immobilizer System
LIC2047
SECURITY SYSTEMS (if so equipped)
2-26Instruments and controls