Page 175 of 426

WARNING
Failure to follow the warnings and in-
structions for proper use of the Rear-
View Monitor system could result in se-
rious injury or death.
∙ RearView Monitor is a conveniencefeature and is not a substitute for
proper backing. Always turn and look
out the windows and check mirrors to
be sure that it is safe to move before
operating the vehicle. Always back up
slowly.
∙ The system is designed as an aid to the driver in showing large stationary
objects directly behind the vehicle, to
help avoid damaging the vehicle.
∙ The distance guide line and the ve- hicle width line should be used as a
reference only when the vehicle is on a
level paved surface. The distance
viewed on the monitor is for reference
only and may be different than the
actual distance between the vehicle
and displayed objects.
CAUTION
Do not scratch the camera lens when
cleaning dirt or snow from the front of
the camera.
The RearView Monitor system automati-
cally shows a rear view of the vehicle when
the shif t lever is shif ted into the R (Reverse)
position. While in R (Reverse), pressing the
CAMERA button (if so equipped) will cycle
through guideline options. The radio can
still be heard while the RearView Monitor is
active.
To display the rear view, the RearView Moni-
tor system uses a camera located just
above the vehicle’s license plate
�1.
REARVIEW MONITOR SYSTEM
OPERATION
With the ignition switch in the ON position,
move the shif t lever to the R (Reverse) po-
sition to operate the RearView Monitor.
LHA3686
4-12Monitor, climate, audio, phone and voice recognition systems
Page 176 of 426

HOW TO READ THE DISPLAYED
LINES
Guiding lines which indicate the vehicle
width and distances to objects with refer-
ence to the vehicle body line
�Aare dis-
played on the monitor.
Distance guide lines
Indicate distances from the vehicle body.
∙ Red line
�1: approx. 1.5 f t (0.5 m)
∙ Yellow line
�2: approx. 3 f t (1 m)
∙ Green line
�3: approx. 7 f t (2 m)
∙ Green line
�4: approx. 10 f t (3 m) Vehicle width guide lines
�5
Indicate the vehicle width when backing
up.
DIFFERENCE BETWEEN PREDICTED
AND ACTUAL DISTANCES
The displayed guidelines and their loca-
tions on the ground are for approximate
reference only. Objects on uphill or downhill
surfaces or projecting objects will be actu-
ally located at distances different from
those displayed in the monitor relative to
the guidelines (refer to illustrations). When
in doubt, turn around and view the objects
as you are backing up, or park and exit the
vehicle to view the positioning of objects
behind the vehicle.
Backing up on a steep uphill
When backing up the vehicle up a hill, the
distance guide lines and the vehicle width
guide lines are shown closer than the actual
distance. Note that any object on the hill is
further than it appears on the monitor.
LHA2944
LHA3687
Monitor, climate, audio, phone and voice recognition systems4-13
Page 177 of 426
Backing up on a steep downhill
When backing up the vehicle down a hill,
the distance guide lines and the vehicle
width guide lines are shown farther than
the actual distance. Note that any objecton the hill is closer than it appears on the
monitor.
Backing up near a projecting
object
The vehicle may seem to nearly clear the
object in the display. However, the vehicle
may hit the object if it projects over the
actual backing up course.
LHA3688LHA4513
4-14Monitor, climate, audio, phone and voice recognition systems
Page 178 of 426
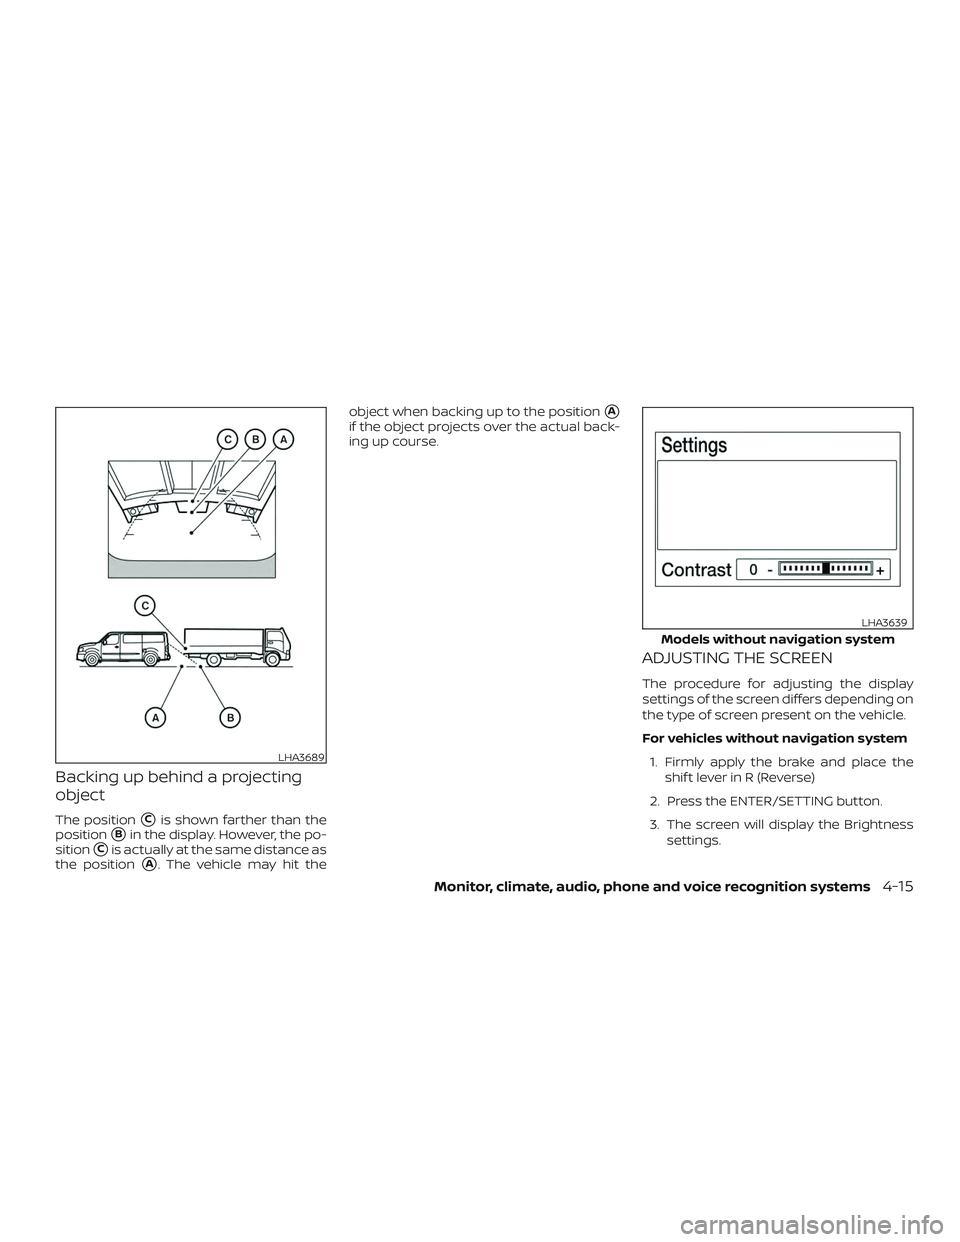
Backing up behind a projecting
object
The position�Cis shown farther than the
position
�Bin the display. However, the po-
sition
�Cis actually at the same distance as
the position
�A. The vehicle may hit the object when backing up to the position
�A
if the object projects over the actual back-
ing up course.
ADJUSTING THE SCREEN
The procedure for adjusting the display
settings of the screen differs depending on
the type of screen present on the vehicle.
For vehicles without navigation system
1. Firmly apply the brake and place the shif t lever in R (Reverse)
2. Press the ENTER/SETTING button.
3. The screen will display the Brightness settings.
LHA3689
Models without navigation system
LHA3639
Monitor, climate, audio, phone and voice recognition systems4-15
Page 179 of 426

4. Turn the TUNE/FOLDER orTUNE/SCROLL knob to adjust the set-
ting up or down.
5. Press the ENTER/SETTING button again to display the Contrast settings.
6. Turn the TUNE/FOLDER or TUNE/SCROLL knob to adjust the set-
ting up or down.
7. Press the ENTER/SETTING button to complete the adjustment. ∙ Do not adjust the display settings of the
RearView Monitor while the vehicle is
moving.
For vehicles with navigation system 1. Firmly apply the brake and place the shif t lever in R (Reverse)
2. Press the
button on the control
panel.
3. The screen will display the Night set- tings.
4. Turn the TUNE knob to adjust the set- ting up or down.
5. Press the
button again to access
the Auto settings.
6. Turn the TUNE knob to adjust the set- ting up or down.
∙ Do not adjust the display settings of the RearView Monitor while the vehicle is
moving.
REARVIEW MONITOR SYSTEM
LIMITATIONS
WARNING
Listed below are the system limitations
for RearView Monitor. Failure to operate
the vehicle in accordance with these
system limitations could result in seri-
ous injury or death.
∙ The system cannot completely elimi-nate blind spots and may not show
every object.
∙ Underneath the bumper and the cor- ner areas of the bumper cannot be
viewed on the RearView Monitor be-
cause of its monitoring range limita-
tion. The system will not show small
objects below the bumper, and may
not show objects close to the bumper
or on the ground.
∙ Objects viewed in the RearView Moni- tor differ from actual distance be-
cause a wide-angle lens is used.
∙ Objects in the RearView Monitor will appear visually opposite compared to
when viewed in the rearview and out-
side mirrors.
Models with navigation system
LHA3679
4-16Monitor, climate, audio, phone and voice recognition systems
Page 180 of 426

∙ Use the displayed lines as a reference.The lines are highly affected by the
number of occupants, fuel level, ve-
hicle position, road conditions and
road grade.
∙ Make sure that the rear doors are se- curely closed when backing up.
∙ Do not put anything on the rearview camera. The rearview camera is in-
stalled above the license plate.
∙ When washing the vehicle with high pressure water, be sure not to spray it
around the camera. Otherwise, water
may enter the camera unit causing
water condensation on the lens, a
malfunction, fire or an electric shock.
∙ Do not strike the camera. It is a preci- sion instrument. Otherwise, it may
malfunction or cause damage result-
ing in a fire or an electric shock.
The following are operating limitations and
do not represent a system malfunction: ∙ When the temperature is extremely high or low, the screen may not clearly
display objects. ∙ When strong light directly shines on the
camera, objects may not be displayed
clearly.
∙ Vertical lines may be seen in objects on the screen. This is due to strong re-
flected light from the bumper.
∙ The screen may flicker under fluores- cent light.
∙ The colors of objects on the RearView Monitor may differ somewhat from the
actual color of objects.
∙ Objects on the monitor may not be clear in a dark environment.
∙ There may be a delay when switching between views.
∙ If dirt, rain or snow accumulate on the camera, the RearView Monitor may not
display objects clearly. Clean the cam-
era.
∙ Do not use wax on the camera lens. Wipe off any wax with a clean cloth
dampened with a diluted mild cleaning
agent, then wipe with a dry cloth.
SYSTEM MAINTENANCE
CAUTION
∙ Do not use alcohol, benzine or thinnerto clean the camera. This will cause
discoloration.
∙
Do not damage the camera as the moni-
tor screen may be adversely affected.
If dirt, rain or snow accumulates on the
camera
�1, the RearView Monitor may not
display objects clearly. Clean the camera
by wiping it with a cloth dampened with a
diluted mild cleaning agent and then wip-
ing it with a dry cloth.
LHA3686
Monitor, climate, audio, phone and voice recognition systems4-17
Page 181 of 426
Adjust air flow direction by moving the vent
slides.
Open or close the vents by using the dial.
Move the dial toward the
to open the
vents or toward the
to close them. Adjust the air flow direction of the vents by
opening, closing or rotating.
These vents are only operational when the
rear fan speed control dial is at a setting
other than 0 and the rear temperature
control dial is at a setting other than hot.
For additional information, refer to “Rear
seat air conditioner” in this section. The air flow from the floor vents located
beneath the driver’s and front passenger’s
seats cannot be adjusted or closed. These
vents are only operational when theair flow control button is selected.
For additional information, refer to “Air flow
control buttons” in this section.
Front (side and center)
LHA2065
Rear (ceiling)
LHA2130
Floor (beneath driver’s and
front passenger’s seats)
LHA2128
VENTS
4-18Monitor, climate, audio, phone and voice recognition systems
Page 182 of 426

The air flow from the floor vents located
beneath the second and third row passen-
ger’s seats cannot be adjusted or closed.
These vents are only operational when the
rear fan speed control dial is at a setting
other than 0 and the rear temperature
control dial is at a setting other than cold.
For additional information, refer to “Rear
seat air conditioner” in this section.
WARNING
∙ The air conditioner cooling functionoperates only when the engine is
running.
∙ Do not leave children or adults who would normally require the assis-
tance of others alone in your vehicle.
Pets should also not be lef t alone.
They could accidentally injure them-
selves or others through inadvertent
operation of the vehicle. Also, on hot,
sunny days, temperatures in a closed
vehicle could quickly become high
enough to cause severe or possibly
fatal injuries to people or animals.
∙ Do not use the recirculation mode for long periods as it may cause the inte-
rior air to become stale and the win-
dows to fog up. NOTE:
∙ Odors from inside and outside the ve- hicle can build up in the air conditioner
unit. Odor can enter the passenger
compartment through the vents.
∙ When parking, set the heater and air conditioner controls to turn off air recir-
culation to allow fresh air into the pas-
senger compartment. This should help
reduce odors inside the vehicle.
Floor (beneath 2nd and 3rd rows)
LHA2129
HEATER AND AIR CONDITIONER
(manual) (if so equipped)
Monitor, climate, audio, phone and voice recognition systems4-19