2018 NISSAN NV PASSENGER VAN buttons
[x] Cancel search: buttonsPage 191 of 426
∙ When parking, set the heater and airconditioner controls to turn off air recir-
culation to allow fresh air into the pas-
senger compartment. This should help
reduce odors inside the vehicle.
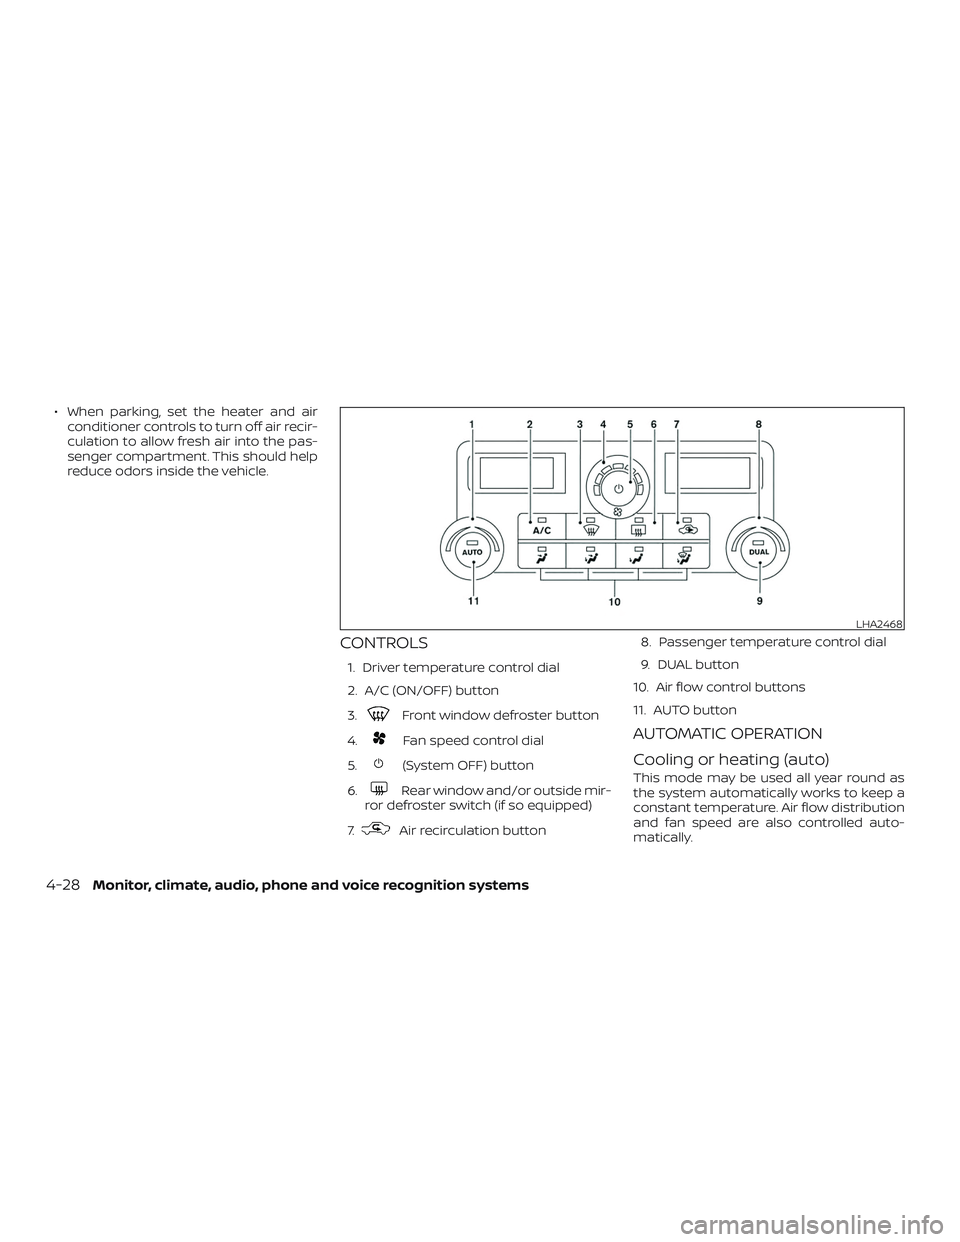
CONTROLS
1. Driver temperature control dial
2. A/C (ON/OFF) button
3.
Front window defroster button
4.
Fan speed control dial
5.
(System OFF) button
6.
Rear window and/or outside mir-
ror defroster switch (if so equipped)
7.
Air recirculation button 8. Passenger temperature control dial
9. DUAL button
10. Air flow control buttons
11. AUTO button
AUTOMATIC OPERATION
Cooling or heating (auto)
This mode may be used all year round as
the system automatically works to keep a
constant temperature. Air flow distribution
and fan speed are also controlled auto-
matically.
LHA2468
4-28Monitor, climate, audio, phone and voice recognition systems
Page 193 of 426
Temperature control dial
The temperature control dial allows you to
adjust the temperature of the outlet air. To
lower the temperature, turn the dial to the
lef t. To increase the temperature, turn the
dial to the right. Temperature can be ad-
justed on the driver’s and passenger’s side.
Air recirculation
Press theair recirculation button to
recirculate interior air inside the vehicle.
Press the AUTO button to return to auto-
matic mode.
The air recirculation button will not be acti-
vated when the air conditioner is in DEF,
floor, or floor/defrost mode.
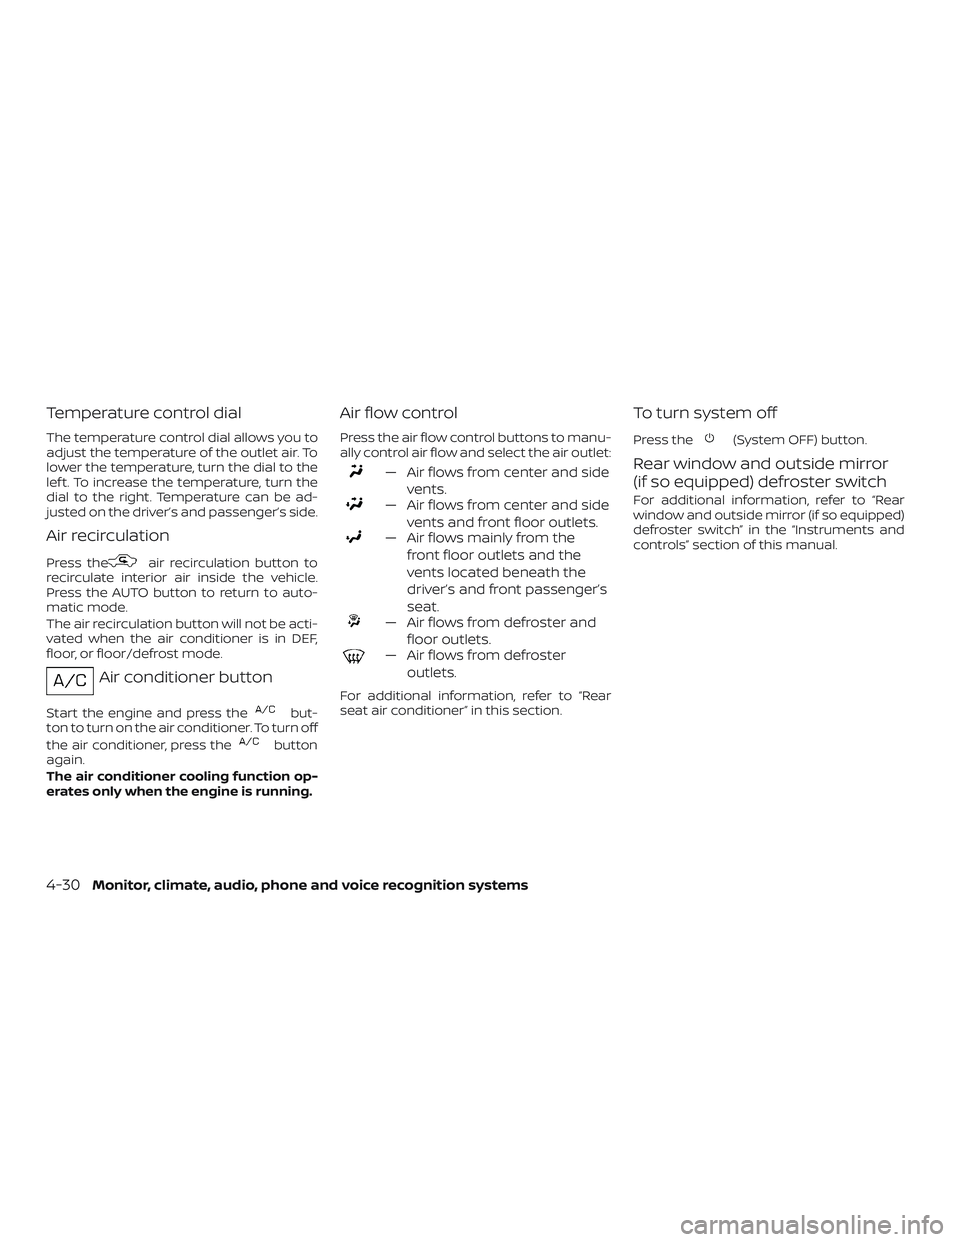
Air conditioner button
Start the engine and press thebut-
ton to turn on the air conditioner. To turn off
the air conditioner, press the
button
again.
The air conditioner cooling function op-
erates only when the engine is running.
Air flow control
Press the air flow control buttons to manu-
ally control air flow and select the air outlet:
— Air flows from center and side
vents.
— Air flows from center and sidevents and front floor outlets.
— Air flows mainly from thefront floor outlets and the
vents located beneath the
driver’s and front passenger’s
seat.
— Air flows from defroster andfloor outlets.
— Air flows from defrosteroutlets.
For additional information, refer to “Rear
seat air conditioner” in this section.
To turn system off
Press the(System OFF) button.
Rear window and outside mirror
(if so equipped) defroster switch
For additional information, refer to “Rear
window and outside mirror (if so equipped)
defroster switch” in the “Instruments and
controls” section of this manual.
4-30Monitor, climate, audio, phone and voice recognition systems
Page 205 of 426
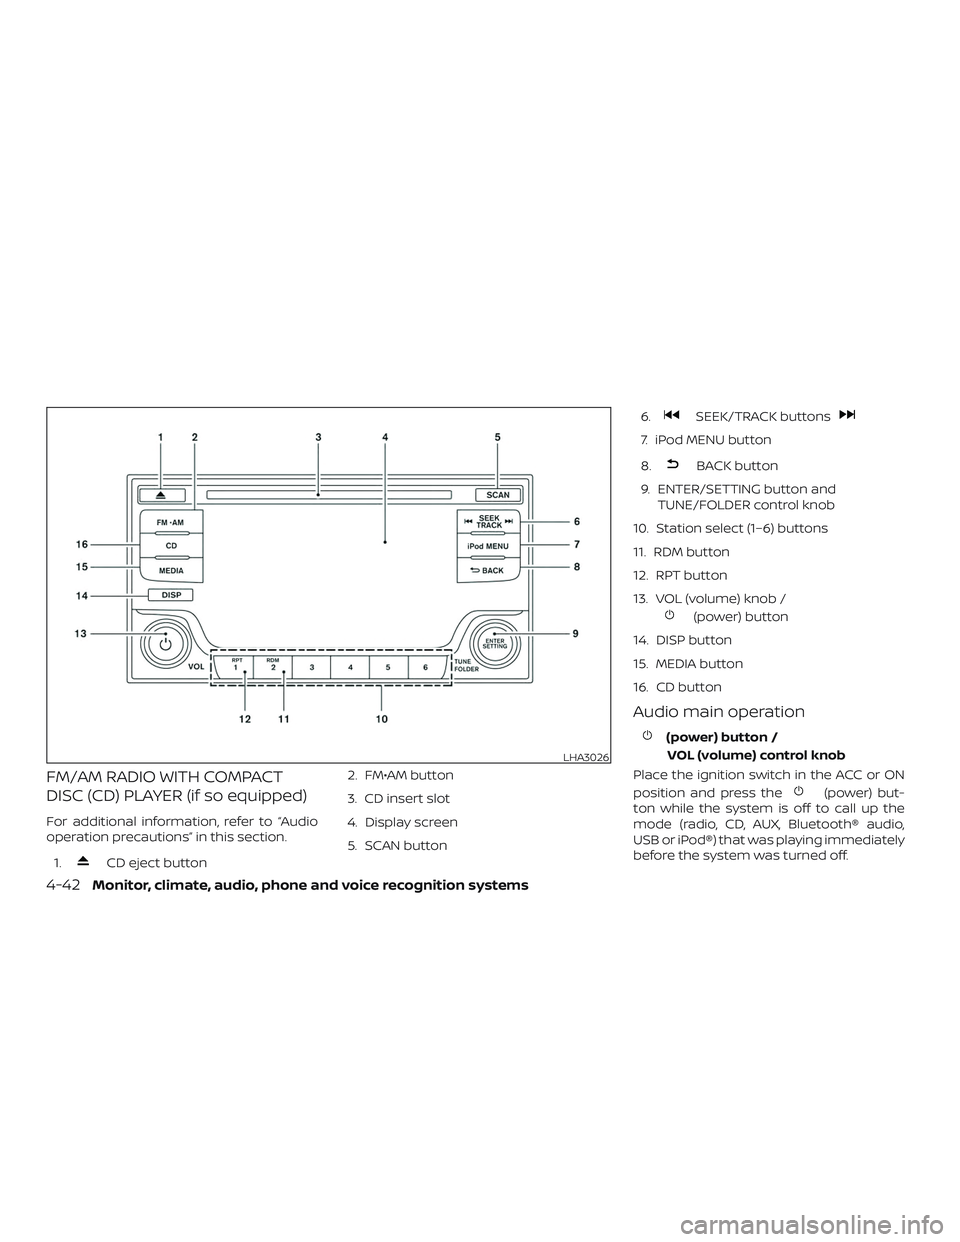
FM/AM RADIO WITH COMPACT
DISC (CD) PLAYER (if so equipped)
For additional information, refer to “Audio
operation precautions” in this section.1.
CD eject button 2. FM•AM button
3. CD insert slot
4. Display screen
5. SCAN button 6.
SEEK/TRACK buttons
7. iPod MENU button
8.
BACK button
9. ENTER/SETTING button and TUNE/FOLDER control knob
10. Station select (1–6) buttons
11. RDM button
12. RPT button
13. VOL (volume) knob /
(power) button
14. DISP button
15. MEDIA button
16. CD button
Audio main operation
(power) button / VOL (volume) control knob
Place the ignition switch in the ACC or ON
position and press the
(power) but-
ton while the system is off to call up the
mode (radio, CD, AUX, Bluetooth® audio,
USB or iPod®) that was playing immediately
before the system was turned off.
LHA3026
4-42Monitor, climate, audio, phone and voice recognition systems
Page 207 of 426
Clock Set1. Press the ENTER/SETTING button.
2. Turn the TUNE/FOLDER knob to select “Clock Adjust”.
3. Press the ENTER/SETTING button.
4. Turn the TUNE/FOLDER knob to adjust hours.
5. Press the ENTER/SETTING button.
6. Rotate the TUNE/FOLDER knob to ad- just minutes.
7. Press the ENTER/SETTING button.
8. Press the
BACK button to finish.
DISP button
The display screen can be turned off by
pressing the DISP button. You can listen to
music while the display is off. If you want to
turn the screen on, either press the DISP
button or press the FM·AM, CD or MEDIA
button.
iPod MENU button
This button can only be used for iPod® op-
erations. For additional information, refer to
“iPod® player operation without Navigation
System” in this section.
BACK button
Press the
BACK button to return to
the previous menu screen.
FM/AM radio operation
FM·AM button
Press the FM·AM button to change the
band as follows:
AM →FM1 →FM2 →AM
If another audio source is playing when the
FM·AM button is pressed, the audio source
playing will automatically be turned off and
the last radio station played will begin play-
ing.
TUNE/FOLDER knob (Tuning)
Turn the TUNE/FOLDER knob to the lef t or
right for manual tuning.
SEEK/TRACK tuning
Press the
TRACK button orSEEK button to tune from low to high or
high to low frequencies and to stop at the
next broadcasting station. SCAN tuning
Press the SCAN button to stop at each
broadcasting station for 5 seconds. SCAN
will appear on the screen while the radio is
scan tuning.
Pressing the button again during this
5 second period will stop SCAN tuning and
the radio will remain tuned to that station. If
the SCAN button is not pressed within
5 seconds, SCAN tuning moves to the next
station.
1 to 6 Station memory operations
Six stations can be set for the AM band.
Twelve stations can be set for the FM band
(six for FM1, six for FM2).
1. Choose the radio band AM, FM1 or FM2 using the FM·AM button.
2. Tune to the desired station using manual, SEEK or SCAN tuning. Press
and hold any of the desired station
memory buttons (1 – 6) until the preset
number is updated on the display and
the sound is briefly muted.
3. The channel indicator will then come on and the sound will resume. Pro-
gramming is now complete.
4-44Monitor, climate, audio, phone and voice recognition systems
Page 208 of 426
4. Other buttons can be set in the samemanner.
If the battery cable is disconnected, or if the
fuse opens, the radio memory will be can-
celed. In that case, reset the desired sta-
tions.
Compact disc (CD) player
operation
If the radio is already operating, it automati-
cally turns off and the compact disc begins
to play.
MEDIA button
With a CD loaded, press the MEDIA button
until the CD mode is displayed on the
screen.
CD/MP3 display mode
While listening to an MP3/WMA CD, certain
text may be displayed on the screen if the
CD has been encoded with text informa-
tion. Depending on how the MP3/WMA CD
is encoded, information such as Artist,
Song and Folder will be displayed.
The track number and the total number of
tracks in the current folder or on the cur-
rent disc are displayed on the screen as
well.
SEEK/TRACK (Reverse or Fast Forward) button
Press and hold the SEEK/TRACK
button
orfor 1.5 seconds while
the compact disc is playing to reverse or
fast forward the track being played. The
compact disc plays at an increased speed
while reversing or fast forwarding. When
the button is released, the compact disc
returns to normal play speed.
SEEK/TRACK button
Press the
SEEK/TRACK button while a
CD or MP3/WMA CD is playing to return to
the beginning of the current track. Press
the
SEEK/TRACK button several times
to skip backward several tracks.
Press the
SEEK/TRACK button while a
CD or MP3/WMA CD is playing to advance
one track. Press the
SEEK/TRACK but-
ton several times to skip forward several
tracks. If the last track on a CD is skipped,
the first track on the disc is played. If the last
track in a folder of an MP3/WMA CD is
skipped, the first track of the next folder is
played. TUNE/FOLDER knob (MP3/WMA CD only)
If a MP3/WMA CD with multiple folders is
playing, turn the TUNE/FOLDER knob to
change folders. Turn the knob to the lef t to
skip back a folder. Turn the knob to the right
to skip ahead a folder.
RPT (repeat) button
When the RPT button is pressed while a
compact disc is playing, the play pattern
can be changed as follows:
CD:
1 Track Repeat
←→OFF
CD with MP3 or WMA:
1 Folder Repeat →1 Track Repeat →OFF
1 Track Repeat: the current track will be
repeated.
1 Folder Repeat: the current folder will be
repeated.
OFF: No repeat play pattern is applied. The
indicator on the display will turn off.
The current play pattern of the CD is dis-
played on the screen unless no pattern is
applied.
Monitor, climate, audio, phone and voice recognition systems4-45
Page 210 of 426
FM/AM/SAT RADIO WITH
COMPACT DISC (CD) PLAYER
(Type A) (if so equipped)
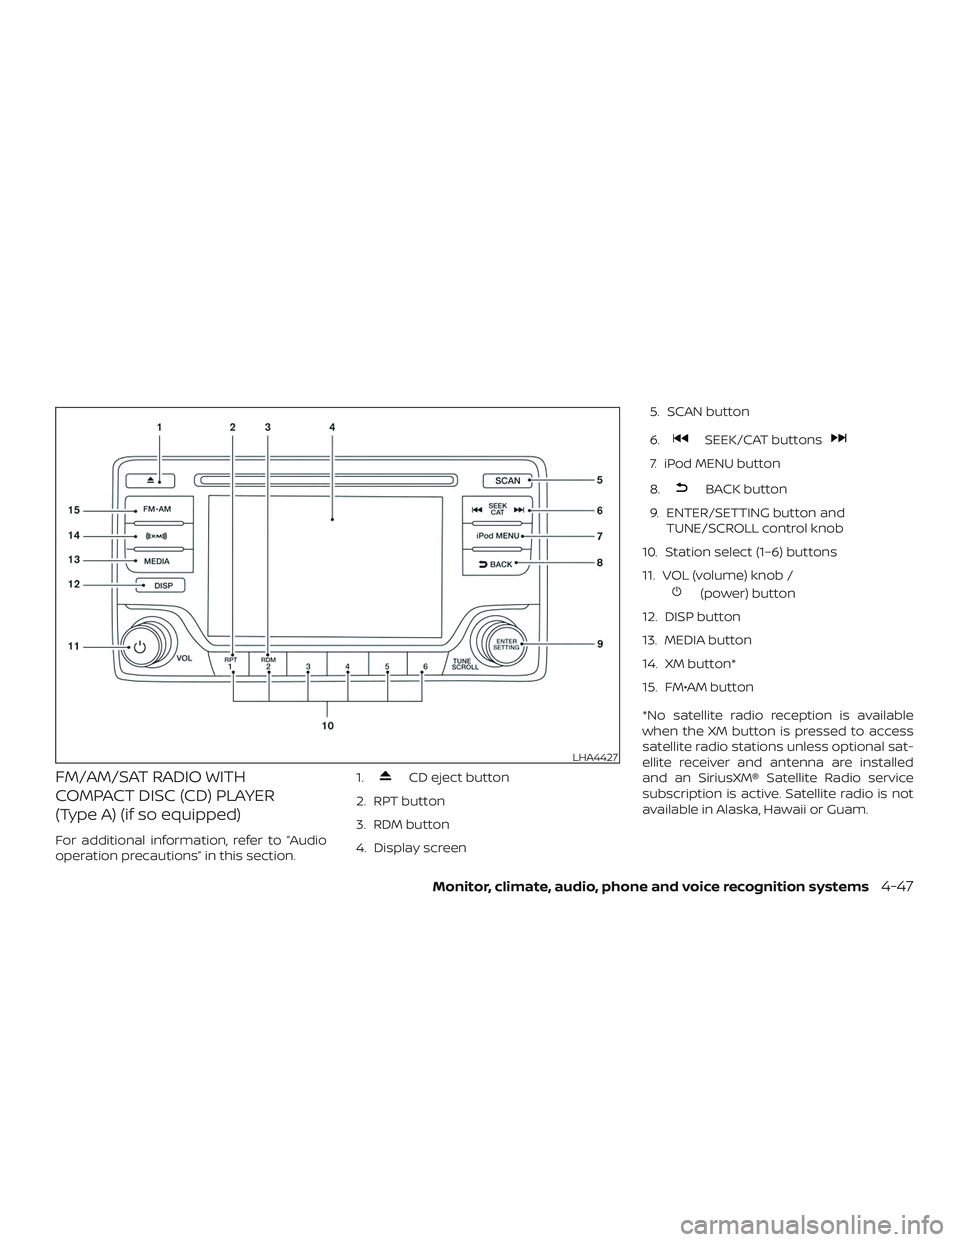
For additional information, refer to “Audio
operation precautions” in this section.1.
CD eject button
2. RPT button
3. RDM button
4. Display screen 5. SCAN button
6.
SEEK/CAT buttons
7. iPod MENU button
8.
BACK button
9. ENTER/SETTING button and TUNE/SCROLL control knob
10. Station select (1–6) buttons
11. VOL (volume) knob /
(power) button
12. DISP button
13. MEDIA button
14. XM button*
15. FM•AM button
*No satellite radio reception is available
when the XM button is pressed to access
satellite radio stations unless optional sat-
ellite receiver and antenna are installed
and an SiriusXM® Satellite Radio service
subscription is active. Satellite radio is not
available in Alaska, Hawaii or Guam.
LHA4427
Monitor, climate, audio, phone and voice recognition systems4-47
Page 214 of 426
1 to 6 Station memory operations
Six stations can be set for the AM band.
Twelve stations can be set for the FM band
(6 for FM1, 6 for FM2). Eighteen channels can
be set for the satellite radio (6 for XM1, 6 for
XM2, 6 for XM3).1. Choose the radio band AM, FM1 or FM2 using the FM·AM select button, or
choose the satellite band XM1, XM2 or
XM3 using the XM button.
2. Tune to the desired station using manual, SEEK or SCAN tuning. Press
and hold any of the desired station
memory buttons (1 – 6) until the preset
number is updated on the display and
the sound is briefly muted.
3. The channel indicator will then come on and the sound will resume. Pro-
gramming is now complete.
4. Other buttons can be set in the same manner.
If the battery cable is disconnected, or if the
fuse opens, the radio memory will be can-
celed. In that case, reset the desired sta-
tions.Compact disc (CD) player
operation
If the radio is already operating, it automati-
cally turns off and the compact disc begins
to play.
MEDIA button
With a CD loaded, press the MEDIA button
until the CD mode is displayed on the
screen.
CD/MP3 display mode
While listening to an MP3/WMA CD, certain
text may be displayed on the screen if the
CD has been encoded with text informa-
tion. Depending on how the MP3/WMA CD
is encoded, information such as Artist,
Song and Folder will be displayed.
The track number and the total number of
tracks in the current folder or on the cur-
rent disc are displayed on the screen as
well.
SEEK/CAT (Reverse or Fast Forward) button
Press and hold the SEEK/CAT button
orfor 1.5 seconds while the compact
disc is playing to reverse or fast forward the
track being played. The compact disc plays at an increased speed while reversing or
fast forwarding. When the button is re-
leased, the compact disc returns to normal
play speed.
SEEK/CAT button
Press the
SEEK/CAT button while a
CD or MP3/WMA CD is playing to return to
the beginning of the current track. Press
the
SEEK/CAT button several times to
skip backward several tracks.
Press the
SEEK/CAT button while a
CD or MP3/WMA CD is playing to advance
one track. Press the
SEEK/CAT button
several times to skip forward several
tracks. If the last track on a CD is skipped,
the first track on the disc is played. If the last
track in a folder of an MP3/WMA CD is
skipped, the first track of the next folder is
played.
TUNE/SCROLL knob (MP3/WMA CD only)
If a MP3/WMA CD with multiple folders is
playing, turn the TUNE/SCROLL knob to
change folders. Turn the knob to the lef t to
skip back a folder. Turn the knob to the right
to skip ahead a folder.
Monitor, climate, audio, phone and voice recognition systems4-51
Page 219 of 426
SEEK tuning
When in FM or AM mode, press the seek
buttons
orto tune from low to
high or high to low frequencies and to stop
at the next broadcasting station.
When in SXM mode, press the seek
buttons
orto change the cat-
egory.
1 to 6 Station memory operations
Twelve stations can be set for the FM band
(6 for FM1, 6 for FM2) and 6 stations can be
set for the AM band. Eighteen stations can
be set for the SXM band (6 for SXM1, 6 for
SXM2, 6 for SXM3).1. Choose the radio band AM, FM1 or FM2 using the FM·AM button or choose the
radio band SXM1, SXM2, SXM3 using the
SXM button.
2. Tune to the desired station using manual or seek tuning. Press and hold
any of the desired station memory
(1 – 6) until a beep sound is heard. 3. The channel indicator will then come
on and the sound will resume. Pro-
gramming is now complete.
4. Other buttons can be set in the same manner.
If the battery cable is disconnected or if the
fuse opens, the radio memory will be can-
celed. In that case, reset the desired sta-
tions.
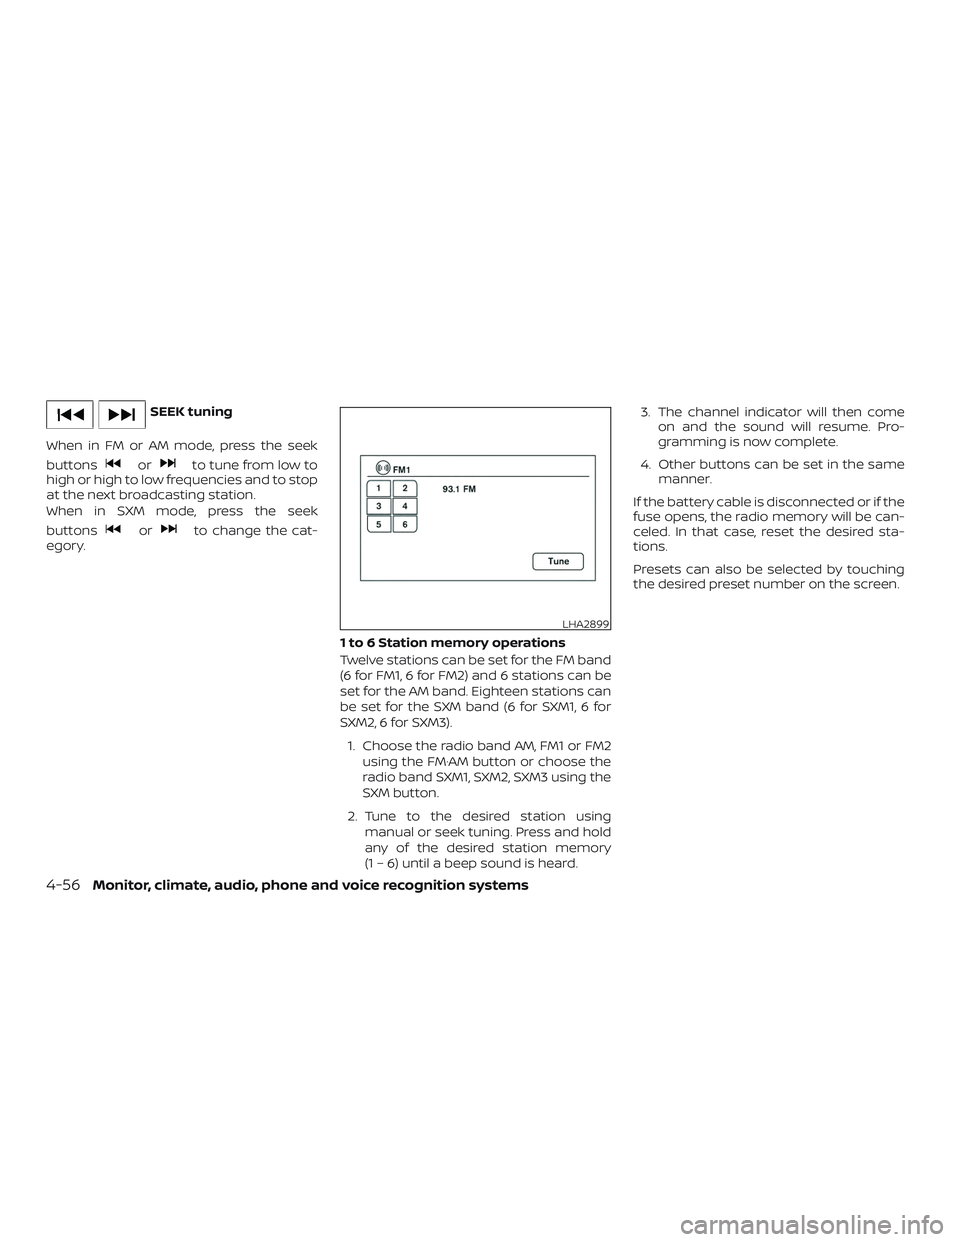
Presets can also be selected by touching
the desired preset number on the screen.
LHA2899
4-56Monitor, climate, audio, phone and voice recognition systems