Page 70 of 460
ways be correctly worn and the occupant
seated a suitable distance away from the
steering wheel, instrument panel and door
finishers. For additional information, refer
to “Seat belts” in this section.
The supplemental air bags operate only
when the ignition switch is placed in the
ON position.
Af ter placing the ignition switch in the
ON position, the supplemental air bag
warning light illuminates. The supple-
mental air bag warning light will turn off
af ter about 7 seconds if the system is
operational.
Page 71 of 460
∙ The driver and front passenger seatbelt buckles are equipped with sen-
sors that detect if the seat belts are
fastened. The NISSAN Advanced Air
Bag System monitors the severity of a
collision and seat belt usage, then in-
flates the air bags as needed. Failure
to properly wear seat belts can in-
crease the risk or severity of injury in
an accident.
∙ The front passenger seat is equipped with an occupant classification sen-
sor (weight sensor) that turns the
front passenger air bag OFF under
some conditions. This sensor is only
used in this seat. Failure to be properly
seated and wearing the seat belt can
increase the risk or severity of injury in
an accident. For additional informa-
tion, refer to “Front passenger air bag
and status light” in this section.
∙ Keep hands on the outside of the steering wheel. Placing them inside
the steering wheel rim could increase
the risk that they are injured when the
front air bag inflates.
Page 77 of 460

WARNING
To ensure proper operation of the pas-
senger’s NISSAN Advanced Air Bag Sys-
tem, please observe the following
items.
∙ Do not allow a passenger in the rearbench seats to push or pull on the
seatback pocket.
∙ Do not place heavy loads heavier than 9.1 lbs. (4 kg) on the seatback, head
restraint/headrest or in the seatback
pocket.
∙ Make sure that there is nothing press- ing against the rear of the seatback,
such as a child restraint installed in
the rear seat or an object stored on
the floor.
∙ Make sure that there is no object placed under the front passenger
seat.
∙ Make sure that there is no object placed between the seat cushion and
center console or between the seat
cushion and the door. ∙ If a forward-facing child restraint is
installed in the front passenger seat,
do not position the front passenger
seat so the child restraint contacts the
instrument panel. If the child restraint
does contact the instrument panel,
the system may determine the seat is
occupied and the passenger air bag
may deploy in a collision. Also the
front passenger air bag status light
may not illuminate. For additional in-
formation, refer to “Child restraints” in
this section.
∙ Confirm the operating condition with the front passenger air bag status
light.
∙ If you notice that the front passenger air bag status light is not operating as
described in this section, get the oc-
cupant classification system checked.
It is recommended that you visit a
NISSAN dealer for this service.
∙ Until you have confirmed with a dealer that your passenger seat occu-
pant classification system is working
properly, position the occupants in
the rear seating positions. ∙ Do not position the front passenger
seat so it contacts the rear seat. If the
front seat does contact the rear seat,
the air bag system may determine a
sensor malfunction has occurred and
the front passenger air bag status
light may illuminate and the supple-
mental air bag warning light may
flash.
This vehicle is equipped with the NISSAN
Advanced Air Bag System for the driver and
front passenger seats. This system is de-
signed to meet certification requirements
under U.S. regulations. It is also permitted in
Canada. All of the information, cautions
and warnings in this manual still apply
and must be followed.
The driver supplemental front-impact air
bag is located in the center of the steering
wheel. The front passenger supplemental
front-impact air bag is mounted in the
dashboard above the glove box. The front
air bags are designed to inflate in higher
severity frontal collisions, although they
may inflate if the forces in another type of
collision are similar to those of a higher
severity frontal impact. They may not in-
flate in certain frontal collisions. Vehicle
Safety—Seats, seat belts and supplemental restraint system1-57
Page 105 of 460
For additional information, refer to “Power
steering” in the “Starting and driving” sec-
tion of this manual.
Page 196 of 460
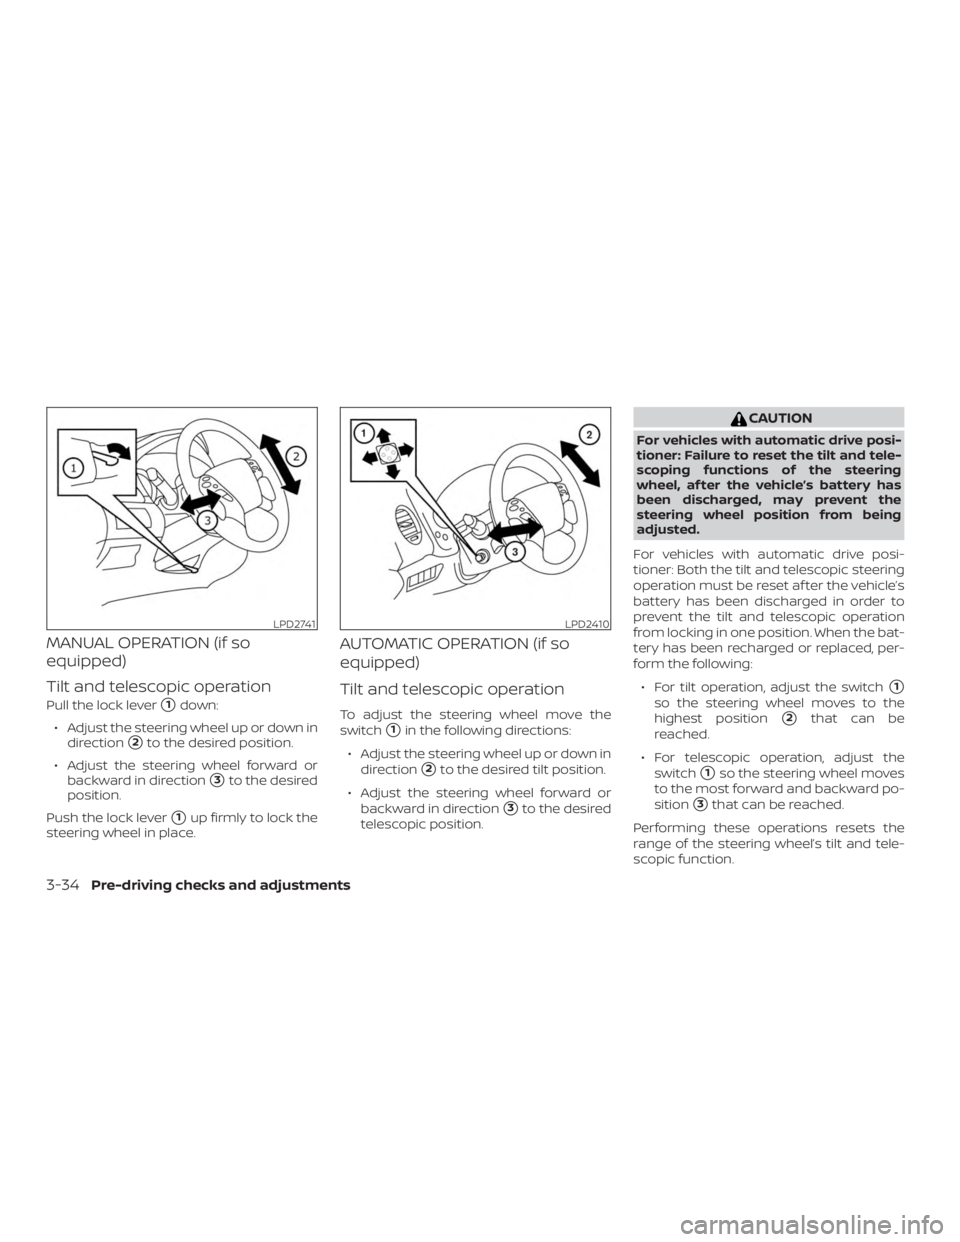
MANUAL OPERATION (if so
equipped)
Tilt and telescopic operation
Pull the lock lever�1down:
∙ Adjust the steering wheel up or down in direction
�2to the desired position.
∙ Adjust the steering wheel forward or backward in direction
�3to the desired
position.
Push the lock lever
�1up firmly to lock the
steering wheel in place.
AUTOMATIC OPERATION (if so
equipped)
Tilt and telescopic operation
To adjust the steering wheel move the
switch
�1in the following directions:
∙ Adjust the steering wheel up or down in direction
�2to the desired tilt position.
∙ Adjust the steering wheel forward or backward in direction
�3to the desired
telescopic position.
Page 197 of 460
Entry/Exit function
The automatic drive positioner system will
make the steering wheel move up auto-
matically when the driver’s door is opened
and the ignition switch is in the LOCK posi-
tion. This lets the driver get into and out of
the seat more easily. The steering wheel
moves back into position when the driver’s
door is closed and the ignition switch is
pushed.
For additional information, refer to “Auto-
matic drive positioner” in this section.1. To block glare from the front, swing
down�1the main sun visor.
2. To block glare from the side, remove the main sun visor from the center
mount and swing the visor to the side
�2.
3. To extend
�3the sun visor, slide in or
out as needed.
Page 245 of 460

WARNING
∙ Radio waves could adversely affectelectric medical equipment. Those
who use a pacemaker should contact
the electric medical equipment
manufacturer for the possible influ-
ences before use.
∙
If the low tire pressure warning light
illuminates while driving, avoid sudden
steering maneuvers or abrupt braking,
reduce vehicle speed, pull off the road
to a safe location and stop the vehicle
as soon as possible. Driving with under-
inflated tires may permanently dam-
age the tires and increase the likeli-
hood of tire failure. Serious vehicle
damage could occur and may lead to
an accident and could result in serious
personal injury. Check the tire pressure
for all four tires. Adjust the tire pressure
to the recommended COLD tire pres-
sure shown on the Tire and Loading In-
formation label to turn the low tire
pressure warning light off. If you have a
flat tire, replace it with a spare tire as
soon as possible. (For additional infor-
mation on changing a flat tire, refer to
“Flat tire” in the “In case of emergency ”
section of this manual.)
∙ When replacing a wheel without the TPMS such as the spare tire, when a
spare tire is mounted or a wheel is
replaced, tire pressure will not be indi-
cated, the TPMS will not function and
the low tire pressure warning light will
flash for approximately 1 minute. The
light will remain on af ter 1 minute.
Have your tires replaced and/or TPMS
system reset as soon as possible. It is
recommended that you visit a NISSAN
dealer for this service.
∙ Replacing tires with those not origi- nally specified by NISSAN could affect
the proper operation of the TPMS.
∙ Do not inject any tire liquid or aerosol tire sealant into the tires, as this may
cause a malfunction of the tire pres-
sure sensors.
Page 248 of 460

4. When appropriate, slowly release theaccelerator pedal to gradually slow the
vehicle.
5. If there is nothing in the way, steer the vehicle to follow the road while vehicle
speed is reduced. Do not attempt to
drive the vehicle back onto the road
surface until vehicle speed is reduced.
6. When it is safe to do so, gradually turn the steering wheel until both tires re-
turn to the road surface. When all tires
are on the road surface, steer the ve-
hicle to stay in the appropriate driving
lane.
∙ If you decide that it is not safe to re- turn the vehicle to the road surface
based on vehicle, road or traffic con-
ditions, gradually slow the vehicle to a
stop in a safe place off the road.
RAPID AIR PRESSURE LOSS
Rapid air pressure loss or a “blow-out” can
occur if the tire is punctured or is damaged
due to hitting a curb or pothole. Rapid air
pressure loss can also be caused by driving
on under-inflated tires.
Rapid air pressure loss can affect the han-
dling and stability of the vehicle, especially
at highway speeds. Help prevent rapid air pressure loss by
maintaining the correct air pressure and
visually inspecting the tires for wear and
damage. For additional information, refer
to “Wheels and tires” in the “Do-it-yourself ”
section of this manual. If a tire rapidly loses
air pressure or “blows-out” while driving,
maintain control of the vehicle by following
the procedure below. Please note that this
procedure is only a general guide. The ve-
hicle must be driven as appropriate based
on the conditions of the vehicle, road and
traffic.