Page 109 of 460

∙ Distance To Empty and fuel indicator
The display will be")
∙ Vehicle and meter display settings
∙ Cruise control status
∙ Odometer/twin trip odometer
∙ Gear position information (P, R, N, D)
∙ Distance To Empty and fuel indicator
The display will be interrupted when a
phone call is received. Phone calls can be
answered or rejected through the steering
wheel controls.
HOW TO USE THE VEHICLE
INFORMATION DISPLAY
The vehicle information display can be
changed using the OK
and
buttons located on
the steering wheel.
1. OK — change or select an item in the vehicle information display.
— scroll up or down the vehicle
information menu items. If the vehicle
information display is not showing a
menu with the
buttons, pressing
the
will change to the
previous/next audio preset. 2.
— go back or forward
through the vehicle information menu
items or to change from one display
screen to the next (i.e. trip, TPMS, fuel
economy).
The OK and
buttons also
control audio and control panel functions
in some conditions. Most screens and
menus offer instruction prompts of the
steering switch buttons to indicate how to
control the vehicle information display. An
orange cursor is shown to indicate where
you are in the available menu items. A scroll
bar with up and down arrows will appear if
there is more than one page of menu
items. For additional information, refer to
the separate NissanConnect® Owner’s
Manual.
LIC3778
Instruments and controls2-17
Page 129 of 460
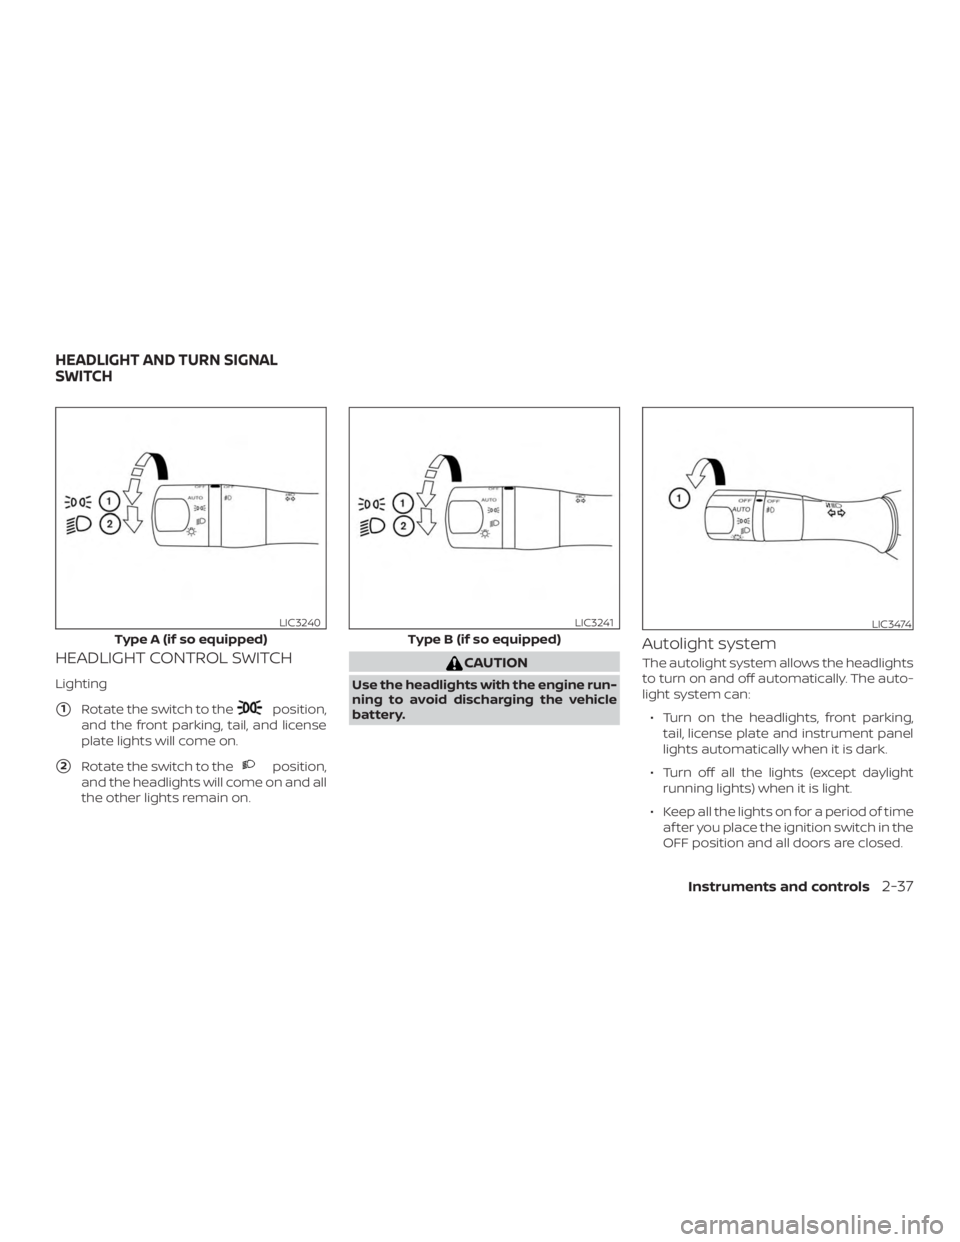
HEADLIGHT CONTROL SWITCH
Lighting
�1Rotate the switch to theposition,
and the front parking, tail, and license
plate lights will come on.
�2Rotate the switch to theposition,
and the headlights will come on and all
the other lights remain on.
CAUTION
Use the headlights with the engine run-
ning to avoid discharging the vehicle
battery.
Autolight system
The autolight system allows the headlights
to turn on and off automatically. The auto-
light system can:
∙ Turn on the headlights, front parking, tail, license plate and instrument panel
lights automatically when it is dark.
∙ Turn off all the lights (except daylight running lights) when it is light.
∙ Keep all the lights on for a period of time af ter you place the ignition switch in the
OFF position and all doors are closed.
Type A (if so equipped)
LIC3240
Type B (if so equipped)
LIC3241LIC3474
HEADLIGHT AND TURN SIGNAL
SWITCH
Instruments and controls2-37
Page 130 of 460

NOTE:
Autolight activation sensitivity and the
time delay for autolight shutoff can be
adjusted. For additional information, re-
fer to “Vehicle information display ” in
this section.
To turn on the autolight system:1. Turn the headlight switch to the AUTO position
�1.
2. Turn the ignition switch to ON.
3. The autolight system automatically turns the headlights on and off.
Initially, if the ignition switch is turned off
and a door is opened and lef t open, the
headlights remain on for a period of time. If
another door is opened while the head-
lights are on, then the timer is reset.
To turn the autolight system off, turn the
switch to the OFF,
,orposition. Be sure you do not put anything on top
of the autolight sensor located in the top
side
�1of the instrument panel. The au-
tolight sensor controls the autolight; if it
is covered, the autolight sensor reacts as
if it is dark out and the headlights will
illuminate. If this occurs while parked
with the engine off and the ignition
switch placed in the ON position, your
vehicle’s battery could become dis-
charged.
Headlight beam select
�1To select the high beam function, push
the lever forward while the low beams
are on. The high beam lights come on
and the
indicator light illumi-
nates.
�2Pull the lever back to return to the low
beams.
LIC2237LIC3250
2-38Instruments and controls
Page 132 of 460

INSTRUMENT BRIGHTNESS
CONTROL
Press the “+” button�Ato increase the
brightness of instrument panel lights.
Press the “-” button
�Bto decrease the
brightness of instrument panel lights.
TURN SIGNAL SWITCH
Turn signal
�1Move the lever up or down to signal the
turning direction. When the turn is
completed, the turn signal cancels au-
tomatically.
Lane change signal
�2Move the lever up or down until the
turn signal begins to flash, but the lever
does not latch, to signal a lane change.
Hold the lever until the lane change is
completed.
Move the lever up or down until the
turn signal begins to flash, but the lever
does not latch, and release the lever.
The turn signal will automatically flash
three times.
Choose the appropriate method to signal
a lane change based on road and traffic
conditions.
NOTE:
The 3 Flash Pass feature may be dis-
abled. For additional information, refer
to “How to use the vehicle information
display ” in this section.
LIC2305LIC3252
2-40Instruments and controls
Page 139 of 460
 system switch is used in
combination with a NissanConnect® Ser-
vices subscription to call for assistance in
case of an emergency.
Pushing the switch will (with a paid sub-
scription")
The E-call (SOS) system switch is used in
combination with a NissanConnect® Ser-
vices subscription to call for assistance in
case of an emergency.
Pushing the switch will (with a paid sub-
scription) reach a Response Specialist that
will provide assistance based on the situa-
tion described by the vehicle’s occupant.
For additional information, or to enroll your
vehicle, refer to
www.NissanUSA.com/connect,
www.Nissan.ca/NissanConnect, or
www.Nissan.ca/NissanConnect/fr or call
855–426–6628.
12V OUTLETS
The power outlets are for powering electri-
cal accessories such as cellular tele-
phones. They are rated at 12 volt, 120W (10A)
maximum.
The vehicle’s power outlets are powered
only when the ignition switch is in the ACC
(if so equipped) or ON position.
Open the cap to use a power outlet.
CAUTION
∙ The outlet and plug may be hot duringor immediately af ter use.
∙ Only certain power outlets are de- signed for use with a cigarette lighter
unit. Do not use any other power out-
let for an accessory lighter. It is rec-
ommended that you visit a NISSAN
dealer for additional information.
∙ Do not use with accessories that ex- ceed a 12 volt, 120W (10A) power draw.
LIC3357
Instrument Panel
LIC3002
Center Console
LIC3705
E-CALL (SOS) SWITCH (if so
equipped) POWER OUTLETS
Instruments and controls2-47
Page 141 of 460
The extended storage switch is used when
shipping the vehicle. It is located in the fuse
panel to the lef t of the steering wheel on
the instrument panel. If any electrical
equipment does not operate, ensure the
extended storage switch is pushed fully in
place, as shown.FRONT-DOOR POCKETSPulled position
LIC3266
Pushed position
LIC3268LIC3671
STORAGE
Instruments and controls2-49
Page 149 of 460

POWER WINDOWS
WARNING
∙ Make sure that all passengers havetheir hands, etc., inside the vehicle
while it is in motion and before closing
the windows. Use the window lock
switch to prevent unexpected use of
the power windows.
∙ To help avoid risk of injury or death through unintended operation of the
vehicle and/or its systems, including
entrapment in windows or inadver-
tent door lock activation, do not leave
children, people who require the as-
sistance of others or pets unattended
in your vehicle. Additionally, the tem-
perature inside a closed vehicle on a
warm day can quickly become high
enough to cause a significant risk of
injury or death to people and pets.
The power windows operate when the ig-
nition switch is placed in the ON position, or
for a period of time af ter the ignition switch
is placed in the OFF position. If the driver’s
or passenger’s door is opened during this
period of time, the power to the windows is
canceled.
1. Window lock button
2. Power door lock switch
3. Front passenger side automatic switch
4. Right rear passenger side switch
5. Lef t rear passenger side switch
6. Driver’s side automatic switch
Driver’s side power window
switch
The driver’s side control panel is equipped
with switches to open or close all of the
windows.
To open a window, push the switch to the
detent and continue to hold down until the
desired window position is reached. To
close a window, pull the switch to the de-
tent and continue to hold up until the de-
sired window position is reached.
Locking passengers’ windows
When the window lock switch is pushed,
only the driver’s side window can be
opened or closed. Push it again to cancel
the window lock function.LIC3238
WINDOWS
Instruments and controls2-57
Page 173 of 460

∙ The request switch is operational onlywhen the Intelligent Key has been de-
tected by the Intelligent Key system.
Lockout protection
To prevent the Intelligent Key from being
accidentally locked in the vehicle, lockout
protection is equipped with the Intelligent
Key system.
When any door is open, the doors are
locked, and then the Intelligent Key is put
inside the vehicle and all the doors are
closed, a warning chime will sound and the
doors will automatically unlock.
NOTE:
The doors may not lock when the Intelli-
gent Key is in the same hand that is op-
erating the request switch to lock the
door. Put the Intelligent Key in a purse,
pocket or your other hand.CAUTION
The lockout protection may not func-
tion under the following conditions:
∙ When the Intelligent Key is placed on top of the instrument panel.
∙ When the Intelligent Key is placed in- side the glove box or a storage bin.
∙ When the Intelligent Key is placed in- side the door pockets.
∙ When the Intelligent Key is placed in- side or near metallic materials.
Unlocking doors
1. Carry the Intelligent Key.
2. Push the door handle request switch.
3. The door on which the request switch
was pressed will unlock and the hazard
warning lights flash once, the outside
chime sounds once, and the front and
tail lights may turn on for 30 seconds.
4. Push the door handle request switch again within one minute to unlock the
remaining doors.
LPD2551
Pre-driving checks and adjustments3-11