2018 NISSAN MICRA window
[x] Cancel search: windowPage 139 of 330
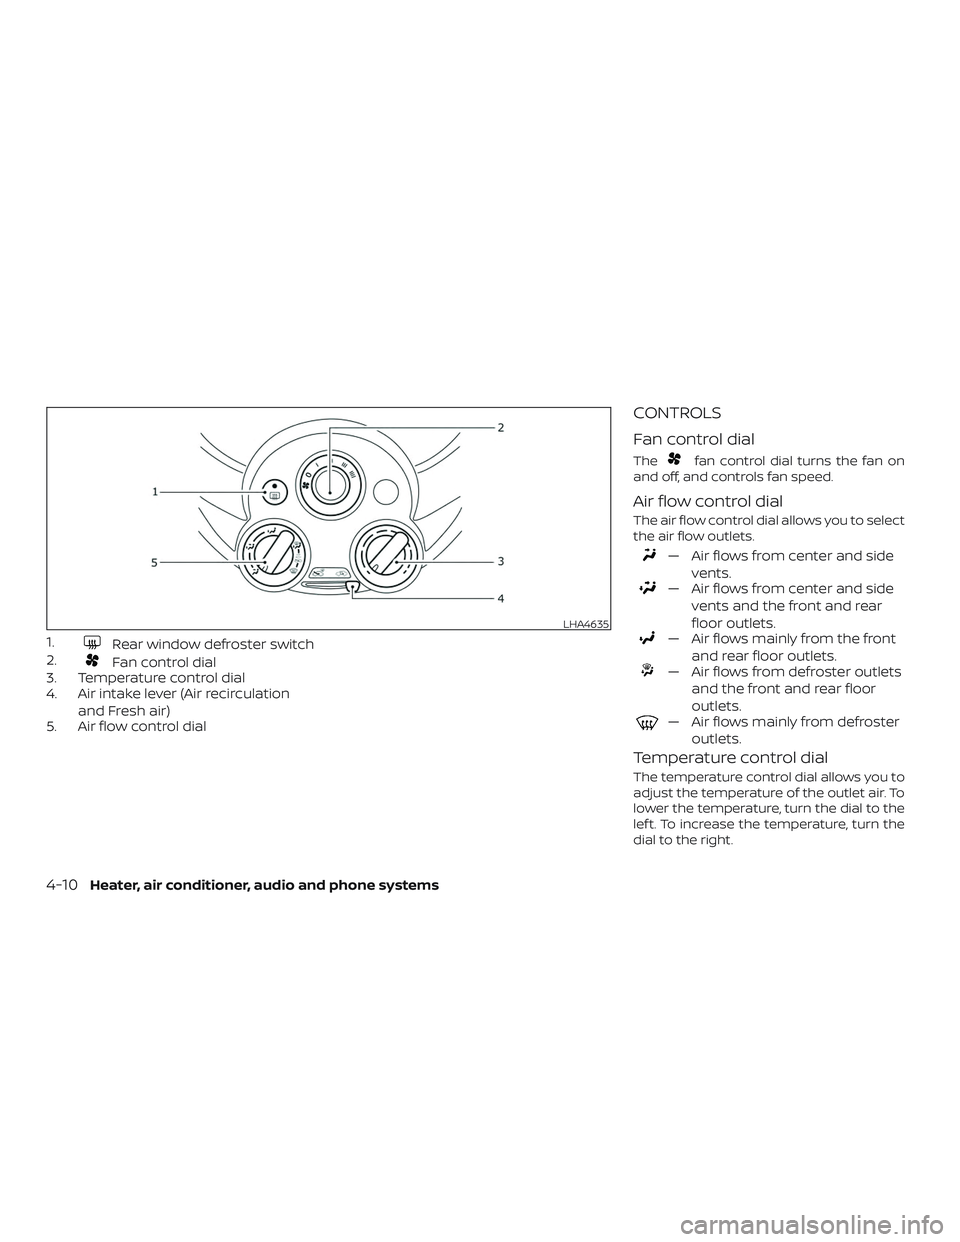
1.Rear window defroster switch
2.
Fan control dial
3. Temperature control dial
4. Air intake lever (Air recirculation
and Fresh air)
5. Air flow control dial
CONTROLS
Fan control dial
Thefan control dial turns the fan on
and off, and controls fan speed.
Air flow control dial
The air flow control dial allows you to select
the air flow outlets.
— Air flows from center and side
vents.
— Air flows from center and sidevents and the front and rear
floor outlets.
— Air flows mainly from the frontand rear floor outlets.
— Air flows from defroster outletsand the front and rear floor
outlets.
— Air flows mainly from defrosteroutlets.
Temperature control dial
The temperature control dial allows you to
adjust the temperature of the outlet air. To
lower the temperature, turn the dial to the
lef t. To increase the temperature, turn the
dial to the right.
LHA4635
4-10Heater, air conditioner, audio and phone systems
Page 140 of 330
Fresh airMove the air intake lever to theposi-
tion. The air flow is drawn from outside the
vehicle.
Air recirculation
Move the air intake lever to theposi-
tion to recirculate air inside the vehicle.
Use the
selection:
∙ when driving on a dusty road.
∙ to prevent traffic fumes from entering passenger compartment.
∙ for maximum cooling when using the air conditioner.
Rear window defroster switch
For additional information about the rear
window defroster switch, refer to “Rear win-
dow and outside mirror (if so equipped)
defroster switch” in the “Instruments and
controls” section of this manual.
HEATER OPERATION
Heating
This mode is used to direct heated air to
the foot outlets. Some air also flows from
the defrost outlets.
1. Move the air intake lever to the
position for normal heating.
2. Turn the air flow control dial to the
position.
3. Turn the
fan control dial to the
desired position.
4. Turn the temperature control dial to the desired position between the
middle and the hot position.
Ventilation
This mode directs outside air to the side
and center vents.
1. Move the air intake lever to the
position.
2. Turn the air flow control dial to the
position.
3. Turn the
fan control dial to the
desired position. 4. Turn the temperature control dial to
the desired position.
Defrosting or defogging
This mode directs the air to the defrost
outlets to defrost/defog the windows.
1. Move the air intake lever to the
position.
2. Turn the air flow control dial to the
position.
3. Turn the
fan control dial to the
desired position.
4. Turn the temperature control dial to the desired position between the
middle and the hot position.
5. Align lef t and right vents to direct air flow toward the front side windows.
∙ To quickly remove ice or fog from the windows, turn the fan control dial to the
maximum position and the tempera-
ture control dial to the full hot position.
Heater, air conditioner, audio and phone systems4-11
Page 145 of 330
CONTROLS
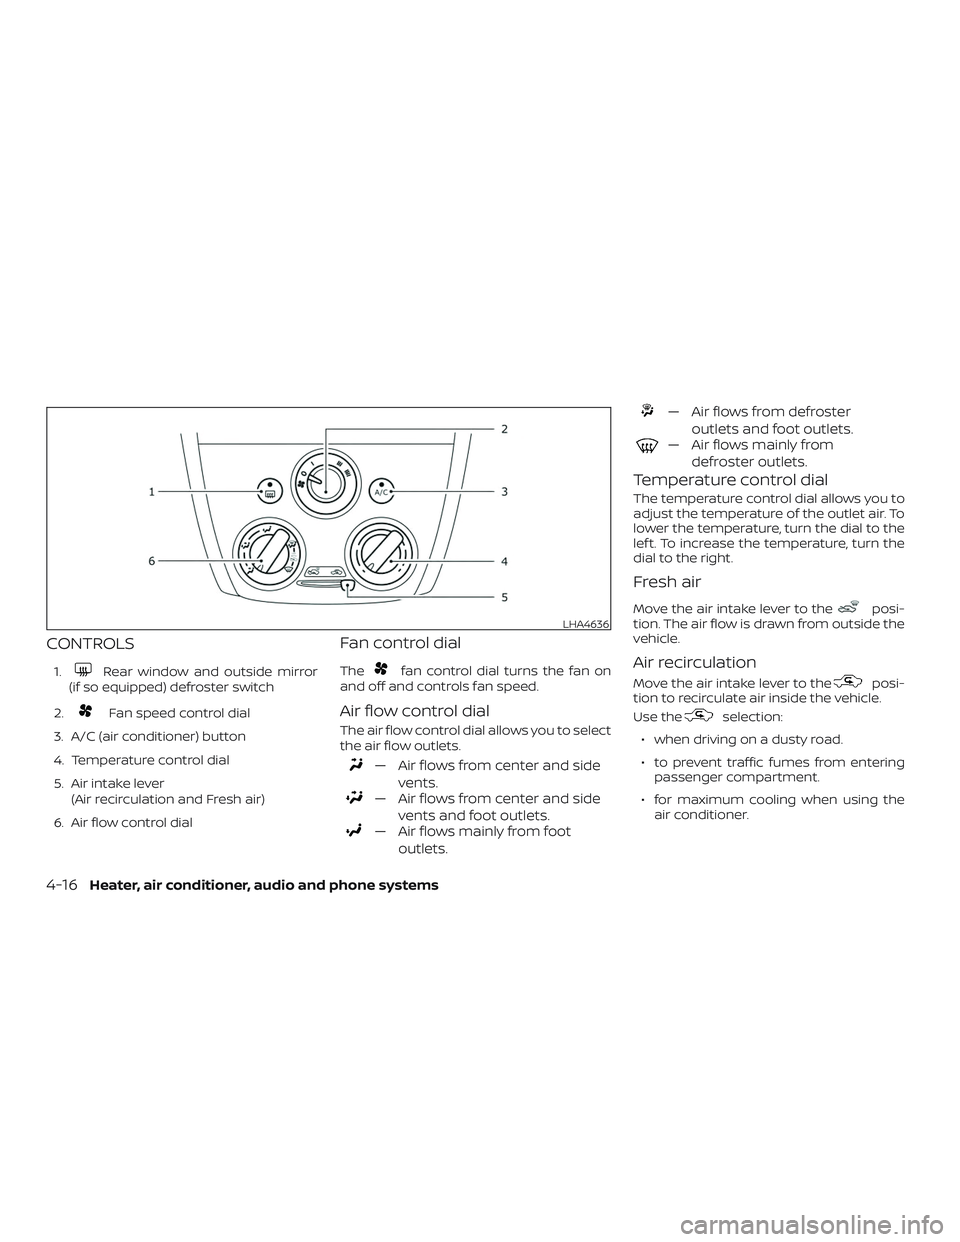
1.Rear window and outside mirror
(if so equipped) defroster switch
2.
Fan speed control dial
3. A/C (air conditioner) button
4. Temperature control dial
5. Air intake lever (Air recirculation and Fresh air)
6. Air flow control dial
Fan control dial
Thefan control dial turns the fan on
and off and controls fan speed.
Air flow control dial
The air flow control dial allows you to select
the air flow outlets.
— Air flows from center and side
vents.
— Air flows from center and sidevents and foot outlets.
— Air flows mainly from footoutlets.
— Air flows from defroster outlets and foot outlets.
— Air flows mainly fromdefroster outlets.
Temperature control dial
The temperature control dial allows you to
adjust the temperature of the outlet air. To
lower the temperature, turn the dial to the
lef t. To increase the temperature, turn the
dial to the right.
Fresh air
Move the air intake lever to theposi-
tion. The air flow is drawn from outside the
vehicle.
Air recirculation
Move the air intake lever to theposi-
tion to recirculate air inside the vehicle.
Use the
selection:
∙ when driving on a dusty road.
∙ to prevent traffic fumes from entering passenger compartment.
∙ for maximum cooling when using the air conditioner.
LHA4636
4-16Heater, air conditioner, audio and phone systems
Page 146 of 330
Air conditioner button
Start the engine, turn the fan control dial to
the desired position and press the
button to turn on the air conditioner. The
indicator light comes on when the air con-
ditioner is operating. To turn off the air con-
ditioner, press the
button again.
The air conditioner cooling function op-
erates only when the engine is running.
Rear window and outside mirror
(if so equipped) defroster switch
For additional information, refer to “Rear
window and outside mirror (if so equipped)
defroster switch” in the “Instruments and
controls” section of this manual.
HEATER OPERATION
Heating
This mode is used to direct heated air to
the foot outlets. Some air also flows from
the defrost outlets.
1. Move the air intake lever to the
position for normal heating.
2. Turn the air flow control dial to the
position. 3. Turn the
fan control dial to the
desired position.
4. Turn the temperature control dial to the desired position between the
middle and the hot position.
Ventilation
This mode directs outside air to the side
and center vents.
1. Move the air intake lever to the
position.
2. Turn the air flow control dial to the
position.
3. Turn the
fan control dial to the
desired position.
4. Turn the temperature control dial to the desired position.
Defrosting or defogging
This mode directs the air to the defrost
outlets to defrost/defog the windows.
1. Move the air intake lever to the
position.
2. Turn the air flow control dial to the
position. 3. Turn the
fan control dial to the
desired position.
4. Turn the temperature control dial to the desired position between the
middle and the hot position.
∙ To quickly remove ice or fog from the windows, turn the fan control dial to the
maximum position and the tempera-
ture control dial to the full hot position.
When the
orposition is se-
lected, press the
button to turn on
the air conditioner for better performance.
This will dehumidif y the air and help defog
the windows.
Bi-level heating
This mode directs cooler air from the side
and center vents and warmer air from the
floor outlets. When the temperature con-
trol dial is moved to the full hot or full cool
position, the air between the vents and the
floor outlets is the same temperature.
1. Move the air intake lever to the
position.
2. Turn the air flow control dial to the
position.
Heater, air conditioner, audio and phone systems4-17
Page 147 of 330
3. Turn thefan control dial to the
desired position.
4. Turn the temperature control dial to the desired position.
Heating and defogging
This mode heats the cabin and defogs the
windshield.
1. Move the air intake lever to the
position.
2. Turn the air flow control dial to the
position.
3. Turn the
fan control dial to the
desired position.
4. Turn the temperature control dial to the desired position between the
middle and the hot position.
When the
orposition is se-
lected, press the
button to turn on
the air conditioner for better performance.
This will dehumidif y the air and help defog
the windows.
Operating tips
Clear snow and ice from the wiper blades
and air inlet in front of the windshield.
This improves heater operation.
AIR CONDITIONER OPERATION
Start the engine, turn thefan control
dial to the desired position, and press
the
button to activate the air condi-
tioner. When the air conditioner is on, cool-
ing and dehumidif ying functions are
added to the heater operation.
The air conditioner cooling function op-
erates only when the engine is running.
Cooling
This mode is used to cool and dehumidif y
the air.
1. Move the air intake lever to the
position.
2. Turn the air flow control dial to the
position.
3. Turn the
fan control dial to the
desired position.
4. Press the
button. The indicator
light comes on. 5. Turn the temperature control dial to
the desired position.
∙ For quick cooling when the outside temperature is high, move the air intake
lever to the
position. Be sure to
return to the
position for normal
cooling.
Dehumidified heating
This mode is used to heat and dehumidif y
the air.
1. Move the air intake lever to the
position.
2. Turn the air flow control dial to the
position.
3. Turn the
fan control dial to the
desired position.
4. Press the
button. The indicator
light comes on.
5. Turn the temperature control dial to the desired position.
Dehumidified defogging
This mode is used to defog the windows
and dehumidif y the air.
1. Move the air intake lever to the
position.
4-18Heater, air conditioner, audio and phone systems
Page 148 of 330
2. Turn the air flow control dial tothe
position.
3. Turn the
fan control dial to the de-
sired position.
4. Turn the temperature control dial to the desired position.
Operating tips
∙ Keep the windows closed while the airconditioner is in operation.
∙ Af ter parking in the sun, drive for 2 or 3 minutes with the windows open to
vent hot air from the passenger com-
partment. Then, close the windows.
This allows the air conditioner to cool
the interior more quickly.
∙ The air conditioning system should
be operated for approximately
10 minutes at least once a month.
This helps prevent damage to the
system due to lack of lubrication. ∙ A visible mist may be seen coming from
the ventilators in hot, humid conditions
as the air is cooled rapidly. This does not
indicate a malfunction.
∙ If the engine coolant temperature
gauge indicates engine coolant tem-
perature over the normal range, turn
the air conditioner off. For additional
information, refer to “If your vehicle
overheats” in the “In case of emer-
gency ” section of this manual.
AIR FLOW CHARTS
The following charts show the button and
dial positions for MAXIMUM AND QUICK
heating, cooling or defrosting. The air in-
take lever should always be in the
position for heating and defrosting.
Heater, air conditioner, audio and phone systems4-19
Page 163 of 330

SCAN (tuning) button
Press the SCAN button. SCAN illuminates in
the display window. Scan tuning begins
from low to high frequencies. Scan tuning
stops for 5 seconds at each broadcasting
station that has sufficient signal strength.
When scanning, SCAN blinks in the display.
Pressing the SCAN button again during this
5 second period stops scan tuning and the
radio remains tuned to that station.
1 to 6 Station memory operations
Twelve stations can be set for the FM band
(six for FM1, six for FM2) and six stations can
be set for the AM band.1. Choose the radio band AM, FM1 or FM2 using the AM or FM button.
2. Tune to the desired station using manual, SEEK or SCAN tuning. Press
and hold any of the desired station
memory buttons (1 – 6) until a beep is
heard.
3. The channel indicator will then come on and the sound will resume. Pro-
gramming is now complete. 4. Other buttons can be set in the same
manner.
If the battery cable is disconnected or if the
fuse opens, the radio memory will be can-
celed. In that case, reset the desired sta-
tions.
Compact disc (CD) player
operation
Place the ignition switch in the ACC or ON
position, and carefully insert the compact
disc into the slot with the label side up. The
compact disc is automatically pulled into
the slot and starts to play.
If the radio is already operating, it automati-
cally turns off and the compact disc begins
to play.
CD button
When the CD button is pressed with a com-
pact disc loaded and the radio playing, the
radio turns off and the last used compact
disc starts to play.
SEEK and TRACK (Fast Forward, Rewind)
buttons:
When the
SEEK button orTRACK button is pressed while the com-
pact disc is playing, the compact disc plays
at an increased speed while fast forward-
ing or rewinding. When the button is re-
leased, the compact disc returns to normal
play speed.
SEEK and TRACK buttons
When the
SEEK button is pressed
while the compact disc is playing, the next
track following the present one starts to
play from the beginning. Press the
SEEK button several times to skip several
tracks. Each time the button is pressed, the
CD advances one additional track. The
track number appears in the display win-
dow. (When the last track on the compact
disc is skipped, the first track is played.)
When the
TRACK button is pressed,
the track being played returns to the be-
ginning. Press the
TRACK button sev-
eral times to skip back several tracks. Each
time the button is pressed the CD moves
back one track.
4-34Heater, air conditioner, audio and phone systems
Page 179 of 330
Initialization
When the ignition switch is placed in the ON
position, NISSAN Voice Recognition is initial-
ized, which takes a few seconds. If the
button is pressed before the initialization
completes, the system will announce
“Hands-free phone system not ready” and
will not react to voice commands.
Operating tips
To get the best performance out of the
system, observe the following:∙ Keep the interior of the vehicle as quiet as possible. Close the windows to elimi-
nate surrounding noises (traffic noises,
vibration sounds, etc.), which may pre-
vent the system from recognizing voice
commands correctly.
Giving voice commands (if so
equipped)
To operate NISSAN Voice Recognition,
press and release the
button located
on the steering wheel. Af ter the tone
sounds, speak a command.
The command given is picked up by the
microphone, and voice feedback is given
when the command is accepted. ∙ If you need to hear the available com-
mands for the current menu again, say
“Help” and the system will repeat them.
∙ If a command is not recognized, the system announces, “Command not
recognized. Please try again.” Make sure
the command is said exactly as
prompted by the system and repeat
the command in a clear voice.
∙ If you want to go back to the previous command, you can say “Go back” or
“Correction” any time the system is
waiting for a response.
∙ You can cancel a command when the system is waiting for a response by say-
ing, “Cancel” or “Quit.” The system an-
nounces “Cancel” and ends the Voice
Recognition session. You can also press
and hold the
button on the steer-
ing wheel for 5 seconds at any time to
end the Voice Recognition session.
Whenever the Voice Recognition ses-
sion is canceled, a double beep is
played to indicate you have exited the
system. ∙ If you want to adjust the volume of the
voice feedback, push the volume con-
trol switches (+ or -) on the steering
wheel while being provided with feed-
back. You can also use the radio volume
control knob.
Voice Prompt Interrupt
In most cases you can interrupt the voice
feedback to speak the next command by
pressing the
button on the steering
wheel. Af ter interrupting the system, wait
for a beep before speaking your command.
One Shot Call
To use the system faster, you may speak
the second level commands with the main
menu command on the main menu. For
example, press the
button and af ter
the tone say, “Call Redial”.
4-50Heater, air conditioner, audio and phone systems