Page 34 of 428

SEAT BELT WARNING LIGHT
Both the driver’s and passenger’s front
seats are equipped with a seat belt warn-
ing light. The warning light, located on the
instrument panel, will show the status of
the driver and passenger seat belt.
NOTE:
The front passenger seat belt warning
light will not light up if the seat is not
occupied.For additional information, refer to “Warn-
ing lights, indicator lights and audible re-
minders” in the “Instruments and controls”
section of this manual.
PREGNANT WOMEN
NISSAN recommends that pregnant
women use seat belts. The seat belt should
be worn snug and always position the lap
belt as low as possible around the hips, not
the waist. Place the shoulder belt over your
shoulder and across your chest. Never run
the lap/shoulder belt over your abdominal
area. Contact your doctor for specific rec-
ommendations.
INJURED PERSONS
NISSAN recommends that injured persons
use seat belts. Check with your doctor for
specific recommendations.
THREE-POINT TYPE SEAT BELT
WITH RETRACTOR
Page 64 of 428

WARNING
∙ The front air bags ordinarily will notinflate in the event of a side impact,
rear impact, rollover, or lower severity
frontal collision. Always wear your
seat belts to help reduce the risk or
severity of injury in various kinds of
accidents
∙ The front passenger air bag will not inflate if the passenger air bag status
light is lit. For additional information,
refer to “Front passenger air bag and
status light” in this section. ∙ The seat belts and the front air bags
are most effective when you are sit-
ting well back and upright in the seat.
The front air bags inflate with great
force. Even with the NISSAN Advanced
Air Bag System, if you are unre-
strained, leaning forward, sitting side-
ways or out of position in any way, you
are at greater risk of injury or death in
a crash. You may also receive serious
or fatal injuries from the front air bag
if you are up against it when it inflates.
Always sit back against the seatback
and as far away as practical from the steering wheel or instrument panel.
Always properly use the seat belts.
∙ The driver and front passenger seat belt buckles are equipped with sen-
sors that detect if the seat belts are
fastened. The NISSAN Advanced Air
Bag System monitors the severity of a
collision and seat belt usage, then in-
flates the air bags as needed. Failure
to properly wear seat belts can in-
crease the risk or severity of injury in
an accident.
∙ The front passenger seat is equipped with an occupant classification sen-
sor (weight sensor) that turns the
front passenger air bag OFF under
some conditions. This sensor is only
used in this seat. Failure to be properly
seated and wearing the seat belt can
increase the risk or severity of injury in
an accident. For additional informa-
tion, refer to “Front passenger air bag
and status light” in this section.
∙ Keep hands on the outside of the steering wheel. Placing them inside
the steering wheel rim could increase
the risk that they are injured when the
front air bag inflates.
Page 115 of 428

switches. For additional information, refer
to “Sport mode” in the “Starting and driving”
section of this manual.
Illumination indicator
This indicator shows the illumination ad-
justment of the instrument panel. For addi-
tional information, refer to “Instrument
brightness control” in this section.
Transmission Shif t Position indicator
This indicator shows the transmission shif t
position.
Outside Temperature Display
The outside temperature display appears
in the center region of the vehicle informa-
tion display.
Low Outside Temperature
This warning appears if the outside tem-
perature is below 37°F (3°C). The tempera-
ture can be changed to display in Celsius or
Fahrenheit. For additional information, re-
fer to “Settings” in this section.Oil and Filter
This indicator appears when the customer
set distance comes for changing the en-
gine oil and filter. You can set or reset the
distance for checking or replacing these
items. For scheduled maintenance items
and intervals, refer to the “Maintenance and
schedules” section of this manual.
Tire
This indicator appears when the customer
set distance is reached for replacing tires.
You can set or reset the distance for replac-
ing tires.
Page 130 of 428

CAUTION
Use the headlights with the engine run-
ning to avoid discharging the vehicle
battery.
Autolight system
The autolight system allows the headlights
to be set so they turn on and off automati-
cally. The autolight system can:∙ Turn on the headlights, front parking, tail, license plate and instrument panel
lights automatically when it is dark.
∙ Turn off all the lights when it is light.
∙ Keep all the lights on for a period of time af ter you turn the key to OFF and all
doors are closed. NOTE:
Autolight activation sensitivity and the
time delay for autolight shutoff can be
adjusted. For additional information, re-
fer to “Vehicle information display ” in
this section.
To turn on the autolight system:
1. Turn the headlight switch to the AUTO position
�1.
2. Place the ignition switch in the ON po- sition.
3. The autolight system automatically turns the headlights on and off.
Initially, if the ignition switch is placed in the
OFF position and a door is opened and lef t
open, the headlights remain on for a period
of time. If another door is opened while the
headlights are on, then the timer is reset.
To turn the autolight system off, turn the
switch to the OFF,
Page 131 of 428
Be sure you do not put anything on top
of the autolight sensor located in the top
side of the instrument panel. The auto-
light sensor controls the autolight; if it is
covered, the autolight sensor reacts as if
it is dark out and the headlights will illu-
minate. If this occurs while parked with
the engine off and the key in the ON po-
sition, your vehicle’s battery could be-
come discharged.Headlight beam select
�1To select the high beam function, push
the lever forward. The high beam lights
come on and the
Page 167 of 428

CAUTION
The lockout protection may not func-
tion under the following conditions:
∙ When the Intelligent Key is placed ontop of the instrument panel.
∙ When the Intelligent Key is placed in- side the glove box or a storage bin.
∙ When the Intelligent Key is placed in- side the door pockets.
∙ When the Intelligent Key is placed in- side or near metallic materials.
Unlocking doors
1. Carry the Intelligent Key.
2. Push the door handle request switch.
3. The door on which the request switch was pressed will unlock and the hazard
warning lights flash once, the outside
buzzer sounds once, and the front and
tail lights may turn on for 30 seconds.
4. Push the door handle request switch again within one minute, the outside
buzzer sounds once and the remaining
doors unlock. NOTE:
∙ If “Selective Unlock” is turned off in
“Vehicle Settings,” all doors will un-
lock upon the first request switch
�1
press.
∙ Request switches for all doors and
trunk lid can be deactivated when the
“Ext. Door Switch” is switched to OFF
in “Vehicle Settings” of the vehicle in-
formation display. For additional in-
formation, refer to “Vehicle informa-
tion display ” in the “Instruments and
controls” section of this manual.
Page 177 of 428
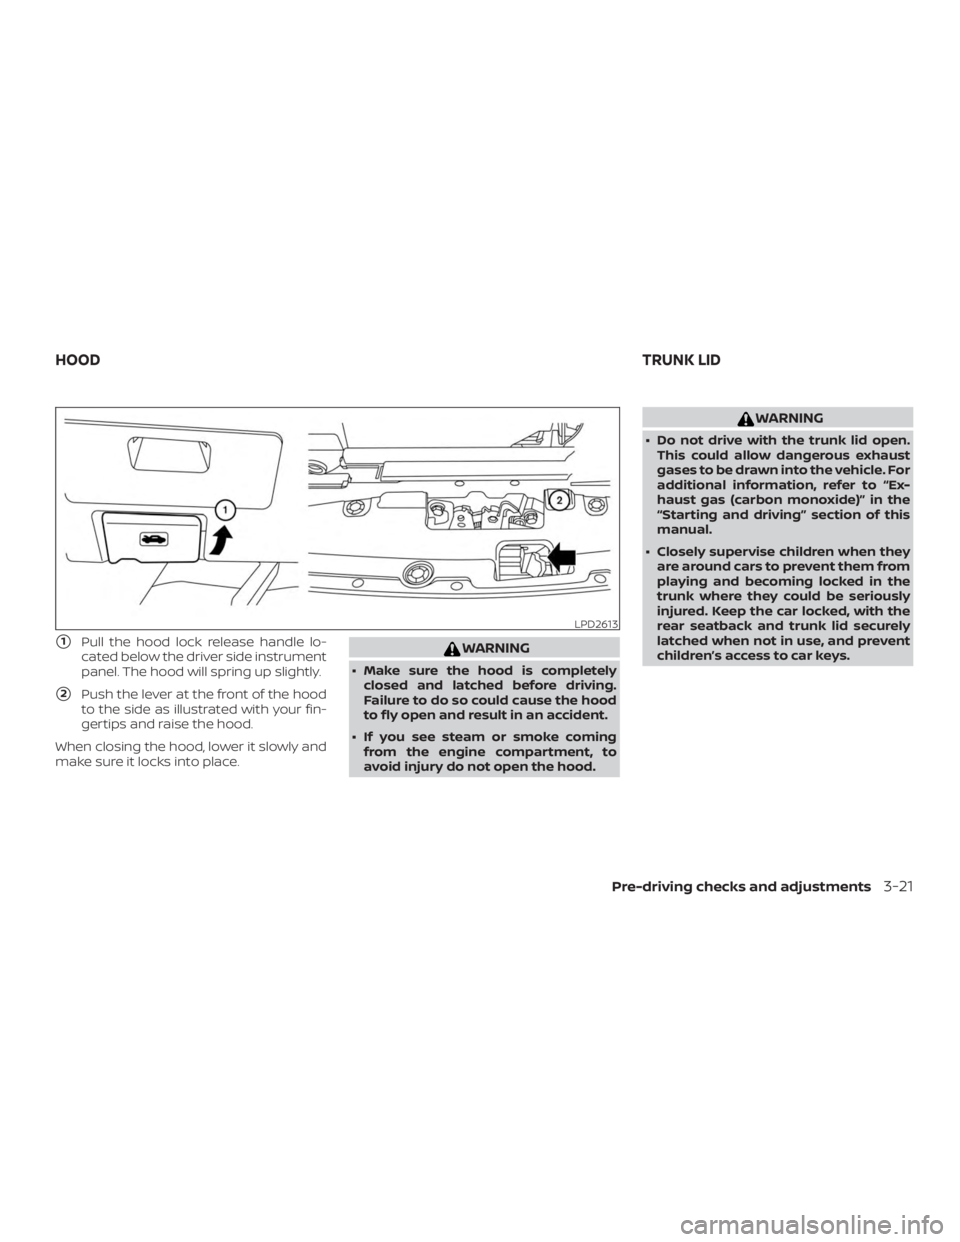
�1Pull the hood lock release handle lo-
cated below the driver side instrument
panel. The hood will spring up slightly.
�2Push the lever at the front of the hood
to the side as illustrated with your fin-
gertips and raise the hood.
When closing the hood, lower it slowly and
make sure it locks into place.
Page 236 of 428

one who does not carry the Intelligent Key,
to push the ignition switch to start the en-
gine.
The operating range of the engine start
function is inside of the vehicle
�1.
∙ The luggage area is not included in the operating range, but the Intelligent Key
may function.
∙ If the Intelligent Key is placed on the instrument panel, inside the glove box,
storage bin or door pocket, the Intelli-
gent Key may not function.
∙ If the Intelligent Key is placed near the door or window outside the vehicle, the
Intelligent Key may function.
PUSH-BUTTON IGNITION SWITCH
POSITIONS
LOCK (Normal parking position)
The ignition switch can only be locked in
this position.
The ignition switch will be unlocked when it
is pushed to the ACC position while carry-
ing the Intelligent Key.
The ignition switch will lock when any door
is opened or closed with the ignition
switched off. ACC (Accessories)
This position activates electrical accesso-
ries, such as the radio, when the engine is
not running.
ACC has a battery saver feature that will
place the ignition switch in the OFF position
af ter a period of time under the following
conditions:
∙ All doors are closed.
∙ The shif t lever is in P (Park).
∙ The hazard lamps are off.
∙ The turn signals are off.
The battery saver feature will be canceled if
any of the following occur: ∙ Any door is opened.
∙ The shif t lever is moved out of P (Park).
∙ The ignition switch changes position.
∙ The hazard lamps are turned on.
ON (Normal operating position)
This position turns on the ignition system
and electrical accessories. ON has a battery saver feature that will
place the ignition switch in the OFF posi-
tion, if the vehicle is not running, af ter some
time under the following conditions:
∙ All doors are closed.
∙ The shif t lever is in P (Park).
∙ The hazard lamps are off.
∙ The turn signals are off.
The battery saver feature will be canceled if
any of the following occur: ∙ Any door is opened.
∙ The shif t lever is moved out of the P (Park) position.
∙ The ignition switch changes position.
∙ The hazard lamps are turned on.
∙ The turn signals are turned on.