Page 332 of 435

4. Turn off the engine.
5. Raise the hood to warn other trafficand to signal professional road assis-
tance personnel that you need assis-
tance.
6. Have all passengers get out of the ve- hicle and stand in a safe place, away
from traffic and clear of the vehicle.
WARNING
∙ Make sure the parking brake is se-curely applied and the Continuously
Variable Transmission (CVT) is shif ted
into P (Park).
∙ Never change tires when the vehicle is on a slope, ice or slippery areas. This is
hazardous.
∙ Never change tires if oncoming traffic is close to your vehicle. Wait for pro-
fessional road assistance.
A. Blocks
B. Flat tire
Blocking wheels
Place suitable blocks at both the front and
back of the wheel diagonally opposite the
flat tire to prevent the vehicle from moving
when it is jacked up.
WARNING
Be sure to block the wheel as the vehicle
may move and result in personal injury.
Getting the spare tire and tools
1. Open the lif tgate.
2. Lif t the flaps on the wheel cover to ac- cess the spare tire.
LCE2142LCE2428
6-4In case of emergency
Page 333 of 435
3. Carefully remove the wheel cover toavoid potential damage to the side
trim. 4. Remove the jacking rod�A, the jack�B,
and wheel nut wrench
�Cfrom the
storage cover
�D.
5. Remove the storage cover
�Dto ac-
cess the spare tire. 6. To loosen the bolt, turn counterclock-
wise.
7. Once loosened remove the bolt, and remove the spare tire.
LCE2429LCE2430SCE0913
In case of emergency6-5
Page 334 of 435
Removing wheel cover (if so
equipped)
CAUTION
Do not use your hands to pry off wheel
caps or wheel covers. Doing so could
result in personal injury.
To remove the wheel cover, use the jack rod
�1as illustrated.
Apply cloth
�2between the wheel and jack
rod to prevent damaging the wheel and
wheel cover. Use caution not to scratch the wheel cover
or wheel surface.
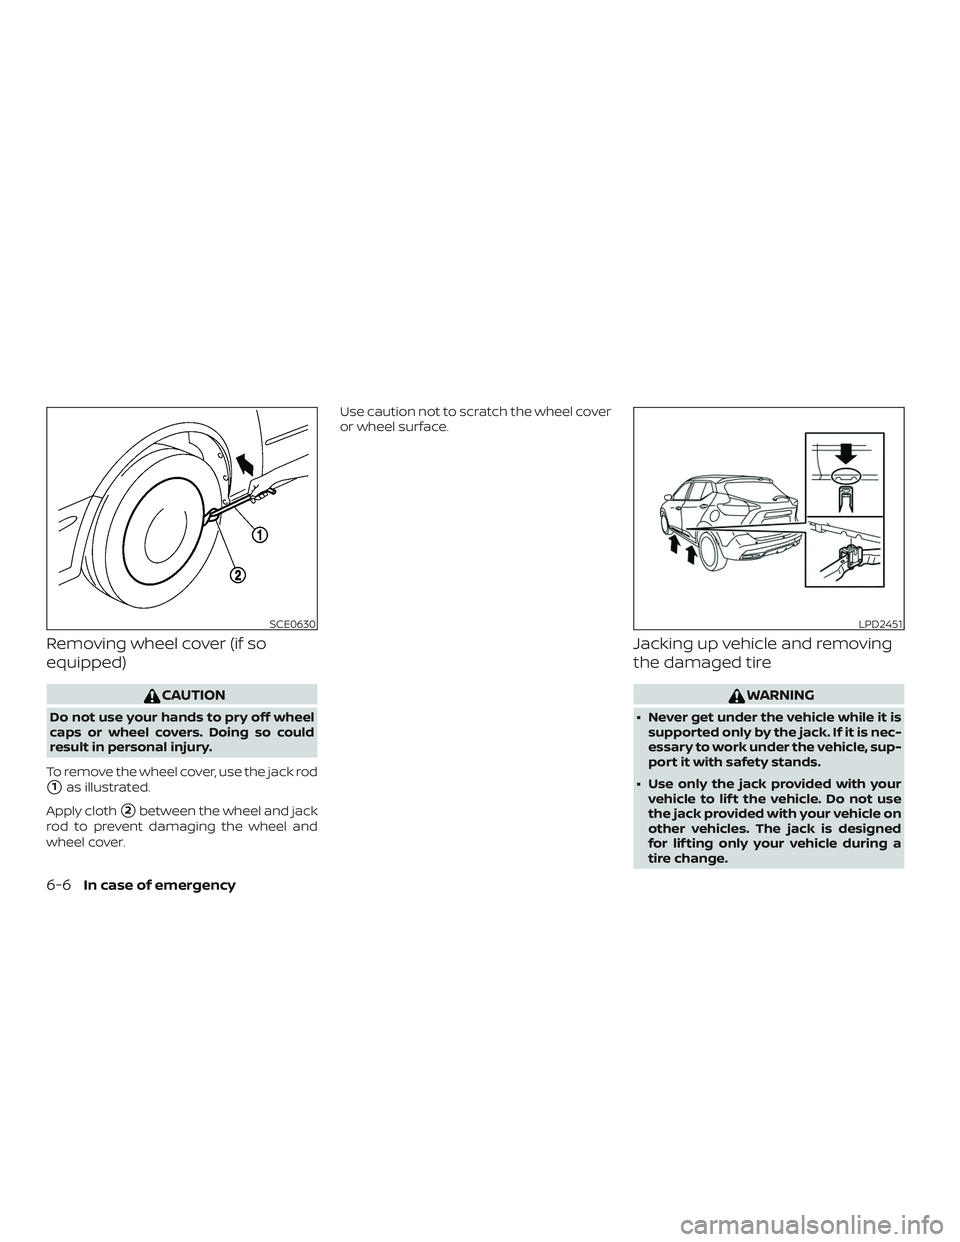
Jacking up vehicle and removing
the damaged tire
WARNING
∙ Never get under the vehicle while it is
supported only by the jack. If it is nec-
essary to work under the vehicle, sup-
port it with safety stands.
∙ Use only the jack provided with your vehicle to lif t the vehicle. Do not use
the jack provided with your vehicle on
other vehicles. The jack is designed
for lif ting only your vehicle during a
tire change.
SCE0630LPD2451
6-6In case of emergency
Page 335 of 435

∙ Use the correct jack-up points. Neveruse any other part of the vehicle for
jack support.
∙ Never jack up the vehicle more than necessary.
∙ Never use blocks on or under the jack.
∙ Do not start or run the engine while vehicle is on the jack. It may cause the
vehicle to move. This is especially true
for vehicles with limited slip
differentials.
∙ Do not allow passengers to stay in the vehicle while it is on the jack.
∙ Never run the engine with a wheel(s) off the ground. It may cause the ve-
hicle to move. Always refer to the proper illustrations for
the correct placement and jack-up points
for your specific vehicle model and jack
type.
Carefully read the caution label attached
to the jack body and the following in-
structions.
1. Loosen each wheel nut 1 or 2 turns by turning counterclockwise with the
wheel nut wrench. Do not remove the
wheel nuts until the tire is off the
ground.
2. Place the jack directly under the jack-up point as illustrated so the top of the jack contacts the vehicle at the
jack-up point. Align the jack head be-
tween the 2 notches in the front or the
rear as shown. Also fit the groove of the
jack head between the notches as
shown.
The jack should be used on firm and
level ground.
3. To lif t the vehicle, securely hold the jack lever and rod with both hands. Carefully
raise the vehicle until the tire clears the
ground. Remove the wheel nuts, and
then remove the tire.
LCE2059
In case of emergency6-7
Page 336 of 435

Installing the spare tire
1. Clean any mud or dirt from the surfacebetween the wheel and hub.
2. Carefully put the spare tire on and tighten the wheel nuts finger tight.
3. With the wheel nut wrench, tighten wheel nuts alternately and evenly in the
sequence illustrated (
�A,�B,�C,�D) until
they are tight.
4. Lower the vehicle slowly until the tire touches the ground. Then, with the
wheel nut wrench, tighten the wheel nuts securely in the sequence illus-
trated (
�A,�B,�C,�D). Lower the vehicle
completely.
WARNING
∙ Incorrect wheel nuts or improperly tightened wheel nuts can cause the
wheel to become loose or come off.
This could cause an accident.
∙ Do not use oil or grease on the wheel studs or nuts. This could cause the
nuts to become loose.
∙ Retighten the wheel nuts when the vehicle has been driven for 600 miles
(1,000 km) (also in cases of a flat
tire,etc.).
As soon as possible, tighten the wheel
nuts to the specified torque with a
torque wrench.
Wheel nut tightening torque: 83 f t-lb (113 N·m)
The wheel nuts must be kept tightened
to specification at all times. It is recom-
mended that wheel nuts be tightened to
specification at each lubrication interval. Adjust tire pressure to the COLD pres-
sure.
COLD pressure: Af ter vehicle has been
parked for 3 hours or more or driven less
than 1 mile (1.6 km).
COLD tire pressures are shown on the
Tire and Loading Information label.
5. Securely store the jack and the tool kit in its storage area.
6. Place the spare tire cover and lif tgate floor carpeting over the jack and tool
kit.
7. Securely store the damaged tire in the vehicle.
8. Close the lif tgate.
WARNING
∙ Always make sure that the spare tire and jacking equipment are properly
secured af ter use. Such items can be-
come dangerous projectiles in an ac-
cident or sudden stop.
∙ The spare tire is designed for emer- gency use. For additional information,
refer to “Wheels and tires” in the “Do-
it-yourself ” section of this manual.
WCE0048
6-8In case of emergency
Page 341 of 435
 models
with Continuously Variable
Transmission (CVT)
NISSAN recommends that your vehicle be
towed with the driving (front) wheels off the
ground or place the vehicle on a flatb")
Front-Wheel Drive (FWD) models
with Continuously Variable
Transmission (CVT)
NISSAN recommends that your vehicle be
towed with the driving (front) wheels off the
ground or place the vehicle on a flatbed
truck as illustrated.
CAUTION
∙ Never tow CVT models with the frontwheels on the ground or four wheels
on the ground (forward or backward),
as this may cause serious and expen-
sive damage to the transmission. If it
is necessary to tow the vehicle with
the rear wheels raised always use
towing dollies under the front wheels.
∙ When towing CVT models with the rear wheels on the ground or on tow-
ing dollies: – Place the ignition switch in the OFF
position, and secure the steering
wheel in a straight-ahead position
with a rope or similar device. Never
secure the steering wheel by plac-
ing the ignition switch in the LOCK
position. This may damage the
steering lock mechanism (for
models with a steering lock
mechanism).
VEHICLE RECOVERY (freeing a
stuck vehicle)
WARNING
To avoid vehicle damage, serious per-
sonal injury or death when recovering a
stuck vehicle:
∙ Contact a professional towing serviceto recover the vehicle if you have any
questions regarding the recovery
procedure.
∙ Tow chains or cables must be at- tached only to main structural mem-
bers of the vehicle.
∙ Do not use the vehicle tie-downs to tow or free a stuck vehicle.
LCE2343
In case of emergency6-13
Page 342 of 435

∙ Only use devices specifically designedfor vehicle recovery and follow the
manufacturer’s instructions.
∙ Always pull the recovery device straight out from the front of the ve-
hicle. Never pull at an angle.
∙ Route recovery devices so they do not touch any part of the vehicle except
the attachment point.
If your vehicle is stuck in sand, snow, mud,
etc., use a tow strap or other device de-
signed specifically for vehicle recovery. Al-
ways follow the manufacturer’s instruc-
tions for the recovery device.
Rocking a stuck vehicle
WARNING
∙ Stand clear of a stuck vehicle.
∙ Do not spin your tires at high speed. This could cause them to explode and
result in serious injury. Parts of your
vehicle could also overheat and be
damaged. If your vehicle is stuck in sand, snow, mud,
etc., use the following procedure:
1. Turn off the Vehicle Dynamic Control (VDC) system .
2. Make sure the area in front and behind the vehicle is clear of obstructions.
3. Turn the steering wheel right and lef t to clear an area around the front tires.
4. Slowly rock the vehicle forward and backward.
∙ Shif t back and forth between R (Re- verse) and D (Drive).
∙ Apply the accelerator as little as pos- sible to maintain the rocking motion.
∙ Release the accelerator pedal before shif ting between R (Reverse) and D
(Drive).
∙ Do not spin the tires above 34 mph (55 km/h).
5. If the vehicle cannot be freed af ter a few tries, contact a professional towing
service to remove the vehicle.
6-14In case of emergency
Page 343 of 435
7 Appearance and care
Cleaning exterior................................ 7-2
Washing ...................................... 7-2
Waxing ....................................... 7-2
Removing spots .............................. 7-3
Underbody ................................... 7-3
Glass ......................................... 7-3
Aluminum alloy wheels (if so equipped) ....... 7-3
Chromeparts................................ 7-3
Tire dressings ................................ 7-3
Cleaning interior ................................. 7-4 Air fresheners
................................ 7-5
Floor mats (if so equipped) ................... 7-5
Seatbelts ....................................7-6
Corrosion protection ............................ 7-7
Most common factors contributing to
vehicle corrosion ............................. 7-7
Environmental factors influence the
rate of corrosion .............................. 7-7
Protect your vehicle from corrosion .......... 7-7