Page 146 of 467
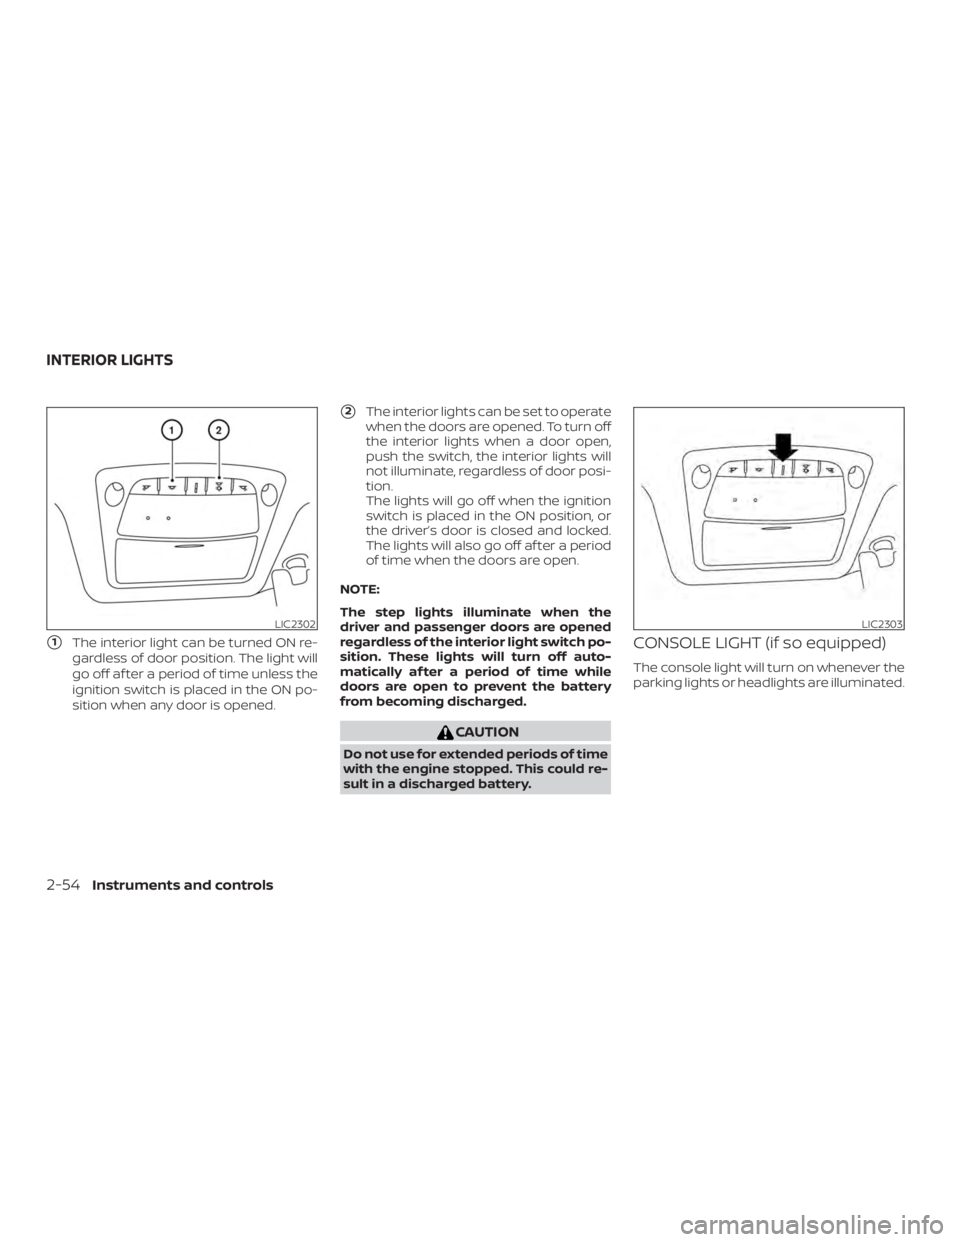
�1The interior light can be turned ON re-
gardless of door position. The light will
go off af ter a period of time unless the
ignition switch is placed in the ON po-
sition when any door is opened.
�2The interior lights can be set to operate
when the doors are opened. To turn off
the interior lights when a door open,
push the switch, the interior lights will
not illuminate, regardless of door posi-
tion.
The lights will go off when the ignition
switch is placed in the ON position, or
the driver’s door is closed and locked.
The lights will also go off af ter a period
of time when the doors are open.
NOTE:
The step lights illuminate when the
driver and passenger doors are opened
regardless of the interior light switch po-
sition. These lights will turn off auto-
matically af ter a period of time while
doors are open to prevent the battery
from becoming discharged.
Page 147 of 467
MAP LIGHTS
To turn the map lights on, push the
switches. To turn them off, push the
switches again.
Page 148 of 467
The HomeLink® Universal Transceiver pro-
vides a convenient way to consolidate the
functions of up to three individual hand-
held transmitters into one built-in device.
HomeLink® Universal Transceiver:∙ Will operate most radio frequency de- vices such as garage doors, gates,
home and office lighting, entry door
locks and security systems.
∙ Is powered by your vehicle’s battery. No separate batteries are required. If the
vehicle’s battery is discharged or is dis-
connected, HomeLink® will retain all
programming.
When the HomeLink® Universal Trans-
ceiver is programmed, retain the original
transmitter for future programming pro-
cedures (Example: new vehicle pur-
chases). Upon sale of the vehicle, the
programmed HomeLink® Universal
Transceiver buttons should be erased for
security purposes. For additional infor-
mation, refer to “Programming
HomeLink®” in this section.
Page 159 of 467
WARNING
∙ Radio waves could adversely affectelectric medical equipment. Those
who use a pacemaker should contact
the electric medical equipment
manufacturer for the possible influ-
ences before use.
∙ The Intelligent Key transmits radio waves when the buttons are pressed.
The FAA advises the radio waves may
affect aircraf t navigation and com-
munication systems. Do not operate
the Intelligent Key while on an air-
plane. Make sure the buttons are not
operated unintentionally when the
unit is stored for a flight.
The Intelligent Key can operate all the door
locks using the remote control function or
pushing the request switch on the vehicle
without taking the key out from a pocket or
purse. The operating environment and/or
conditions may affect the Intelligent Key
operation.
Be sure to read the following before using
the Intelligent Key.
Page 169 of 467
NOTE:
If you change the answer back horn and
light flash feature with the Intelligent
Key, the vehicle information display
screen will show the current mode af ter
the ignition switch has been cycled from
the OFF to the ON position. The vehicle
information display screen can also be
used to change the answer back horn
mode.
To deactivate:Press and hold the
Page 175 of 467
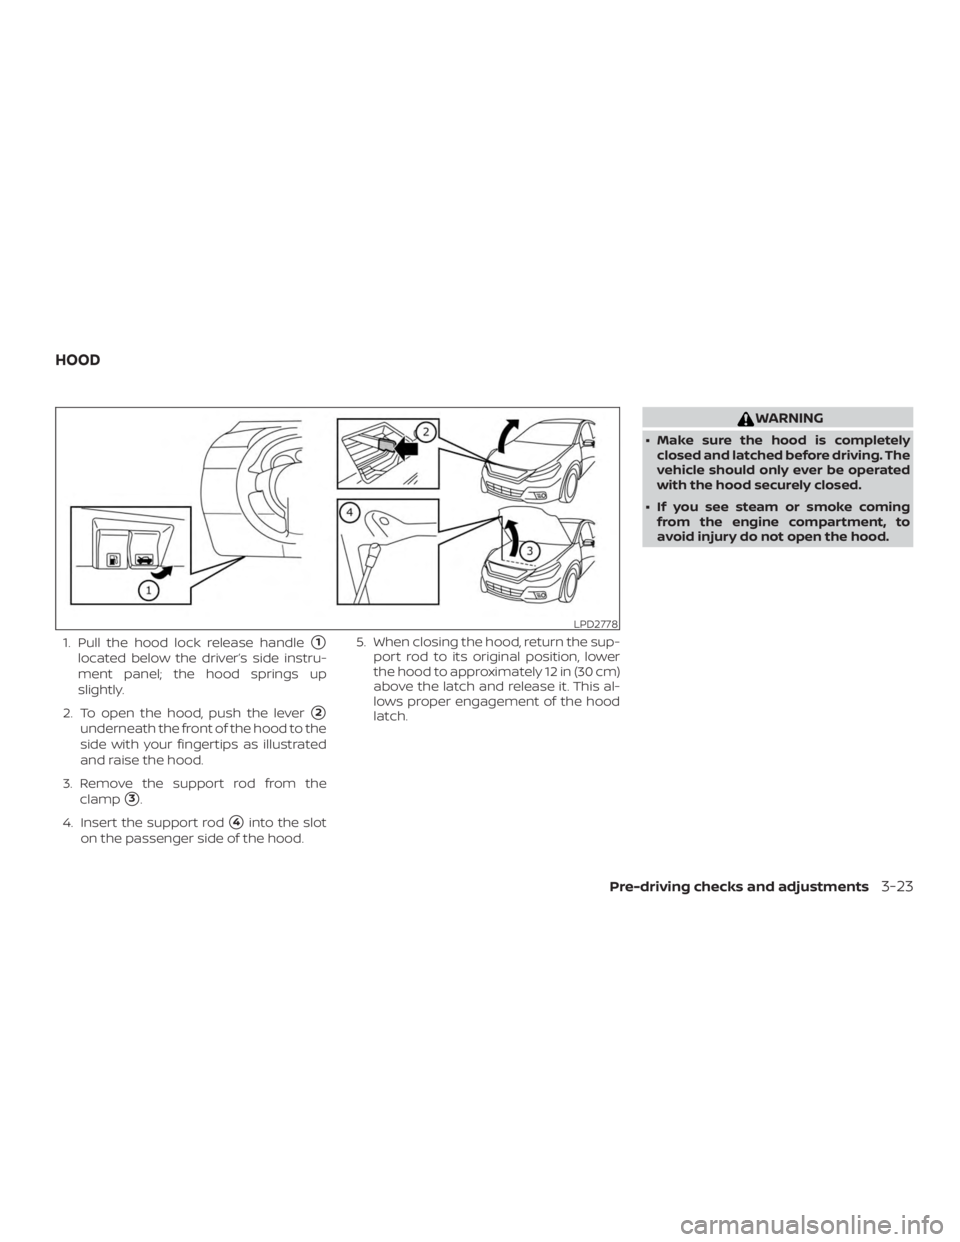
1. Pull the hood lock release handle�1
located below the driver’s side instru-
ment panel; the hood springs up
slightly.
2. To open the hood, push the lever
�2
underneath the front of the hood to the
side with your fingertips as illustrated
and raise the hood.
3. Remove the support rod from the clamp
�3.
4. Insert the support rod
�4into the slot
on the passenger side of the hood. 5. When closing the hood, return the sup-
port rod to its original position, lower
the hood to approximately 12 in (30 cm)
above the latch and release it. This al-
lows proper engagement of the hood
latch.
Page 182 of 467
VANITY MIRRORS
To access the vanity mirror, pull the sun
visor down and flip open the mirror cover.
Some vanity mirrors are illuminated and
turn on when the mirror cover is open.
MANUAL ANTI-GLARE REARVIEW
MIRROR (if so equipped)
Use the night position�1to reduce glare
from the headlights of vehicles behind you
at night.
Use the day position
�2when driving in
daylight hours.
Page 258 of 467

Additional information:∙ When replacing a wheel without the TPMS such as the spare tire, the TPMS
does not monitor the tire pressure of
the spare tire.
∙ The TPMS will activate only when the vehicle is driven at speeds above
16 mph (25 km/h). Also, this system may
not detect a sudden drop in tire pres-
sure (for example, a flat tire while driv-
ing).
∙ The low tire pressure warning light does not automatically turn off when the tire
pressure is adjusted on all four tires. Af-
ter all four tires are inflated to the rec-
ommended pressure, the vehicle must
be driven at speeds above 16 mph
(25 km/h) to activate the TPMS and turn
off the low tire pressure warning light.
Use a tire pressure gauge to check the
tire pressure.
∙ The “Tire Pressure Low - Add Air” warn- ing appears in the vehicle information
display when the low tire pressure
warning light is illuminated and low tire
pressure is detected. The “Tire Pressure
Low - Add Air” warning turns off when
the low tire pressure warning light turns
off. ∙ The “Tire Pressure Low - Add Air” warn-
ing appears each time the ignition
switch is placed in the ON position as
long as the low tire pressure warning
light remains illuminated.
∙ The “Tire Pressure Low - Add Air” warn- ing does not appear if the low tire pres-
sure warning light illuminates to indi-
cate a TPMS malfunction.
∙ Tire pressure rises and falls depending on the heat caused by the vehicle’s op-
eration and the outside temperature.
Do not reduce the tire pressure af ter
driving because the tire pressure rises
af ter driving. Low outside temperature
can lower the temperature of the air
inside the tire which can cause a lower
tire inflation pressure. This may cause
the low tire pressure warning light to
illuminate. If the warning light illumi-
nates, check the tire pressure for all four
tires.
∙ The Tire and Loading Information label is located in the driver’s door opening. ∙ You can also check the tire pressure of
all tires (except the spare) on the vehicle
information display screen. The order of
the tire pressure figures displayed on
the screen corresponds with the actual
order of the tire position.
For additional information, refer to “Low tire
pressure warning light” in the “Instruments
and controls” section, “Tire Pressure Moni-
toring System (TPMS)” in the “In case of
emergency” section and “Tire pressure” in
the “Do-it-yourself ” section of this manual.