2018 NISSAN 370Z belt
[x] Cancel search: beltPage 84 of 453

2-14Instruments and controls
If you have a flat tire, replace it
with a spare tire (if so equipped)
or repair it with the tire puncture
repair kit (if so equipped) as soon
as possible. If no tire is flat and all
tires are properly inflated, it is
recommended you consult a
NISSAN dealer.
. Since the spare tire is not
equipped with the TPMS, when a
spare tire is mounted or a wheel
is replaced, the TPMS will not
function and the low tire pressure
warning light will flash for ap-
proximately 1 minute. The light
will remain on after the 1 minute.
Have your tires replaced and/or
TPMS system reset as soon as
possible. It is recommended you
visit a NISSAN dealer for these
services.
. Replacing tires with those not
originally specified by NISSAN
could affect the proper operation
of the TPMS.
CAUTION
.The TPMS is not a substitute for
the regular tire pressure check. Be sure to check the tire pressure
regularly.
. If the vehicle is being driven at
speeds of less than 16 MPH (25
km/h), the TPMS may not operate
correctly.
. Be sure to install the specified
size of tires to the four wheels
correctly.
Master warning light
When the ignition switch is in the ON
position, the master warning light illumi-
nates if any of the following are displayed
on the vehicle information display:
.No key warning
. Low fuel warning
. Low washer fluid warning
. Parking brake release warning
. Door/rear hatch/trunk open warning
. Loose fuel cap warning
. Check tire pressure warning
. Extended storage fuse warning
See “Vehicle information display” (P.2-19).
Seat belt warning light and
chime
The light and chime remind you to fasten
seat belts. The light illuminates whenever
the ignition switch is pushed to the ON
position, and will remain illuminated until
the driver’s seat belt is fastened. At the
same time, the chime will sound for about
6 seconds unless the driver’s seat belt is
securely fastened.
The seat belt warning light for the front
passenger will illuminate if the seat belt is
not fastened when the front passenger’s
seat is occupied. For approximately 5
seconds after the ignition switch is in
the ON position, the system does not
activate the warning light for the front
passenger.
See “Seat belts” (P.1-10) for precautions on
seat belt usage.
Supplemental air bag warning
light
After pushing the ignition switch to the
ON position, the supplemental air bag
warning light will illuminate. The air bag
warning light will turn off after about 7
seconds if the front air bag, side air bag
and curtain air bag systems and/or pre-
tensioner system are operational.
Page 85 of 453

If any of the following conditions occur,
the front air bag, side air bag and curtain
air bag systems and/or pretensioner
system need servicing.
.The supplemental air bag warning
light remains on after approximately
7 seconds.
. The supplemental air bag warning
light flashes intermittently.
. The supplemental air bag warning
light does not come on at all.
It is recommended you visit a NISSAN
dealer for these services.
Unless checked and repaired, the Supple-
mental Restraint Systems and/or the
pretensioner seat belt may not function
properly.
For additional information, see “Supple-
mental restraint system” (P.1-30).
WARNING
If the supplemental air bag warning
light is on, it could mean that the
front air bag, side air bag and curtain
air bag systems and/or pretensioner
system will not operate in an acci-
dent. To help avoid injury to yourself
or others, have your vehicle checked.
It is recommended you visit a NISSAN
dealer for this service.
Vehicle Dynamic Control (VDC)
warning light
When the ignition switch is in the ON
position, the Vehicle Dynamic Control
(VDC) warning light illuminates and then
turns off.
The light will blink when the VDC system
or the traction control system is operat-
ing, thus alerting the driver that the
vehicle is nearing its traction limits. The
road surface may be slippery.
When the VDC warning light illuminates
when the VDC system is turned on, this
light alerts the driver to the fact that the
VDC system’s fail-safe mode is operating,
for example the VDC system may not be
functioning properly. Have the system
checked. It is recommended you visit a
NISSAN dealer for this service. If a mal-
function occurs in the system, the VDC
system function will be canceled but the
vehicle is still driveable. For additional
information, see “Vehicle Dynamic Control
(VDC) system” (P.5-30) of this manual.
INDICATOR LIGHTS
Cruise indicator light
Cruise main switch indicator:
This light illuminates when the cruise
control main switch is pushed. The light
turns off when the main switch is pushed
again. When the cruise main switch in-
dicator light illuminates, the cruise control
system is operational. (See “Cruise con-
trol” (P.5-22).)
Cruise malfunction:
If the cruise indicator light blinks while the
engine is running, it may indicate the
cruise control system is not functioning
properly. Have the system checked. It is
recommended you visit a NISSAN dealer
for this service. (See “Cruise control” (P.5-
22).)
Exterior light indicator
This indicator illuminates when the head-
light switch is turned to the AUTO,orposition and the front parking lights,
instrument panel lights, rear combination
lights, license plate lights or headlights
are on. The indicator turns off when these
lights are turned off.
Instruments and controls2-15
Page 131 of 453
WARNING
.Always have the doors locked
while driving. Along with the use
of seat belts, this provides great-
er safety in the event of an
accident by helping to prevent
persons from being thrown from
the vehicle. This also helps keep
children and others from unin-
tentionally opening the doors,
and will help keep out intruders.
. Before opening any door, always
look for and avoid oncoming
traffic.
. To help avoid risk of injury or
death through unintended opera-
tion of the vehicle and or its
systems, including entrapment
in windows or inadvertent door
lock activation, do not leave chil-
dren, people who require the
assistance of others or pets un-
attended in your vehicle. Addi-
tionally, the temperature inside a
closed vehicle on a warm day can
quickly become high enough to
cause a significant risk of injury
or death to people and pets.
SPA2565
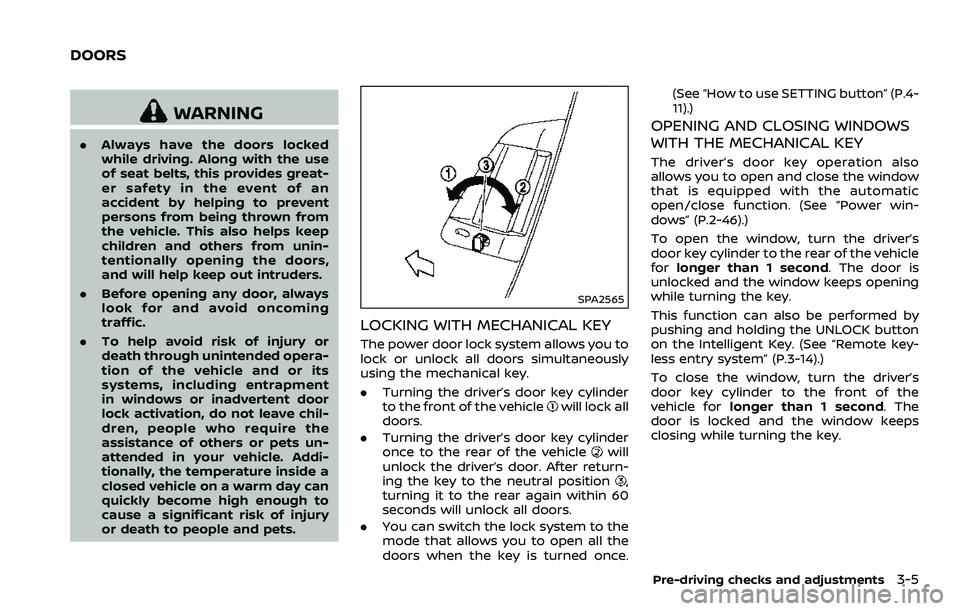
LOCKING WITH MECHANICAL KEY
The power door lock system allows you to
lock or unlock all doors simultaneously
using the mechanical key.
.Turning the driver’s door key cylinder
to the front of the vehicle
will lock all
doors.
. Turning the driver’s door key cylinder
once to the rear of the vehicle
will
unlock the driver’s door. After return-
ing the key to the neutral position
,
turning it to the rear again within 60
seconds will unlock all doors.
. You can switch the lock system to the
mode that allows you to open all the
doors when the key is turned once. (See “How to use SETTING button” (P.4-
11).)
OPENING AND CLOSING WINDOWS
WITH THE MECHANICAL KEY
The driver’s door key operation also
allows you to open and close the window
that is equipped with the automatic
open/close function. (See “Power win-
dows” (P.2-46).)
To open the window, turn the driver’s
door key cylinder to the rear of the vehicle
for
longer than 1 second. The door is
unlocked and the window keeps opening
while turning the key.
This function can also be performed by
pushing and holding the UNLOCK button
on the Intelligent Key. (See “Remote key-
less entry system” (P.3-14).)
To close the window, turn the driver’s
door key cylinder to the front of the
vehicle for longer than 1 second. The
door is locked and the window keeps
closing while turning the key.
Pre-driving checks and adjustments3-5
DOORS
Page 150 of 453
3-24Pre-driving checks and adjustments
.Do not allow anyone to stand up
or extend any portion of their
body out of the opening while
the vehicle is in motion or while
the top is being operated.
. In an accident you could be
thrown from the vehicle with an
open top. Always use seat belts
and proper child restraints.
CAUTION
.Do not operate the top when the
temperature is below 32°F (0°C).
This may result in damage to the
top material or operating system.
. Remove water drops, snow, ice or
sand from the top, and dry the
surface of the top completely
before opening it.
. Do not open the top when it is
wet or damp. This may cause
interior water damage, stains or
mildew on the top material.
. Be sure to turn off the rear
window defroster switch. Never
turn it on while the top is being
operated or fully opened. The
heat may damage the top mate- rial.SPA2691
CAUTION
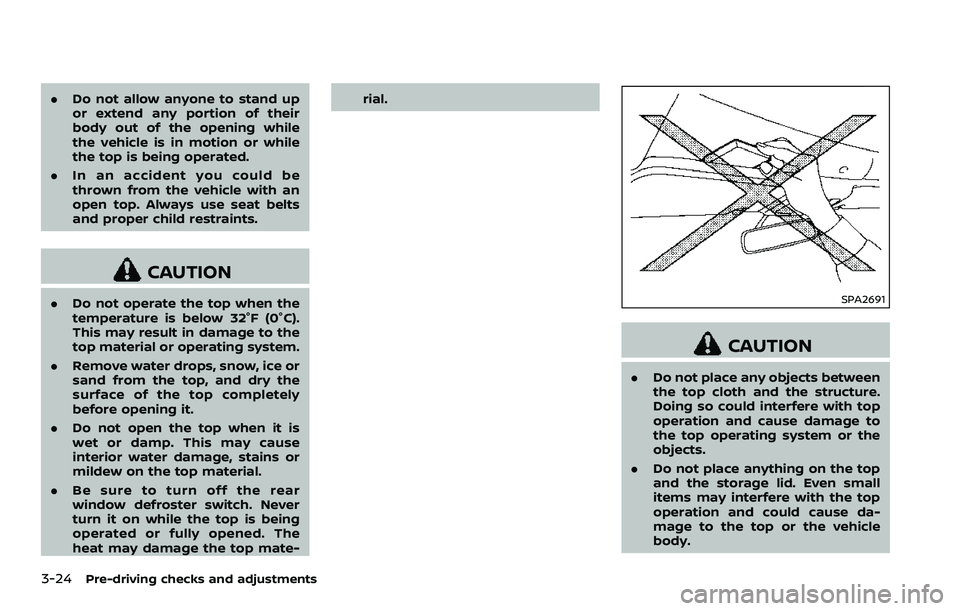
.
Do not place any objects between
the top cloth and the structure.
Doing so could interfere with top
operation and cause damage to
the top operating system or the
objects.
. Do not place anything on the top
and the storage lid. Even small
items may interfere with the top
operation and could cause da-
mage to the top or the vehicle
body.
Page 164 of 453
3-38Pre-driving checks and adjustments
WARNING
.Do not adjust the steering wheel
while driving. You could lose con-
trol of your vehicle and cause an
accident.
. Do not adjust the steering wheel
any closer to you than is neces-
sary for proper steering opera-
tion and comfort. The driver’s air
bag inflates with great force. If
you are unrestrained, leaning for-
ward, sitting sideways or out of
position in any way, you are at
greater risk of injury or death in a
crash. You may also receive ser-
ious or fatal injuries from the air
bag if you are up against it when
it inflates. Always sit back against
the seatback and as far away as
practical from the steering wheel.
Always use the seat belts.
SPA2583
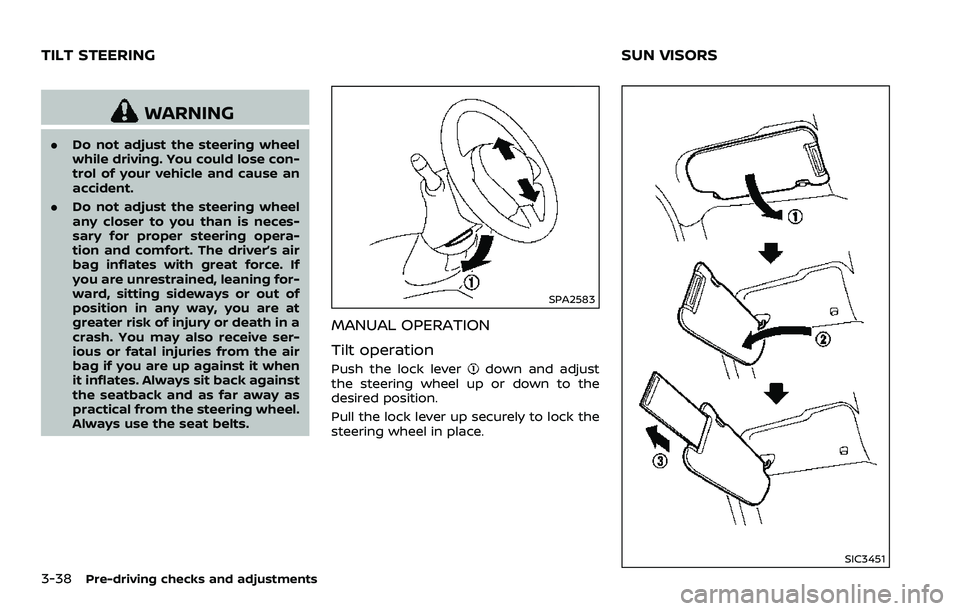
MANUAL OPERATION
Tilt operation
Push the lock leverdown and adjust
the steering wheel up or down to the
desired position.
Pull the lock lever up securely to lock the
steering wheel in place.
SIC3451
TILT STEERING SUN VISORS
Page 298 of 453
5-6Starting and driving
authority to operate the equipment.
For Canada:
This device complies with Industry Ca-
nada licence-exempt RSS standard(s).
Operation is subject to the following
two conditions: (1) this device may not
cause interference, and (2) this device
must accept any interference, including
interference that may cause undesired
operation of the device.
AVOIDING COLLISION AND ROLL-
OVER
WARNING
Failure to operate this vehicle in a
safe and prudent manner may result
in loss of control or an accident.
Be alert and drive defensively at all times.
Obey all traffic regulations. Avoid exces-
sive speed, high speed cornering, or
sudden steering maneuvers, because
these driving practices could cause you
to lose control of your vehicle. As with
any vehicle, a loss of control could
result in a collision with other vehicles
or objects, or cause the vehicle to roll-
over, particularly if the loss of control
causes the vehicle to slide sideways. Be
attentive at all times, and avoid driving when tired. Never drive when under the
influence of alcohol or drugs (including
prescription or over-the-counter drugs
which may cause drowsiness). Always
wear your seat belt as outlined in the
“Seat belts” (P.1-10) of this manual, and
also instruct your passengers to do so.
Seat belts help reduce the risk of injury in
collisions and rollovers.
In a rollover
crash, an unbelted or improperly belted
person is significantly more likely to be
injured or killed than a person properly
wearing a seat belt.
OFF-ROAD RECOVERY
While driving, the right side or left side
wheels may unintentionally leave the
road surface. If this occurs, maintain
control of the vehicle by following the
procedure below. Please note that this
procedure is only a general guide. The
vehicle must be driven as appropriate
based on the conditions of the vehicle,
road and traffic.
1. Remain calm and do not overreact.
2. Do not apply the brakes.
3. Maintain a firm grip on the steering wheel with both hands and try to hold
a straight course.
4. When appropriate, slowly release the accelerator pedal to gradually slow
the vehicle. 5. If there is nothing in the way, steer the
vehicle to follow the road while the
vehicle speed is reduced. Do not
attempt to drive the vehicle back onto
the road surface until vehicle speed is
reduced.
6. When it is safe to do so, gradually turn the steering wheel until both tires
return to the road surface. When all
tires are on the road surface, steer the
vehicle to stay in the appropriate
driving lane.
.If you decide that it is not safe toreturn the vehicle to the road sur-
face based on vehicle, road or
traffic conditions, gradually slow
the vehicle to a stop in a safe place
off the road.
RAPID AIR PRESSURE LOSS
Rapid air pressure loss or a “blow-out” can
occur if the tire is punctured or is
damaged due to hitting a curb or pothole.
Rapid air pressure loss can also be caused
by driving on under-inflated tires.
Rapid air pressure loss can affect the
handling and stability of the vehicle,
especially at highway speeds.
Help prevent rapid air pressure loss by
maintaining the correct air pressure and
visually inspect the tires for wear and
damage. See “Wheels and tires” (P.8-26) of
Page 303 of 453
.Make sure the area around the vehicle
is clear.
. Check fluid levels such as engine oil,
coolant, brake fluid and window
washer fluid as frequently as possible,
or at least whenever you refuel.
. Check that all windows and lights are
clean.
. Visually inspect tires for their appear-
ance and condition. Also check tires
for proper inflation.
. Lock all doors.
. Position seat and adjust head re-
straints.
. Adjust inside and outside mirrors.
. Fasten seat belts and ask all passen-
gers to do likewise.
. Check the operation of warning lights
when the ignition switch is pushed to
the ON position. (See “Warning lights,
indicator lights and audible remin-
ders” (P.2-10).)1. Apply the parking brake.
2.Automatic Transmission (AT) model:
Move the shift lever to the P (Park) or N
(Neutral) position. (P is recommended.)
The starter is designed not to operate
unless the shift lever is in either of the
above positions.
Manual Transmission (MT) model:
Move the shift lever to the N (Neutral)
position. Depress the clutch pedal fully
to the floor.
The starter is designed not to operate
unless the clutch pedal is fully de-
pressed.
The Intelligent Key must be carried
when operating the ignition switch.
3. Push the ignition switch to the ON position. Depress the brake pedal (AT
model) or the clutch pedal (MT model)
and push the ignition switch to start
the engine.
To start the engine immediately, push
and release the ignition switch while
depressing the brake pedal or the
clutch pedal with the ignition switch
in any position.
.If the engine is very hard to start inextremely cold weather or when
restarting, depress the accelerator
pedal a little (approximately 1/3 to the floor) and while holding, crank
the engine. Release the accelerator
pedal when the engine starts.
.If the engine is very hard to start
because it is flooded, depress the
accelerator pedal all the way to the
floor and hold it. Push the ignition
switch to the ON position to start
cranking the engine. After 5 or 6
seconds, stop cranking by pushing
the ignition switch to OFF. After
cranking the engine, release the
accelerator pedal. Crank the engine
with your foot off the accelerator
pedal by depressing the brake
pedal and pushing the push-button
ignition switch to start the engine.
If the engine starts, but fails to run,
repeat the above procedure.
CAUTION
Do not operate the starter for more
than 15 seconds at a time. If the
engine does not start, push the
ignition switch to OFF and wait 10
seconds before cranking again,
otherwise the starter could be da-
maged.
Starting and driving5-11
BEFORE STARTING THE ENGINE STARTING THE ENGINE
Page 319 of 453
.HEADED UPHILL WITH CURB:
Turn the wheels away from the
curb and move the vehicle back
until the curb side wheel gently
touches the curb.
.HEADED UPHILL OR DOWNHILL, NOCURB:
Turn the wheels toward the side of
the road so the vehicle will move
away from the center of the road if
it moves.
4. Push the ignition switch to the OFF position.
WARNING
If the engine is not running or is
turned off while driving, the power
assist for the steering will not work.
Steering will be harder to operate.
The power assisted steering uses a hy-
draulic pump, driven by the engine, to
assist steering.
If the engine stops or the drive belt
breaks, you will still have control of the
vehicle. However, much greater steering
effort is needed, especially in sharp turns
and at low speeds.
BRAKING PRECAUTIONS
The brake system has two separate
hydraulic circuits. If one circuit malfunc-
tions, you will still have braking at two
wheels.
Vacuum assisted brakes
The brake booster aids braking by using
engine vacuum. If the engine stops, you
can stop the vehicle by depressing the
brake pedal. However, greater foot pres-
sure on the brake pedal will be required to
stop the vehicle and the stopping dis-
tance will be longer.
Wet brakes
When the vehicle is washed or driven
through water, the brakes may get wet.
As a result, your braking distance will be
longer and the vehicle may pull to one
side during braking.
To dry brakes, drive the vehicle at a safe
speed while lightly tapping the brake
pedal to heat-up the brakes. Do this until
the brakes return to normal. Avoid driving
the vehicle at high speeds until the brakes
function correctly.
Starting and driving5-27
POWER STEERING BRAKE SYSTEM