2018 NISSAN 370Z warning light
[x] Cancel search: warning lightPage 141 of 453
Locking doors, rear hatch/trunk lid
and fuel-filler door
1. Push the ignition switch to the OFFposition and make sure you carry the
Intelligent Key with you.*
2. Close all the doors and the rear hatch/ trunk lid.
3. Push the LOCK
buttonon the
Intelligent Key.
4. All the doors, the rear hatch/trunk lid and fuel-filler door will lock.
5. The hazard indicator flashes twice and the horn chirps once.
*: Doors and the rear hatch/trunk lid will
lock with the Intelligent Key while the
ignition switch is in the ACC or ON
position.
Unlocking doors, rear hatch/trunk
lid and fuel-filler door
1. Push the UNLOCKbuttonon
the Intelligent Key once.
2. The hazard indicator flashes once. The driver’s door and fuel-filler door will
unlock.
3. Push the UNLOCK
button on the
Intelligent Key again within 60 sec-
onds.
4. The hazard indicator flashes once again. All the doors and the rear hatch/trunk lid will unlock.
All doors and the rear hatch/trunk lid will
be locked automatically unless one of the
following operations is performed within 1
minute after pushing the UNLOCK
button on the Intelligent Key while the
doors are locked. If during this 1-minute
time period, the UNLOCK
button on
the Intelligent Key is pushed, all doors and
the rear hatch/trunk lid will be locked
automatically after another 1 minute.
. Opening any door
. Pushing the ignition switch
. Inserting the Intelligent Key into the
Intelligent Key port
Opening windows
The UNLOCKbutton operation also
allows you to open a window that is
equipped with the automatic open/close
function. (See “Power windows” (P.2-46).)
To open the window, push the door
UNLOCK
buttonon the Intelligent
Key for about 3 seconds after the door is
unlocked.
To stop opening, release the UNLOCK
button.
Window cannot be closed using the
Intelligent Key.
The door window can be opened or
closed by turning the metal key in a door lock. (See “Doors” (P.3-5).)
Using panic alarm
If you are near your vehicle and feel
threatened, you may activate the alarm
to call attention as follows:
1. Push the PANIC
buttonon the
Key for more than 1 second.
2. The theft warning alarm and head- lights will stay on for 25 seconds.
3. The panic alarm stops when:
.It has run for 25 seconds, or.Any of the buttons on the Intelligent Key are pushed. (Note: Panic button
should be pushed for more than 1
second.)
Setting hazard indicator and horn
mode
This vehicle is set in hazard indicator and
horn mode when you first receive the
vehicle.
In hazard indicator and horn mode, when
the LOCK
buttonis pushed, the
hazard indicator flashes twice and the
horn chirps once. When the UNLOCK
buttonis pushed, the hazard indicator
flashes once.
If horns are not necessary, the system
can be switched to the hazard indicator
mode.
Pre-driving checks and adjustments3-15
Page 143 of 453
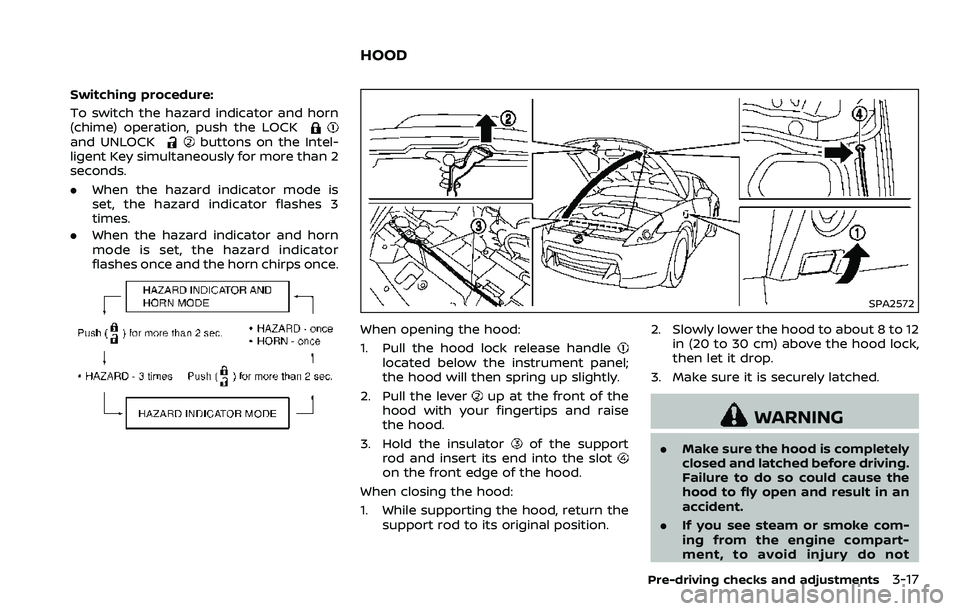
Switching procedure:
To switch the hazard indicator and horn
(chime) operation, push the LOCK
and UNLOCKbuttons on the Intel-
ligent Key simultaneously for more than 2
seconds.
. When the hazard indicator mode is
set, the hazard indicator flashes 3
times.
. When the hazard indicator and horn
mode is set, the hazard indicator
flashes once and the horn chirps once.
SPA2572
When opening the hood:
1. Pull the hood lock release handle
located below the instrument panel;
the hood will then spring up slightly.
2. Pull the lever
up at the front of the
hood with your fingertips and raise
the hood.
3. Hold the insulator
of the support
rod and insert its end into the slot
on the front edge of the hood.
When closing the hood:
1. While supporting the hood, return the support rod to its original position. 2. Slowly lower the hood to about 8 to 12
in (20 to 30 cm) above the hood lock,
then let it drop.
3. Make sure it is securely latched.
WARNING
. Make sure the hood is completely
closed and latched before driving.
Failure to do so could cause the
hood to fly open and result in an
accident.
. If you see steam or smoke com-
ing from the engine compart-
ment, to avoid injury do not
Pre-driving checks and adjustments3-17
HOOD
Page 149 of 453
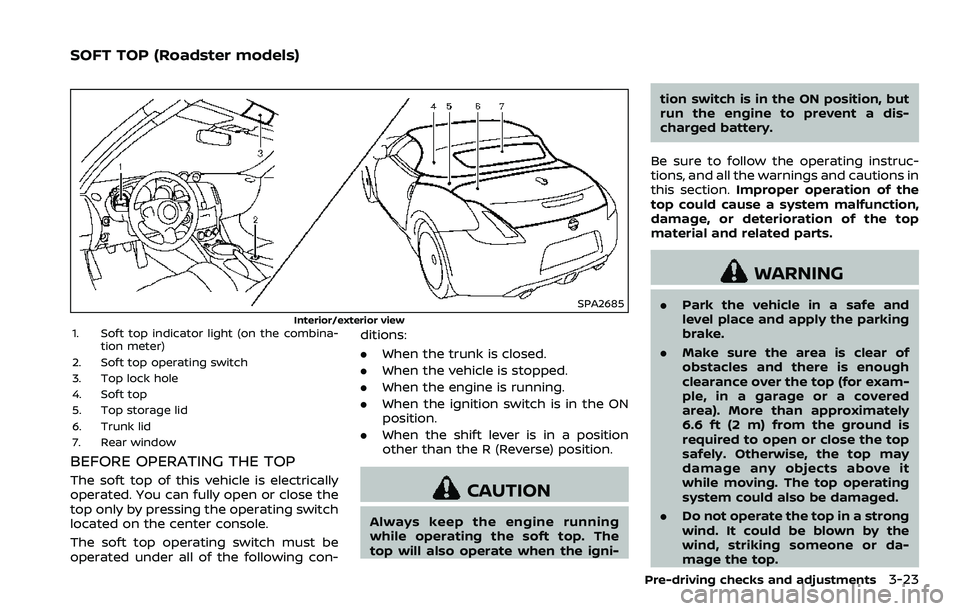
SPA2685
Interior/exterior view1. Soft top indicator light (on the combina-tion meter)
2. Soft top operating switch
3. Top lock hole
4. Soft top
5. Top storage lid
6. Trunk lid
7. Rear window
BEFORE OPERATING THE TOP
The soft top of this vehicle is electrically
operated. You can fully open or close the
top only by pressing the operating switch
located on the center console.
The soft top operating switch must be
operated under all of the following con- ditions:
.
When the trunk is closed.
. When the vehicle is stopped.
. When the engine is running.
. When the ignition switch is in the ON
position.
. When the shift lever is in a position
other than the R (Reverse) position.CAUTION
Always keep the engine running
while operating the soft top. The
top will also operate when the igni- tion switch is in the ON position, but
run the engine to prevent a dis-
charged battery.
Be sure to follow the operating instruc-
tions, and all the warnings and cautions in
this section. Improper operation of the
top could cause a system malfunction,
damage, or deterioration of the top
material and related parts.
WARNING
. Park the vehicle in a safe and
level place and apply the parking
brake.
. Make sure the area is clear of
obstacles and there is enough
clearance over the top (for exam-
ple, in a garage or a covered
area). More than approximately
6.6 ft (2 m) from the ground is
required to open or close the top
safely. Otherwise, the top may
damage any objects above it
while moving. The top operating
system could also be damaged.
. Do not operate the top in a strong
wind. It could be blown by the
wind, striking someone or da-
mage the top.
Pre-driving checks and adjustments3-23
SOFT TOP (Roadster models)
Page 162 of 453
3-36Pre-driving checks and adjustments
To lock, close the fuel-filler door securely
and lock all doors by operating the door
handle request switch, the LOCK button
on the Intelligent Key, the mechanical key
or the power door lock switch.
FUEL-FILLER CAP
WARNING
.Gasoline is extremely flammable
and highly explosive under cer-
tain conditions. You could be
burned or seriously injured if it is
misused or mishandled. Always
stop engine and do not smoke or
allow open flames or sparks near
the vehicle when refueling.
. Do not attempt to top off the fuel
tank after the fuel pump nozzle
shuts off automatically. Contin-
ued refueling may cause fuel
overflow, resulting in fuel spray
and possibly a fire.
. Use only an original equipment
type fuel-filler cap as a replace-
ment. It has a built-in safety valve
needed for proper operation of
the fuel system and emission
control system. An incorrect cap
can result in a serious malfunc-
tion and possible injury. It could also cause the malfunction indi-
cator light to come on.
. Never pour fuel into the throttle
body to attempt to start your
vehicle.
. Do not fill a portable fuel contain-
er in the vehicle or trailer. Static
electricity can cause an explosion
of flammable liquid, vapor or gas
in any vehicle or trailer. To reduce
the risk of serious injury or death
when filling portable fuel contain-
ers:
— Always place the container on
the ground when filling.
— Do not use electronic devices when filling.
— Keep the pump nozzle in con- tact with the container while
you are filling it.
— Use only approved portable fuel containers for flammable
liquid.
CAUTION
. If fuel is spilled on the vehicle
body, flush it away with water to avoid paint damage.
. Insert the cap straight into the
fuel-filler tube, then tighten until
the fuel-filler cap clicks. Failure to
tighten the fuel-filler cap properly
may cause the
malfunction
indicator light (MIL) to illuminate.
If the
light illuminates be-
cause the fuel-filler cap is loose
or missing, tighten or install the
cap and continue to drive the
vehicle. The
light should turn
off after a few driving trips. If the
light does not turn off after a
few driving trips, have the vehicle
inspected. It is recommended you
visit a NISSAN dealer for this
service.
. The LOOSE FUEL CAP warning will
appear if the fuel-filler cap is not
properly tightened. It may take a
few driving trips for the message
to be displayed. Failure to tighten
the fuel-filler cap properly after
the LOOSE FUEL CAP warning
appears may cause the
Mal-
function Indicator Light (MIL) to
illuminate.
Page 165 of 453
CAUTION
.Do not store the main sun visor
before storing the extension sun
visor.
. Do not pull the extension sun
visor forcedly downwards.
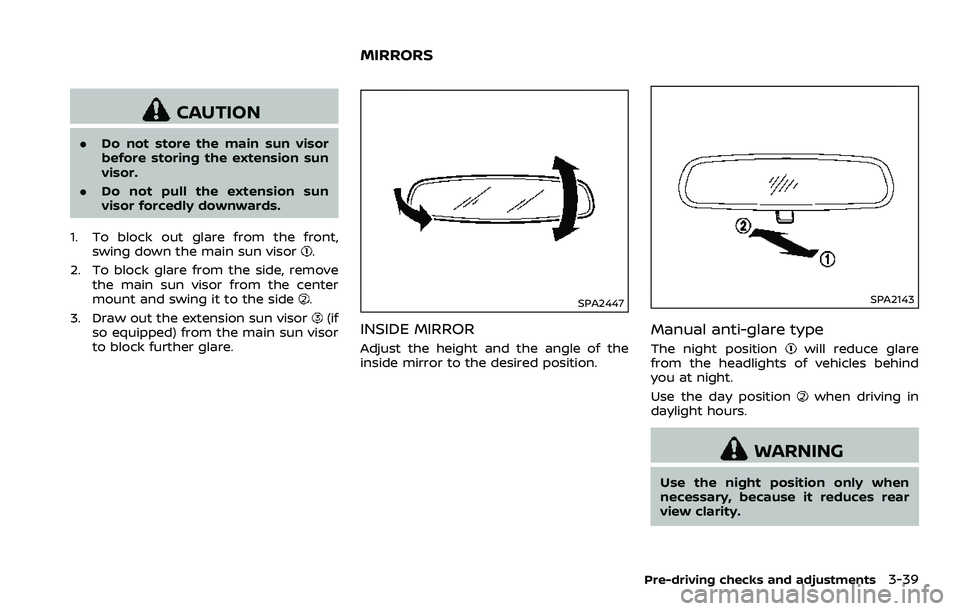
1. To block out glare from the front, swing down the main sun visor
.
2. To block glare from the side, remove the main sun visor from the center
mount and swing it to the side
.
3. Draw out the extension sun visor
(if
so equipped) from the main sun visor
to block further glare.SPA2447
INSIDE MIRROR
Adjust the height and the angle of the
inside mirror to the desired position.
SPA2143
Manual anti-glare type
The night positionwill reduce glare
from the headlights of vehicles behind
you at night.
Use the day position
when driving in
daylight hours.
WARNING
Use the night position only when
necessary, because it reduces rear
view clarity.
Pre-driving checks and adjustments3-39
MIRRORS
Page 166 of 453
3-40Pre-driving checks and adjustments
SPA2450
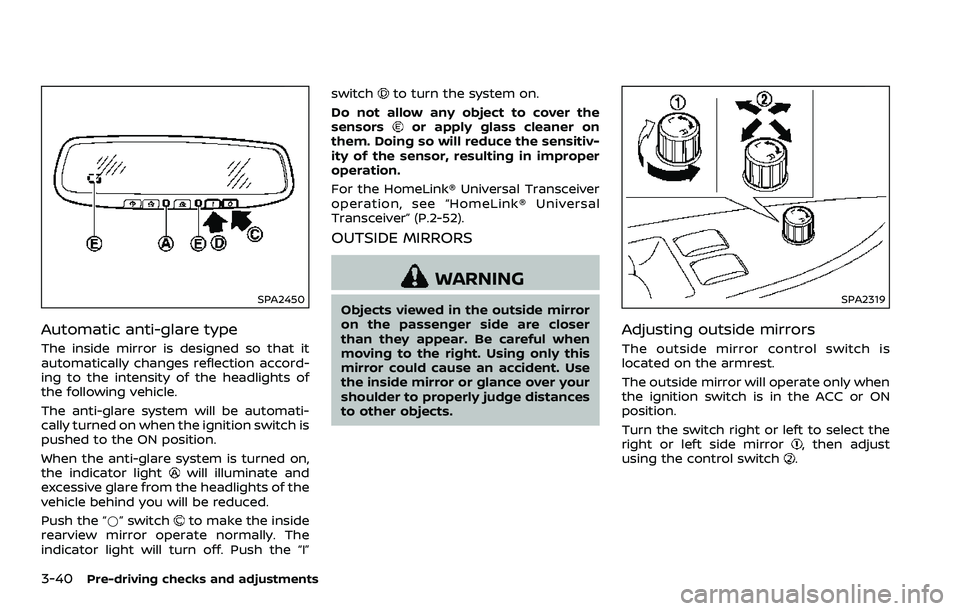
Automatic anti-glare type
The inside mirror is designed so that it
automatically changes reflection accord-
ing to the intensity of the headlights of
the following vehicle.
The anti-glare system will be automati-
cally turned on when the ignition switch is
pushed to the ON position.
When the anti-glare system is turned on,
the indicator light
will illuminate and
excessive glare from the headlights of the
vehicle behind you will be reduced.
Push the “*” switch
to make the inside
rearview mirror operate normally. The
indicator light will turn off. Push the “I” switch
to turn the system on.
Do not allow any object to cover the
sensors
or apply glass cleaner on
them. Doing so will reduce the sensitiv-
ity of the sensor, resulting in improper
operation.
For the HomeLink® Universal Transceiver
operation, see “HomeLink® Universal
Transceiver” (P.2-52).
OUTSIDE MIRRORS
WARNING
Objects viewed in the outside mirror
on the passenger side are closer
than they appear. Be careful when
moving to the right. Using only this
mirror could cause an accident. Use
the inside mirror or glance over your
shoulder to properly judge distances
to other objects.SPA2319
Adjusting outside mirrors
The outside mirror control switch is
located on the armrest.
The outside mirror will operate only when
the ignition switch is in the ACC or ON
position.
Turn the switch right or left to select the
right or left side mirror
, then adjust
using the control switch.
Page 187 of 453
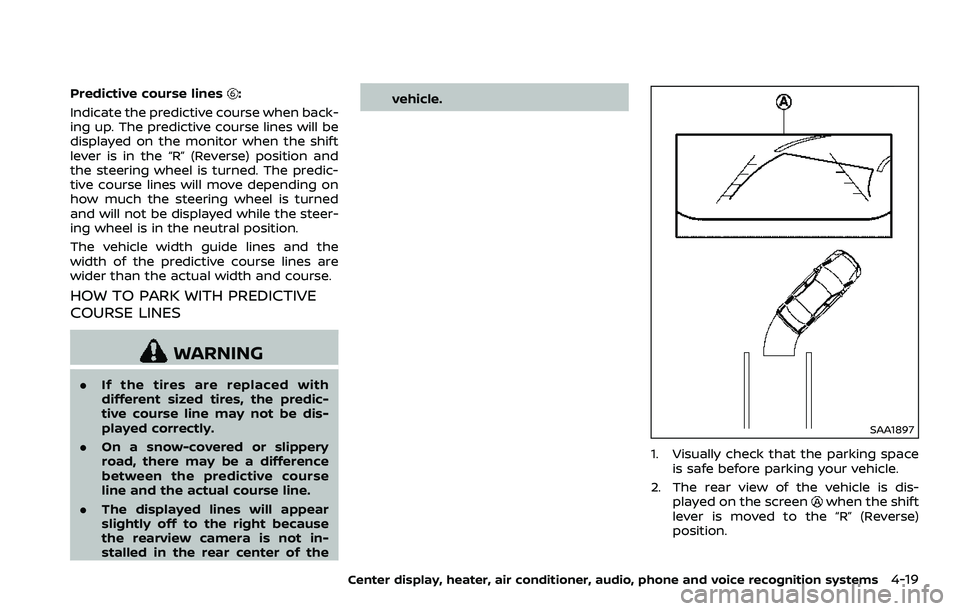
Predictive course lines:
Indicate the predictive course when back-
ing up. The predictive course lines will be
displayed on the monitor when the shift
lever is in the “R” (Reverse) position and
the steering wheel is turned. The predic-
tive course lines will move depending on
how much the steering wheel is turned
and will not be displayed while the steer-
ing wheel is in the neutral position.
The vehicle width guide lines and the
width of the predictive course lines are
wider than the actual width and course.
HOW TO PARK WITH PREDICTIVE
COURSE LINES
WARNING
. If the tires are replaced with
different sized tires, the predic-
tive course line may not be dis-
played correctly.
. On a snow-covered or slippery
road, there may be a difference
between the predictive course
line and the actual course line.
. The displayed lines will appear
slightly off to the right because
the rearview camera is not in-
stalled in the rear center of the vehicle.
SAA1897
1. Visually check that the parking space
is safe before parking your vehicle.
2. The rear view of the vehicle is dis- played on the screen
when the shift
lever is moved to the “R” (Reverse)
position.
Center display, heater, air conditioner, audio, phone and voice recognition systems4-19
Page 296 of 453
5-4Starting and driving
main continuously illuminated. This se-
quence will continue upon subsequent
vehicle start-ups as long as the malfunc-
tion exists. When the malfunction indica-
tor is illuminated, the system may not be
able to detect or signal low tire pressure
as intended. TPMS malfunctions may
occur for a variety of reasons, including
the installation of replacement or alter-
nate tires or wheels on the vehicle that
prevent the TPMS from functioning prop-
erly. Always check the TPMS malfunction
telltale after replacing one or more tires
or wheels on your vehicle to ensure that
the replacement or alternate tires and
wheels allow the TPMS to continue to
function properly.
Additional information
.Since the spare tire is not equipped
with the TPMS, the TPMS does not
monitor the tire pressure of the spare
tire.
. The TPMS will activate only when the
vehicle is driven at speeds above 16
MPH (25 km/h). Also, this system may
not detect a sudden drop in tire
pressure (for example a flat tire while
driving).
. The low tire pressure warning light
does not automatically turn off when
the tire pressure is adjusted. After the
tire is inflated to the recommended pressure, the vehicle must be driven at
speeds above 16 MPH (25 km/h) to
activate the TPMS and turn off the low
tire pressure warning light. Use a tire
pressure gauge to check the tire
pressure.
. The CHECK TIRE PRESSURE warning
also appears on the vehicle informa-
tion display when the low tire pres-
sure warning light is illuminated and
low tire pressure is detected. The
CHECK TIRE PRESSURE warning turns
off when the low tire pressure warn-
ing light turns off.
The CHECK TIRE PRESSURE warning
appears each time the ignition switch
is placed in the ON position as long as
the low tire pressure warning light
remains illuminated.
The CHECK TIRE PRESSURE warning
does not appear if the low tire pres-
sure warning light illuminates to in-
dicate a TPMS malfunction.
. Tire pressure rises and falls depending
on the heat caused by the vehicle’s
operation and the outside tempera-
ture. Do not reduce the tire pressure
after driving because the tire pressure
rises after driving. Low outside tem-
perature can lower the temperature
of the air inside the tire which can
cause a lower tire inflation pressure. This may cause the low tire pressure
warning light to illuminate. If the
warning light illuminates in low ambi-
ent temperature, check the tire pres-
sure for all four tires.
For additional information, see “Low tire
pressure warning light” (P.2-13) and “Tire
Pressure Monitoring System (TPMS)” (P.6-
3).
WARNING
. If the low tire pressure warning
light illuminates while driving,
avoid sudden steering maneu-
vers or abrupt braking, reduce
vehicle speed, pull off the road
to a safe location and stop the
vehicle as soon as possible. Driv-
ing with under-inflated tires may
permanently damage the tires
and increase the likelihood of tire
failure. Serious vehicle damage
could occur and may lead to an
accident and could result in ser-
ious personal injury. Check the
tire pressure for all four tires.
Adjust the tire pressure to the
recommended COLD tire pressure
shown on the Tire and Loading
Information label to turn the low
tire pressure warning light OFF. If