2018 NISSAN 370Z automatic transmission
[x] Cancel search: automatic transmissionPage 307 of 453
When canceling the manual shift mode,
return the shift lever to the D (Drive)
position. The transmission returns to the
normal driving mode.
When you pull the paddle shifter (if so
equipped) while in the D (Drive) position,
the transmission will shift to the upper or
lower range temporarily. The transmis-
sion will automatically return to the D
(Drive) position after a short period of
time. If you want to return to the D (Drive)
position manually, pull and hold the
paddle shifter (if so equipped) for about
1.5 seconds.
In the manual shift mode, the shift range
is displayed on the transmission position
indicator in the meter.
Shift ranges up or down one by one as
follows:
1M?
/2M?
/3M?
/4M?
/5M?
/6M?
/ 7M
7M(7th):
Use this position for all normal forward
driving at highway speeds.
6
M(6th) and 5M(5th):
Use these positions when driving up long
slopes, or for engine braking when driving
down long slopes. 4
M(4th), 3M(3rd) and 2M(2nd):
Use these positions for hill climbing or
engine braking on downhill grades.
1
M(1st):
Use this position when climbing steep
hills slowly or driving slowly through deep
snow, or for maximum engine braking on
steep downhill grades.
. Remember not to drive at high speeds
for extended periods of time in lower
than 7th gear. This reduces fuel econ-
omy.
. Moving the shift lever rapidly to the
same side twice will shift the ranges in
succession.
. In the manual shift mode, the trans-
mission may not shift to the se-
lected gear or may automatically
shift to the other gear. This helps
maintain driving performance and
reduces the chance of vehicle da-
mage or loss of control.
. When the transmission does not
shift to the selected gear, the Auto-
matic Transmission (AT) position in-
dicator light (on the instrument
panel) will blink and the buzzer will
sound.
. In the manual shift mode, the trans-
mission automatically shifts down
to 1st gear before the vehicle comes to a stop. When accelerating again, it
is necessary to shift up to the
desired range.
Starting and driving5-15
Page 309 of 453
SSD0829
Shift lock release
If the battery charge is low or discharged,
the shift lever may not be moved from the
P (Park) position even with the brake
pedal depressed and the shift lever but-
ton pushed.
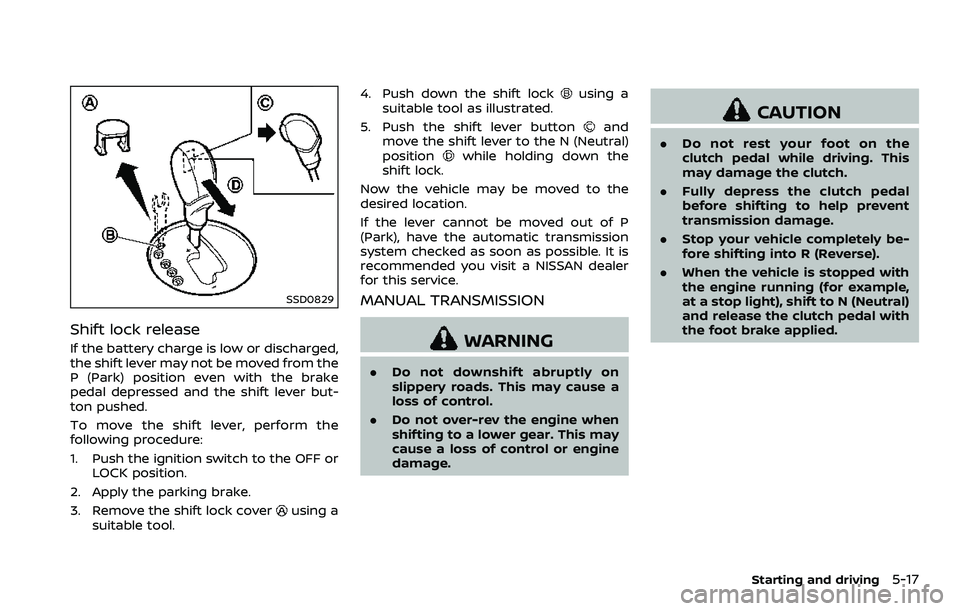
To move the shift lever, perform the
following procedure:
1. Push the ignition switch to the OFF orLOCK position.
2. Apply the parking brake.
3. Remove the shift lock cover
using a
suitable tool. 4. Push down the shift lock
using a
suitable tool as illustrated.
5. Push the shift lever button
and
move the shift lever to the N (Neutral)
position
while holding down the
shift lock.
Now the vehicle may be moved to the
desired location.
If the lever cannot be moved out of P
(Park), have the automatic transmission
system checked as soon as possible. It is
recommended you visit a NISSAN dealer
for this service.
MANUAL TRANSMISSION
WARNING
. Do not downshift abruptly on
slippery roads. This may cause a
loss of control.
. Do not over-rev the engine when
shifting to a lower gear. This may
cause a loss of control or engine
damage.
CAUTION
.Do not rest your foot on the
clutch pedal while driving. This
may damage the clutch.
. Fully depress the clutch pedal
before shifting to help prevent
transmission damage.
. Stop your vehicle completely be-
fore shifting into R (Reverse).
. When the vehicle is stopped with
the engine running (for example,
at a stop light), shift to N (Neutral)
and release the clutch pedal with
the foot brake applied.
Starting and driving5-17
Page 310 of 453
5-18Starting and driving
SSD0536
Shifting
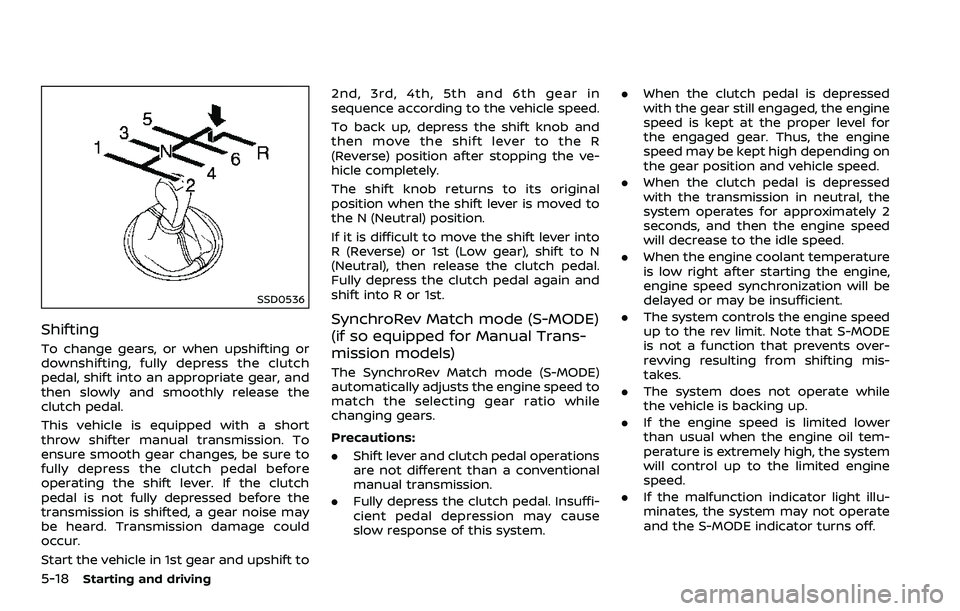
To change gears, or when upshifting or
downshifting, fully depress the clutch
pedal, shift into an appropriate gear, and
then slowly and smoothly release the
clutch pedal.
This vehicle is equipped with a short
throw shifter manual transmission. To
ensure smooth gear changes, be sure to
fully depress the clutch pedal before
operating the shift lever. If the clutch
pedal is not fully depressed before the
transmission is shifted, a gear noise may
be heard. Transmission damage could
occur.
Start the vehicle in 1st gear and upshift to2nd, 3rd, 4th, 5th and 6th gear in
sequence according to the vehicle speed.
To back up, depress the shift knob and
then move the shift lever to the R
(Reverse) position after stopping the ve-
hicle completely.
The shift knob returns to its original
position when the shift lever is moved to
the N (Neutral) position.
If it is difficult to move the shift lever into
R (Reverse) or 1st (Low gear), shift to N
(Neutral), then release the clutch pedal.
Fully depress the clutch pedal again and
shift into R or 1st.
SynchroRev Match mode (S-MODE)
(if so equipped for Manual Trans-
mission models)
The SynchroRev Match mode (S-MODE)
automatically adjusts the engine speed to
match the selecting gear ratio while
changing gears.
Precautions:
.
Shift lever and clutch pedal operations
are not different than a conventional
manual transmission.
. Fully depress the clutch pedal. Insuffi-
cient pedal depression may cause
slow response of this system. .
When the clutch pedal is depressed
with the gear still engaged, the engine
speed is kept at the proper level for
the engaged gear. Thus, the engine
speed may be kept high depending on
the gear position and vehicle speed.
. When the clutch pedal is depressed
with the transmission in neutral, the
system operates for approximately 2
seconds, and then the engine speed
will decrease to the idle speed.
. When the engine coolant temperature
is low right after starting the engine,
engine speed synchronization will be
delayed or may be insufficient.
. The system controls the engine speed
up to the rev limit. Note that S-MODE
is not a function that prevents over-
revving resulting from shifting mis-
takes.
. The system does not operate while
the vehicle is backing up.
. If the engine speed is limited lower
than usual when the engine oil tem-
perature is extremely high, the system
will control up to the limited engine
speed.
. If the malfunction indicator light illu-
minates, the system may not operate
and the S-MODE indicator turns off.
Page 311 of 453
SSD0830
SynchroRev Match mode (S-MODE)
warning:
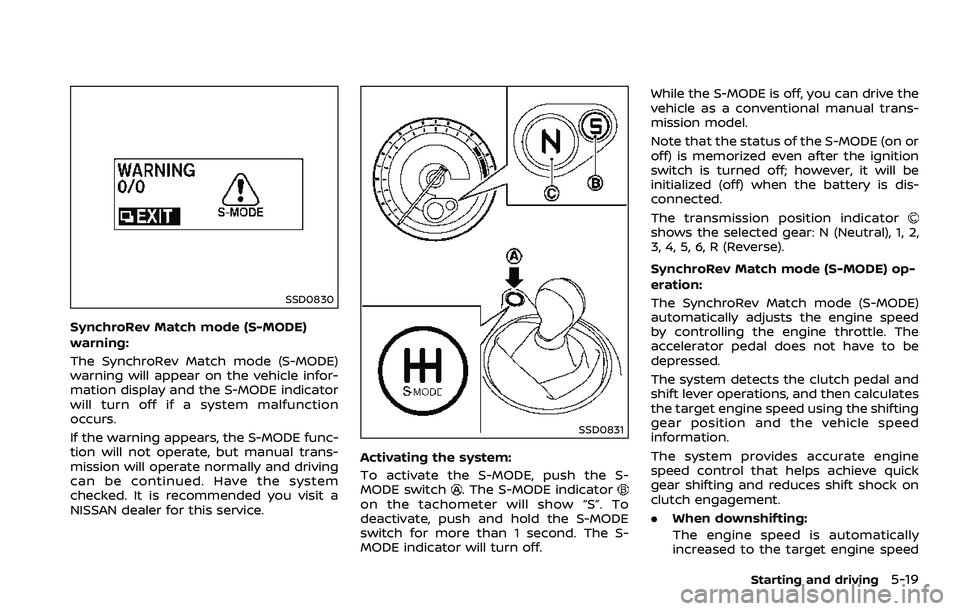
The SynchroRev Match mode (S-MODE)
warning will appear on the vehicle infor-
mation display and the S-MODE indicator
will turn off if a system malfunction
occurs.
If the warning appears, the S-MODE func-
tion will not operate, but manual trans-
mission will operate normally and driving
can be continued. Have the system
checked. It is recommended you visit a
NISSAN dealer for this service.
SSD0831
Activating the system:
To activate the S-MODE, push the S-
MODE switch
. The S-MODE indicatoron the tachometer will show “S”. To
deactivate, push and hold the S-MODE
switch for more than 1 second. The S-
MODE indicator will turn off.While the S-MODE is off, you can drive the
vehicle as a conventional manual trans-
mission model.
Note that the status of the S-MODE (on or
off) is memorized even after the ignition
switch is turned off; however, it will be
initialized (off) when the battery is dis-
connected.
The transmission position indicator
shows the selected gear: N (Neutral), 1, 2,
3, 4, 5, 6, R (Reverse).
SynchroRev Match mode (S-MODE) op-
eration:
The SynchroRev Match mode (S-MODE)
automatically adjusts the engine speed
by controlling the engine throttle. The
accelerator pedal does not have to be
depressed.
The system detects the clutch pedal and
shift lever operations, and then calculates
the target engine speed using the shifting
gear position and the vehicle speed
information.
The system provides accurate engine
speed control that helps achieve quick
gear shifting and reduces shift shock on
clutch engagement.
.
When downshifting:
The engine speed is automatically
increased to the target engine speed
Starting and driving5-19
Page 314 of 453
5-22Starting and driving
SPA2110
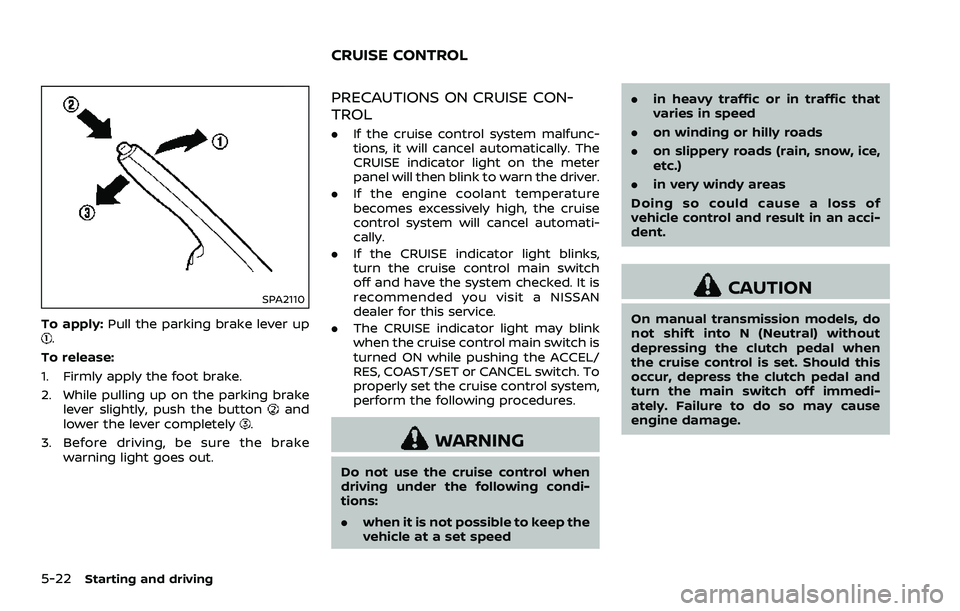
To apply:Pull the parking brake lever up.
To release:
1. Firmly apply the foot brake.
2. While pulling up on the parking brake lever slightly, push the button
and
lower the lever completely.
3. Before driving, be sure the brake warning light goes out.
PRECAUTIONS ON CRUISE CON-
TROL
.If the cruise control system malfunc-
tions, it will cancel automatically. The
CRUISE indicator light on the meter
panel will then blink to warn the driver.
. If the engine coolant temperature
becomes excessively high, the cruise
control system will cancel automati-
cally.
. If the CRUISE indicator light blinks,
turn the cruise control main switch
off and have the system checked. It is
recommended you visit a NISSAN
dealer for this service.
. The CRUISE indicator light may blink
when the cruise control main switch is
turned ON while pushing the ACCEL/
RES, COAST/SET or CANCEL switch. To
properly set the cruise control system,
perform the following procedures.
WARNING
Do not use the cruise control when
driving under the following condi-
tions:
. when it is not possible to keep the
vehicle at a set speed .
in heavy traffic or in traffic that
varies in speed
. on winding or hilly roads
. on slippery roads (rain, snow, ice,
etc.)
. in very windy areas
Doing so could cause a loss of
vehicle control and result in an acci-
dent.
CAUTION
On manual transmission models, do
not shift into N (Neutral) without
depressing the clutch pedal when
the cruise control is set. Should this
occur, depress the clutch pedal and
turn the main switch off immedi-
ately. Failure to do so may cause
engine damage.
CRUISE CONTROL
Page 315 of 453
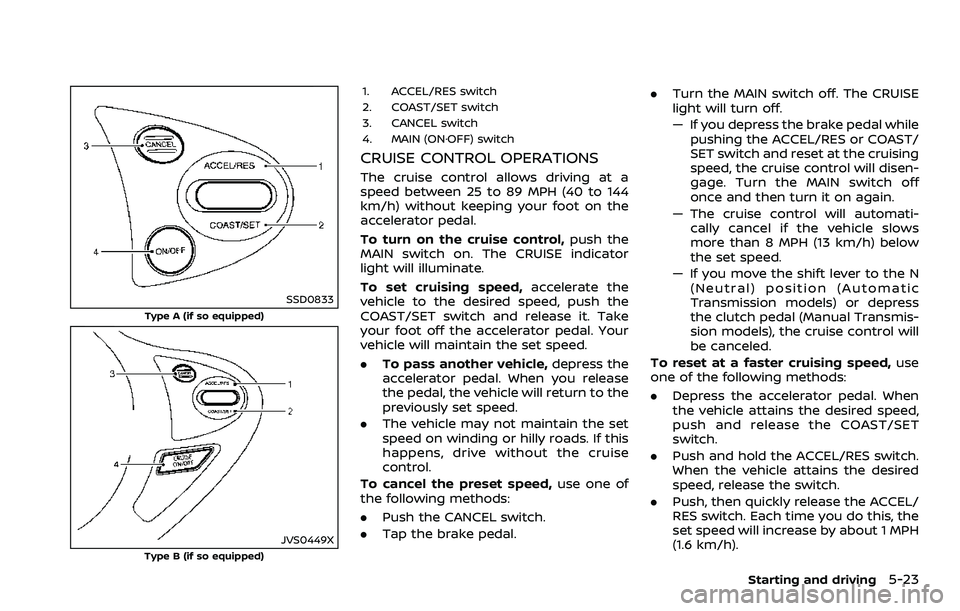
SSD0833
Type A (if so equipped)
JVS0449XType B (if so equipped)
1. ACCEL/RES switch
2. COAST/SET switch
3. CANCEL switch
4. MAIN (ON·OFF) switch
CRUISE CONTROL OPERATIONS
The cruise control allows driving at a
speed between 25 to 89 MPH (40 to 144
km/h) without keeping your foot on the
accelerator pedal.
To turn on the cruise control,push the
MAIN switch on. The CRUISE indicator
light will illuminate.
To set cruising speed, accelerate the
vehicle to the desired speed, push the
COAST/SET switch and release it. Take
your foot off the accelerator pedal. Your
vehicle will maintain the set speed.
. To pass another vehicle, depress the
accelerator pedal. When you release
the pedal, the vehicle will return to the
previously set speed.
. The vehicle may not maintain the set
speed on winding or hilly roads. If this
happens, drive without the cruise
control.
To cancel the preset speed, use one of
the following methods:
. Push the CANCEL switch.
. Tap the brake pedal. .
Turn the MAIN switch off. The CRUISE
light will turn off.
— If you depress the brake pedal while
pushing the ACCEL/RES or COAST/
SET switch and reset at the cruising
speed, the cruise control will disen-
gage. Turn the MAIN switch off
once and then turn it on again.
— The cruise control will automati- cally cancel if the vehicle slows
more than 8 MPH (13 km/h) below
the set speed.
— If you move the shift lever to the N (Neutral) position (Automatic
Transmission models) or depress
the clutch pedal (Manual Transmis-
sion models), the cruise control will
be canceled.
To reset at a faster cruising speed, use
one of the following methods:
. Depress the accelerator pedal. When
the vehicle attains the desired speed,
push and release the COAST/SET
switch.
. Push and hold the ACCEL/RES switch.
When the vehicle attains the desired
speed, release the switch.
. Push, then quickly release the ACCEL/
RES switch. Each time you do this, the
set speed will increase by about 1 MPH
(1.6 km/h).
Starting and driving5-23
Page 318 of 453
5-26Starting and driving
SD1006MA
WARNING
.Do not stop or park the vehicle
over flammable materials such as
dry grass, waste paper or rags.
They may ignite and cause a fire.
. Never leave the engine running
while the vehicle is unattended.
. Do not leave children unattended
inside the vehicle. They could
unknowingly activate switches
or controls. Unattended children
could become involved in serious
accidents. .
To help avoid risk of injury or
death through unintended opera-
tion of the vehicle and/or its
systems, do not leave children,
people who require the assis-
tance of others or pets unat-
tended in your vehicle.
Additionally, the temperature in-
side a closed vehicle on a warm
day can quickly become high
enough to cause a significant risk
of injury or death to people and
pets.
. Safe parking procedures require
that both the parking brake be
applied and the transmission placed into P (Park) for Automatic
Transmission (AT) model or in an
appropriate gear for Manual
Transmission (MT) model. Failure
to do so could cause the vehicle
to move unexpectedly or roll
away and result in an accident.
. Make sure the automatic trans-
mission shift lever has been
pushed as far forward as it can
go and cannot be moved without
depressing the foot brake pedal.
1. Firmly apply the parking brake.
2. Automatic transmission models:
Move the shift lever to the P (Park)
position.
Manual transmission models:
Place the shift lever in the R (Reverse)
gear. When parking on an uphill grade,
place the shift lever in the 1st gear.
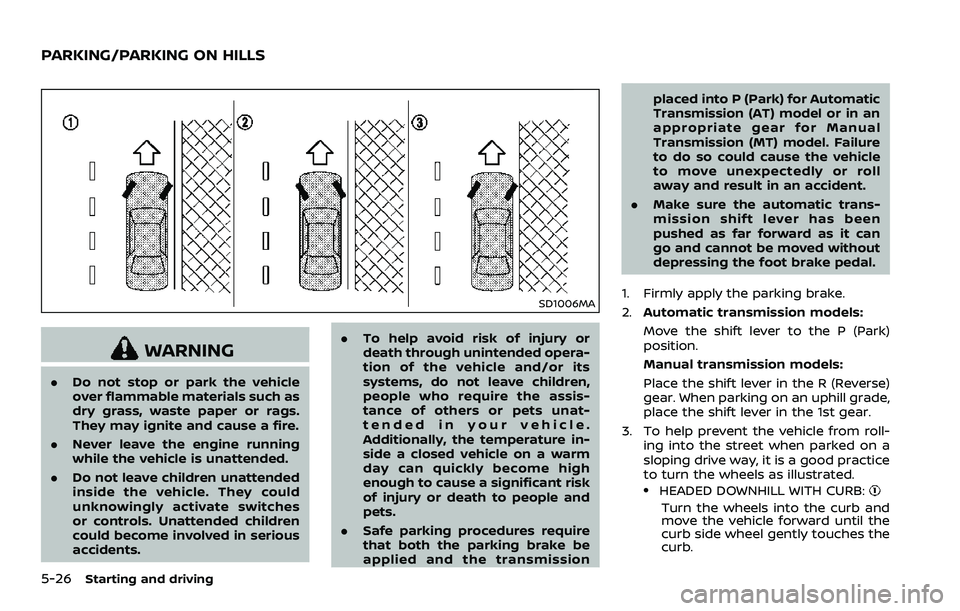
3. To help prevent the vehicle from roll- ing into the street when parked on a
sloping drive way, it is a good practice
to turn the wheels as illustrated.
.HEADED DOWNHILL WITH CURB:
Turn the wheels into the curb and
move the vehicle forward until the
curb side wheel gently touches the
curb.
PARKING/PARKING ON HILLS
Page 329 of 453
6 In case of emergency
Hazard warning flasher switch .......................................... 6-2
Roadside assistance program ............................................ 6-2
Emergency engine shut off ................................................... 6-3
Flat tire ........................................................................\
........................... 6-3Tire Pressure Monitoring System (TPMS) ............ 6-3
Changing a flat tire (for models with
spare tire) ........................................................................\
.............. 6-4
Repairing flat tire (for models with
emergency tire puncture repair kit) ........................ 6-9
Jump starting ........................................................................\
......... 6-15
Push starting ........................................................................\
........... 6-17 If your vehicle overheats ...................................................... 6-17
Towing your vehicle ................................................................. 6-19
Towing Automatic Transmission
recommended by NISSAN (except for
NISMO models) .................................................................... 6-20
Towing Manual Transmission recommended
by NISSAN (except for NISMO models) .............. 6-21
Towing recommended by NISSAN
(NISMO models) ................................................................... 6-22
Vehicle recovery (freeing a stuck vehicle) ...... 6-22