2018 NISSAN 370Z reset
[x] Cancel search: resetPage 177 of 453
position, the “Navigation Version” key is
displayed after selecting the “Others” key.
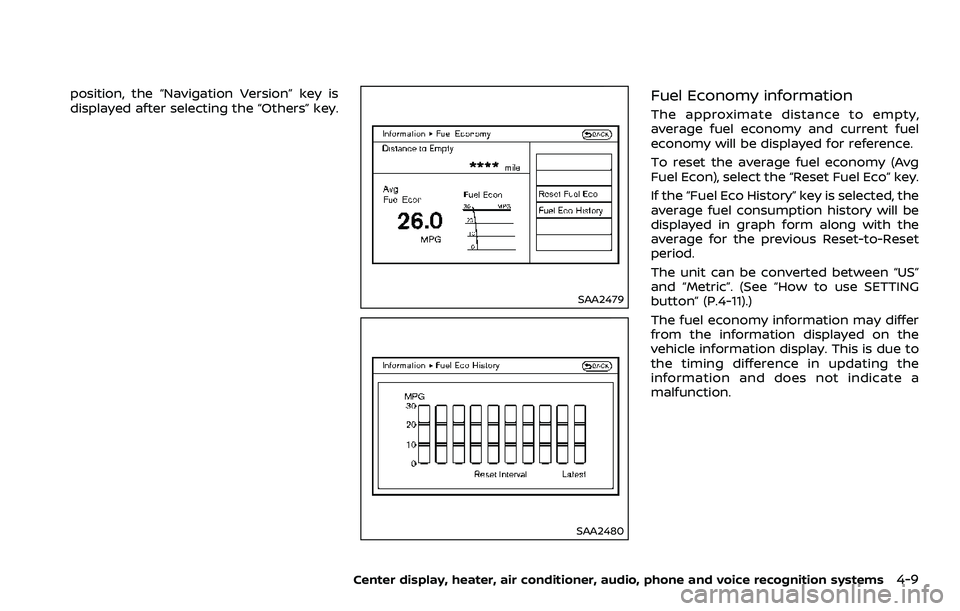
SAA2479
SAA2480
Fuel Economy information
The approximate distance to empty,
average fuel economy and current fuel
economy will be displayed for reference.
To reset the average fuel economy (Avg
Fuel Econ), select the “Reset Fuel Eco” key.
If the “Fuel Eco History” key is selected, the
average fuel consumption history will be
displayed in graph form along with the
average for the previous Reset-to-Reset
period.
The unit can be converted between “US”
and “Metric”. (See “How to use SETTING
button” (P.4-11).)
The fuel economy information may differ
from the information displayed on the
vehicle information display. This is due to
the timing difference in updating the
information and does not indicate a
malfunction.
Center display, heater, air conditioner, audio, phone and voice recognition systems4-9
Page 178 of 453
4-10Center display, heater, air conditioner, audio, phone and voice recognition systems
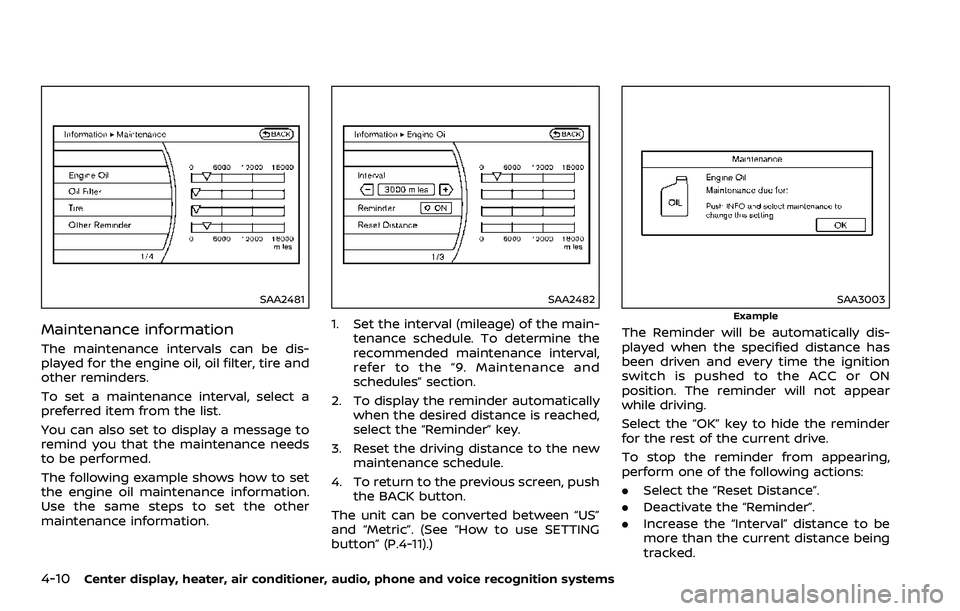
SAA2481
Maintenance information
The maintenance intervals can be dis-
played for the engine oil, oil filter, tire and
other reminders.
To set a maintenance interval, select a
preferred item from the list.
You can also set to display a message to
remind you that the maintenance needs
to be performed.
The following example shows how to set
the engine oil maintenance information.
Use the same steps to set the other
maintenance information.
SAA2482
1. Set the interval (mileage) of the main-tenance schedule. To determine the
recommended maintenance interval,
refer to the “9. Maintenance and
schedules” section.
2. To display the reminder automatically when the desired distance is reached,
select the “Reminder” key.
3. Reset the driving distance to the new maintenance schedule.
4. To return to the previous screen, push the BACK button.
The unit can be converted between “US”
and “Metric”. (See “How to use SETTING
button” (P.4-11).)
SAA3003
Example
The Reminder will be automatically dis-
played when the specified distance has
been driven and every time the ignition
switch is pushed to the ACC or ON
position. The reminder will not appear
while driving.
Select the “OK” key to hide the reminder
for the rest of the current drive.
To stop the reminder from appearing,
perform one of the following actions:
. Select the “Reset Distance”.
. Deactivate the “Reminder”.
. Increase the “Interval” distance to be
more than the current distance being
tracked.
Page 203 of 453
CAUTION
.Do not force the USB device into
the USB connection port. Insert-
ing the USB device tilted or up-
side-down into the port may da-
mage the port. Make sure that
the USB device is connected cor-
rectly into the USB connection
port.
. Do not grab the USB connection
port cover (if so equipped) when
pulling the USB device out of the
port. This could damage the port
and the cover.
. Do not leave the USB cable in a
place where it can be pulled
unintentionally. Pulling the cable
may damage the port.
The vehicle is not equipped with a USB
device. USB devices should be purchased
separately as necessary.
This system cannot be used to format
USB devices. To format a USB device, use
a personal computer.
In some states/area, the USB device for
the front seats plays only sound without
images for regulatory reasons, even when
the vehicle is parked. This system supports various USB mem-
ory devices, USB hard drives and iPod®
players. Some USB devices may not be
supported by this system.
.
Partitioned USB devices may not be
played correctly.
. Some characters used in other lan-
guages (Chinese, Japanese, etc.) may
not appear properly in the display.
Using English language characters
with a USB device is recommended.
General notes for USB use:
Refer to your device manufacturer’s own-
er information regarding the proper use
and care of the device.
Notes for iPod® use:
“Made for iPod®”, “Made for iPhone®”, and
“Made for iPad®” mean that an electronic
accessory has been designed to connect
specifically to iPod®, iPhone®, or iPad®,
respectively, and has been certified by the
developer to meet Apple performance
standards.
Apple is not responsible for the operation
of this device or its compliance with
safety and regulatory standards.
Please note that the use of this accessory
with iPod®, iPhone®, or iPad® may affect
wireless performance.
iPad®, iPhone®, iPod®, iPod classic®, iPod
nano®, iPod shuffle®, and iPod touch® are trademarks of Apple Inc., registered in the
U.S. and other countries. Lightning is a
trademark of Apple Inc.
.
Improperly plugging in the iPod® may
cause a checkmark to be displayed on
and off (flickering). Always make sure
that the iPod® is connected properly.
. An iPod nano® (1st Generation) may
remain in fast forward or rewind mode
if it is connected during a seek opera-
tion. In this case, please manually
reset the iPod®.
. An iPod nano® (2nd Generation) will
continue to fast-forward or rewind if it
is disconnected during a seek opera-
tion.
. An incorrect song title may appear
when the Play Mode is changed while
using an iPod nano® (2nd Generation)
. Audiobooks may not play in the same
order as they appear on an iPod®.
. Large video files cause slow responses
in an iPod®. The vehicle center display
may momentarily black out, but will
soon recover.
. If an iPod® automatically selects large
video files while in the shuffle mode,
the vehicle center display may mo-
mentarily black out, but will soon
recover.
Center display, heater, air conditioner, audio, phone and voice recognition systems4-35
Page 213 of 453
language setting.
Scroll direction:
Set the scrolling behavior of the TUNE/
MENU knob to scroll UP or DOWN.
FM·AM radio operation
The audio system operates when the
ignition switch is in the “ACC” or “ON”
position.
FM·AM button:
When the FM·AM button is pushed while
the audio system is off, the audio system
will turn on and the radio will turn on.
When the FM·AM button is pushed while
another audio source is already operat-
ing, it will automatically turn off, and the
radio will turn on.
To change the radio bands, push the
FM·AM button until the desired band
appears.
AM ?FM 1 ?FM 2 ?AM
TUNE/MENU knob:
When adjusting the broadcasting station
frequency manually, turn the TUNE/MENU
knob until the preferred frequency is
achieved.
Seek tuning button:
When adjusting the broadcasting station
frequency automatically, push the
button. When the system detects a
broadcasting station, it will stop at the
station.
Radio memory buttons:
During radio reception, pushing the radio
memory button for less than 2 seconds
will select the stored radio station.
The audio system can store up to 12 FM
station frequencies (six in each of FM 1and
FM 2) and 6 AM station frequencies.
To store the station frequency manually:
1. Tune to the desired broadcasting station frequency by using the
button.
2. Push and hold a radio memory button
-until a beep sounds. (The radio
mutes when the radio memory button
is pushed.)
3. The channel indicator will display and the radio mute disengages, indicating
that the memory is stored properly.
4. Perform steps 1 - 3 for all other memory buttons.
If the battery cable is disconnected, or if
the audio fuse blows, the radio memory
will be erased. In such a case, reset the desired stations.
SCAN button:
Push the SCAN button to tune from low
to high frequencies and stops at each
broadcasting station for 5 seconds. Push-
ing the SCAN button again during this 5
seconds period will stop SCAN tuning and
the radio will remain tuned to that
station.
If the SCAN button is not pushed within 5
seconds, SCAN tuning moves to the next
station.
CD player operation
The audio system operates when the
ignition switch is in the “ACC” or “ON”
position.
Loading:
Insert a CD into the slot with the label side
facing up. The CD will be guided auto-
matically into the slot and will start
playing. After loading the CD, the number
of tracks and the playtime will appear on
the display.
CAUTION
Do not force the CD into the slot. This
could damage the player.
Center display, heater, air conditioner, audio, phone and voice recognition systems4-45
Page 220 of 453
4-52Center display, heater, air conditioner, audio, phone and voice recognition systems
SAA2495
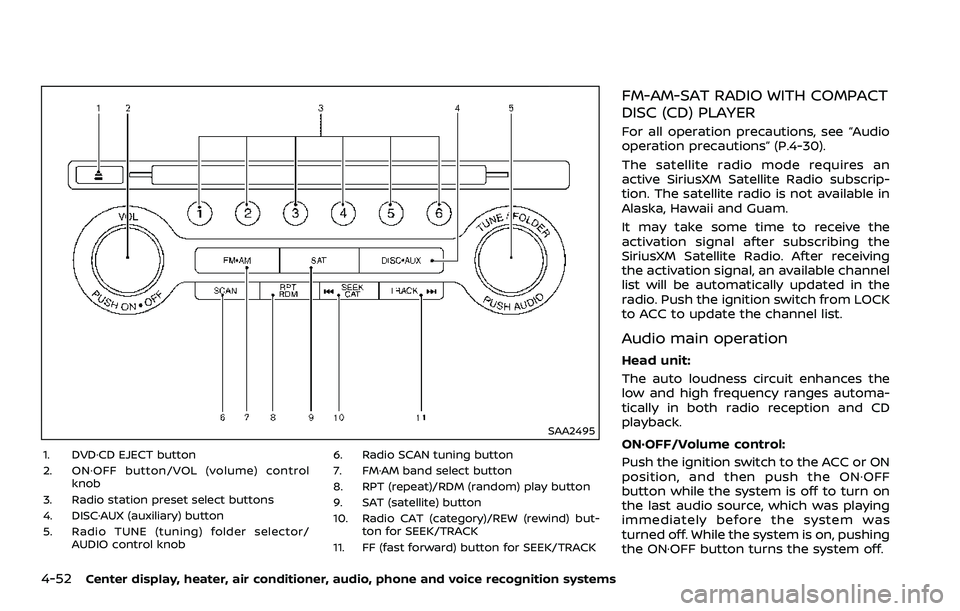
1. DVD·CD EJECT button
2. ON·OFF button/VOL (volume) controlknob
3. Radio station preset select buttons
4. DISC·AUX (auxiliary) button
5. Radio TUNE (tuning) folder selector/ AUDIO control knob 6. Radio SCAN tuning button
7. FM·AM band select button
8. RPT (repeat)/RDM (random) play button
9. SAT (satellite) button
10. Radio CAT (category)/REW (rewind) but-
ton for SEEK/TRACK
11. FF (fast forward) button for SEEK/TRACK
FM-AM-SAT RADIO WITH COMPACT
DISC (CD) PLAYER
For all operation precautions, see “Audio
operation precautions” (P.4-30).
The satellite radio mode requires an
active SiriusXM Satellite Radio subscrip-
tion. The satellite radio is not available in
Alaska, Hawaii and Guam.
It may take some time to receive the
activation signal after subscribing the
SiriusXM Satellite Radio. After receiving
the activation signal, an available channel
list will be automatically updated in the
radio. Push the ignition switch from LOCK
to ACC to update the channel list.
Audio main operation
Head unit:
The auto loudness circuit enhances the
low and high frequency ranges automa-
tically in both radio reception and CD
playback.
ON·OFF/Volume control:
Push the ignition switch to the ACC or ON
position, and then push the ON·OFF
button while the system is off to turn on
the last audio source, which was playing
immediately before the system was
turned off. While the system is on, pushing
the ON·OFF button turns the system off.
Page 222 of 453
4-54Center display, heater, air conditioner, audio, phone and voice recognition systems
.UPDATING (When the satellite radio
subscription is not active)
SCAN tuning:
Push the SCAN tuning button to tune
from low to high frequencies and stop at
each broadcasting station/channel for 5
seconds. Pushing the button again during
this 5 seconds period will stop SCAN
tuning and the radio will remain tuned
to that station/channel.
If the SCAN tuning button is not pushed
within 5 seconds, SCAN tuning moves to
the next station/channel.
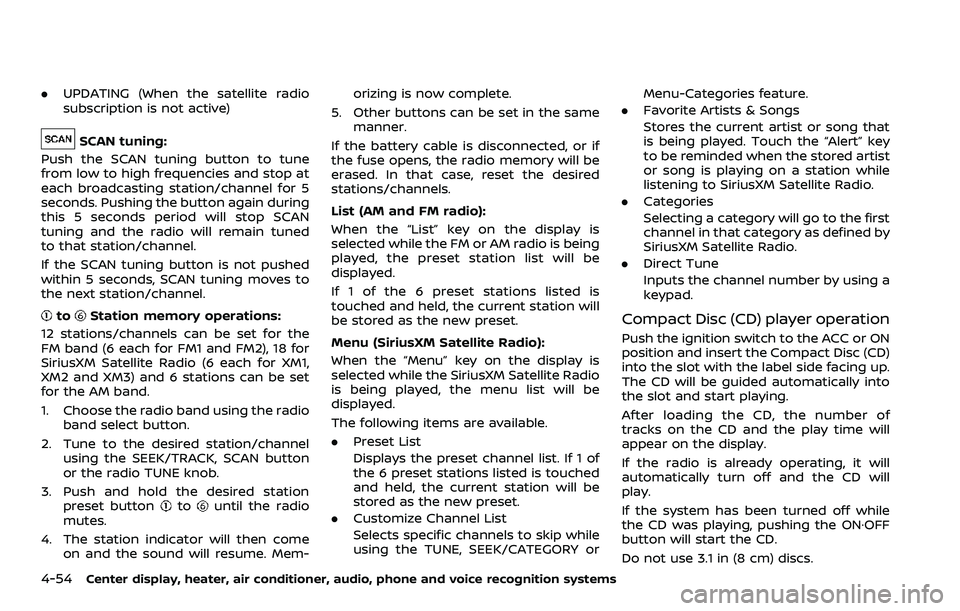
toStation memory operations:
12 stations/channels can be set for the
FM band (6 each for FM1 and FM2), 18 for
SiriusXM Satellite Radio (6 each for XM1,
XM2 and XM3) and 6 stations can be set
for the AM band.
1. Choose the radio band using the radio band select button.
2. Tune to the desired station/channel using the SEEK/TRACK, SCAN button
or the radio TUNE knob.
3. Push and hold the desired station preset button
tountil the radio
mutes.
4. The station indicator will then come on and the sound will resume. Mem- orizing is now complete.
5. Other buttons can be set in the same manner.
If the battery cable is disconnected, or if
the fuse opens, the radio memory will be
erased. In that case, reset the desired
stations/channels.
List (AM and FM radio):
When the “List” key on the display is
selected while the FM or AM radio is being
played, the preset station list will be
displayed.
If 1 of the 6 preset stations listed is
touched and held, the current station will
be stored as the new preset.
Menu (SiriusXM Satellite Radio):
When the “Menu” key on the display is
selected while the SiriusXM Satellite Radio
is being played, the menu list will be
displayed.
The following items are available.
. Preset List
Displays the preset channel list. If 1 of
the 6 preset stations listed is touched
and held, the current station will be
stored as the new preset.
. Customize Channel List
Selects specific channels to skip while
using the TUNE, SEEK/CATEGORY or Menu-Categories feature.
. Favorite Artists & Songs
Stores the current artist or song that
is being played. Touch the “Alert” key
to be reminded when the stored artist
or song is playing on a station while
listening to SiriusXM Satellite Radio.
. Categories
Selecting a category will go to the first
channel in that category as defined by
SiriusXM Satellite Radio.
. Direct Tune
Inputs the channel number by using a
keypad.
Compact Disc (CD) player operation
Push the ignition switch to the ACC or ON
position and insert the Compact Disc (CD)
into the slot with the label side facing up.
The CD will be guided automatically into
the slot and start playing.
After loading the CD, the number of
tracks on the CD and the play time will
appear on the display.
If the radio is already operating, it will
automatically turn off and the CD will
play.
If the system has been turned off while
the CD was playing, pushing the ON·OFF
button will start the CD.
Do not use 3.1 in (8 cm) discs.
Page 241 of 453
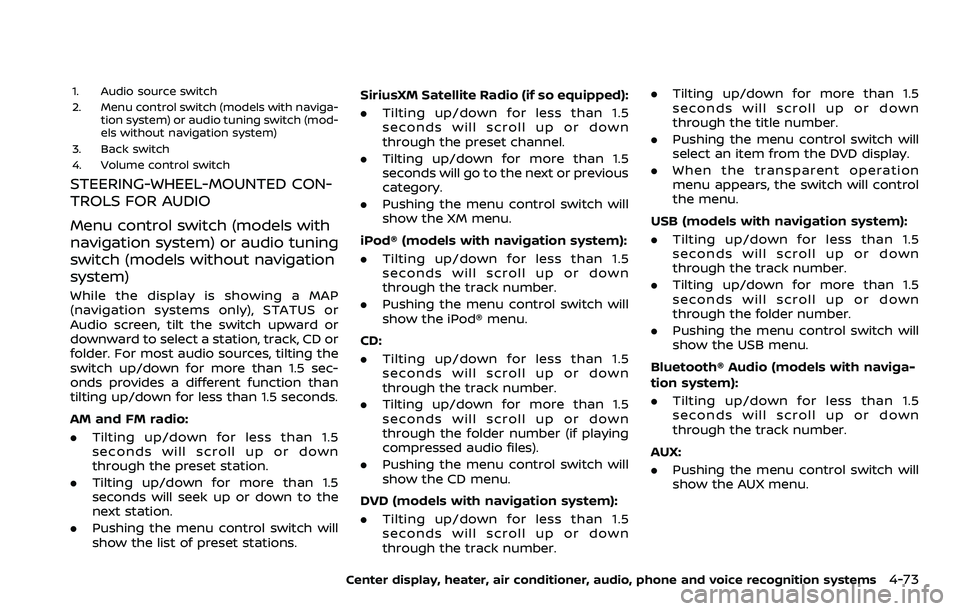
1. Audio source switch
2. Menu control switch (models with naviga-tion system) or audio tuning switch (mod-
els without navigation system)
3. Back switch
4. Volume control switch
STEERING-WHEEL-MOUNTED CON-
TROLS FOR AUDIO
Menu control switch (models with
navigation system) or audio tuning
switch (models without navigation
system)
While the display is showing a MAP
(navigation systems only), STATUS or
Audio screen, tilt the switch upward or
downward to select a station, track, CD or
folder. For most audio sources, tilting the
switch up/down for more than 1.5 sec-
onds provides a different function than
tilting up/down for less than 1.5 seconds.
AM and FM radio:
. Tilting up/down for less than 1.5
seconds will scroll up or down
through the preset station.
. Tilting up/down for more than 1.5
seconds will seek up or down to the
next station.
. Pushing the menu control switch will
show the list of preset stations. SiriusXM Satellite Radio (if so equipped):
. Tilting up/down for less than 1.5
seconds will scroll up or down
through the preset channel.
. Tilting up/down for more than 1.5
seconds will go to the next or previous
category.
. Pushing the menu control switch will
show the XM menu.
iPod® (models with navigation system):
. Tilting up/down for less than 1.5
seconds will scroll up or down
through the track number.
. Pushing the menu control switch will
show the iPod® menu.
CD:
. Tilting up/down for less than 1.5
seconds will scroll up or down
through the track number.
. Tilting up/down for more than 1.5
seconds will scroll up or down
through the folder number (if playing
compressed audio files).
. Pushing the menu control switch will
show the CD menu.
DVD (models with navigation system):
. Tilting up/down for less than 1.5
seconds will scroll up or down
through the track number. .
Tilting up/down for more than 1.5
seconds will scroll up or down
through the title number.
. Pushing the menu control switch will
select an item from the DVD display.
. When the transparent operation
menu appears, the switch will control
the menu.
USB (models with navigation system):
. Tilting up/down for less than 1.5
seconds will scroll up or down
through the track number.
. Tilting up/down for more than 1.5
seconds will scroll up or down
through the folder number.
. Pushing the menu control switch will
show the USB menu.
Bluetooth® Audio (models with naviga-
tion system):
. Tilting up/down for less than 1.5
seconds will scroll up or down
through the track number.
AUX:
. Pushing the menu control switch will
show the AUX menu.
Center display, heater, air conditioner, audio, phone and voice recognition systems4-73
Page 261 of 453
Once the name and location are con-
firmed, the system begins the call.
“Phone Number” (speak digits)
When prompted by the system, say the
number to call. Refer to “Making a call by
entering a phone number” (P.4-91) for
more details.
“Redial”
Use the Redial command to call the last
number that was dialed.
The system acknowledges the command,
repeats the number and begins dialing.
If a redial number does not exist, the
system announces, “There is no number
to redial” and ends the VR session.
“Call back”
Use the Call Back command to dial the
number of the last incoming call within
the vehicle.
The system acknowledges the command,
repeats the number and begins dialing.
If a call back number does not exist, the
system announces, “There is no number
to call back” and ends the VR session.
“Special Number”
To dial more than 10 digits or any special
characters, please say “Special Number”.
When the system acknowledges the com-
mand, the system will prompt you tospeak the number.
“During a call”
During a call there are several command
options available. Push the
button on
the steering wheel to mute the receiving
voice and enter commands.
. “Help” — The system announces the
available commands.
. “Go back/Correction” — The system
announces “Go back,” ends the VR
session and returns to the call.
. “Cancel/Quit” — The system an-
nounces “Cancel,” ends the VR session
and returns to the call.
. “Send/Enter/Call/Dial” — Use the Send
command to enter numbers, “*” or “#”
during a call. For example, if you were
directed to dial an extension by an
automated system:
Say: “Send one two three four.”
The system acknowledges the com-
mand and sends the tones associated
with the numbers. The system then
ends the VR session and returns to
the call. Say “star” for “*”, say “pound”
for “#”.
. “Transfer call” — Use the Transfer Call
command to transfer the call from the
Bluetooth® Hands-Free Phone System
to the cellular phone when privacy is
desired. The system announces, “Transfer call.
Call transferred to privacy mode.” The
system then ends the VR session.
To reconnect a call from the cellular
phone to the Bluetooth® Hands-Free
Phone system, push the
button.
. “Mute” — Use the Mute command to
mute your voice so the other party
cannot hear it. Use the mute com-
mand again to unmute your voice.
NOTE:
If a call is ended or the cellular phone
network connection is lost while the
Mute feature is on, the Mute feature will
be reset to “off” for the next call so the
other party can hear your voice.
Phonebook (phones without auto-
matic phonebook download func-
tion)
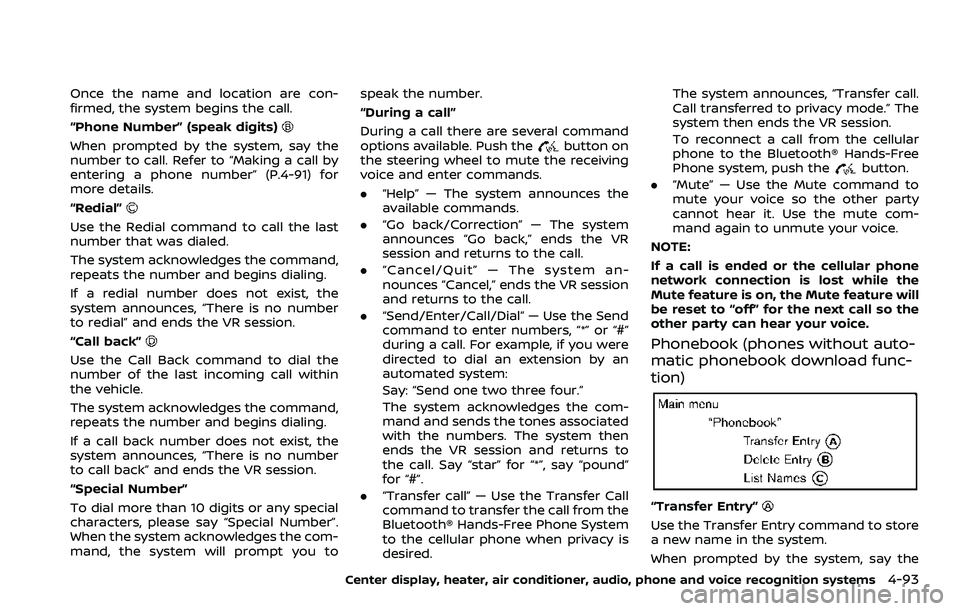
“Transfer Entry”
Use the Transfer Entry command to store
a new name in the system.
When prompted by the system, say the
Center display, heater, air conditioner, audio, phone and voice recognition systems4-93