2018 NISSAN 370Z USB port
[x] Cancel search: USB portPage 169 of 453

4 Center display, heater, air conditioner,audio, phone and voice recognition sys-
tems
Safety note ........................................................................\
................. 4-3
Center multi-function control panel (models with
navigation system) ....................................................................... 4-4
How to use multi-function controller ..................... 4-4
How to use touch screen ................................................. 4-5
Menu options ........................................................................\
..... 4-7
How to select menus on the screen ....................... 4-7
Vehicle information and settings (models with
navigation system) ....................................................................... 4-8 How to use STATUS button ........................................... 4-8
How to use brightness control and display
ON/OFF button ........................................................................\
. 4-8
How to use INFO button ................................................... 4-8
How to use SETTING button ......................................... 4-11
RearView Monitor (models with
navigation system) ..................................................................... 4-17 RearView Monitor system operation .................... 4-18
How to read displayed lines ......................................... 4-18
How to park with predictive course lines ......... 4-19
Adjusting the screen ......................................................... 4-22
Predictive course line settings .................................. 4-22
RearView Monitor system limitations .................. 4-22
System maintenance ........................................................ 4-23 Ventilators ........................................................................\
............... 4-24
Center ventilators ............................................................. 4-24
Side ventilators ................................................................... 4-24
Heater and air conditioner ................................................. 4-25
Automatic air conditioner (Type A) (if
so equipped) ........................................................................\
.. 4-26
Automatic air conditioner (Type B) (if
so equipped) ........................................................................\
.. 4-28
Operating tips ...................................................................... 4-30
In-cabin microfilter ........................................................... 4-30
Servicing air conditioner .............................................. 4-30
Audio system ........................................................................\
........ 4-30 Audio operation precautions ................................... 4-30
FM-AM radio with Compact Disc
(CD) player ........................................................................\
....... 4-43
FM-AM-SAT radio with Compact Disc
(CD) player ........................................................................\
....... 4-52
DVD (Digital Versatile Disc) player operation
(models with navigation system) ......................... 4-55
USB (Universal Serial Bus) connection port
(models with navigation system) ......................... 4-59
Bluetooth® streaming audio (models with
navigation system) ........................................................... 4-63
Page 202 of 453
4-34Center display, heater, air conditioner, audio, phone and voice recognition systems
— 3.1 in (8 cm) discs
— CD/DVDs that are not round
— CD/DVDs with a paper label
— CD/DVDs that are warped,scratched or have abnormal edges
— This audio system can only play prerecorded CD/DVDs. It has no
capabilities to record or burn CD/
DVDs.
. If the CD/DVD cannot be played, one
of the following messages will be
displayed.
Disc Read Error:
— Confirm that the CD/DVD is in-
serted correctly (the label side is
facing up, etc.).
— Confirm that the CD/DVD is not bent or warped and it is free of
scratches.
Please Eject Disc:
— This may be an error due to the temperature inside the player being
too high. Remove the CD/DVD by
pushing the EJECT button, and
after a short time reinsert the CD/
DVD. The CD/DVD can be played
when the temperature of the player
returns to normal. If the error
persists, consult your local dealer. Unplayable File:
— The file may be copy protected.
— The file is not MP3, WMA, AAC, M4A
or DivX® type.
Region Invalid:
— The DVD is not for region 1 or all regions. Use DVDs with a region
code “1”, “ALL” or “1 included” for
your DVD entertainment system.
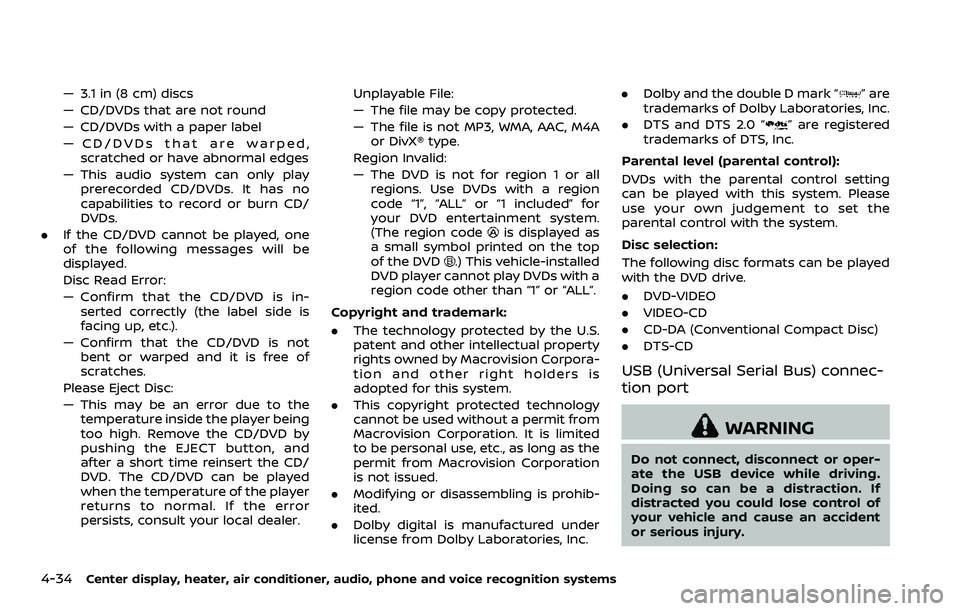
(The region code
is displayed as
a small symbol printed on the top
of the DVD
.) This vehicle-installed
DVD player cannot play DVDs with a
region code other than “1” or “ALL”.
Copyright and trademark:
. The technology protected by the U.S.
patent and other intellectual property
rights owned by Macrovision Corpora-
tion and other right holders is
adopted for this system.
. This copyright protected technology
cannot be used without a permit from
Macrovision Corporation. It is limited
to be personal use, etc., as long as the
permit from Macrovision Corporation
is not issued.
. Modifying or disassembling is prohib-
ited.
. Dolby digital is manufactured under
license from Dolby Laboratories, Inc. .
Dolby and the double D mark “
” are
trademarks of Dolby Laboratories, Inc.
. DTS and DTS 2.0 “
” are registered
trademarks of DTS, Inc.
Parental level (parental control):
DVDs with the parental control setting
can be played with this system. Please
use your own judgement to set the
parental control with the system.
Disc selection:
The following disc formats can be played
with the DVD drive.
. DVD-VIDEO
. VIDEO-CD
. CD-DA (Conventional Compact Disc)
. DTS-CD
USB (Universal Serial Bus) connec-
tion port
WARNING
Do not connect, disconnect or oper-
ate the USB device while driving.
Doing so can be a distraction. If
distracted you could lose control of
your vehicle and cause an accident
or serious injury.
Page 203 of 453
CAUTION
.Do not force the USB device into
the USB connection port. Insert-
ing the USB device tilted or up-
side-down into the port may da-
mage the port. Make sure that
the USB device is connected cor-
rectly into the USB connection
port.
. Do not grab the USB connection
port cover (if so equipped) when
pulling the USB device out of the
port. This could damage the port
and the cover.
. Do not leave the USB cable in a
place where it can be pulled
unintentionally. Pulling the cable
may damage the port.
The vehicle is not equipped with a USB
device. USB devices should be purchased
separately as necessary.
This system cannot be used to format
USB devices. To format a USB device, use
a personal computer.
In some states/area, the USB device for
the front seats plays only sound without
images for regulatory reasons, even when
the vehicle is parked. This system supports various USB mem-
ory devices, USB hard drives and iPod®
players. Some USB devices may not be
supported by this system.
.
Partitioned USB devices may not be
played correctly.
. Some characters used in other lan-
guages (Chinese, Japanese, etc.) may
not appear properly in the display.
Using English language characters
with a USB device is recommended.
General notes for USB use:
Refer to your device manufacturer’s own-
er information regarding the proper use
and care of the device.
Notes for iPod® use:
“Made for iPod®”, “Made for iPhone®”, and
“Made for iPad®” mean that an electronic
accessory has been designed to connect
specifically to iPod®, iPhone®, or iPad®,
respectively, and has been certified by the
developer to meet Apple performance
standards.
Apple is not responsible for the operation
of this device or its compliance with
safety and regulatory standards.
Please note that the use of this accessory
with iPod®, iPhone®, or iPad® may affect
wireless performance.
iPad®, iPhone®, iPod®, iPod classic®, iPod
nano®, iPod shuffle®, and iPod touch® are trademarks of Apple Inc., registered in the
U.S. and other countries. Lightning is a
trademark of Apple Inc.
.
Improperly plugging in the iPod® may
cause a checkmark to be displayed on
and off (flickering). Always make sure
that the iPod® is connected properly.
. An iPod nano® (1st Generation) may
remain in fast forward or rewind mode
if it is connected during a seek opera-
tion. In this case, please manually
reset the iPod®.
. An iPod nano® (2nd Generation) will
continue to fast-forward or rewind if it
is disconnected during a seek opera-
tion.
. An incorrect song title may appear
when the Play Mode is changed while
using an iPod nano® (2nd Generation)
. Audiobooks may not play in the same
order as they appear on an iPod®.
. Large video files cause slow responses
in an iPod®. The vehicle center display
may momentarily black out, but will
soon recover.
. If an iPod® automatically selects large
video files while in the shuffle mode,
the vehicle center display may mo-
mentarily black out, but will soon
recover.
Center display, heater, air conditioner, audio, phone and voice recognition systems4-35
Page 206 of 453
4-38Center display, heater, air conditioner, audio, phone and voice recognition systems
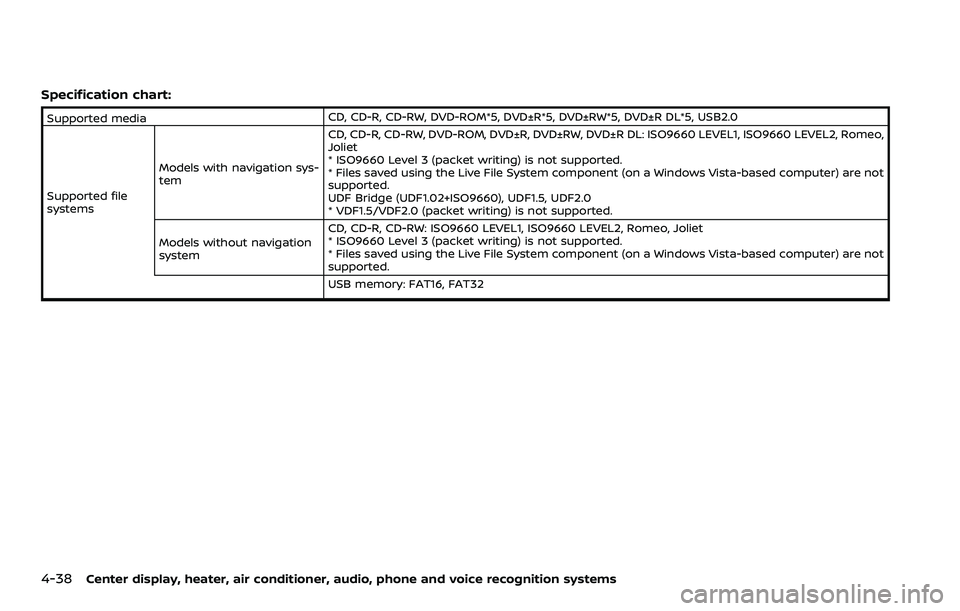
Specification chart:
Supported mediaCD, CD-R, CD-RW, DVD-ROM*5, DVD±R*5, DVD±RW*5, DVD±R DL*5, USB2.0
Supported file
systems Models with navigation sys-
tem CD, CD-R, CD-RW, DVD-ROM, DVD±R, DVD±RW, DVD±R DL: ISO9660 LEVEL1, ISO9660 LEVEL2, Romeo,
Joliet
* ISO9660 Level 3 (packet writing) is not supported.
* Files saved using the Live File System component (on a Windows Vista-based computer) are not
supported.
UDF Bridge (UDF1.02+ISO9660), UDF1.5, UDF2.0
* VDF1.5/VDF2.0 (packet writing) is not supported.
Models without navigation
system CD, CD-R, CD-RW: ISO9660 LEVEL1, ISO9660 LEVEL2, Romeo, Joliet
* ISO9660 Level 3 (packet writing) is not supported.
* Files saved using the Live File System component (on a Windows Vista-based computer) are not
supported.
USB memory: FAT16, FAT32
Page 208 of 453
4-40Center display, heater, air conditioner, audio, phone and voice recognition systems
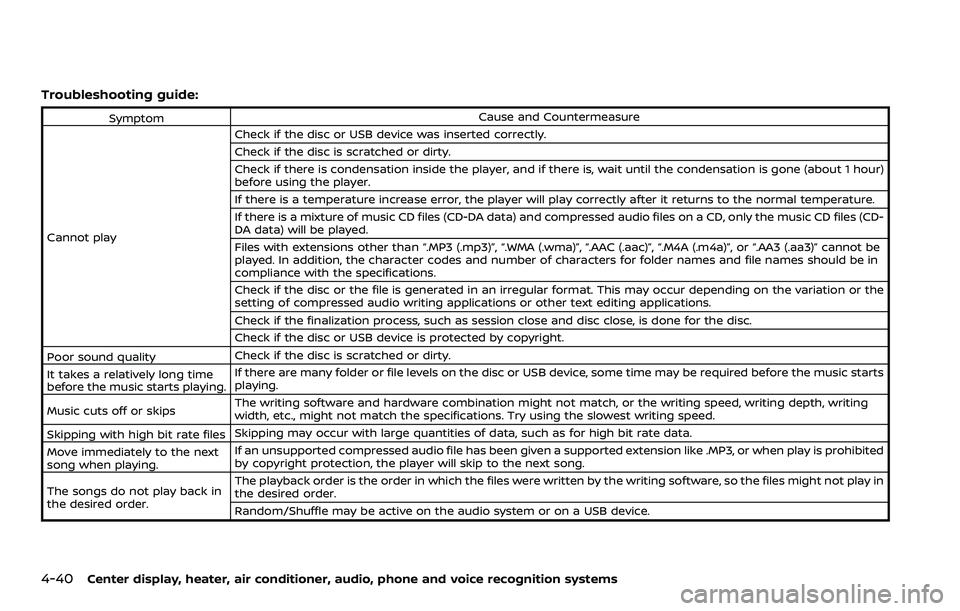
Troubleshooting guide:
SymptomCause and Countermeasure
Cannot play Check if the disc or USB device was inserted correctly.
Check if the disc is scratched or dirty.
Check if there is condensation inside the player, and if there is, wait until the condensation is gone (about 1 hour)
before using the player.
If there is a temperature increase error, the player will play correctly after it returns to the normal temperature.
If there is a mixture of music CD files (CD-DA data) and compressed audio files on a CD, only the music CD files (CD-
DA data) will be played.
Files with extensions other than “.MP3 (.mp3)”, “.WMA (.wma)”, “.AAC (.aac)”, “.M4A (.m4a)”, or “.AA3 (.aa3)” cannot be
played. In addition, the character codes and number of characters for folder names and file names should be in
compliance with the specifications.
Check if the disc or the file is generated in an irregular format. This may occur depending on the variation or the
setting of compressed audio writing applications or other text editing applications.
Check if the finalization process, such as session close and disc close, is done for the disc.
Check if the disc or USB device is protected by copyright.
Poor sound quality Check if the disc is scratched or dirty.
It takes a relatively long time
before the music starts playing. If there are many folder or file levels on the disc or USB device, some time may be required before the music starts
playing.
Music cuts off or skips The writing software and hardware combination might not match, or the writing speed, writing depth, writing
width, etc., might not match the specifications. Try using the slowest writing speed.
Skipping with high bit rate files Skipping may occur with large quantities of data, such as for high bit rate data.
Move immediately to the next
song when playing. If an unsupported compressed audio file has been given a supported extension like .MP3, or when play is prohibited
by copyright protection, the player will skip to the next song.
The songs do not play back in
the desired order. The playback order is the order in which the files were written by the writing software, so the files might not play in
the desired order.
Random/Shuffle may be active on the audio system or on a USB device.
Page 209 of 453

Compressed Video Files (models
with navigation system)
Explanation of terms:
.DivX® - DivX® refers to the DivX® codec
owned by DivX, Inc. used for a lossy
compression of video based on MPEG-
4.
. AVI - AVI stands for Audio Video
Interleave. It is a standard file format
originated by Microsoft Corporation. A
“.divx” encoded file can be saved into
the “.avi” file format for playback on
this system if it meets the require-
ments stated in the table in this
section. However, not all the “.avi” files
are playable on this system since
different encodings can be used than
the DivX® codec.
. ASF - ASF stands for Advanced Sys-
tems Format. It is a file format owned
by Microsoft Corporation. Note: Only “.
asf” files that meet the requirements
stated in the table in this section can
be played.
. Bit rate — Bit rate denotes the number
of bits per second used by a digital
video file. The size and quality of a
compressed digital audio file is deter-
mined by the bit rate used when
encoding the file. Requirement for Supporting Video Playback:
Media CD, CD-R, CD-RW, DVD, DVD±R, DVD±RW, DVD±RW DL, USB 2.0 Memory
File Systems CD,
CD-R,
CD-RW,
DVD,
DVD±R,
DVD±RW,
DVD±RW DL ISO9660 LEVEL1, ISO9660 LEVEL2, Romeo, Joliet, UDF Bridge
(UDF1.02+ISO9660), UDF1.5, UDF2.0
- ISO9660 Level 3 (packet writing) is not supported.
- Files saved using the Live File System component (on a
Windows Vista-based computer) are not supported.
- VDF1.5/VDF2.0 (packet writing) is not supported.
USB Memory FAT16, FAT32
File Types .divx, .avi Video Codecs DivX3, DivX4, DivX5, DivX6
Audio Codecs MP3, MPEG2.5 Audio Layer3, Dolby
Digital, LPCM
.asf Video Codec ISO-MPEG4
Audio Codec G.726
Bit Rates .divx, .avi Maximum Average 4Mbps
Maximum Peak 8Mbps
Resolution .divx, .avi Minimum 32 × 32
Maximum 720 × 480
.asf Minimum 32 × 32
Maximum 720 × 576
Center display, heater, air conditioner, audio, phone and voice recognition systems4-41
Page 215 of 453
played, the title of the played track is
displayed. If the title information is not
provided then “Track” is displayed.
When the DISP button is pushed repeat-
edly, further information about the track
can be displayed along with the track title
as follows:
CD:
Track time?Album ?Artist ?Track
time
CD with MP3/WMA:
Track time ?Album ?Artist ?Folder
name ?Track time
Track details:
Pushing and holding the DISP button will
turn the display into a detailed overview
and after a few seconds it returns to the
main display.
button:
When the SCAN button is pushed while a
CD is being played, the first 10 seconds of
all the tracks will be played.
When the SCAN button is pushed again,
the CD will return to normal play from the
track which is playing.
CD eject button:
When the CD eject button is pushed while
a CD is loaded, the CD will be ejected.
When the CD eject button is pushed twice,
the CD will be ejected further, and the CD
can be removed with ease.
When the ignition switch is in the “OFF” or
“LOCK” position it is possible to eject the
CD currently being played. However the
audio unit will not be activated.
If a CD is ejected by pushing the CD eject
button, and it is not taken out from the
loading slot within 8 seconds, the CD will
automatically be reloaded to the slot to
protect the CD.
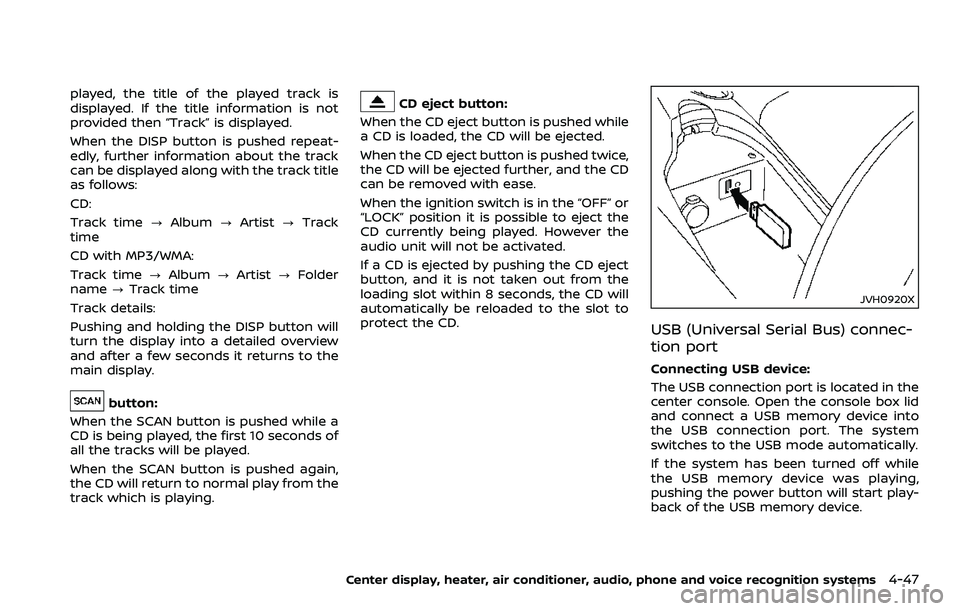
JVH0920X
USB (Universal Serial Bus) connec-
tion port
Connecting USB device:
The USB connection port is located in the
center console. Open the console box lid
and connect a USB memory device into
the USB connection port. The system
switches to the USB mode automatically.
If the system has been turned off while
the USB memory device was playing,
pushing the power button will start play-
back of the USB memory device.
Center display, heater, air conditioner, audio, phone and voice recognition systems4-47
Page 216 of 453
4-48Center display, heater, air conditioner, audio, phone and voice recognition systems
WARNING
Do not connect, disconnect or oper-
ate the USB device while driving.
Doing so can be a distraction. If
distracted you could lose control of
your vehicle and cause an accident
or serious injury.
CAUTION
.Do not force the USB device into
the USB connection port. Insert-
ing the USB device tilted or up-
side-down into the port may da-
mage the port. Make sure that
the USB device is connected cor-
rectly into the USB connection
port. (Some USB devices come
with a
mark as a guide. Make
sure that the mark is facing the
correct direction before inserting
the device.)
. Do not leave the USB cable in a
place where it can be pulled
unintentionally. Pulling the cable
may damage the port. Refer to your device manufacturer’s own-
er information regarding the proper use
and care of the device.
USB button:
When the USB button is pushed with the
system off and the USB memory device is
inserted, the system will turn on.
USB device main operation:
The following operations are identical to
the audio main operation of the Compact
Disc (CD) operation. For details, see “CD
player operation” (P.4-45).
. List view
. Quick search
.
. RDM (Random play)
. RPT (Repeat track)
. SCAN
. Folder browsing
DISP button:
While a track with recorded music infor-
mation tags (ID3-tags) is being played, the
title of the played track is displayed. If the
tags are not provided then a notification
message is displayed.
When the DISP button is pushed repeat-
edly, further information about the track
can be displayed along with the track title
as follows:
Track time ?Artist ?Album ?Folder
name ?Track time
Track details:
Pushing and holding the DISP button will
turn the display into a detailed overview
and after a few seconds it returns to the
main display, or push the DISP button
briefly.