2018 NISSAN 370Z COUPE start
[x] Cancel search: startPage 9 of 453

Illustrated table of contents0
Safety — Seats, seat belts and supplemental restraint
system1
Instruments and controls
Pre-driving checks and adjustments
Center display, heater, air conditioner, audio, phone and
voice recognition systems
Starting and driving
In case of emergency
Appearance and care
Do-it-yourself
Maintenance and schedules
Technical and consumer information
2
3
4
5
6
7
8
9
10
Table of
Contents
Index11
Page 81 of 453

CHECKING LIGHTS
With all doors closed, apply the parking
brake, fasten the seat belts and place the
ignition switch in the ON position without
starting the engine. The following lights (if
so equipped) will come on:
,or,,
The following lights (if so equipped) come
on briefly and then go off:
,or,,,,,
If any light does not come on or operates
in a way other than described, it may
indicate a burned-out bulb and/or a
system malfunction. It is recommended
you have the system checked by a
NISSAN dealer.
Some indicators and warnings are also
displayed on the vehicle information dis-
play. (See “Vehicle information display”
(P.2-19).)
WARNING LIGHTS
orAnti-lock Braking Sys-
tem (ABS) warning light
When the ignition switch is in the ON
position, the Anti-lock Braking System
(ABS) warning light illuminates and then
turns off. This indicates the ABS is opera-
tional.
If the ABS warning light illuminates while
the engine is running, or while driving, it
may indicate the ABS is not functioning
properly. Have the system checked. It is
recommended you visit a NISSAN dealer
for this service.
If an ABS malfunction occurs, the anti-
lock function is turned off. The brake
system then operates normally, but with-
out anti-lock assistance. (See “Brake sys-
tem” (P.5-27).)
Automatic transmission check
warning light (if so equipped)
When the ignition switch is pushed to the
ON position, the light comes on for 2
seconds. If the light comes on at any
other time, it may indicate the transmis-
sion is not functioning properly. It is
recommended you visit a NISSAN dealer
to check and repair the transmission.
orBrake warning light
This light functions for both the parking
brake and the foot brake systems.
Parking brake indicator:
When the ignition switch is in the ON
position, the light comes on when the
parking brake is applied.
Low brake fluid warning light:
When the ignition switch is in the ON
position, the light warns of a low brake
fluid level. If the light comes on while the
engine is running with the parking brake
not applied, stop the vehicle and perform
the following:
1. Check the brake fluid level. Add brake
fluid as necessary. (See “Brake and
clutch fluid” (P.8-9).)
2. If the brake fluid level is correct, have the warning system checked. It is
recommended you have this service
performed by a NISSAN dealer.
Anti-lock Braking System (ABS) warning
indicator:
When the parking brake is released and
the brake fluid level is sufficient, if both
the brake warning light and the Anti-lock
Braking System (ABS) warning light illu-
minate, it may indicate the ABS is not
functioning properly. Have the brake
Instruments and controls2-11
Page 82 of 453

2-12Instruments and controls
system checked, and if necessary re-
paired. It is recommended you visit a
NISSAN dealer for this service. (See “Anti-
lock Braking System (ABS) warning light”
(P.2-11).)
WARNING
.Your brake system may not be
working properly if the warning
light is on. Driving could be dan-
gerous. If you judge it to be safe,
drive carefully to the nearest
service station for repairs. Other-
wise, have your vehicle towed
because driving it could be dan-
gerous.
. Pressing the brake pedal with the
engine stopped and/or low brake
fluid level may increase your
stopping distance and braking
will require greater pedal effort
as well as pedal travel.
. If the brake fluid level is below the
minimum or MIN mark on the
brake fluid reservoir, do not drive
until the brake system has been
checked. It is recommended you
visit a NISSAN dealer for this
service.
Charge warning light
If the light comes on while the engine is
running, it may indicate the charging
system is not functioning properly. Turn
the engine off and check the alternator
belt. If the belt is loose, broken, missing or
if the light remains on, have your vehicle
serviced immediately. It is recommended
you visit a NISSAN dealer for this service.
CAUTION
Do not continue driving if the alter-
nator belt is loose, broken or miss-
ing.
Engine oil pressure warning
light
This light warns of low engine oil pres-
sure. If the light flickers or comes on
during normal driving, pull off the road in
a safe area, stop the engine immediately
and call a NISSAN dealer or other author-
ized repair shop.
The engine oil pressure warning light is
not designed to indicate a low oil level.
Use the dipstick to check the oil level.
(See “Engine oil” (P.8-6).)
CAUTION
Running the engine with the engine
oil pressure warning light on could
cause serious damage to the engine
almost immediately. Such damage is
not covered by warranty. Turn off the
engine as soon as it is safe to do so.
Intelligent Key system warn-
ing light
After the ignition switch is pushed to the
ON position, this light comes on for about
2 seconds and then turns off.
This light warns of a malfunction with the
Intelligent Key system.
If the light comes on while the engine is
stopped, it may be impossible to start the
engine. If the light comes on while the
engine is running, you can drive the
vehicle. However in these cases, it is
recommended you visit a NISSAN dealer
for repair as soon as possible.
Page 89 of 453
SIC3977
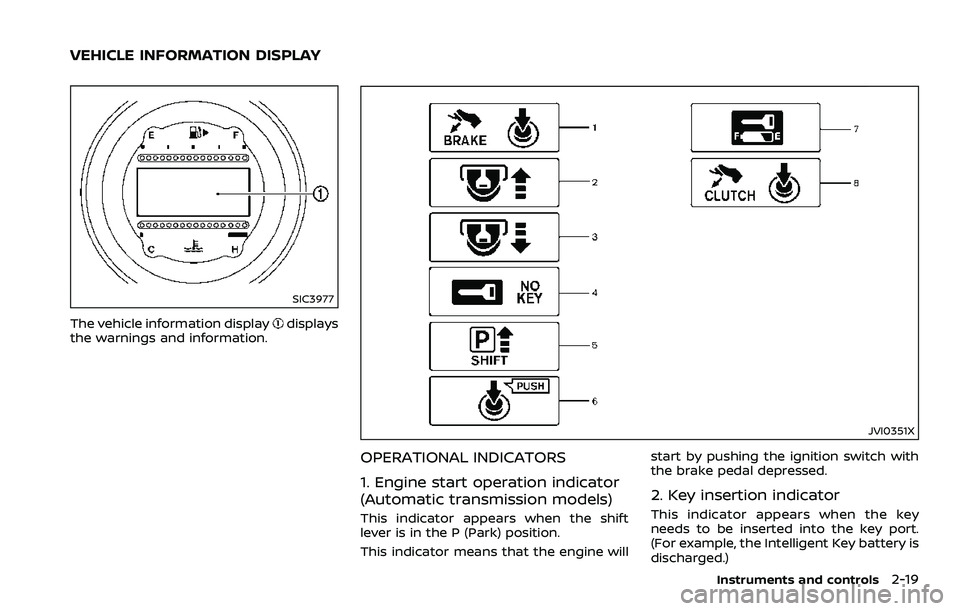
The vehicle information displaydisplays
the warnings and information.
JVI0351X
OPERATIONAL INDICATORS
1. Engine start operation indicator
(Automatic transmission models)
This indicator appears when the shift
lever is in the P (Park) position.
This indicator means that the engine will start by pushing the ignition switch with
the brake pedal depressed.
2. Key insertion indicator
This indicator appears when the key
needs to be inserted into the key port.
(For example, the Intelligent Key battery is
discharged.)
Instruments and controls2-19
VEHICLE INFORMATION DISPLAY
Page 90 of 453

2-20Instruments and controls
If this indicator appears, insert the key
into the key port in the correct direction.
(See “Push-button ignition switch” (P.5-8).)
3. Intelligent Key removal indicator
This indicator appears when the driver’s
door is opened with the ignition switch in
the OFF or LOCK position and the Intelli-
gent Key placed in the key port. A key
reminder chime also sounds.
If this indicator appears, remove the
Intelligent Key from the key port and take
it with you when leaving the vehicle.
4. NO KEY warning
This warning appears in either of the
following conditions.
No Intelligent Key inside the vehicle:
The warning appears when the door is
closed with the Intelligent Key left outside
the vehicle and the ignition switch in the
ACC or ON position. Make sure that the
Intelligent Key is inside the vehicle.
Unregistered Intelligent Key:
The warning appears when the ignition
switch is pushed from the LOCK position
and the Intelligent Key cannot be recog-
nized by the system. You cannot start the
engine with an unregistered key. Use the
registered Intelligent Key.
See “Intelligent Key system” (P.3-7) formore details.
5. SHIFT “P” warning (Automatic
Transmission models)
This warning appears when the ignition
switch is pushed to stop the engine with
the shift lever in any position except the P
(Park) position.
If this warning appears, move the shift
lever to the P (Park) position or push the
ignition switch to the ON position.
An inside warning chime will also sound.
(See “Intelligent Key system” (P.3-7).)
6. “PUSH” warning (Automatic
Transmission models)
This warning appears when the shift lever
is moved to the P (Park) position with the
ignition switch in the ACC position after
the SHIFT “P” warning appears.
To push the ignition switch to the OFF
position, perform the following proce-
dure:
SHIFT “P” warning
?(Move the shift lever
to “P”) ?PUSH warning ?(Push the
ignition switch ?ignition switch position
is turned to ON) ?PUSH warning ?
(Push the ignition switch ?ignition
switch position is turned to OFF)
7. Intelligent Key battery discharge
indicator
This indicator appears when the Intelli-
gent Key battery is running out of power.
If this indicator appears, replace the
battery with a new one. (See “Intelligent
Key battery replacement” (P.8-20).)
8. Engine start operation indicator
(Manual Transmission models)
This indicator means that the engine will
start by pushing the ignition switch with
the clutch pedal depressed.
Page 97 of 453

JVI1447X
Clock
Clock can be adjusted in this mode.
Adjusting the time:
To adjust the time, perform the following
procedure.
1. Push the
switchfor a short time.
The hours display will start to flash.
Keep pushing the
switchto
adjust the hours.
2. Push the
switchfor a short time.
The minutes display will start to flash.
Keep pushing the
switchto
adjust the minutes. 3. Push the
switchfor a short time
to complete the clock adjustment.
Resetting the time:
Push the
switchfor more than 1
second to reset the time.
JVI1452X
Setting
Setting cannot be made while driving. A
message “Setting can only be operated
when stopped” is also displayed on the
vehicle information display.
The
switchandswitchare
used in the setting mode to select and
decide a menu.
SKIP:
Push the
switchto move to the
warning check mode.
Push the
switchto select other
menus.
Instruments and controls2-27
Page 98 of 453

2-28Instruments and controls
ALERT:
Alert menu can be set to notify the
following items.
.UPSHIFT
Select this submenu to set the engine
speed (RPM) of the upshift indicator.
See “Upshift indicator” (P.5-20) (MT
models) or “Manual shift mode” (P.5-
14) (AT models).
. TIMER
Select this submenu to specify when
the “TIMER” indicator activates.
. ICY
Select this submenu to display the low
outside temperature warning.
To return to the top page of the setting
mode, select “BACK”.
MAINTENANCE:
The maintenance intervals of the follow-
ing items can be set or reset for the
reminders.
. OIL
Select this submenu to set or reset the
distance for changing the engine oil.
. FILTER
Select this submenu to set or reset the
distance for replacing the oil filter.
. TIRE
Select this submenu to set or reset the
distance for replacing tires. .
OTHER
Select this submenu and set or reset
the distance for replacing items other
than the engine oil, oil filter and tires.
To return to the top page of the setting
mode, select “BACK”.
OPTIONS:
The 3 option menus can be set to your
preference.
. LANGUAGE
Select this submenu to choose English
or French for display.
. UNIT
Select this submenu to choose the
unit from US or METRIC.
. EFFECTS
Select this menu to set the dial effects
described below to on or off.
— The indicator needles sweep in the
meters when the engine is started.
To return to the top page of the setting
mode, select “BACK”.
SIC3993
Warning check
To see if there are any of the following
warnings and corresponding details, se-
lect this menu.
. No key warning
. Low fuel warning
. Low washer fluid warning
. Parking brake release warning
. Door/rear hatch/trunk open warning
. Loose fuel cap warning
. Check tire pressure warning
SKIP:
Push the
switchto move to the
warning check mode.
Page 100 of 453

2-30Instruments and controls
SIC2045
How to arm the vehicle security
system
1. Close all windows.The system can be armed even if the
windows are open.
2. Push the ignition switch to the OFF position.
3. Remove the Intelligent Key from the vehicle.
4. Close all doors, hood and rear hatch/ trunk. Lock all doors and trunk (Road-
ster models). The doors can be locked
with the Intelligent Key, door handle
request switch, power door lock
switch or mechanical key. 5. Confirm that the security indicator
light comes on. The security indicator
light stays on for about 30 seconds.
The vehicle security system is now
pre-armed. After about 30 seconds
the vehicle security system automati-
cally shifts into the armed phase. The
security light begins to flash once
every approximately 3 seconds. If,
during this 30-second pre-arm time
period, the door is unlocked, or the
ignition switch is pushed to ACC or
ON, the system will not arm.
Even when the driver and/or passen-
gers are in the vehicle, the system will
activate with all doors, hood and rear
hatch locked with the ignition switch in
the LOCK position. When pushing the
ignition switch to the ACC or ON posi-
tion, the system will be released.
Vehicle security system activation
The vehicle security system will give the
following alarm:
. The headlights blink and the horn
sounds intermittently.
. The alarm automatically turns off
after approximately 1 minute. How-
ever, the alarm reactivates if the
vehicle is tampered with again.
The alarm is activated by: .
Unlocking the door or opening the
rear hatch without using the button
on the Intelligent Key, the door handle
request switch or the mechanical key.
(Even if the door is opened by releas-
ing the door inside lock knob, the
alarm will activate.)
. Opening the hood.
How to stop an activated alarm
The alarm will stop by unlocking a door
by pushing the unlock button on the
Intelligent Key, the door handle request
switch or using the mechanical key. The
alarm will not stop if the ignition switch is
pushed to the ACC or ON position.
If the system does not operate as
described above, it is recommended
you have it checked by a NISSAN dealer.
NISSAN VEHICLE IMMOBILIZER SYS-
TEM
The NISSAN Vehicle Immobilizer System
will not allow the engine to start without
the use of the registered Intelligent Key.
Never leave these keys in the vehicle.
For USA:
This device complies with Part 15 of the
FCC Rules. Operation is subject to the
following two conditions:
(1) This device may not cause harmful
interference, and (2) this device must