2018 NISSAN 370Z COUPE radio
[x] Cancel search: radioPage 221 of 453
Turn the VOL control knob to adjust the
volume.
Adjusting tone quality and speaker
balance:
To adjust Bass, Treble, Balance and Fade,
push the Audio control knob. When the
display shows the setting you want to
change (Bass, Treble, Balance and Fade),
rotate the Audio control knob to set the
desired setting. For the other setting
methods, see “How to use SETTING but-
ton” (P.4-11).
This vehicle has some sound effect func-
tions as follows:
.Speed Sensitive Vol.
For more details, see “How to use SETTING
button” (P.4-11).
Switching the display:
Pushing the DISC·AUX button will switch
the displays as follows:
iPod®/USB ?CD/DVD ?Bluetooth®
Audio ?AUX ?iPod®/USBFM-AM-SAT radio operation
radio (FM/AM) band select:
Pushing the radio band select button will
change the band as follows:
AM ?FM1 ?FM2 ?AM
radio (SAT) band select:
Pushing the radio band select button will
change the band as follows:
XM1 ?XM2 ?XM3 ?XM1
When the radio band select button is
pushed while the ignition switch is in the
ACC or ON position, the radio will come
on at the channel last played.
The last channel played will also come on
when the ON·OFF button is pushed to ON.
The satellite radio is not available in
Alaska, Hawaii and Guam.
If another audio source is playing when
the radio band select button is turned to
ON, the audio source will automatically be
turned off and the last radio channel
played will come on.
When the stereo broadcast signal is weak,
the radio will automatically change from
stereo to monaural reception. TUNE (Tuning):
. For AM and FM radio
Turn the radio TUNE knob for manual
tuning.
. For SiriusXM Satellite Radio
Turn the radio TUNE knob to seek
channels from all of the categories
when any category is not selected.
SEEK tuning/CATEGORY
(CAT):
. For AM and FM radio
Push the SEEK button
orto
tune from low to high or high to low
frequencies and to stop at the next
broadcasting station.
. For SiriusXM Satellite Radio
Push the SEEK button
orto
tune to the first channel of the next or
previous category.
During satellite radio reception, the fol-
lowing notices will be displayed under
certain conditions.
. NO SIGNAL (No signal is received while
the SAT tuner is connected.)
. OFF AIR (Broadcasting signed off)
. CHECK ANTENNA (Antenna connec-
tion error)
. LOADING (When the initial setting is
performed)
Center display, heater, air conditioner, audio, phone and voice recognition systems4-53
Page 222 of 453

4-54Center display, heater, air conditioner, audio, phone and voice recognition systems
.UPDATING (When the satellite radio
subscription is not active)
SCAN tuning:
Push the SCAN tuning button to tune
from low to high frequencies and stop at
each broadcasting station/channel for 5
seconds. Pushing the button again during
this 5 seconds period will stop SCAN
tuning and the radio will remain tuned
to that station/channel.
If the SCAN tuning button is not pushed
within 5 seconds, SCAN tuning moves to
the next station/channel.
toStation memory operations:
12 stations/channels can be set for the
FM band (6 each for FM1 and FM2), 18 for
SiriusXM Satellite Radio (6 each for XM1,
XM2 and XM3) and 6 stations can be set
for the AM band.
1. Choose the radio band using the radio band select button.
2. Tune to the desired station/channel using the SEEK/TRACK, SCAN button
or the radio TUNE knob.
3. Push and hold the desired station preset button
tountil the radio
mutes.
4. The station indicator will then come on and the sound will resume. Mem- orizing is now complete.
5. Other buttons can be set in the same manner.
If the battery cable is disconnected, or if
the fuse opens, the radio memory will be
erased. In that case, reset the desired
stations/channels.
List (AM and FM radio):
When the “List” key on the display is
selected while the FM or AM radio is being
played, the preset station list will be
displayed.
If 1 of the 6 preset stations listed is
touched and held, the current station will
be stored as the new preset.
Menu (SiriusXM Satellite Radio):
When the “Menu” key on the display is
selected while the SiriusXM Satellite Radio
is being played, the menu list will be
displayed.
The following items are available.
. Preset List
Displays the preset channel list. If 1 of
the 6 preset stations listed is touched
and held, the current station will be
stored as the new preset.
. Customize Channel List
Selects specific channels to skip while
using the TUNE, SEEK/CATEGORY or Menu-Categories feature.
. Favorite Artists & Songs
Stores the current artist or song that
is being played. Touch the “Alert” key
to be reminded when the stored artist
or song is playing on a station while
listening to SiriusXM Satellite Radio.
. Categories
Selecting a category will go to the first
channel in that category as defined by
SiriusXM Satellite Radio.
. Direct Tune
Inputs the channel number by using a
keypad.
Compact Disc (CD) player operation
Push the ignition switch to the ACC or ON
position and insert the Compact Disc (CD)
into the slot with the label side facing up.
The CD will be guided automatically into
the slot and start playing.
After loading the CD, the number of
tracks on the CD and the play time will
appear on the display.
If the radio is already operating, it will
automatically turn off and the CD will
play.
If the system has been turned off while
the CD was playing, pushing the ON·OFF
button will start the CD.
Do not use 3.1 in (8 cm) discs.
Page 223 of 453

PLAY:
When the DISC·AUX (CD play) button is
pushed with the system off and the CD
loaded, the system will turn on and the
CD will start to play.
When the DISC·AUX button is pushed with
the CD loaded and the radio playing, the
radio will automatically be turned off and
the CD will start to play.
Menu:
When the “Menu” key on the display is
selected while the CD is being played, the
menu screen will be displayed. The fol-
lowing menu options are available.
. Folder List (for CD with compressed
audio files)
Displays the folder list.
. Track List
Displays the track list.
. Play Mode
Select a play mode from the following
items.
— Normal
— 1 Folder Repeat (for CD with com-
pressed audio files)
— 1 Track Repeat
— 1 Disc Random
— 1 Folder Random (for CD with com- pressed audio files)Next/Previous Track and
Fast Forward/Rewind:
When the
orbutton is pushed for
more than 1.5 seconds while the CD is
being played, the CD will play while fast
forwarding or rewinding. When the but-
ton is released, the CD will return to
normal play speed.
When the
orbutton is pushed for
less than 1.5 seconds while the CD is being
played, the next track or the beginning of
the current track on the CD will be played.
When the rewind button is pushed for less
than 1.5 seconds within 3 seconds after
the current track starts playing, the pre-
vious track will be played. Push the button
several times to skip through the tracks.
REPEAT (RPT), RANDOM (RDM):
When the RPT button is pushed while the
CD is played, the play pattern can be
changed as follows:
(CD)
(CD with compressed audio files)
CD EJECT:
When the CD EJECT button is pushed with
the CD loaded, the CD will be ejected.
If the CD comes out and is not removed,
it will be pulled back into the slot to
protect it.
DVD (Digital Versatile Disc) PLAYER
OPERATION (models with naviga-
tion system)
Precautions
Start the engine when using the DVD
entertainment system.
Movies will not be shown on the front
display while the vehicle is in any drive
position to reduce driver distraction.
Audio is available when a movie is played.
To view movies in the front display, stop
the vehicle in a safe location, move the
shift lever to the P (Park) position and
apply the parking brake.
Center display, heater, air conditioner, audio, phone and voice recognition systems4-55
Page 241 of 453
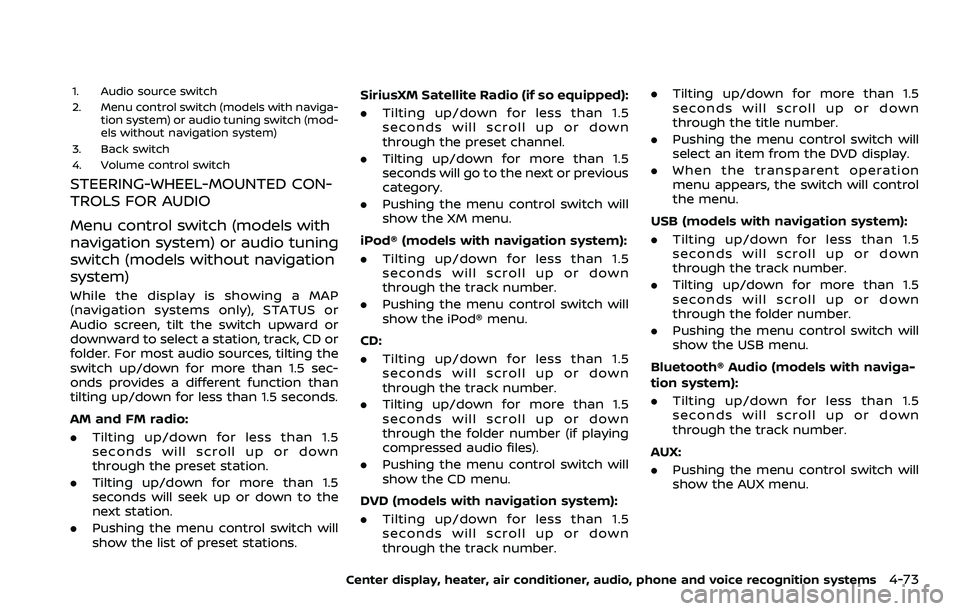
1. Audio source switch
2. Menu control switch (models with naviga-tion system) or audio tuning switch (mod-
els without navigation system)
3. Back switch
4. Volume control switch
STEERING-WHEEL-MOUNTED CON-
TROLS FOR AUDIO
Menu control switch (models with
navigation system) or audio tuning
switch (models without navigation
system)
While the display is showing a MAP
(navigation systems only), STATUS or
Audio screen, tilt the switch upward or
downward to select a station, track, CD or
folder. For most audio sources, tilting the
switch up/down for more than 1.5 sec-
onds provides a different function than
tilting up/down for less than 1.5 seconds.
AM and FM radio:
. Tilting up/down for less than 1.5
seconds will scroll up or down
through the preset station.
. Tilting up/down for more than 1.5
seconds will seek up or down to the
next station.
. Pushing the menu control switch will
show the list of preset stations. SiriusXM Satellite Radio (if so equipped):
. Tilting up/down for less than 1.5
seconds will scroll up or down
through the preset channel.
. Tilting up/down for more than 1.5
seconds will go to the next or previous
category.
. Pushing the menu control switch will
show the XM menu.
iPod® (models with navigation system):
. Tilting up/down for less than 1.5
seconds will scroll up or down
through the track number.
. Pushing the menu control switch will
show the iPod® menu.
CD:
. Tilting up/down for less than 1.5
seconds will scroll up or down
through the track number.
. Tilting up/down for more than 1.5
seconds will scroll up or down
through the folder number (if playing
compressed audio files).
. Pushing the menu control switch will
show the CD menu.
DVD (models with navigation system):
. Tilting up/down for less than 1.5
seconds will scroll up or down
through the track number. .
Tilting up/down for more than 1.5
seconds will scroll up or down
through the title number.
. Pushing the menu control switch will
select an item from the DVD display.
. When the transparent operation
menu appears, the switch will control
the menu.
USB (models with navigation system):
. Tilting up/down for less than 1.5
seconds will scroll up or down
through the track number.
. Tilting up/down for more than 1.5
seconds will scroll up or down
through the folder number.
. Pushing the menu control switch will
show the USB menu.
Bluetooth® Audio (models with naviga-
tion system):
. Tilting up/down for less than 1.5
seconds will scroll up or down
through the track number.
AUX:
. Pushing the menu control switch will
show the AUX menu.
Center display, heater, air conditioner, audio, phone and voice recognition systems4-73
Page 243 of 453
conditions.
— The vehicle enters an auto-matic car wash.
— The vehicle enters a garage with a low ceiling.
— The vehicle is covered with a car cover.
. Always properly tighten the an-
tenna rod during installation.
Otherwise, the antenna rod may
break during vehicle operation. When installing a car phone or a CB radio
in your vehicle, be sure to observe the
following cautions, otherwise the new
equipment may adversely affect the elec-
tronic control modules and electronic
control system harness.
WARNING
.
A cellular phone should not be
used for any purpose while driv-
ing so full attention may be given
to vehicle operation. Some juris-
dictions prohibit the use of cellu-
lar phones while driving.
. If you must make a call while your
vehicle is in motion, the hands-
free cellular phone operational
mode (if so equipped) is highly
recommended. Exercise extreme
caution at all times so full atten-
tion may be given to vehicle
operation.
. If a conversation in a moving
vehicle requires you to take
notes, pull off the road to a safe
location and stop your vehicle
before doing so.
CAUTION
.Keep the antenna as far away as
possible from the electronic con-
trol modules.
. Keep the antenna wire more than
8 in (20 cm) away from the
electronic control system har-
ness. Do not route the antenna
wire next to any harness.
. Adjust the antenna standing-
wave ratio as recommended by
the manufacturer.
. Connect the ground wire from the
CB radio chassis to the body.
. For details, it is recommended
you visit a NISSAN dealer.
Center display, heater, air conditioner, audio, phone and voice recognition systems4-75
CAR PHONE OR CB RADIO
Page 244 of 453
4-76Center display, heater, air conditioner, audio, phone and voice recognition systems
WARNING
.Use a phone after stopping your
vehicle in a safe location. If you
have to use a phone while driving,
exercise extreme caution at all
times so full attention may be
given to vehicle operation.
. If you find yourself unable to
devote full attention to vehicle
operation while talking on the
phone, pull off the road to a safe
location and stop your vehicle
before doing so.
CAUTION
To avoid draining the vehicle battery,
use a phone after starting the en-
gine.
Your vehicle is equipped with Bluetooth®
Hands-Free Phone System. If you are an
owner of a compatible Bluetooth® en-
abled cellular phone, you can set up the
wireless connection between your cellu-
lar phone and the in-vehicle phone mod-
ule. With Bluetooth® wireless technology,
you can make or receive a telephone call with your cellular phone in your pocket.
Once a cellular phone is connected to the
in-vehicle phone module, no phone con-
necting procedure is required anymore.
Your phone is automatically connected
with the in-vehicle phone module when
the ignition switch is pushed to the ON
position with the registered cellular
phone turned on and carried in the
vehicle.
You can register up to 5 different Blue-
tooth® cellular phones in the in-vehicle
phone module. However, you can talk on
only one cellular phone at a time.
The NISSAN Voice Recognition system
supports the phone commands, so dial-
ing a phone number using your voice is
possible. For more details, see “NISSAN
Voice Recognition System (models with
navigation system)” (P.4-99).
Before using the Bluetooth® Hands-Free
Phone System, refer to the following
notes.
.
Wireless LAN (Wi-Fi) and the Blue-
tooth® functions share the same fre-
quency band (2.4 GHz). Using the
Bluetooth® and the wireless LAN func-
tions at the same time may slow down
or disconnect the communication and
cause undesired noise. It is recom-
mended that you turn off the wireless LAN (Wi-Fi) when using the Bluetooth®
functions.
. Set up the wireless connection be-
tween a compatible cellular phone
and the in-vehicle phone module be-
fore using the Bluetooth® Hands-Free
Phone System.
. Some Bluetooth® enabled cellular
phones may not be recognized by
the in-vehicle phone module. Please
visit
www.nissanusa.com/bluetooth for a
recommended phone list.
. You will not be able to use a hands-
free phone under the following condi-
tions:
— Your vehicle is outside of the tele-
phone service area.
— Your vehicle is in an area where it is difficult to receive radio waves;
such as in a tunnel, in an under-
ground parking garage, behind a
tall building or in a mountainous
area.
— Your cellular phone is locked in order not to be dialed.
. When the radio wave condition is not
ideal or ambient sound is too loud, it
may be difficult to hear the other
person’s voice during a call.
Bluetooth® HANDS-FREE PHONE SYSTEM
(models with navigation system)
Page 255 of 453
Bluetooth® and the wireless LAN func-
tions at the same time may slow down
or disconnect the communication and
cause undesired noise. It is recom-
mended that you turn off the wireless
LAN (Wi-Fi) when using the Bluetooth®
functions.
. Set up the wireless connection be-
tween a compatible cellular phone
and the in-vehicle phone module be-
fore using the Bluetooth® Hands-Free
Phone System.
. Some Bluetooth® enabled cellular
phones may not be recognized by
the in-vehicle phone module. Please
visit www.nissanusa.com/bluetooth
for a recommended phone list and
connecting.
. You will not be able to use a hands-
free phone under the following condi-
tions:
— Your vehicle is outside of the tele-
phone service area.
— Your vehicle is in an area where it is difficult to receive radio waves;
such as in a tunnel, in an under-
ground parking garage, near a tall
building or in a mountainous area.
— Your cellular phone is locked to prevent it from being dialed. .
When the radio wave condition is not
ideal or ambient sound is too loud, it
may be difficult to hear the other
person’s voice during a call.
. Immediately after the ignition switch
is pushed to the ON position, it may be
impossible to receive a call for a short
period of time.
. Do not place the cellular phone in an
area surrounded by metal or far away
from the in-vehicle phone module to
prevent tone quality degradation and
wireless connection disruption.
. While a cellular phone is connected
through the Bluetooth® wireless con-
nection, the battery power of the
cellular phone may discharge quicker
than usual. The Bluetooth® Hands-
Free Phone System cannot charge
cellular phones.
. If the Bluetooth® Hands-Free Phone
System seems to be malfunctioning, it
is recommended to contact a NISSAN
dealer.
. Some cellular phones or other devices
may cause interference or a buzzing
noise to come from the audio system
speakers. Storing the device in a
different location may reduce or elim-
inate the noise.
. Refer to the cellular phone Owner’s
Manual regarding battery charging, cellular phone antenna, etc.
. This wireless hands free car kit is
based on Bluetooth® technology,
— Frequency: 2402 MHz - 2480 MHz
— Output Power: 4.14 dBm E.I.R.P
— Modulation: FHSS GFSK 8DPSK, π/
4DQPSK
— Number of Channel: 79
— This wireless equipment can’t be used for any services related to
safety because there is the possibi-
lity of radio interference.
REGULATORY INFORMATION
FCC Regulatory information
. CAUTION: To maintain compliance
with FCC’s RF exposure guidelines,
use only the supplied antenna. Un-
authorized antenna, modification, or
attachments could damage the trans-
mitter and may violate FCC regula-
tions.
. Operation is subject to the following
two conditions:
1. this device may not cause interfer- ence and
2. this device must accept any interfer- ence, including interference that may
cause undesired operation of the
device
Center display, heater, air conditioner, audio, phone and voice recognition systems4-87
Page 257 of 453
.If you want to adjust the volume of the
voice feedback, push the volume con-
trol switch (+ or −) on the steering
wheel while being provided with feed-
back. You can also use the radio
volume control knob.
Voice Prompt Interrupt:
In most cases you can interrupt the voice
feedback to speak the next command by
pressing the
button on the steering
wheel.
One Shot Call:
To use the system faster, you may speak
the second level commands with the
main menu command on the main menu.
For example, push the
button and
after the tone say, “Call Redial.” Note: The
combined command of Call and (a Name)
cannot be used.
How to say numbers
NISSAN Voice Recognition requires a
certain way to speak numbers in voice
commands. Refer to the rules and exam-
ples below.
. Either “zero” or “oh” can be used for “0”.
Example: 1-800-662-6200
— “One eight oh oh six six two six two
oh oh”, or — “One eight zero zero six six two six
two oh oh”
. Words can be used for the first 4 digits
places only.
Example: 1-800-662-6200
— “One eight hundred six six two six
two oh oh”,
— NOT “One eight hundred six six two sixty two hundred, and
— NOT “One eight oh oh six six two sixty two hundred.
. Numbers can be spoken in small
groups. The system will prompt you
to continuing entering digits, if de-
sired.
Example: 1-800-662-6200
— “One eight zero zero”
The system repeats the numbers
and prompts you to enter more.
— “six six two” The system repeats the numbers
and prompts you to enter more.
— “six two zero zero”
. You can say “Star” for “*” and “Pound”
for “#” at any time in any position of
the phone number. (Available only
when using the “Special Number”
command.)
Example: 1-555-1212 *123 — “One five five five one two one two
star one two three”
. Say “pound” for “#”. Say “star” for “*”
(available when using the “Special
Number” command and the “Send”
command during a call).
. Say “plus” for “+” (available only when
using the “Special Number” com-
mand).
. Say “pause” for a 2 second pause
(available only when storing a phone
book number).
See “Making a call by entering a phone
number” (P.4-91) and “List of voice
commands” (P.4-92) for more informa-
tion.
NOTE:
For best results, say phone numbers as
single digits.
The voice command “Help” is available at
any time. Please say the “Help” command
to get information about how to use the
system.
INFO
. If you are controlling the telephone
system by voice command for the first
time or do not know the appropriate
voice command, speak “Help”. The
system announces the available com-
mands.
Center display, heater, air conditioner, audio, phone and voice recognition systems4-89