2018 NISSAN 370Z COUPE lock
[x] Cancel search: lockPage 303 of 453

.Make sure the area around the vehicle
is clear.
. Check fluid levels such as engine oil,
coolant, brake fluid and window
washer fluid as frequently as possible,
or at least whenever you refuel.
. Check that all windows and lights are
clean.
. Visually inspect tires for their appear-
ance and condition. Also check tires
for proper inflation.
. Lock all doors.
. Position seat and adjust head re-
straints.
. Adjust inside and outside mirrors.
. Fasten seat belts and ask all passen-
gers to do likewise.
. Check the operation of warning lights
when the ignition switch is pushed to
the ON position. (See “Warning lights,
indicator lights and audible remin-
ders” (P.2-10).)1. Apply the parking brake.
2.Automatic Transmission (AT) model:
Move the shift lever to the P (Park) or N
(Neutral) position. (P is recommended.)
The starter is designed not to operate
unless the shift lever is in either of the
above positions.
Manual Transmission (MT) model:
Move the shift lever to the N (Neutral)
position. Depress the clutch pedal fully
to the floor.
The starter is designed not to operate
unless the clutch pedal is fully de-
pressed.
The Intelligent Key must be carried
when operating the ignition switch.
3. Push the ignition switch to the ON position. Depress the brake pedal (AT
model) or the clutch pedal (MT model)
and push the ignition switch to start
the engine.
To start the engine immediately, push
and release the ignition switch while
depressing the brake pedal or the
clutch pedal with the ignition switch
in any position.
.If the engine is very hard to start inextremely cold weather or when
restarting, depress the accelerator
pedal a little (approximately 1/3 to the floor) and while holding, crank
the engine. Release the accelerator
pedal when the engine starts.
.If the engine is very hard to start
because it is flooded, depress the
accelerator pedal all the way to the
floor and hold it. Push the ignition
switch to the ON position to start
cranking the engine. After 5 or 6
seconds, stop cranking by pushing
the ignition switch to OFF. After
cranking the engine, release the
accelerator pedal. Crank the engine
with your foot off the accelerator
pedal by depressing the brake
pedal and pushing the push-button
ignition switch to start the engine.
If the engine starts, but fails to run,
repeat the above procedure.
CAUTION
Do not operate the starter for more
than 15 seconds at a time. If the
engine does not start, push the
ignition switch to OFF and wait 10
seconds before cranking again,
otherwise the starter could be da-
maged.
Starting and driving5-11
BEFORE STARTING THE ENGINE STARTING THE ENGINE
Page 304 of 453
5-12Starting and driving
4.Warm-up
Allow the engine to idle for at least 30
seconds after starting. Do not race the
engine while warming it up. Drive at
moderate speed for a short distance
first, especially in cold weather. In cold
weather, keep the engine running for
a minimum of 2 - 3 minutes before
shutting it off. Starting and stopping
the engine over a short period of time
may make the vehicle more difficult to
start.
When racing the engine up to 4,500
rpm or more under no load condition,
the engine will enter the fuel cut
mode.
5. To stop the engine, shift the shift lever to the P (Park) position (AT model) or
move the shift lever to the N (Neutral)
position (MT model), and push the
ignition switch to the OFF position.
NOTE:
Care should be taken to avoid situations
that can lead to potential battery dis-
charge and potential no-start condi-
tions such as:
1. Installation or extended use of elec-
tronic accessories that consume
battery power when the engine is
not running (Phone chargers, GPS,
DVD players, etc.) 2.
Vehicle is not driven regularly and/
or only driven short distances.
In these cases, the battery may need to
be charged to maintain battery health.AUTOMATIC TRANSMISSION
7 speed automatic transmission
The automatic transmission in your vehi-
cle is electronically controlled by a trans-
mission control module to produce
maximum efficiency and smooth opera-
tion.
Shown on the following pages are the
recommended operating procedures for
this transmission. Follow these proce-
dures for maximum vehicle performance
and driving enjoyment.
Starting the vehicle
After starting the engine, fully depress the
foot brake pedal and push the shift lever
button before shifting the shift lever to
the R (Reverse), N (Neutral), D (Drive) or
Manual shift mode position. Be sure the
vehicle is fully stopped before attempting
to shift the shift lever.
This automatic transmission model is
designed so that the foot brake pedal
must be depressed before shifting from
P (Park) to any drive position while the
ignition switch position is ON.
The shift lever cannot be moved out of
the P (Park) position and into any of the
other gear positions if the ignition
switch is pushed to the LOCK, OFF or
ACC position.
DRIVING THE VEHICLE
Page 308 of 453
5-16Starting and driving
SSD0832
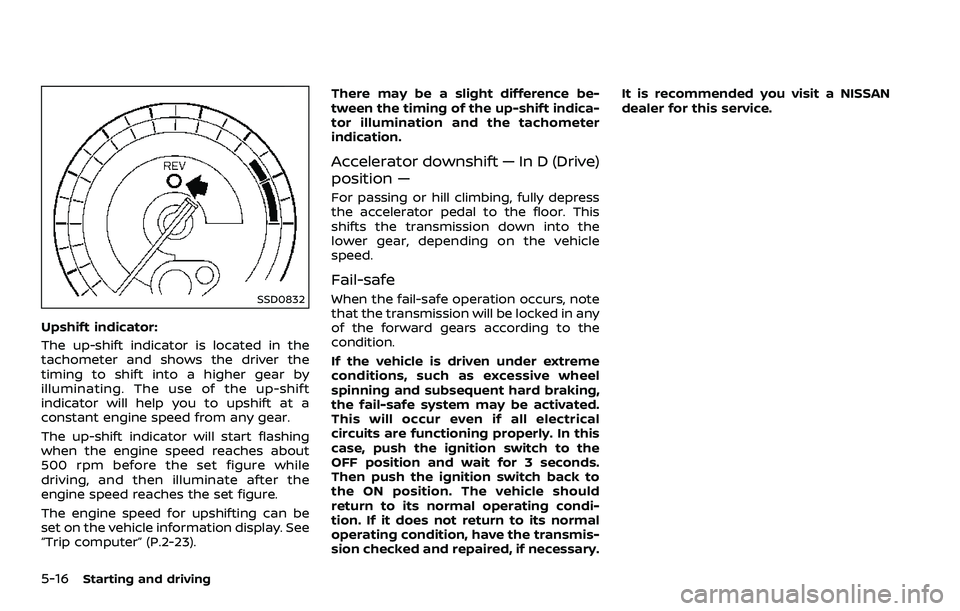
Upshift indicator:
The up-shift indicator is located in the
tachometer and shows the driver the
timing to shift into a higher gear by
illuminating. The use of the up-shift
indicator will help you to upshift at a
constant engine speed from any gear.
The up-shift indicator will start flashing
when the engine speed reaches about
500 rpm before the set figure while
driving, and then illuminate after the
engine speed reaches the set figure.
The engine speed for upshifting can be
set on the vehicle information display. See
“Trip computer” (P.2-23).There may be a slight difference be-
tween the timing of the up-shift indica-
tor illumination and the tachometer
indication.
Accelerator downshift — In D (Drive)
position —
For passing or hill climbing, fully depress
the accelerator pedal to the floor. This
shifts the transmission down into the
lower gear, depending on the vehicle
speed.
Fail-safe
When the fail-safe operation occurs, note
that the transmission will be locked in any
of the forward gears according to the
condition.
If the vehicle is driven under extreme
conditions, such as excessive wheel
spinning and subsequent hard braking,
the fail-safe system may be activated.
This will occur even if all electrical
circuits are functioning properly. In this
case, push the ignition switch to the
OFF position and wait for 3 seconds.
Then push the ignition switch back to
the ON position. The vehicle should
return to its normal operating condi-
tion. If it does not return to its normal
operating condition, have the transmis-
sion checked and repaired, if necessary.It is recommended you visit a NISSAN
dealer for this service.
Page 309 of 453
SSD0829
Shift lock release
If the battery charge is low or discharged,
the shift lever may not be moved from the
P (Park) position even with the brake
pedal depressed and the shift lever but-
ton pushed.
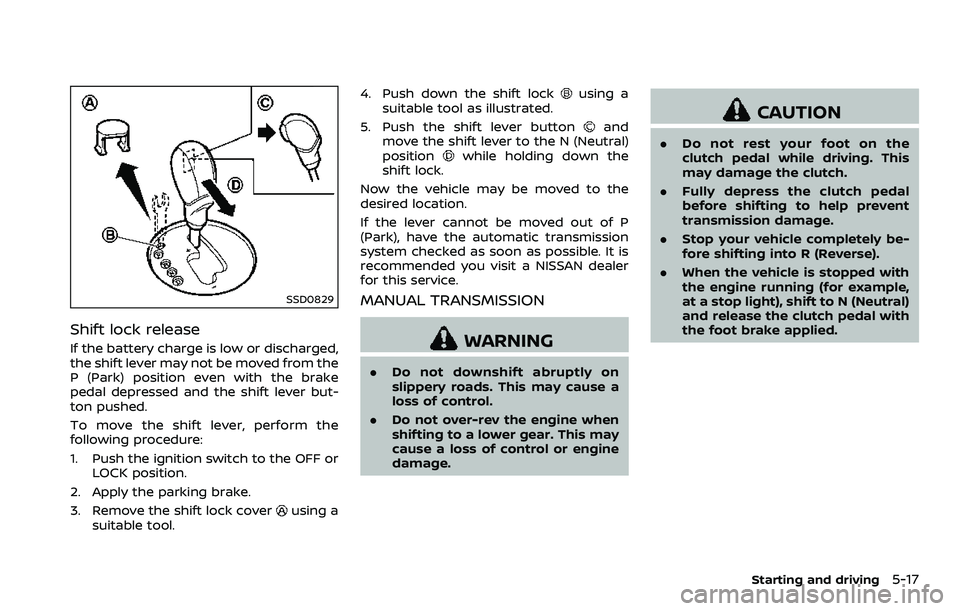
To move the shift lever, perform the
following procedure:
1. Push the ignition switch to the OFF orLOCK position.
2. Apply the parking brake.
3. Remove the shift lock cover
using a
suitable tool. 4. Push down the shift lock
using a
suitable tool as illustrated.
5. Push the shift lever button
and
move the shift lever to the N (Neutral)
position
while holding down the
shift lock.
Now the vehicle may be moved to the
desired location.
If the lever cannot be moved out of P
(Park), have the automatic transmission
system checked as soon as possible. It is
recommended you visit a NISSAN dealer
for this service.
MANUAL TRANSMISSION
WARNING
. Do not downshift abruptly on
slippery roads. This may cause a
loss of control.
. Do not over-rev the engine when
shifting to a lower gear. This may
cause a loss of control or engine
damage.
CAUTION
.Do not rest your foot on the
clutch pedal while driving. This
may damage the clutch.
. Fully depress the clutch pedal
before shifting to help prevent
transmission damage.
. Stop your vehicle completely be-
fore shifting into R (Reverse).
. When the vehicle is stopped with
the engine running (for example,
at a stop light), shift to N (Neutral)
and release the clutch pedal with
the foot brake applied.
Starting and driving5-17
Page 320 of 453
5-28Starting and driving
PARKING BRAKE BREAK-IN
Break in the parking brake shoes when-
ever the stopping effect of the parking
brake is weakened or whenever the
parking brake shoes and/or drums/ro-
tors are replaced, in order to assure the
best braking performance.
This procedure is described in the vehicle
service manual. It is recommended you
visit a NISSAN dealer for this service.
Using the brakes
Avoid resting your foot on the brake
pedal while driving. This will cause over-
heating of the brakes, wearing out the
brake and pads faster and reduce gas
mileage.
To help save the brakes and to prevent
the brakes from overheating, reduce
speed and downshift to a lower gear
before going down a slope or long grade.
Overheated brakes may reduce braking
performance and could result in loss of
vehicle control.
WARNING
.While driving on a slippery sur-
face, be careful when braking,
accelerating or downshifting.
Abrupt braking or accelerating could cause the wheels to skid
and result in an accident.
. If the engine is not running or is
turned off while driving, the
power assist for the brakes will
not work. Braking will be harder.
BRAKE ASSIST
When the force applied to the brake pedal
exceeds a certain level, the Brake Assist is
activated generating greater braking
force than a conventional brake booster
even with light pedal force.
WARNING
The Brake Assist is only an aid to
assist braking operation and is not a
collision warning or avoidance de-
vice. It is the driver’s responsibility to
stay alert, drive safely and be in
control of the vehicle at all times.
ANTI-LOCK BRAKING SYSTEM (ABS)
WARNING
.The Anti-lock Braking System
(ABS) is a sophisticated device,
but it cannot prevent accidents
resulting from careless or dan-
gerous driving techniques. It can
help maintain vehicle control dur-
ing braking on slippery surfaces.
Remember that stopping dis-
tances on slippery surfaces will
be longer than on normal sur-
BRAKE ASSIST
Page 321 of 453

faces even with ABS. Stopping
distances may also be longer on
rough, gravel or snow covered
roads, or if you are using tire
chains. Always maintain a safe
distance from the vehicle in front
of you. Ultimately, the driver is
responsible for safety.
. Tire type and condition may also
affect braking effectiveness.
— When replacing tires, install
the specified size of tires on
all four wheels.
— When installing a spare tire, make sure that it is the proper
size and type as specified on
the Tire and Loading Informa-
tion label. See “Tire and Load-
ing Information label” (P.10-
14) of this manual.
— For detailed information, see “Wheels and tires” (P.8-26) of
this manual.
The Anti-lock Braking System (ABS) con-
trols the brakes so the wheels do not lock
during hard braking or when braking on
slippery surfaces. The system detects the
rotation speed at each wheel and varies
the brake fluid pressure to prevent each
wheel from locking and sliding. By pre- venting each wheel from locking, the
system helps the driver maintain steering
control and helps to minimize swerving
and spinning on slippery surfaces.
Using the system
Depress the brake pedal and hold it down.
Depress the brake pedal with firm steady
pressure, but do not pump the brakes.
The ABS will operate to prevent the
wheels from locking up. Steer the vehicle
to avoid obstacles.
WARNING
Do not pump the brake pedal. Doing
so may result in increased stopping
distances.
Self-test feature
The ABS includes electronic sensors, elec-
tric pumps, hydraulic solenoids and a
computer. The computer has a built-in
diagnostic feature that tests the system
each time you start the engine and move
the vehicle at a low speed in forward or
reverse. When the self-test occurs, you
may hear a “clunk” noise and/or feel a
pulsation in the brake pedal. This is
normal and does not indicate a malfunc-
tion. If the computer senses a malfunc-
tion, it switches the ABS off and
illuminates the ABS warning light on the
instrument panel. The brake system then
operates normally, but without anti-lock
assistance.
If the ABS warning light illuminates during
the self-test or while driving, have the
vehicle checked. It is recommended you
visit a NISSAN dealer for this service.
Normal operation
The ABS operates at speeds above 3 to 6
MPH (5 to 10 km/h).
When the ABS senses that one or more
wheels are close to locking up, the
actuator rapidly applies and releases
hydraulic pressure. This action is similar
to pumping the brakes very quickly. You
may feel a pulsation in the brake pedal
and hear a noise from under the hood or
feel a vibration from the actuator when it
is operating. This is normal and indicates
that the ABS is operating properly. How-
ever, the pulsation may indicate that road
conditions are hazardous and extra care
is required while driving.
Starting and driving5-29
Page 325 of 453
FREEING A FROZEN DOOR LOCK
To prevent a door lock from freezing,
apply deicer through the key hole. If the
lock becomes frozen, heat the key before
inserting it into the key hole or use the
Intelligent Key system.
ANTIFREEZE
In the winter when it is anticipated that
the outside temperature will drop below
32°F (0°C), check antifreeze to assure
proper winter protection. For additional
information, see “Engine cooling system”
(P.8-4).
BATTERY
If the battery is not fully charged during
extremely cold weather conditions, the
battery fluid may freeze and damage the
battery. To maintain maximum efficiency,
the battery should be checked regularly.
For additional information, see “Battery”
(P.8-11).
DRAINING OF COOLANT WATER
If the vehicle is to be left outside without
antifreeze, drain the cooling system, in-
cluding the engine block. Refill before
operating the vehicle. For details, see
“Engine cooling system” (P.8-4).
TIRE EQUIPMENT
SUMMER tires have a tread designed to
provide superior performance on dry
pavement. However, the performance of
these tires will be substantially reduced in
snowy and icy conditions. If you operate
your vehicle on snowy or icy roads,
NISSAN recommends the use of MUD &
SNOW or ALL SEASON tires on all four
wheels. It is recommended you consult a
NISSAN dealer for the tire type, size, speed
rating and availability information.
For additional traction on icy roads,
studded tires may be used. However,
some U.S. states and Canadian provinces
prohibit their use. Check local, state and
provincial laws before installing studded
tires.
Skid and traction capabilities of
studded snow tires, on wet or dry
surfaces, may be poorer than that of
non-studded snow tires.
Tire chains may be used. For details, see
“Tire chains” (P.8-33) of this manual.
SPECIAL WINTER EQUIPMENT
It is recommended that the following
items be carried in the vehicle during
winter:
.A scraper and stiff-bristled brush to
remove ice and snow from the win-
dows and wiper blades.
. A sturdy, flat board to be placed under
the jack to give it firm support.
. A shovel to dig the vehicle out of
snowdrifts.
. Extra window washer fluid to refill the
reservoir tank.
DRIVING ON SNOW OR ICE
WARNING
. Wet ice (32°F, 0°C and freezing
rain), very cold snow or ice can be
slick and very hard to drive on.
The vehicle will have much less
traction or “grip” under these
conditions. Try to avoid driving
on wet ice until the road is salted
or sanded.
. Whatever the condition, drive
with caution. Accelerate and slow
down with care. If accelerating or
downshifting too fast, the drive
wheels will lose even more trac-
Starting and driving5-33
COLD WEATHER DRIVING
Page 326 of 453
5-34Starting and driving
tion.
. Allow more stopping distance
under these conditions. Braking
should be started sooner than on
dry pavement.
. Allow greater following distances
on slippery roads.
. Watch for slippery spots (glare
ice). These may appear on an
otherwise clear road in shaded
areas. If a patch of ice is seen
ahead, brake before reaching it.
Try not to brake while on the ice,
and avoid any sudden steering
maneuvers.
. Do not use the cruise control on
slippery roads.
. Snow can trap dangerous ex-
haust gases under your vehicle.
Keep snow clear of the exhaust
pipe and from around your vehi-
cle.
ENGINE BLOCK HEATER (if so
equipped)
Engine block heaters are used to assist
with cold temperature starting.
The engine block heater should be used
when the outside temperature is 20°F
(−7°C) or lower.
To use the engine block heater
1. Turn the engine off.
2. Open the hood and unwrap the en-
gine block heater cord.
3. Plug the engine block heater cord into a grounded 3-wire, 3-pronged exten-
sion cord.
4. Plug the extension cord into a Ground Fault Interrupt (GFI) protected,
grounded 110-volt AC (VAC) outlet.
5. The engine block heater must be plugged in for at least 2 - 4 hours,
depending on outside temperatures,
to properly warm the engine coolant.
Use an appropriate timer to turn the
engine block heater on.
6. Before starting the engine, unplug and properly store the cord to keep it
away from moving parts.
WARNING
. Do not use your engine block
heater with an ungrounded elec-
trical system or a 2-pronged
adapter. You can be seriously
injured by an electrical shock if
you use an ungrounded connec-
tion. .
Disconnect and properly store the
engine block heater cord before
starting the engine. Damage to
the cord could result in an elec-
trical shock and can cause ser-
ious injury.
. Use a heavy-duty 3-wire, 3-
pronged extension cord rated
for at least 10A. Plug the exten-
sion cord into a Ground Fault
Interrupt (GFI) protected,
grounded 110-VAC outlet. Failure
to use the proper extension cord
or a grounded outlet can result in
a fire or electrical shock and
cause serious personal injury.