2018 MITSUBISHI OUTLANDER PHEV accessory socket
[x] Cancel search: accessory socketPage 6 of 538
![MITSUBISHI OUTLANDER PHEV 2018 Owners Manual (in English) 1. Multi Around Monitor* p. 7-106Audio* p. 8-13
[For DISPLAY AUDIO, Smartphone Link Display Audio and
MITSUBISHI Multi Communication System (MMCS), refer to
the separate owner’s manual.]
2. Hazard w](/manual-img/19/34890/w960_34890-5.png "MITSUBISHI OUTLANDER PHEV 2018 Owners Manual (in English) 1. Multi Around Monitor* p. 7-106Audio* p. 8-13
[For DISPLAY AUDIO, Smartphone Link Display Audio and
MITSUBISHI Multi Communication System (MMCS), refer to
the separate owner’s manual.]
2. Hazard w")
1. Multi Around Monitor* p. 7-106Audio* p. 8-13
[For DISPLAY AUDIO, Smartphone Link Display Audio and
MITSUBISHI Multi Communication System (MMCS), refer to
the separate owner’s manual.]
2. Hazard warning flasher switch p. 6-60
3. ECO mode switch p. 6-61
4. Front passenger’s airbag indicator p. 5-29
5. Passenger’s ventilators p. 8-02
6. Accessory socket* p. 8-74 Cigarette lighter* p. 8-73
7. Electric tailgate power switch* p. 4-20
8. Key slot p. 7-15
9. 220-240 V AC power supply switch* p. 8-75
10. Blind Spot Warning (BSW) switch* p. 7-79
11. Heated steering wheel switch* p. 6-69
12. Heated windscreen switch* p. 6-68
13. Cup holder p. 8-82
14. Selector lever (Joystick type) p. 7-16
15. 220-240 V AC power supply* p. 8-75
16. Floor console box p. 8-81 Arm rest
Accessory socket p. 8-74
USB input terminal p. 8-69
17. Fuel tank filler door release lever p. 2-14
18. Bonnet release lever p. 11-04
19. Rear window demister switch p. 6-67 Wiper de-icer switch* p. 6-67
20. Air conditioner p. 8-04
21. Seat belt reminder p. 5-11
Instruments and controls
1-04OGGE18E1Overview1LHD
Page 7 of 538

1. Accessory socket p. 8-74
2. Electric tailgate power switch* p. 4-20
3. Key slot p. 7-15
4. 220-240 V AC power supply switch* p. 8-75
5. Blind Spot Warning (BSW) switch* p. 7-79
6. Heated steering wheel switch* p. 6-69
7. Heated windscreen switch* p. 6-68
8. Bonnet release lever p. 11-04
9. Fuel tank filler door release lever p. 2-14
10. Floor console box p. 8-81 Arm rest
Accessory socket p. 8-74
USB input terminal p. 8-69
11. 220-240 V AC power supply* p. 8-75
12. Selector lever (Joystick type) p. 7-16
13. Cup holder p. 8-82
14. Rear window demister switch p. 6-67 Wiper de-icer switch* p. 6-67
15. Air conditioner p. 8-04
16. Seat belt reminder p. 5-11
17. Fuse box p. 11-16
18. Passenger’s ventilators p. 8-02
19. Hazard warning flasher switch p. 6-60
20. ECO mode switch p. 6-61
21. Front passenger’s airbag indicator p. 5-29
22. Audio* p. 8-13 Multi Around Monitor* p. 7-106
[For DISPLAY AUDIO, Smartphone Link Display Audio and
MITSUBISHI Multi Communication System (MMCS), refer to
the separate owner’s manual.]
Instruments and controls
1-05OGGE18E1Overview1RHD
Page 14 of 538
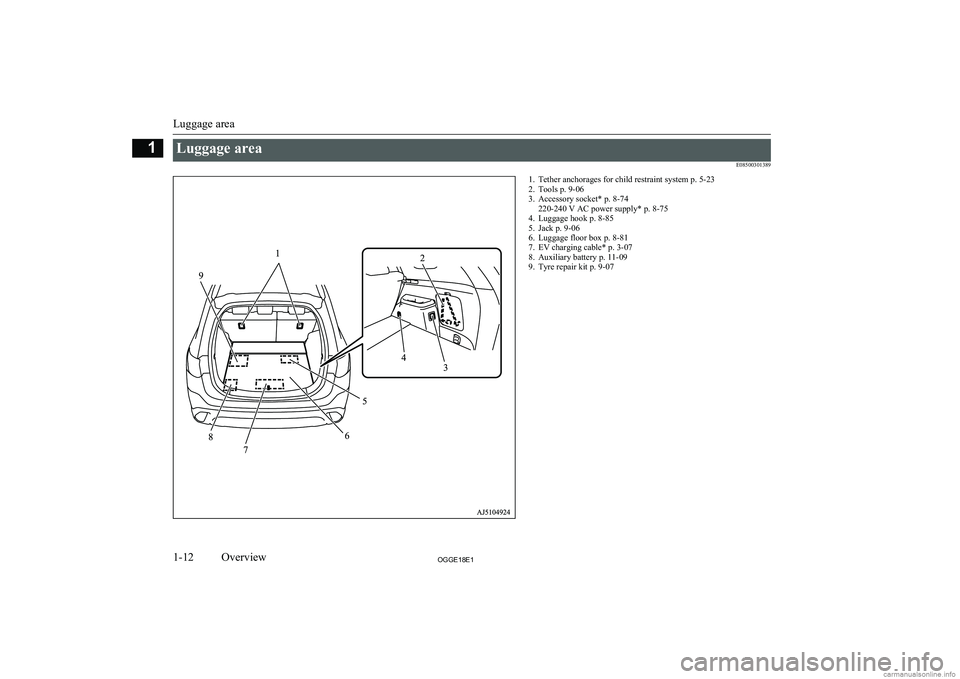
Luggage areaE085003013891. Tether anchorages for child restraint system p. 5-23
2. Tools p. 9-06
3. Accessory socket* p. 8-74 220-240 V AC power supply* p. 8-75
4. Luggage hook p. 8-85
5. Jack p. 9-06
6. Luggage floor box p. 8-81
7. EV charging cable* p. 3-07
8. Auxiliary battery p. 11-09
9. Tyre repair kit p. 9-07
Luggage area
1-12OGGE18E1Overview1
Page 333 of 538

Ventilators........................................................................................... 8-02
Automatic climate control air conditioner.......................................... 8-04
Important operation tips for the air conditioner.................................. 8-12
Air purifier.......................................................................................... 8-13 Remote Climate Control*................................................................... 8-13
Heating................................................................................................ 8-13 LW/MW/FM radio/CD player*.......................................................... 8-13
Handling of Discs................................................................................8-18 Audio Files (MP3/WMA/AAC)..........................................................8-19
Important Points on Safety for the Customer......................................8-23
Operation Keys................................................................................... 8-23
Listen to Radio.................................................................................... 8-26 Listen to DAB*................................................................................... 8-27
Listen to Traffic Messages.................................................................. 8-29
Listen to CDs...................................................................................... 8-29
Listen to MP3s.................................................................................... 8-30
Listen to an iPod................................................................................. 8-31 Listen to Audio Files on a USB Device.............................................. 8-33To play iPod/USB memory device tracks via voice opera-
tion (vehicles with Bluetooth ®
2.0 interface)................................. 8-35
Listen to Bluetooth Audio*................................................................. 8-38
Display Indicator................................................................................. 8-41
Audio Quality and Volume Balance Adjustment............................... 8-42
System Settings................................................................................... 8-43
Troubleshooting.................................................................................. 8-47
Link System*...................................................................................... 8-49
Bluetooth ®
2.0 interface*....................................................................8-49
USB input terminal*........................................................................... 8-69
Sun visors............................................................................................ 8-72Ashtray*.............................................................................................. 8-73
Cigarette lighter*.................................................................................8-73
Accessory socket................................................................................. 8-74
220-240 V AC power supplies*.......................................................... 8-75
Interior lamps...................................................................................... 8-78
Storage spaces..................................................................................... 8-80
Cup holder........................................................................................... 8-82
Bottle holder........................................................................................8-83 Cargo area cover................................................................................. 8-83Assist grips.......................................................................................... 8-85
Coat hook............................................................................................ 8-85
Luggage hooks.................................................................................... 8-85For pleasant driving
OGGE18E18
Page 406 of 538
CAUTIONlDo not touch the heating element or the cig-
arette lighter housing, hold the knob only to prevent burns.
l Do not allow children to operate or play with
the cigarette lighter as burns may occur.
l Something is wrong with the cigarette light-
er if it does not pop back out within approxi-
mately 30 seconds of being pushed in.
Pull it out and have the problem corrected at MITSUBISHI MOTORS Authorized Serv-
ice Point.
l Do not use any electric appliance that is not
approved by MITSUBISHI MOTORS . Do-
ing so could damage the socket. If you used
the cigarette lighter after damaging the sock- et, the cigarette lighter might pop out or fail
to come out after being pushed in.
l When the cigarette lighter socket is used as a
power source for an electric appliance, be sure that the electric appliance operates at
12 V and has an electric capacity of 120 W or less. In addition, long use of the electricappliance when the ready indicator is not il-
luminated may run down the auxiliary bat- tery.Accessory socket
E00711602864CAUTIONlBe sure to use a “plug-in” type accessory op-
erating at 12 V and at 120 W or less.
When using more than one socket at the same time, make sure that the electrical ac-
cessories are 12 V accessories and that the total power consumption does not exceed
120 W.
l Long use of the electric appliance when the
ready indicator is not illuminated may run
down the auxiliary battery.
l When the accessory socket is not in use, be
sure to close the lid or install the cap, be-
cause the socket might become clogged by foreign material and be short-circuited.
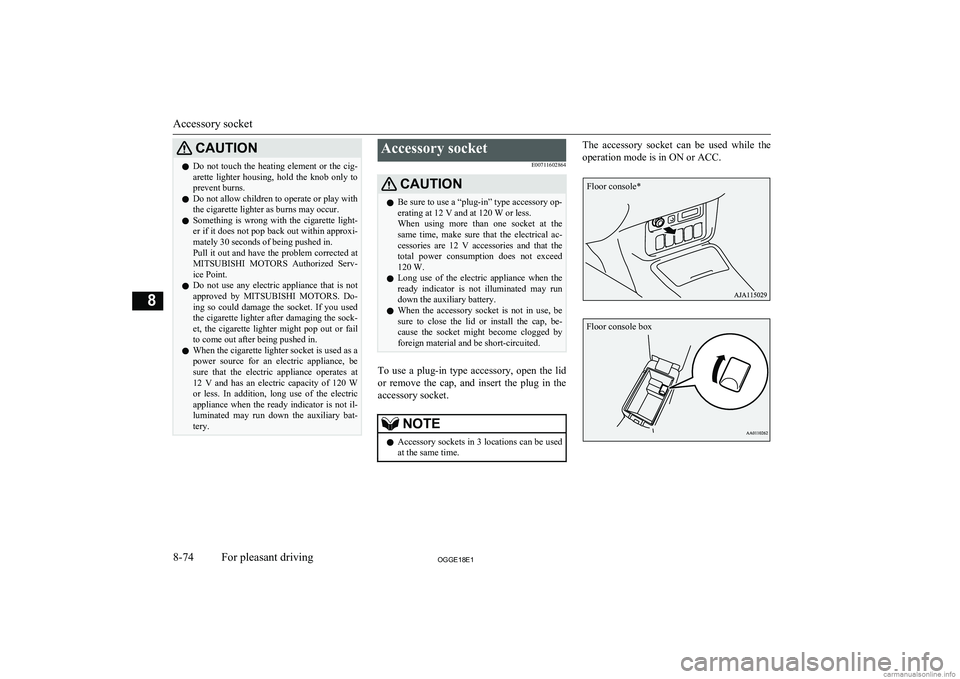
To use a plug-in type accessory, open the lid
or remove the cap, and insert the plug in the accessory socket.
NOTEl Accessory sockets in 3 locations can be used
at the same time.The accessory socket can be used while the
operation mode is in ON or ACC.
Accessory socket
8-74OGGE18E1For pleasant driving8 Floor console* Floor console box
Page 407 of 538
220-240 V AC power
supplies* E00749300022
220-240 V AC power supply can be used as a
power source of household appliances when
the ready indicator illuminates.
CAUTIONl Be sure to use a “plug-in” type accessory op-
erating at 230 V and at 1500 W or less.
When using more than one socket at the same time, make sure that the total power
consumption of the electrical appliances
does not exceed 1500 W at 230 V.
To use
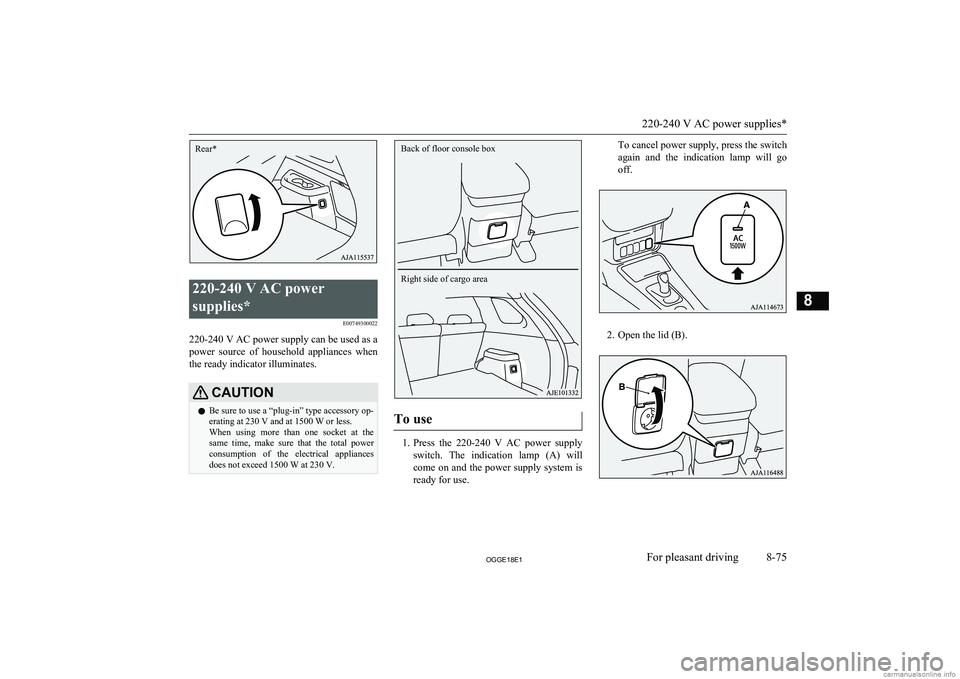
1. Press the 220-240 V AC power supply
switch. The indication lamp (A) will come on and the power supply system is ready for use.
To cancel power supply, press the switch
again and the indication lamp will go
off.
2. Open the lid (B).
220-240 V AC power supplies*
8-75OGGE18E1For pleasant driving8Rear* Back of floor console box
Right side of cargo area
Page 409 of 538

CAUTIONlWhen the 220-240 V AC power supply is
not in use, be sure to cancel power supply by pressing the 220-240 V AC power supply
switch, disconnect the plug and close the lid.
This will prevent the 220-240 V AC power
supply from becoming clogged and short cir-
cuiting.
l Do not stand behind the exhaust pipe as the
engine may automatically start depending on the condition. Heat from the exhaust could
lead to burns.
l Make sure that the plug is inserted all the
way into the 220-240 V AC power supplybefore using an electrical appliance.
l Do not use an electrical appliance in the ve-
hicle which emits heat such as a heater. Heat
damage to interior parts could result.
l Do not connect a malfunctioning electrical
appliance to the 220-240 V AC power sup- ply. Doing so could damage the 220-240 VAC power supply.NOTEl The accessory socket and 220-240 V AC
power supplies can be used simultaneously.
Refer to “Accessory socket” on page 8-74.
l If the plug of the electrical appliance was
loose or wobbled when inserted in the outlet, have the 220-240 V AC power supply re-
placed at a MITSUBISHI MOTORS Au-
thorized Service Point.NOTEl Never leave the vehicle, perform refueling
or washing the vehicle while using the
220-240 V AC power supply.
l You may hear operating sounds such as
sounds from the cooling fan near the lug-
gage area when using the 220-240 V AC power supply. This is normal.
l Never use electrical appliance that is vulner-
able to vibration or heat in the cabin. When
exposed to strong direct sunlight, the cabin will become extremely hot. It could cause
product failure.
l Do not use the 220-240 V AC power supply
with the vehicle covered by a car cover.
l When closing the window, door or tailgate,
be careful not to trap the power supply cord.
l 220-240 V AC power supply cannot be used
in the following cases.
• When the Plug-in Hybrid EV System
warning lamp is illuminated.
• When the drive battery level display indi-
cates 0.
• When the “PROPULSION POWER IS
REDUCED” warning display appears.
l Electrical appliance may not operate normal-
ly or electricity supply stops under the fol- lowing conditions. You may hear an opera- tion noise. This is normal.
• When the power consumption of the elec-
trical appliance exceeds 1500 W.
• When the vehicle interior temperature is
too hot or too cold.
l When the 220-240 V AC power supply can-
not be used or is not returned to operationNOTEautomatically after stopping electricity sup-
ply, follow the procedures below.
1
. Disconnect the plug of electrical ap-
pliance.
2 . Confirm the remaining quantity of
the drive battery. When it is low,
charge the drive battery by using the battery charge mode switch, etc.
Battery charge mode switch ® p. 7-28
Normal charging (charging method
with rated AC 220-240V outlet)
® p. 3-10
Quick charging (charging method with quick charger) ® p. 3-17
3 . Confirm that the ready indicator illu-
minates. If not, start the Plug-in Hy-
brid EV System.
4 . When the vehicle interior tempera-
ture is too hot or too cold, adjust it
appropriately by the using air condi-
tioner.
5 . Press the 220-240 V AC power sup-
ply switch to turn it on.
6 . Confirm that the indication lamp on
the 220-240 V AC power supply
switch comes on and insert the plug in the power outlet.
l The following electrical appliance may not
operate normally even if the power con-
220-240 V AC power supplies*
8-77OGGE18E1For pleasant driving8
Page 429 of 538
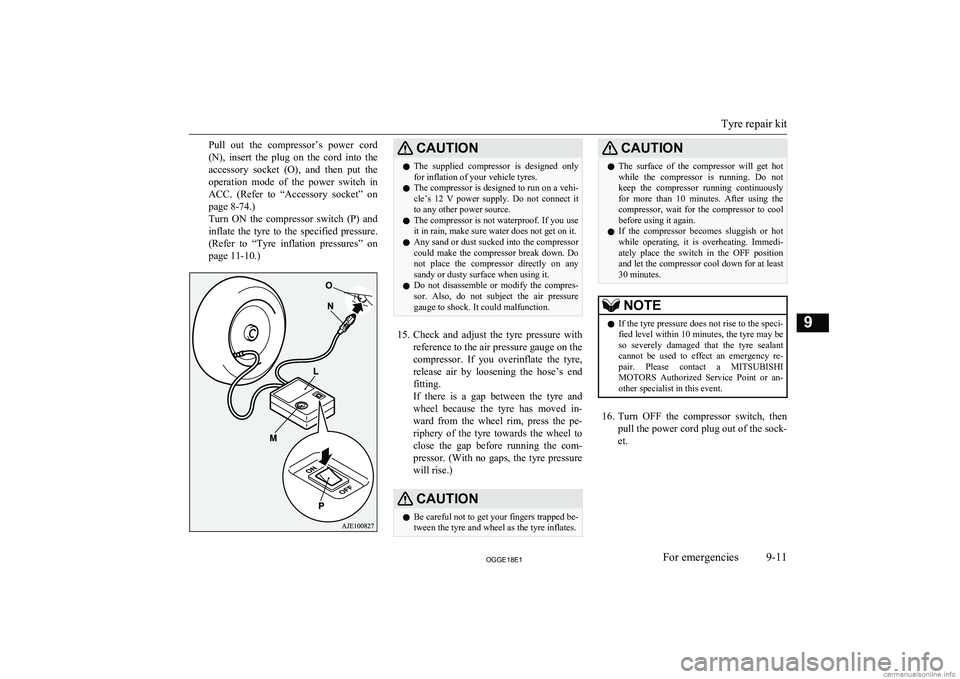
Pull out the compressor’s power cord
(N), insert the plug on the cord into the
accessory socket (O), and then put the operation mode of the power switch in ACC. (Refer to “Accessory socket” on
page 8-74.)
Turn ON the compressor switch (P) and
inflate the tyre to the specified pressure. (Refer to “Tyre inflation pressures” on
page 11-10.)CAUTIONl The supplied compressor is designed only
for inflation of your vehicle tyres.
l The compressor is designed to run on a vehi-
cle’s 12 V power supply. Do not connect itto any other power source.
l The compressor is not waterproof. If you use
it in rain, make sure water does not get on it.
l Any sand or dust sucked into the compressor
could make the compressor break down. Do not place the compressor directly on anysandy or dusty surface when using it.
l Do not disassemble or modify the compres-
sor. Also, do not subject the air pressure
gauge to shock. It could malfunction.
15. Check and adjust the tyre pressure with
reference to the air pressure gauge on the
compressor. If you overinflate the tyre, release air by loosening the hose’s end
fitting.
If there is a gap between the tyre and
wheel because the tyre has moved in-
ward from the wheel rim, press the pe- riphery of the tyre towards the wheel to
close the gap before running the com- pressor. (With no gaps, the tyre pressure
will rise.)
CAUTIONl Be careful not to get your fingers trapped be-
tween the tyre and wheel as the tyre inflates.CAUTIONl The surface of the compressor will get hot
while the compressor is running. Do not
keep the compressor running continuously for more than 10 minutes. After using the compressor, wait for the compressor to cool
before using it again.
l If the compressor becomes sluggish or hot
while operating, it is overheating. Immedi- ately place the switch in the OFF positionand let the compressor cool down for at least30 minutes.NOTEl If the tyre pressure does not rise to the speci-
fied level within 10 minutes, the tyre may be
so severely damaged that the tyre sealant
cannot be used to effect an emergency re- pair. Please contact a MITSUBISHI
MOTORS Authorized Service Point or an-
other specialist in this event.
16. Turn OFF the compressor switch, then
pull the power cord plug out of the sock- et.
Tyre repair kit
9-11OGGE18E1For emergencies9