2018 MITSUBISHI OUTLANDER PHEV child seat
[x] Cancel search: child seatPage 130 of 538
Definition of characters the above table:
lU- Suitable for “universal” category restraints approved for use in this mass group.
l L- Suitable for particular child restraint systems. See the above table of “Recommended Child Restraint Systems”.
l X- Seat position not suitable for children in this mass group.
Child restraint
5-22OGGE18E1Seats and seat belts5
Page 131 of 538
Installing a child restraint sys-tem to the lower anchorage (ISOFIX child restraint mount-ings) and tether anchorage
E00406901944
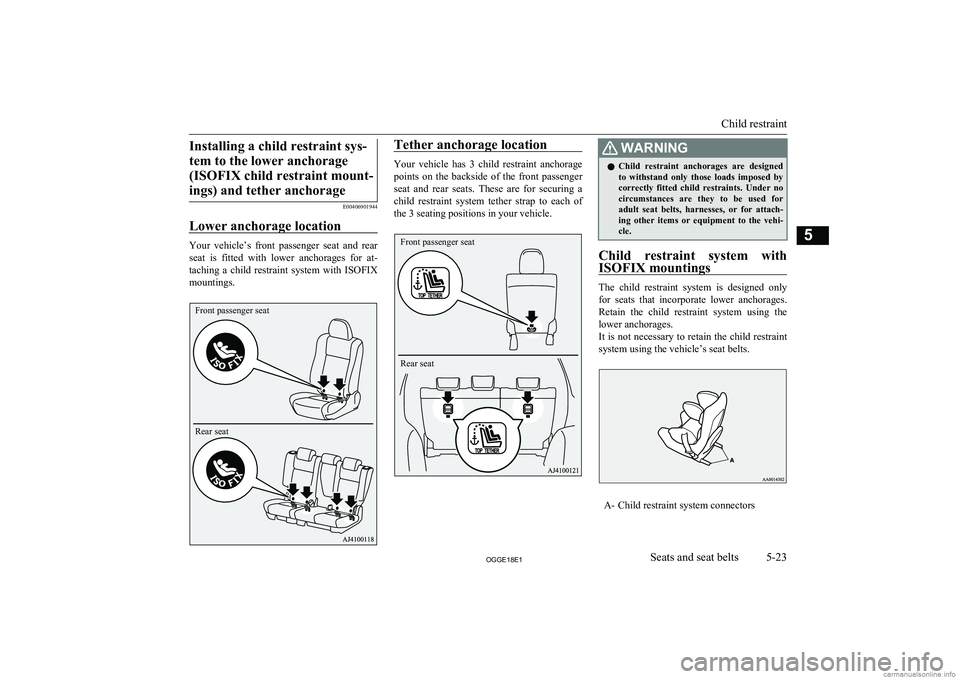
Lower anchorage location
Your vehicle’s front passenger seat and rear seat is fitted with lower anchorages for at-
taching a child restraint system with ISOFIX mountings.
Tether anchorage location
Your vehicle has 3 child restraint anchoragepoints on the backside of the front passenger seat and rear seats. These are for securing a
child restraint system tether strap to each of the 3 seating positions in your vehicle.
WARNINGl Child restraint anchorages are designed
to withstand only those loads imposed by
correctly fitted child restraints. Under no circumstances are they to be used for adult seat belts, harnesses, or for attach-
ing other items or equipment to the vehi- cle.
Child restraint system with
ISOFIX mountings
The child restraint system is designed only
for seats that incorporate lower anchorages.
Retain the child restraint system using the lower anchorages.
It is not necessary to retain the child restraint
system using the vehicle’s seat belts.
A- Child restraint system connectors
Child restraint
5-23OGGE18E1Seats and seat belts5Front passenger seat
Rear seat Front passenger seat Rear seat
Page 132 of 538
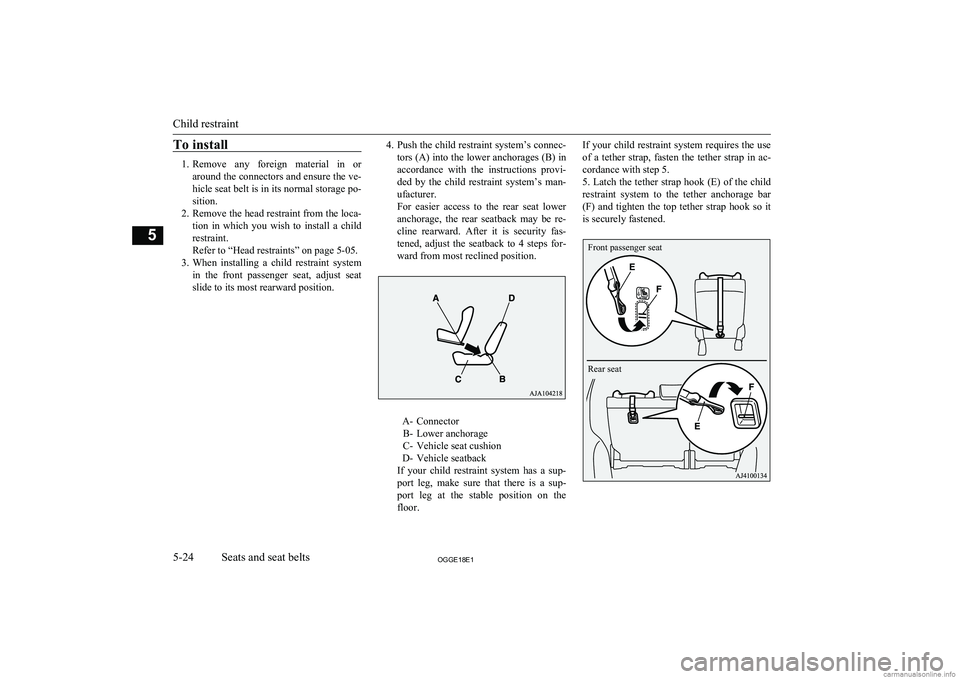
To install
1.Remove any foreign material in or
around the connectors and ensure the ve-
hicle seat belt is in its normal storage po-
sition.
2. Remove the head restraint from the loca-
tion in which you wish to install a child
restraint.
Refer to “Head restraints” on page 5-05.
3. When installing a child restraint system
in the front passenger seat, adjust seat
slide to its most rearward position.
4. Push the child restraint system’s connec-
tors (A) into the lower anchorages (B) in accordance with the instructions provi-
ded by the child restraint system’s man-
ufacturer.
For easier access to the rear seat lower
anchorage, the rear seatback may be re- cline rearward. After it is security fas-
tened, adjust the seatback to 4 steps for- ward from most reclined position.
A- Connector B- Lower anchorage
C- Vehicle seat cushion
D- Vehicle seatback
If your child restraint system has a sup- port leg, make sure that there is a sup-
port leg at the stable position on the floor.
If your child restraint system requires the use
of a tether strap, fasten the tether strap in ac- cordance with step 5.
5. Latch the tether strap hook (E) of the child
restraint system to the tether anchorage bar (F) and tighten the top tether strap hook so it
is securely fastened.
Child restraint
5-24OGGE18E1Seats and seat belts5 Front passenger seat
Rear seat
Page 133 of 538
NOTElIf it is difficult to latch the tether strap hook
in the rear seat, turn the hook sideways.
6. Push and pull the child restraint system in
all directions to be sure it is secure.
To remove
Remove the child restraint system in accord-ance with the instructions provided by the
child restraint system’s manufacturer.
Installing a child restraint sys-
tem to a 3-point type seat belt (with emergency locking mech-anism)
E00408701816
Installation:
1. Put a child restraint system on the seat in
which you wish to install it, and remove
the head restraint from the seat.
Refer to “Head restraints” on page 5-05.
2. When installing a child restraint system
in the front passenger seat, adjust seat slide to its most rearward position and
adjust the front seatback angle to 2 steps
rearward from the first locking position.
3. Route the belt through the child restraint
according to the child restraint system manufacturer’s instructions, then insert
the latch plate into the buckle.
4. Remove all slack of a lap belt by pulling
the webbing through the belt’s adjust-
ment feature.
3-point type seat belt requires no length adjustment, remove all slack by usingthe locking clip.
5. If your child restraint system has a sup-
port leg, make sure that there is a sup-
port leg at the stable position on the
floor.
6. Before putting the child in the restraint,
push and pull the restraint in all direc- tions to be sure it is secure. Do this be-
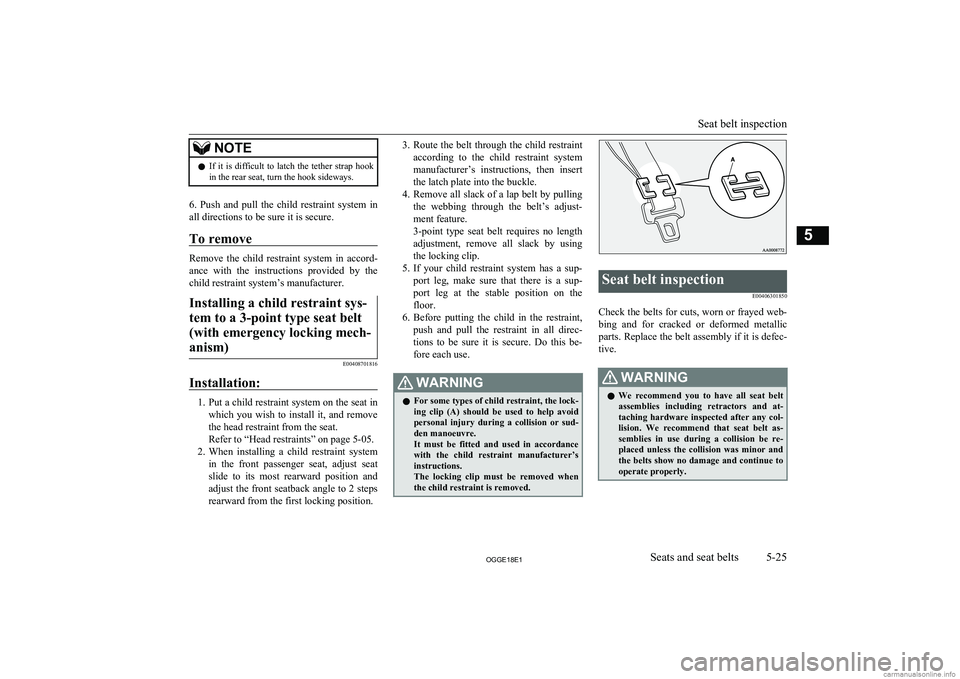
fore each use.WARNINGl For some types of child restraint, the lock-
ing clip (A) should be used to help avoid
personal injury during a collision or sud- den manoeuvre.
It must be fitted and used in accordance with the child restraint manufacturer’s
instructions.
The locking clip must be removed when the child restraint is removed.Seat belt inspection
E00406301850
Check the belts for cuts, worn or frayed web-bing and for cracked or deformed metallic
parts. Replace the belt assembly if it is defec-
tive.
WARNINGl We recommend you to have all seat belt
assemblies including retractors and at-
taching hardware inspected after any col- lision. We recommend that seat belt as-
semblies in use during a collision be re- placed unless the collision was minor and
the belts show no damage and continue to operate properly.
Seat belt inspection
5-25OGGE18E1Seats and seat belts5
Page 135 of 538
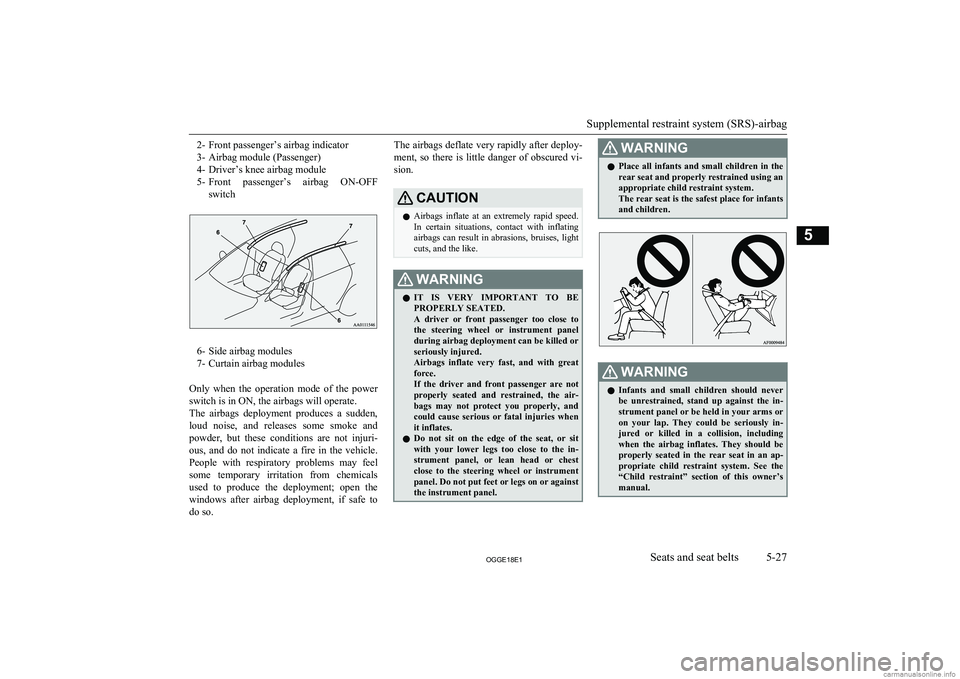
2- Front passenger’s airbag indicator
3- Airbag module (Passenger)
4- Driver’s knee airbag module
5- Front passenger’s airbag ON-OFF
switch
6- Side airbag modules
7- Curtain airbag modules
Only when the operation mode of the power switch is in ON, the airbags will operate.The airbags deployment produces a sudden,
loud noise, and releases some smoke and powder, but these conditions are not injuri- ous, and do not indicate a fire in the vehicle.
People with respiratory problems may feel
some temporary irritation from chemicals used to produce the deployment; open the
windows after airbag deployment, if safe to
do so.
The airbags deflate very rapidly after deploy-
ment, so there is little danger of obscured vi-sion.CAUTIONl Airbags inflate at an extremely rapid speed.
In certain situations, contact with inflatingairbags can result in abrasions, bruises, light
cuts, and the like.WARNINGl IT IS VERY IMPORTANT TO BE
PROPERLY SEATED.
A driver or front passenger too close to the steering wheel or instrument panel
during airbag deployment can be killed or seriously injured.
Airbags inflate very fast, and with great force.
If the driver and front passenger are not
properly seated and restrained, the air-
bags may not protect you properly, and could cause serious or fatal injuries whenit inflates.
l Do not sit on the edge of the seat, or sit
with your lower legs too close to the in-
strument panel, or lean head or chest close to the steering wheel or instrument panel. Do not put feet or legs on or againstthe instrument panel.WARNINGl Place all infants and small children in the
rear seat and properly restrained using an
appropriate child restraint system.
The rear seat is the safest place for infants
and children.WARNINGl Infants and small children should never
be unrestrained, stand up against the in-strument panel or be held in your arms or on your lap. They could be seriously in-jured or killed in a collision, including when the airbag inflates. They should be
properly seated in the rear seat in an ap- propriate child restraint system. See the
“Child restraint” section of this owner’s
manual.
Supplemental restraint system (SRS)-airbag
5-27OGGE18E1Seats and seat belts5
Page 136 of 538
WARNINGlOlder children should be seated in the
rear seat, properly wearing the seat belt,with an appropriate booster seat if nee- ded.Caution for installing the child
restraint on vehicles with a front passenger airbag
E00408802016
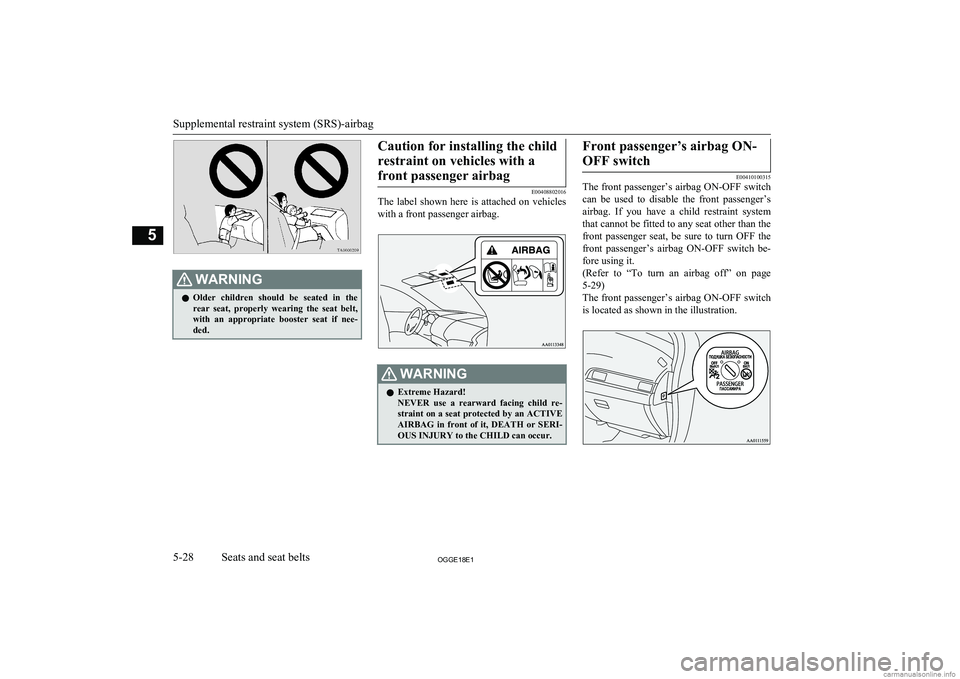
The label shown here is attached on vehicles
with a front passenger airbag.
WARNINGl Extreme Hazard!
NEVER use a rearward facing child re- straint on a seat protected by an ACTIVEAIRBAG in front of it, DEATH or SERI- OUS INJURY to the CHILD can occur.Front passenger’s airbag ON-
OFF switch
E00410100315
The front passenger’s airbag ON-OFF switch
can be used to disable the front passenger’s airbag. If you have a child restraint system
that cannot be fitted to any seat other than the front passenger seat, be sure to turn OFF the front passenger’s airbag ON-OFF switch be-
fore using it.
(Refer to “To turn an airbag off” on page
5-29)
The front passenger’s airbag ON-OFF switch
is located as shown in the illustration.Supplemental restraint system (SRS)-airbag
5-28OGGE18E1Seats and seat belts5
Page 137 of 538

Front passenger’s airbag indi-cator
E00410201528
The front passenger’s airbag indicator is lo-
cated in the instrument panel.
The both indicator normally comes on when
the operation mode of the power switch is put
in ON, and goes off a few seconds later.
When the front passenger’s airbag ON-OFF switch is turned OFF, the OFF indicator will stay on to show that the front passenger’s air-
bag is not operational. When the front pas-
senger’s airbag ON-OFF switch is turned
ON, the OFF indicator goes off, and the ON indicator comes on for approximately 1 mi- nute to show that the front passenger’s airbagis operational.
WARNINGl Do not fit any accessory that makes the
indication lamp impossible to see, and do
not cover the indication lamp with a stick- er. You would not be able to verify thestatus of the passenger airbag system.To turn an airbag off
E00412301259WARNINGl To reduce risk of serious or fatal injury:
• Always put the operation mode of the
power switch in OFF, before operating
the front passenger’s airbag ON-OFF
switch. Failure to do so could adversely affect the airbag performance.
• Wait at least 60 seconds to operate the
front passenger’s airbag ON-OFF switch after putting the operation mode
in OFF.
The SRS airbag system is designed to retain enough voltage to deploy the air-
bag.
• Always remove the key from the front
passenger’s airbag ON-OFF switch af-ter operating that switch. Failure to do
so could lead to improper position of the front passenger’s airbag ON-OFF switch.WARNING• Do not turn OFF the front passenger’s
airbag ON-OFF switch except when a child restraint system is fitted to the
front passenger seat.
• If the OFF indicator does not come on
when the front passenger’s airbag ON- OFF switch is turned OFF, do not fit a
child restraint system to the front pas- senger seat. We recommend you to
have the system inspected by a
MITSUBISHI MOTORS Authorized
Service Point.
• If the OFF indicator remains on when
the front passenger’s airbag ON-OFF switch is turned ON, do not allow any- one to sit on the front passenger seat.
We recommend you to have the system inspected by a MITSUBISHI
MOTORS Authorized Service Point.
To turn an airbag off, follow these steps:
1. Remove the emergency key from the
keyless operation key.
Refer to “Emergency key” on page 4-14.
2. Insert the emergency key into the front
passenger’s airbag ON-OFF switch, and turn it to the “OFF” position.
3. Remove the emergency key from the
front passenger’s airbag ON-OFF switch.
Supplemental restraint system (SRS)-airbag
5-29OGGE18E1Seats and seat belts5
Page 143 of 538
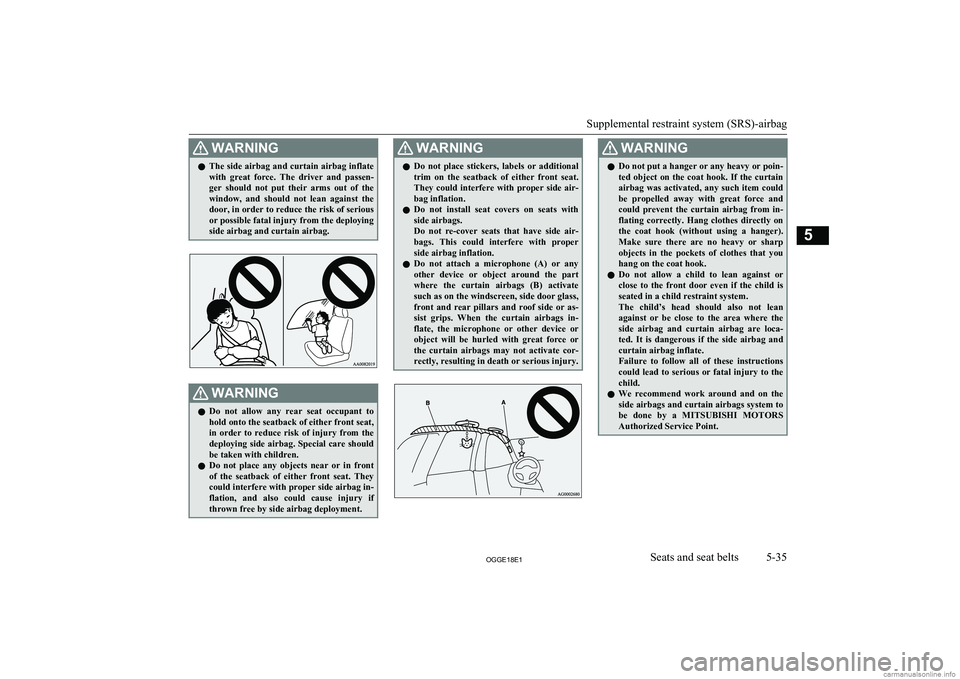
WARNINGlThe side airbag and curtain airbag inflate
with great force. The driver and passen-ger should not put their arms out of the
window, and should not lean against the door, in order to reduce the risk of serious
or possible fatal injury from the deploying
side airbag and curtain airbag.WARNINGl Do not allow any rear seat occupant to
hold onto the seatback of either front seat,
in order to reduce risk of injury from the
deploying side airbag. Special care should
be taken with children.
l Do not place any objects near or in front
of the seatback of either front seat. They could interfere with proper side airbag in-
flation, and also could cause injury if thrown free by side airbag deployment.WARNINGl Do not place stickers, labels or additional
trim on the seatback of either front seat.They could interfere with proper side air-bag inflation.
l Do not install seat covers on seats with
side airbags.
Do not re-cover seats that have side air- bags. This could interfere with properside airbag inflation.
l Do not attach a microphone (A) or any
other device or object around the part where the curtain airbags (B) activate
such as on the windscreen, side door glass, front and rear pillars and roof side or as- sist grips. When the curtain airbags in-
flate, the microphone or other device or
object will be hurled with great force or the curtain airbags may not activate cor-
rectly, resulting in death or serious injury.WARNINGl Do not put a hanger or any heavy or poin-
ted object on the coat hook. If the curtain
airbag was activated, any such item could
be propelled away with great force and could prevent the curtain airbag from in-
flating correctly. Hang clothes directly on the coat hook (without using a hanger).
Make sure there are no heavy or sharp objects in the pockets of clothes that you
hang on the coat hook.
l Do not allow a child to lean against or
close to the front door even if the child is
seated in a child restraint system.
The child’s head should also not lean against or be close to the area where the
side airbag and curtain airbag are loca-
ted. It is dangerous if the side airbag and curtain airbag inflate.
Failure to follow all of these instructions
could lead to serious or fatal injury to the
child.
l We recommend work around and on the
side airbags and curtain airbags system to
be done by a MITSUBISHI MOTORS
Authorized Service Point.
Supplemental restraint system (SRS)-airbag
5-35OGGE18E1Seats and seat belts5