2018 MITSUBISHI OUTLANDER PHEV clock
[x] Cancel search: clockPage 434 of 538

nuts make light contact with the wheel
and the wheel is not loose.CAUTIONl Never apply oil to either the wheel bolts or
the nuts, or they will tighten too much.NOTEl If all 4 aluminium wheels are changed to
steel wheels. e. g. when fitting winter tyres,
use tapered nuts.8. Lower the vehicle slowly by rotating the
wheel nut wrench anticlockwise until the
tyre touches the ground.
9. Tighten the nuts in the order shown in
the illustration until each nut has been tightened to the torque listed here.
Tightening torque: 88 to 108 N•m
CAUTIONl Never use your foot or a pipe extension for
extra force in the wheel nut wrench. If you
do so, you will tighten the nut too much.
10. Lower and remove the jack, then store
the jack, flat tyre, and chocks. Have your
damaged tyre repaired as soon as possi- ble.
11. Check your tyre inflation pressure at the
next gasstation. The correct tyre pres-
sures are shown on the driver’s door la-
bel. See the illustration.
12. After filling your tyres to the correct
pressure, reset the tyre pressure monitor-
ing system (TPMS).
Refer to “Tyre pressure monitoring sys- tem (TPMS): Reset of low tyre pressure
warning threshold” on page 7-93.
How to change a tyre
9-16OGGE18E1For emergencies9
Page 472 of 538
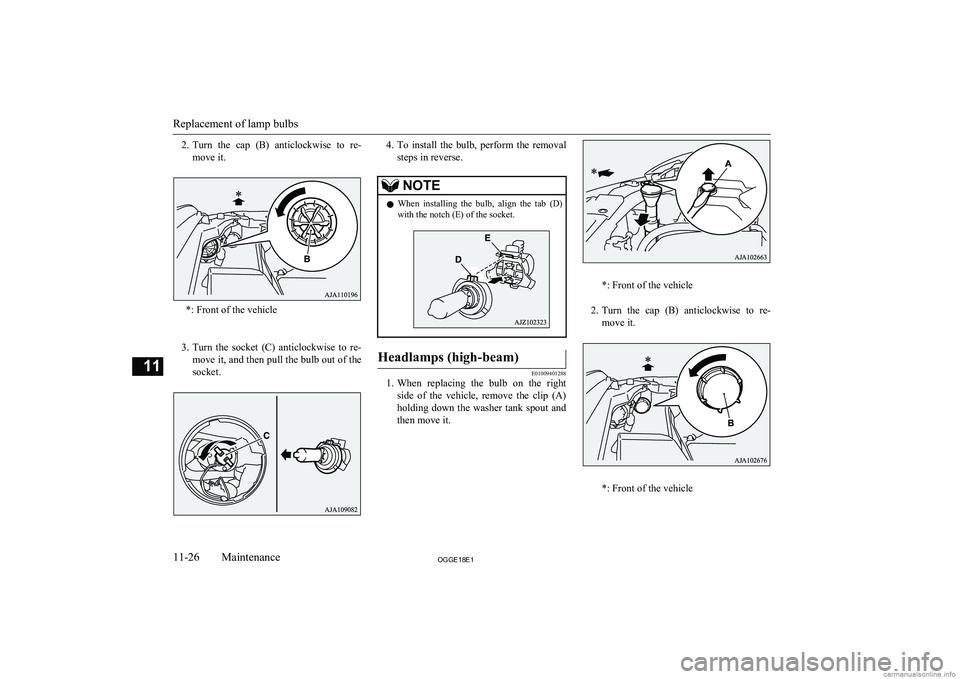
2.Turn the cap (B) anticlockwise to re-
move it.
*: Front of the vehicle
3. Turn the socket (C) anticlockwise to re-
move it, and then pull the bulb out of the
socket.
4. To install the bulb, perform the removal
steps in reverse.NOTEl When installing the bulb, align the tab (D)
with the notch (E) of the socket.Headlamps (high-beam)
E01009401288
1. When replacing the bulb on the right
side of the vehicle, remove the clip (A) holding down the washer tank spout and
then move it.
*: Front of the vehicle
2. Turn the cap (B) anticlockwise to re-
move it.
*: Front of the vehicle
Replacement of lamp bulbs
11-26OGGE18E1Maintenance11
Page 473 of 538
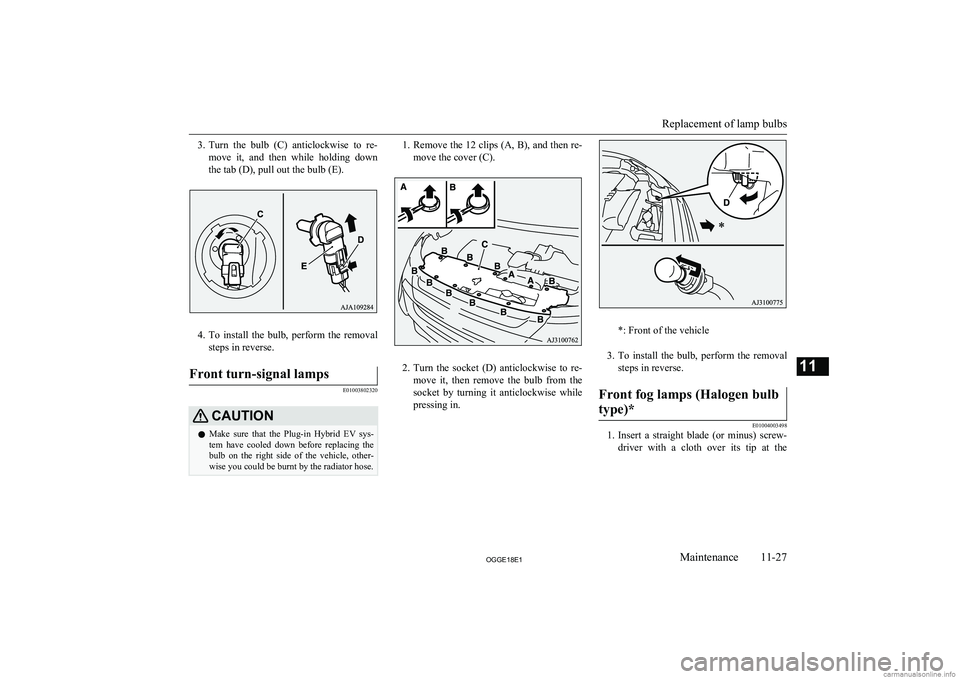
3.Turn the bulb (C) anticlockwise to re-
move it, and then while holding down
the tab (D), pull out the bulb (E).
4. To install the bulb, perform the removal
steps in reverse.
Front turn-signal lamps
E01003802320
CAUTIONl Make sure that the Plug-in Hybrid EV sys-
tem have cooled down before replacing the bulb on the right side of the vehicle, other-wise you could be burnt by the radiator hose.1. Remove the 12 clips (A, B), and then re-
move the cover (C).
2. Turn the socket (D) anticlockwise to re-
move it, then remove the bulb from the socket by turning it anticlockwise while
pressing in.
*: Front of the vehicle
3. To install the bulb, perform the removal
steps in reverse.
Front fog lamps (Halogen bulb
type)*
E01004003498
1. Insert a straight blade (or minus) screw-
driver with a cloth over its tip at the
Replacement of lamp bulbs
11-27OGGE18E1Maintenance11
Page 474 of 538
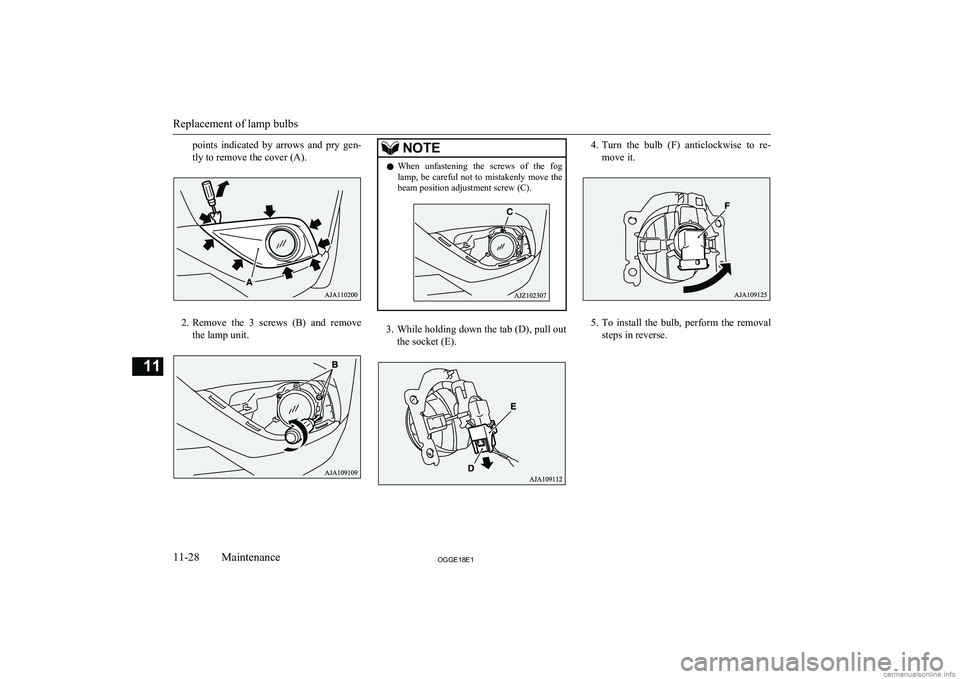
points indicated by arrows and pry gen-tly to remove the cover (A).
2. Remove the 3 screws (B) and remove
the lamp unit.
NOTEl When unfastening the screws of the fog
lamp, be careful not to mistakenly move thebeam position adjustment screw (C).
3. While holding down the tab (D), pull out
the socket (E).
4. Turn the bulb (F) anticlockwise to re-
move it.
5. To install the bulb, perform the removal
steps in reverse.
Replacement of lamp bulbs
11-28OGGE18E1Maintenance11
Page 475 of 538
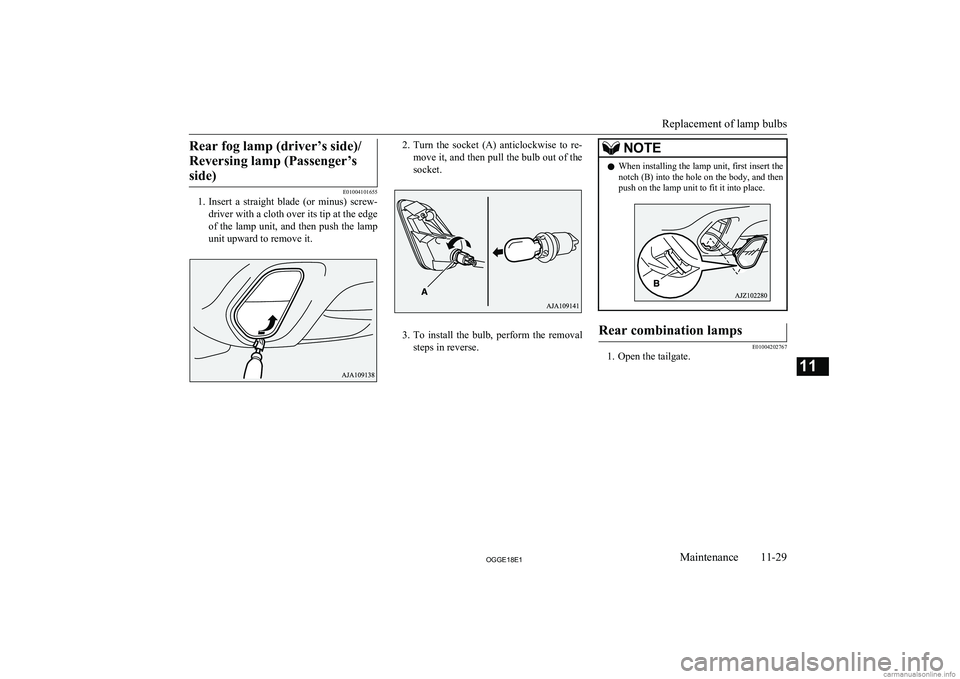
Rear fog lamp (driver’s side)/Reversing lamp (Passenger’s side)
E01004101655
1. Insert a straight blade (or minus) screw-
driver with a cloth over its tip at the edge
of the lamp unit, and then push the lamp
unit upward to remove it.
2. Turn the socket (A) anticlockwise to re-
move it, and then pull the bulb out of the socket.
3. To install the bulb, perform the removal
steps in reverse.
NOTEl When installing the lamp unit, first insert the
notch (B) into the hole on the body, and thenpush on the lamp unit to fit it into place.Rear combination lamps
E01004202767
1. Open the tailgate.
Replacement of lamp bulbs
11-29OGGE18E1Maintenance11
Page 476 of 538
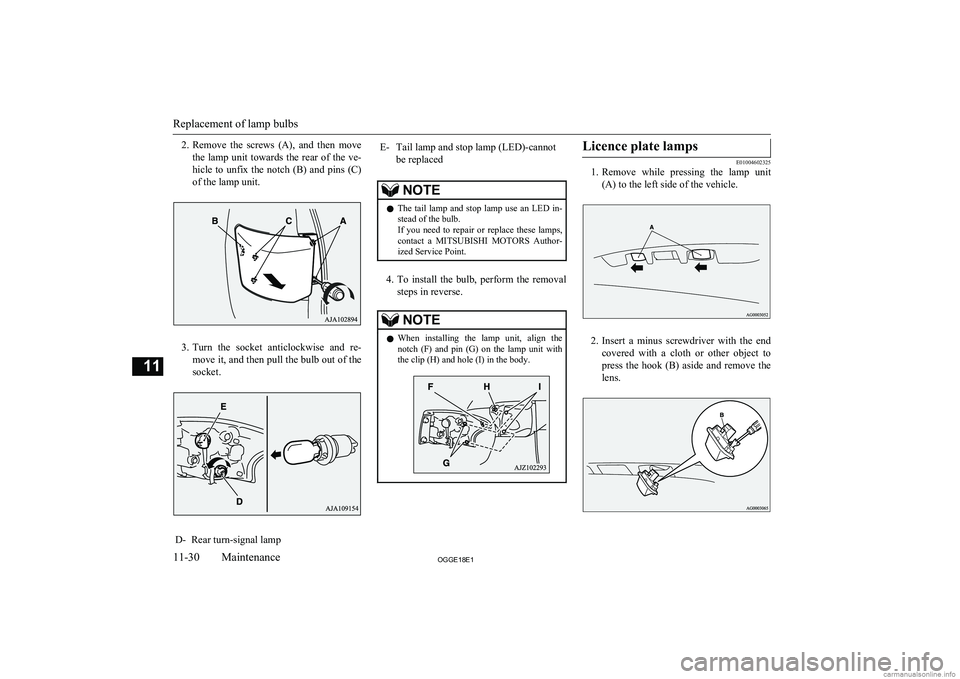
2.Remove the screws (A), and then move
the lamp unit towards the rear of the ve-
hicle to unfix the notch (B) and pins (C) of the lamp unit.
3. Turn the socket anticlockwise and re-
move it, and then pull the bulb out of the
socket.
D-Rear turn-signal lampE-Tail lamp and stop lamp (LED)-cannot
be replacedNOTEl The tail lamp and stop lamp use an LED in-
stead of the bulb.
If you need to repair or replace these lamps, contact a MITSUBISHI MOTORS Author-
ized Service Point.
4. To install the bulb, perform the removal
steps in reverse.
NOTEl When installing the lamp unit, align the
notch (F) and pin (G) on the lamp unit with the clip (H) and hole (I) in the body.Licence plate lamps
E01004602325
1. Remove while pressing the lamp unit
(A) to the left side of the vehicle.
2. Insert a minus screwdriver with the end
covered with a cloth or other object to press the hook (B) aside and remove the lens.
Replacement of lamp bulbs
11-30OGGE18E1Maintenance11
Page 491 of 538

2
220-240 V AC power supplies.......................... 8-754
4-wheel drive operation.....................................7-23A
Accessory (Installation).....................................2-15
Accessory socket............................................... 8-74
Acoustic Vehicle Alerting System (AVAS)......2-06
Active stability control (ASC)...........................7-40
Adaptive Cruise Control System (ACC)........... 7-52
Air conditioner Automatic climate control air conditioner.... 8-04
Important operation tips for the air conditioner................................................... 8-12
Air purifier.........................................................8-13
Airbag................................................................ 5-26 Caution for installing the child re-straint in vehicles with front pas-
senger’s airbag.....................................5-15,5-28
Anti-lock brake system (ABS).......................... 7-36
Ashtray.............................................................. 8-73
Assist grips........................................................ 8-85
Audio CD player...................................................... 8-13
LW/MW/FM radio........................................ 8-13
Troubleshooting............................................ 8-47
Automatic high-beam system (AHB)................6-54
Auxiliary battery............................................. 11-09
Auxiliary battery charge warning lamp.............6-50
B
Basic knowledge for charging........................... 3-04
Battery charge mode switch.............................. 7-28
Battery save mode switch..................................7-27
Battery Auxiliary battery charge warning lamp........ 6-50
Discharged battery (Emergency starting)..... 9-02
Disposal information for used batteries........ 2-17 Specification............................................... 12-08
Blind Spot Warning (BSW).............................. 7-79
Bluetooth® 2.0 interface................................... 8-49
Bonnet............................................................. 11-04
Bottle holders.................................................... 8-83
Brake assist system............................................7-35
Brake warning lamp.......................................... 6-48
Brake Anti-lock brake............................................. 7-36
Brake auto hold............................................. 7-32
Braking.......................................................... 7-30
Fluid.................................................. 11-08,12-10
Parking brake................................................ 7-03
Bulb capacity .................................................. 11-24
C
Capacities........................................................ 12-10
Card holder................................................8-73,8-81
Cargo area cover................................................8-83
Cargo loads......................................................7-115
Catalytic converter.......................................... 11-03
Caution for installing the child re- straint on vehicles with front passen-
ger’s airbag...................................................... 5-28
Cautions on handling of 4-wheel drive vehicles................................................... 7-24
Central door locks............................................. 4-16
Charging............................................................ 3-02
Charging indicator............................................. 6-48
Charging system specifications....................... 12-07
Charging troubleshooting guide........................ 3-21
Check engine warning lamp.............................. 6-49
Child restraint.................................................... 5-15 Caution for installing the child re-straint in vehicles with front pas-
senger’s airbag.....................................5-15,5-28
Child-protection rear doors............................... 4-18
Cigarette lighter................................................. 8-73
Cleaning Exterior of your vehicle.............................. 10-03Interior of your vehicle............................... 10-02
Coat hook.......................................................... 8-85
Combination headlamps and dipper switch...... 6-52
Coolant (engine)....................................11-06,12-10
Coolant (plug-in hybrid EV system)............... 11-06
Cruise control.................................................... 7-42
Cup holder......................................................... 8-82
D
Daytime running lampsBulb capacity.............................................. 11-24
Demister (rear window).................................... 6-67
Digital clock
Alphabetical index
13- 1
OGGE18E1Alphabetical index