2018 MITSUBISHI OUTLANDER III ECU
[x] Cancel search: ECUPage 26 of 441
Modifications to and racing of your vehicle
General information 3-5
3
4. Fueling correctly depends mainly on cor-rect handling of the fuel filler nozzle. Donot tilt the nozzle. Insert the nozzle in thefuel tank filler port as far as it goes.
5. When the nozzle stops automatically, donot add more fuel.6. To re-install, turn the fuel tank filler pipecap slowly clockwise until you hear click-ing sounds, then gently push the fuel tankfiller door closed.
N00301601205
This vehicle should not be modified withnon-Mitsubishi Motors
genuine parts. Mit-
subishi Motors desi
gns and manufactures
high quality vehicles
with an emphasis on
safety and durability.
Modifications using
non-Mitsubishi Motors genuine parts mayaffect the performance,
safety and/or durabil-
ity of your vehicle, a
nd may violate applica-
ble state and/or fe
deral regulations.
DAMAGE OR PERFORMANCE PROB-LEMS RESULTING FROM MODIFICA-TIONS TO OR RACING OF YOUR
NOTE
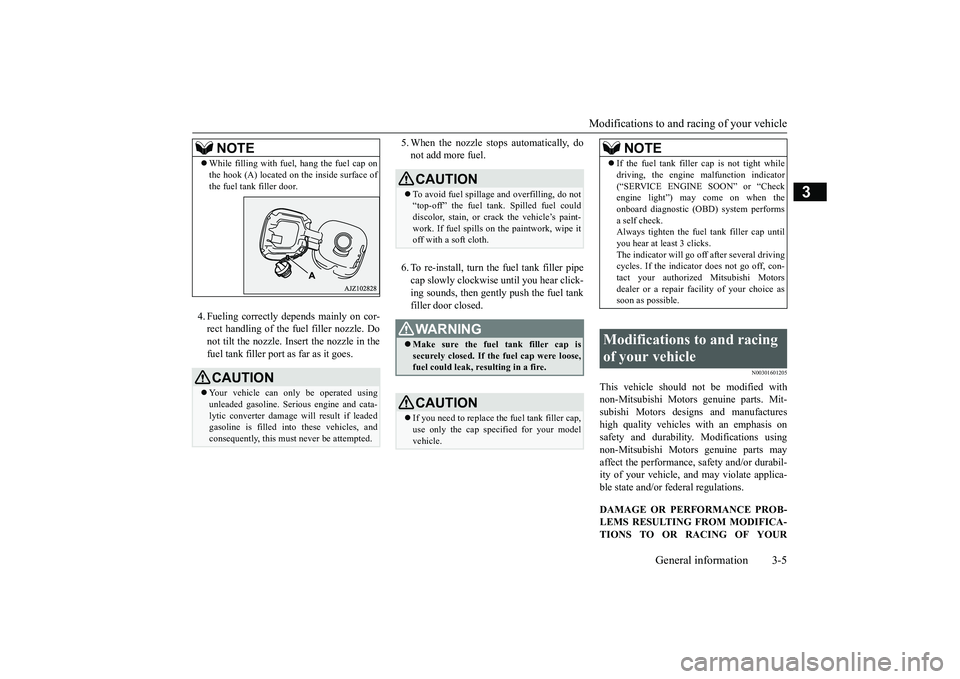
While filling with fuel, hang the fuel cap onthe hook (A) located on the inside surface ofthe fuel tank filler door.CAUTIONYour vehicle can only be operated usingunleaded gasoline. Seri
ous engine and cata-
lytic converter damage will result if leadedgasoline is filled into these vehicles, andconsequently, this must
never be attempted.
CAUTIONTo avoid fuel spillage and overfilling, do not“top-off” the fuel tank.
Spilled fuel could
discolor, stain, or crack the vehicle’s paint-work. If fuel spills on the paintwork, wipe itoff with a soft cloth.WA R N I N GMake sure the fuel tank filler cap issecurely closed. If the fuel cap were loose,fuel could leak, re
sulting in a fire.
CAUTIONIf you need to replace th
e fuel tank filler cap,
use only the cap specified for your modelvehicle.
NOTE
If the fuel tank filler
cap is not tight while
driving, the engine malfunction indicator(
Page 33 of 441

Seats and restraint systems4-4 Seat and restraint systems
4
N00401601251
Your vehicle has seat
belts and other safety
features that help protect you and your pas-sengers in an accident.Seat belts are the most important safetydevice. When worn properly, seat belts canreduce the chance of serious injury or deathin various types of crashes. For added protec-tion during a severe fr
ontal collision, your
vehicle has a Supplemental Restraint System(SRS) with airbags for the driver and passen-gers. The seats, head restraints, and doorlocks also are safety equipment, which mustbe used correctly.Always check the following before you drive:That everyone in your vehicle is properlywearing their seat belt.That infants and small children are prop-erly secured in an appropriate childrestraint system in the rear seat.That all doors are fully closed and locked.That seatbacks are upright, with headrestraints properly adjusted.
Safety equipment cannot prevent injury ordeath in all motor ve
hicle accidents. How-
ever, you can help reduce the risk of injury ordeath, by following the instructions in thismanual.
N00401801426
Position the driver’s seat
as far back as possi-
ble while maintaining a position that stillenables you to fully apply the pedals, easilycontrol the steering wh
eel and safely operate
the vehicle.
Seats and restraint systems
WA R N I N GDo not place objects under the seats. Thiscould prevent the seat from lockingsecurely, and it could
lead to an accident.
It may also cause damage to the seat orother parts.
Front seats
WA R N I N GDo not attempt to adjust the seat whiledriving. This can cause loss of vehicle con-trol and result
in an accident.
Manual seat adjustment Power seat adjustment
After adjusting the seat, make sure that itis securely locked into position.To reduce the risk to the driver of seriousinjury or death duri
ng deployment of the
driver’s airbag, always
properly wear the
seat belt and adjust th
e driver’s seat as far
back as possible while maintaining a posi-tion that still enables
you to fully apply the
pedals, easily control the steering wheel,and safely operate the vehicle.To reduce the risk to the front passengerof serious injury or
death during deploy-
ment of the passeng
er’s airbag, always
properly wear the seat
belt and adjust the
front passenger’s seat as far back as possi-ble.Always place childr
en 12 years old and
under in the rear seat
and use appropriate
child restraint systems.CAUTIONMake sure that the seat is adjusted by anadult. If it is adjusted by a child, an unex-pected accident might occur.Do not place a cushion
or the like between
your back and the seatback while driving.The effectiveness of the head restraints willbe reduced in the event of an accident.When sliding the seat
s, be careful not to
catch your hand or leg.WA R N I N G
BK0249100US.book 4 ページ 2017年5月10日 水曜日 午前8時49分
Page 34 of 441
Front seats
Seat and restraint systems 4-5
4
N00401901326
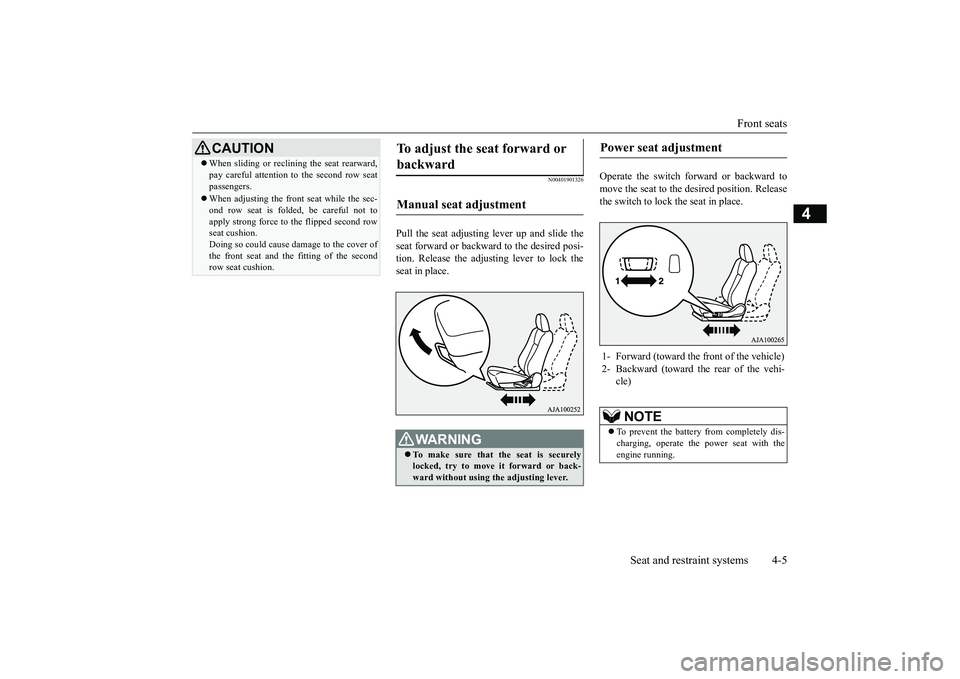
Pull the seat adjusting lever up and slide theseat forward or backward to the desired posi-tion. Release the adjusting lever to lock theseat in place.
Operate the switch forward or backward tomove the seat to the de
sired position. Release
the switch to lock the seat in place.
When sliding or reclin
ing the seat rearward,
pay careful attention
to the second row seat
passengers.When adjusting the front seat while the sec-ond row seat is folded, be careful not toapply strong force to the flipped second rowseat cushion.Doing so could cause da
mage to the cover of
the front seat and the
fitting of the second
row seat cushion.CAUTION
To adjust the seat forward or backward Manual seat adjustment
WA R N I N GTo make sure that the seat is securelylocked, try to move
it forward or back-
ward without using
the adjusting lever.
Power seat adjustment 1- Forward (toward the front of the vehicle)2- Backward (toward the rear of the vehi-
cle)NOTE
To prevent the battery from completely dis-charging, operate the
power seat with the
engine running.
BK0249100US.book 5 ページ 2017年5月10日 水曜日 午前8時49分
Page 38 of 441
Second row seats
Seat and restraint systems 4-9
4
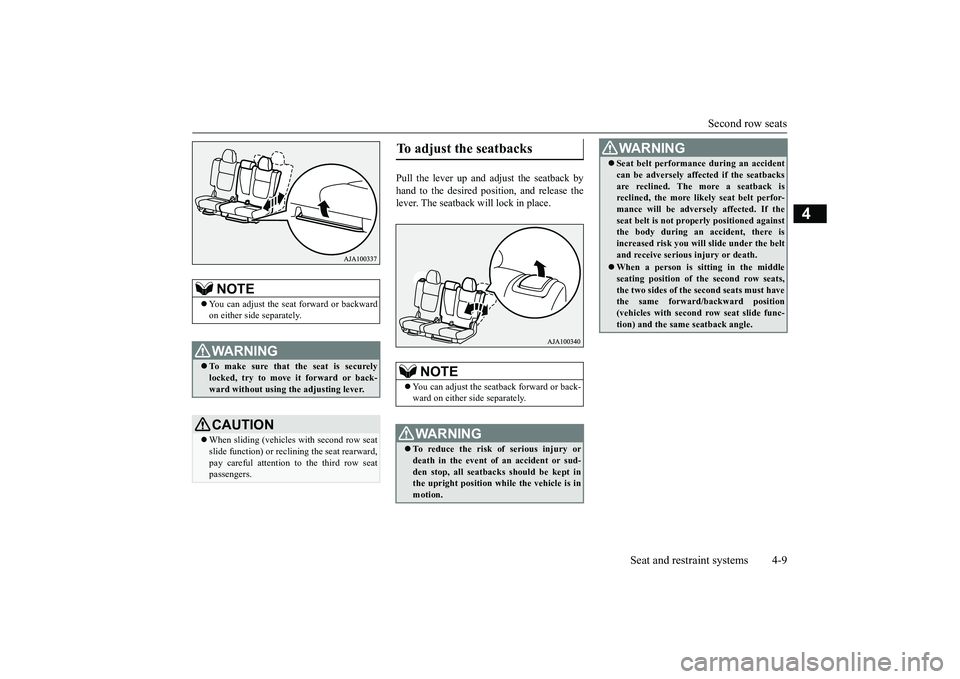
Pull the lever up and adjust the seatback byhand to the desired position, and release thelever. The seatback will lock in place.
NOTE
You can adjust the seat forward or backwardon either side separately.WA R N I N GTo make sure that the seat is securelylocked, try to move
it forward or back-
ward without using
the adjusting lever.
CAUTIONWhen sliding (vehicles with second row seatslide function) or reclin
ing the seat rearward,
pay careful attention to the third row seatpassengers.
To adjust the seatbacks
NOTE
You can adjust the seat
back forward or back-
ward on either side separately.WA R N I N GTo reduce the risk of serious injury ordeath in the event of
an accident or sud-
den stop, all seatbacks should be kept inthe upright position while the vehicle is inmotion.
Seat belt performance during an accidentcan be adversely affect
ed if the seatbacks
are reclined. The more a seatback isreclined, the more likely seat belt perfor-mance will be advers
ely affected. If the
seat belt is not prop
erly positioned against
the body during an accident, there isincreased risk you will slide under the beltand receive serious
injury or death.
When a person is sitting in the middleseating position of the second row seats,the two sides of the second seats must havethe same forward/backward position(vehicles with second row seat slide func-tion) and the same seatback angle.WA R N I N G
BK0249100US.book 9 ページ 2017年5月10日 水曜日 午前8時49分
Page 39 of 441
Third row seat (Seating 7 passengers)4-10 Seat and restraint systems
4
N00403001318
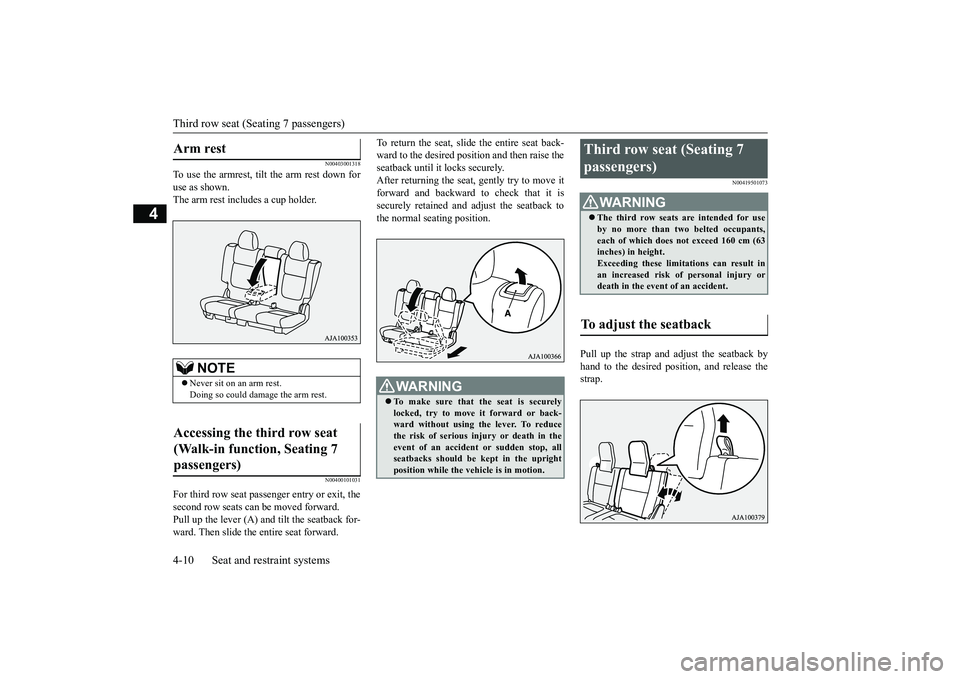
To use the armrest, tilt the arm rest down foruse as shown.The arm rest includes a cup holder.
N00400101031
For third row seat passenger entry or exit, thesecond row seats can be moved forward.Pull up the lever (A) and tilt the seatback for-ward. Then slide the entire seat forward.
To return the seat, slide the entire seat back-ward to the desired pos
ition and then raise the
seatback until it locks securely.After returning the seat, gently try to move itforward and backward to check that it issecurely retained and adjust the seatback tothe normal seating position.
N00419501073
Pull up the strap and ad
just the seatback by
hand to the desired position, and release thestrap.
Arm rest
NOTE
Never sit on an arm rest.Doing so could damage the arm rest.
Accessing the third row seat (Walk-in function, Seating 7 passengers)
WA R N I N GTo make sure that the seat is securelylocked, try to move it forward or back-ward without using the lever. To reducethe risk of serious in
jury or death in the
event of an accident
or sudden stop, all
seatbacks should be kept in the uprightposition while the ve
hicle is in motion.
Third row seat (Seating 7 passengers)
WA R N I N GThe third row seats are intended for useby no more than two belted occupants,each of which does not exceed 160 cm (63inches) in height.Exceeding these limitations can result inan increased risk of
personal injury or
death in the event
of an accident.
To adjust the seatback
BK0249100US.book 10 ページ 2017年5月10日 水曜日 午前8時49分
Page 42 of 441
Making a cargo area
Seat and restraint systems 4-13
4
N00405501115
N00405701146
The second row seat can be folded to createan additional cargo area.
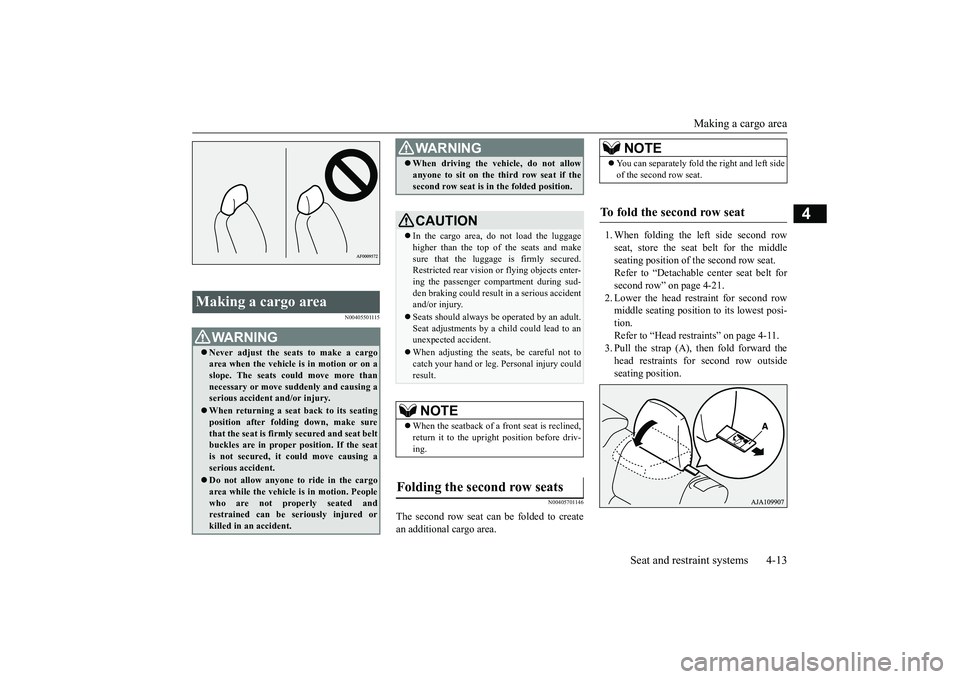
1. When folding the left side second rowseat, store the seat belt for the middleseating position of the second row seat.Refer to “Detachable
center seat belt for
second row” on page 4-21.2. Lower the head restraint for second rowmiddle seating position to its lowest posi-tion.Refer to “Head restraints” on page 4-11.3. Pull the strap (A), then fold forward thehead restraints for second row outsideseating position.
Making a cargo area
WA R N I N GNever adjust the seats to make a cargoarea when the vehicle is in motion or on aslope. The seats co
uld move more than
necessary or move su
ddenly and causing a
serious accident
and/or injury.
When returning a seat back to its seatingposition after fold
ing down, make sure
that the seat is firmly secured and seat beltbuckles are in proper position. If the seatis not secured, it could move causing aserious accident.Do not allow anyone to ride in the cargoarea while the vehicle
is in motion. People
who are not properly seated andrestrained can be seriously injured orkilled in an accident.
When driving the vehicle, do not allowanyone to sit on the third row seat if thesecond row seat is in the folded position.CAUTIONIn the cargo area, do not load the luggagehigher than the top of the seats and makesure that the luggage is firmly secured.Restricted rear vision or
flying objects enter-
ing the passenger compartment during sud-den braking could result
in a serious accident
and/or injury.Seats should always be
operated by an adult.
Seat adjustments by a child could lead to anunexpected accident.When adjusting the seats, be careful not tocatch your hand or leg.
Personal injury could
result.NOTE
When the seatback of a front seat is reclined,return it to the upright
position before driv-
ing.
Folding the second row seats
WA R N I N G
NOTE
You can separately fold
the right and left side
of the second row seat.
To fold the second row seat
BK0249100US.book 13 ページ 2017年5月10日 水曜日 午前8時49分
Page 43 of 441
Making a cargo area4-14 Seat and restraint systems
4
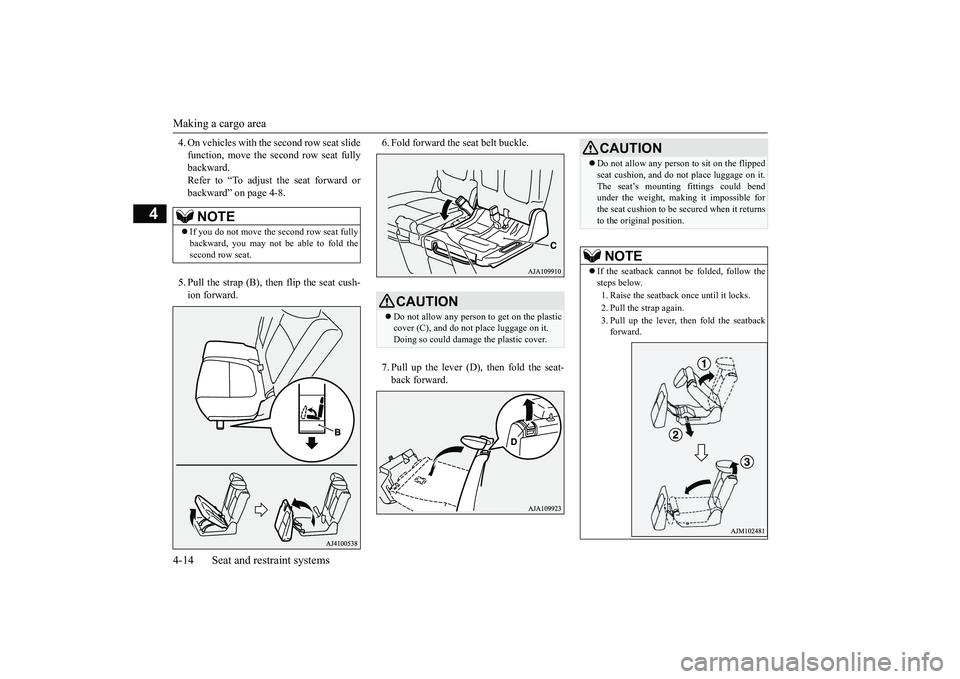
4. On vehicles with th
e second row seat slide
function, move the second row seat fullybackward.Refer to “To adjust the seat forward orbackward” on page 4-8.5. Pull the strap (B), then flip the seat cush-ion forward.
6. Fold forward the seat belt buckle.7. Pull up the lever (D), then fold the seat-back forward.
NOTE
If you do not move the second row seat fullybackward, you may not be able to fold thesecond row seat.
CAUTIONDo not allow any person
to get on the plastic
cover (C), and do not
place luggage on it.
Doing so could damage
the plastic cover.
CAUTIONDo not allow any person to sit on the flippedseat cushion, and do
not place luggage on it.
The seat’s mounting fittings could bendunder the weight, making it impossible forthe seat cushion to be secured when it returnsto the original position.NOTE
If the seatback cannot be folded, follow thesteps below.1. Raise the seatback once until it locks.2. Pull the strap again.3. Pull up the lever, then fold the seatbackforward.
BK0249100US.book 14 ページ 2017年5月10日 水曜日 午前8時49分
Page 44 of 441
Making a cargo area
Seat and restraint systems 4-15
4
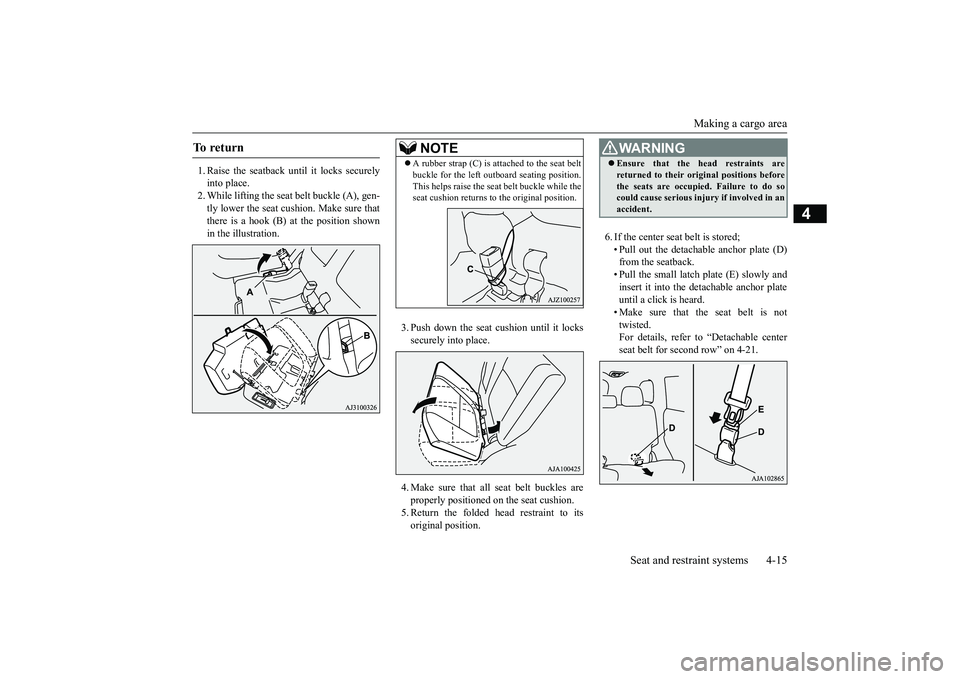
1. Raise the seatback until it locks securelyinto place.2. While lifting the seat belt buckle (A), gen-tly lower the seat cushion. Make sure thatthere is a hook (B) at the position shownin the illustration.
3. Push down the seat cushion until it lockssecurely into place.4. Make sure that all seat belt buckles areproperly positioned on the seat cushion.5. Return the folded head restraint to itsoriginal position.
6. If the center seat
belt is stored;
• Pull out the detachable anchor plate (D)from the seatback.• Pull the small latch plate (E) slowly andinsert it into the detachable anchor plateuntil a click is heard.• Make sure that the seat belt is nottwisted.For details, refer to
“Detachable center
seat belt for second row” on 4-21.
To r e t u r n
NOTE
A rubber strap (C) is atta
ched to the seat belt
buckle for the left out
board seating position.
This helps raise the seat
belt buckle while the
seat cushion returns to the original position.
WA R N I N GEnsure that the head restraints arereturned to their original positions beforethe seats are occupied. Failure to do socould cause serious inju
ry if involved in an
accident.
BK0249100US.book 15 ページ 2017年5月10日 水曜日 午前8時49分