2018 MERCEDES-BENZ SLC ROADSTER ignition
[x] Cancel search: ignitionPage 234 of 298
Calibratingthe compass
XMakes ure that there is sufficient spacef or
you to driv einacircle without impedingt raf-
fic.
In order to calibrat ethe compass correctly, do
th ef ollowing:
Rcalibrat ethe compass in th eopen and no tin
th ev icinity of steel structures or high-voltage
transmission lines.
Rswitch off electrical consumers suchast he
climate control, windshield wipersorr ear win-
dow defroster.
Rclose all doorsa nd thetrunk lid.
XSwitch on th eignition.
XPush aroun dpen int oopening =
(Ypage 231) for approximately six seconds,
until symbol Cis shown in compass display ;
(Ypage 231).
XDrive your vehicle in afull circle at approx-
imately 3mph (5 km/h )to6mph (10 km/h).
When th ecalibration has successfully been
completed, th ecurren tdirection is shown in
compass display ;(
Ypage 231).
Floormats
GWARNING
Object sinthedriver'sf ootwell may restrict
th ec learance aroun dthe pedals or blocka
depressed pedal. This jeopardizes th eoper-
atin gand road safety of th evehicle .Thereisa
ris kofana ccident.
Stow all object ssecurely in th evehicle so that
they do no tget int othe driver'sf ootwell.
When usingf loormats or carpets, mak esure
that they are properl ysecured so that they do
no tslip or obstruc tthe pedals.Don otplace
several floormats or carpetsont opof one
another.
XSlid ethe seat back.
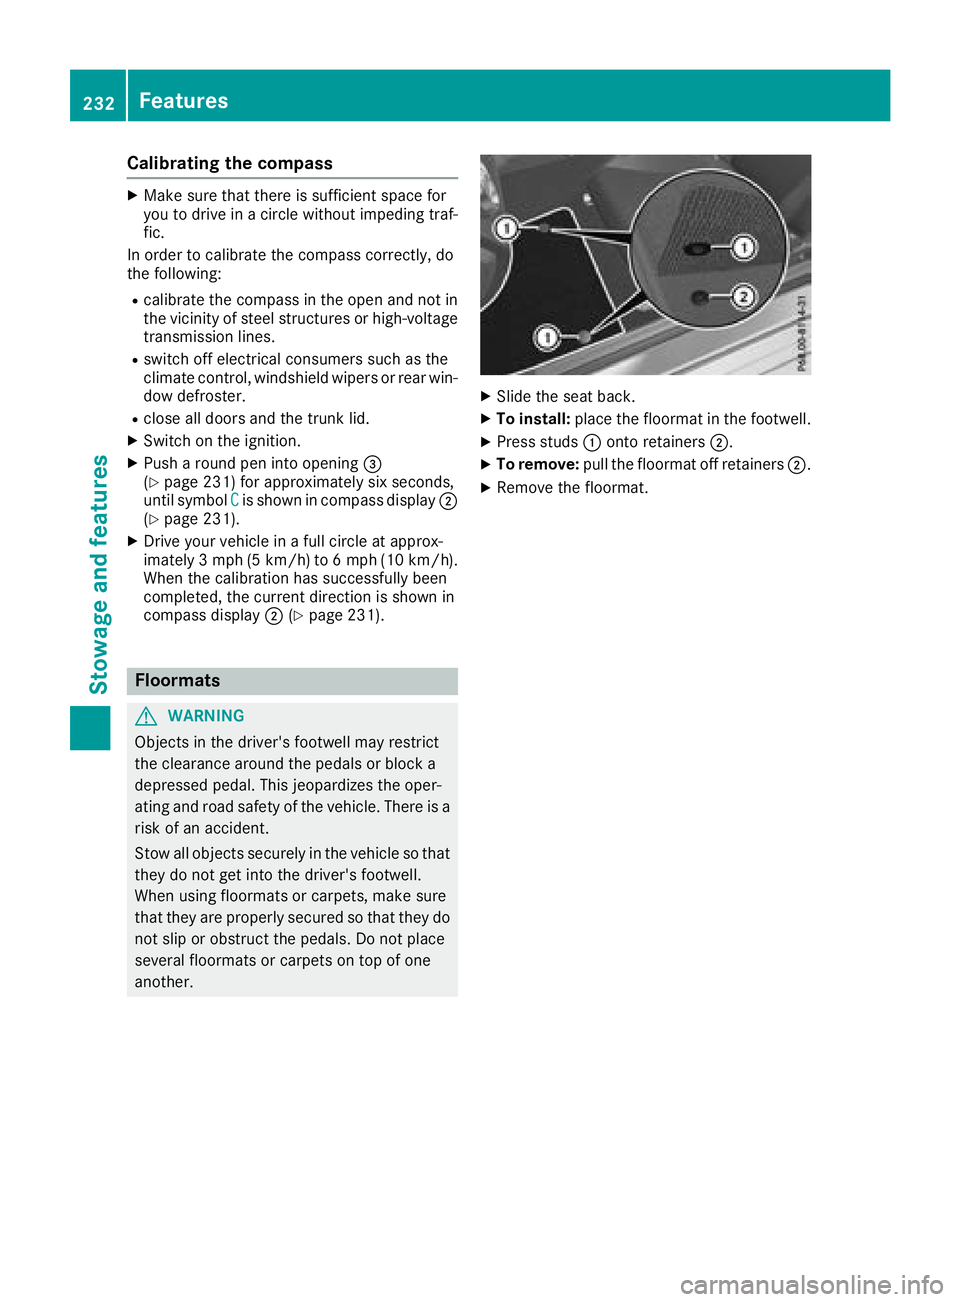
XTo install: placethefloormat in th efootwell.
XPress studs :onto retainers ;.
XTo remove:pull thefloormat off retainers ;.
XRemove thefloormat.
232Features
Stowage and features
Page 235 of 298
Engine compartment
Hood
Important safety notes
GWARNING
If th ehood is unlatched, it may open up when
th ev ehicle is in motion and blocky our view.
Thereisar isk of an accident.
Never unlatch th ehood while driving .Before
ever ytrip, ensure that th ehood is locked.
GWARNING
When opening and closingt hehood,itm ay
suddenly fall int othe closed position.T hereis
ar isk of injury to personsw ithin range of
movementoft hehood.
Open and close th ehood only when no onei s
within its range of movement.
GWARNING
Opening th ehood when th eengine is over-
heated or when there is afireint heengine
compartmen tcoul de xpose you to hot gases
or other servic eproducts. Thereisar isk of
injury.
Let an overheate dengine coo ldown before
opening th ehood.Ift here is afireint he
engine compartment, keep th ehood closed
and contac tthe fired epartment.
GWARNING
The engine compartmen tcontain smoving
components. Certain components, sucha s
th er adiator fan ,may continue to run or start
again suddenly when th eignition is off .There
is ar isk of injury.
If you nee dtodoany work inside th eengine
compartment:
Rswitch off th eignition
Rnever reac hintot he area wheret here is a
risk of danger from moving components,
suchast hefan rotatio narea
Rremove jewelry and watches
Rkeep items of clothing and hair, for exam-
ple, away from moving parts
Opening th ehood
GWARNING
Certain component sintheengine compart-
ment, suchast heengine ,radiator and parts
of th eexhaust system, can become ver yhot.
Workin gintheengine compartmen tposesa
risk of injury.
Wherep ossible, let th eengine coo ldown and
touch only th ecomponent sdescribe dinthe
following.
GWARNING
When th ehood is open and th ewindshield
wipersa re set in motion,y ou can be injured by
th ew iper linkage. Thereisar isk of injury.
Always switch off th ewindshield wipersa nd
th ei gnition before opening th ehood.
!Makes ure that th ewindshield wipersa re
no tfolded away from th ewindshield. You
coul dotherwise damag ethe windshield wip-
ers or th ehood.
XMakes ure that th ewindshield wipersa re
turned off.
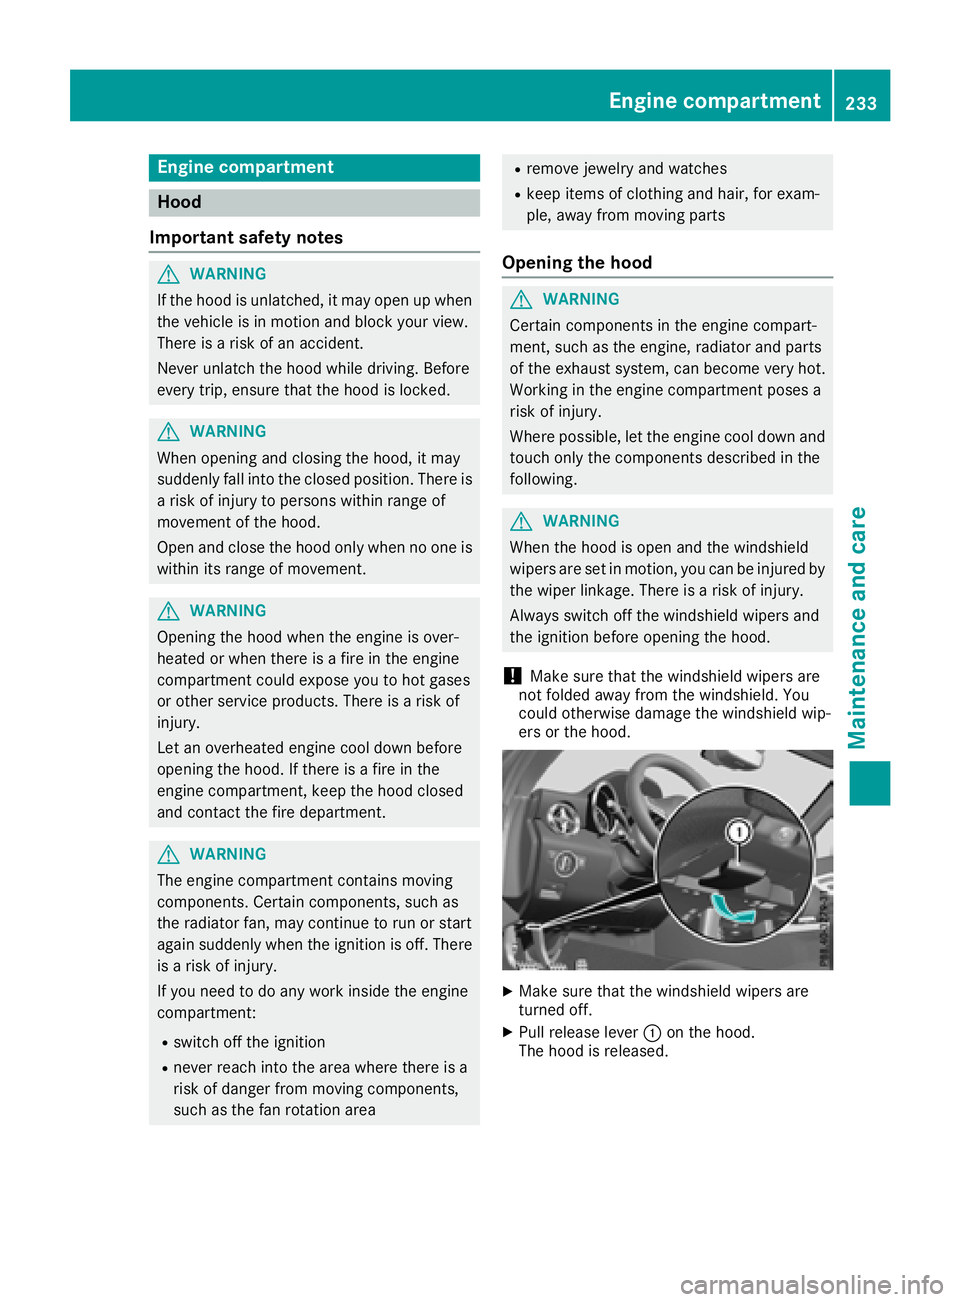
XPull release lever :on th ehood.
The hood is released.
Engine compartment233
Maintenance and care
Z
Page 238 of 298
Workinginthe engine compartment poses a
risk of injury.
Where possible, let the engine cool down and touch only the componentsd escribed in the
following.
GWARNING
The cooling system is pressurized, particularly
when the motor is warm. If you open the cap,
you could be scalded if hot coolant sprays out.
There is arisk of injury.
Let the engine cool down before you open the
cap. Wear gloves and eye protection. Slowly
open the cap to relieve pressure.
Example
XPark the vehicle on alevel surface.
Only check the coolant level when the vehicle
is on alevel surface and the engine has cooled
down.
XTurn the SmartKey to position 2in the igni-
tion lock (Ypage 116).
On vehicles with KEYLESS-GO, press the
Start/Stop button twice (
Ypage 116).
XCheck the coolant temperature gage in the
multifunction display.
The coolant temperature must be below
158 ‡(70 †).
XTurn the SmartKey to position u
(Ypage 116) in the ignition lock.
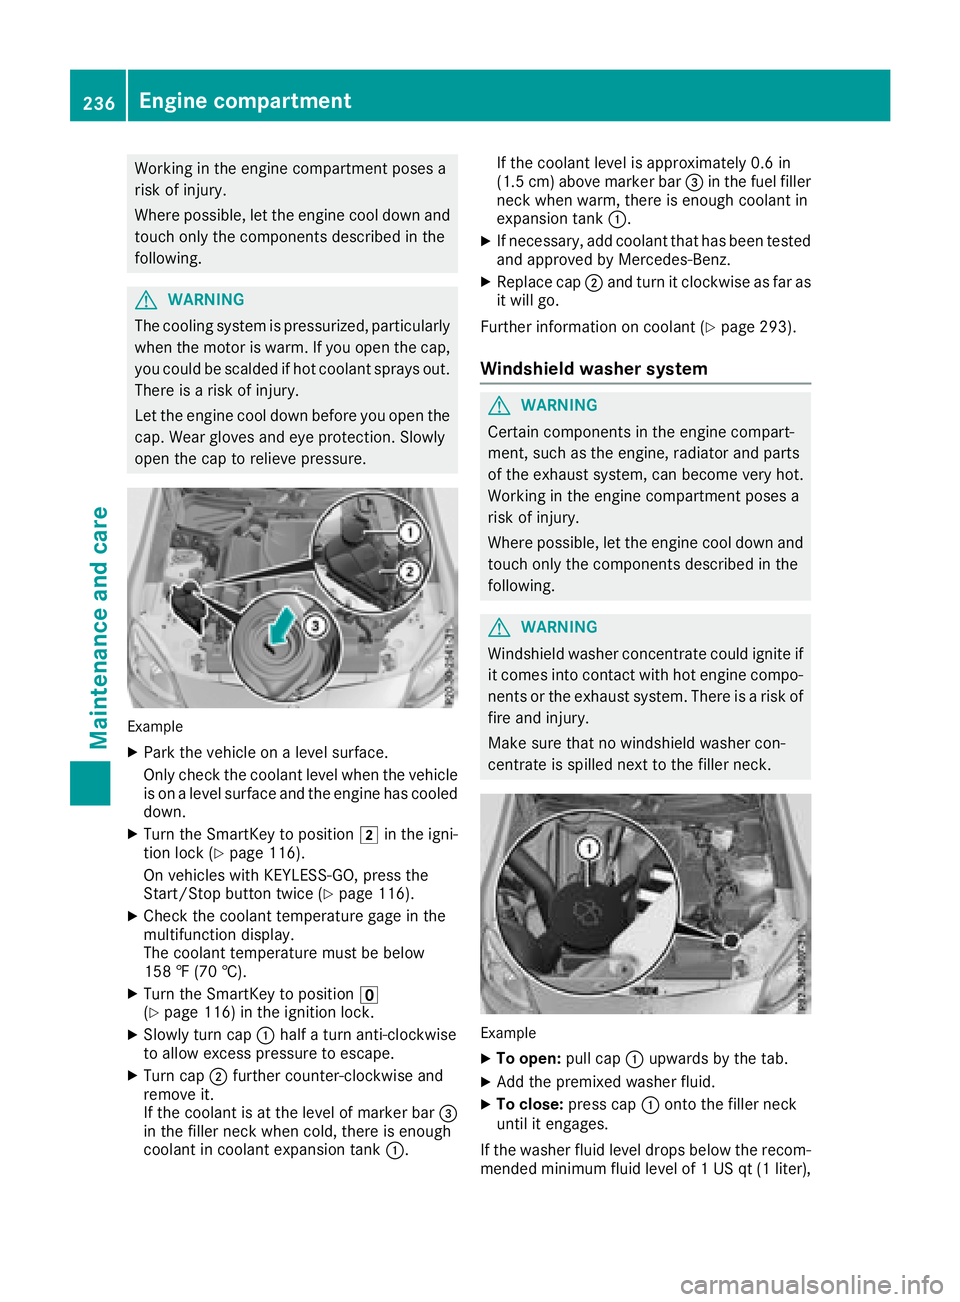
XSlowly turn cap :half aturn anti-clockwise
to allow excessp ressure to escape.
XTurn cap;further counter-clockwise and
remove it.
If the coolant is at the level of marker bar =
in the filler neck when cold, there is enough
coolant in coolant expansion tank :.If the coolant level is approximately 0.6 in
(1.5 cm
)above marker bar =in the fuel filler
neck when warm, there is enough coolant in
expansion tank :.
XIf necessary, add coolant that has been tested
and approved by Mercedes-Benz.
XReplace cap;and turn it clockwise as far as
it will go.
Further information on coolant (
Ypage 293).
Windshield washer system
GWARNING
Certain component sinthe engine compart-
ment,s uch as the engine, radiator and parts
of the exhaust system, can become very hot.
Workin ginthe engine compartment poses a
risk of injury.
Where possible, let the engine cool down and touch only the componentsd escribed in the
following.
GWARNING
Windshield washer concentrate could ignite if it comes into contact with hot engine compo-
nents or the exhaust system. There is arisk of
fire and injury.
Make sure that no windshield washer con-
centrate is spilled next to the filler neck.
Example
XTo open: pull cap:upwards by the tab.
XAdd the premixed washer fluid.
XTo close: press cap :ontothe filler neck
until it engages.
If the washer fluid level drops below the recom-
mended minimum fluid level of 1USqt(1l iter),
236Engine compartment
Maintenance and care
Page 239 of 298
amessage appearsint hemultifunction display
prompting you to add washer fluid (Ypage 201).
Further informatio nonwindshield washer fluid/
antifreeze(
Ypage 294).
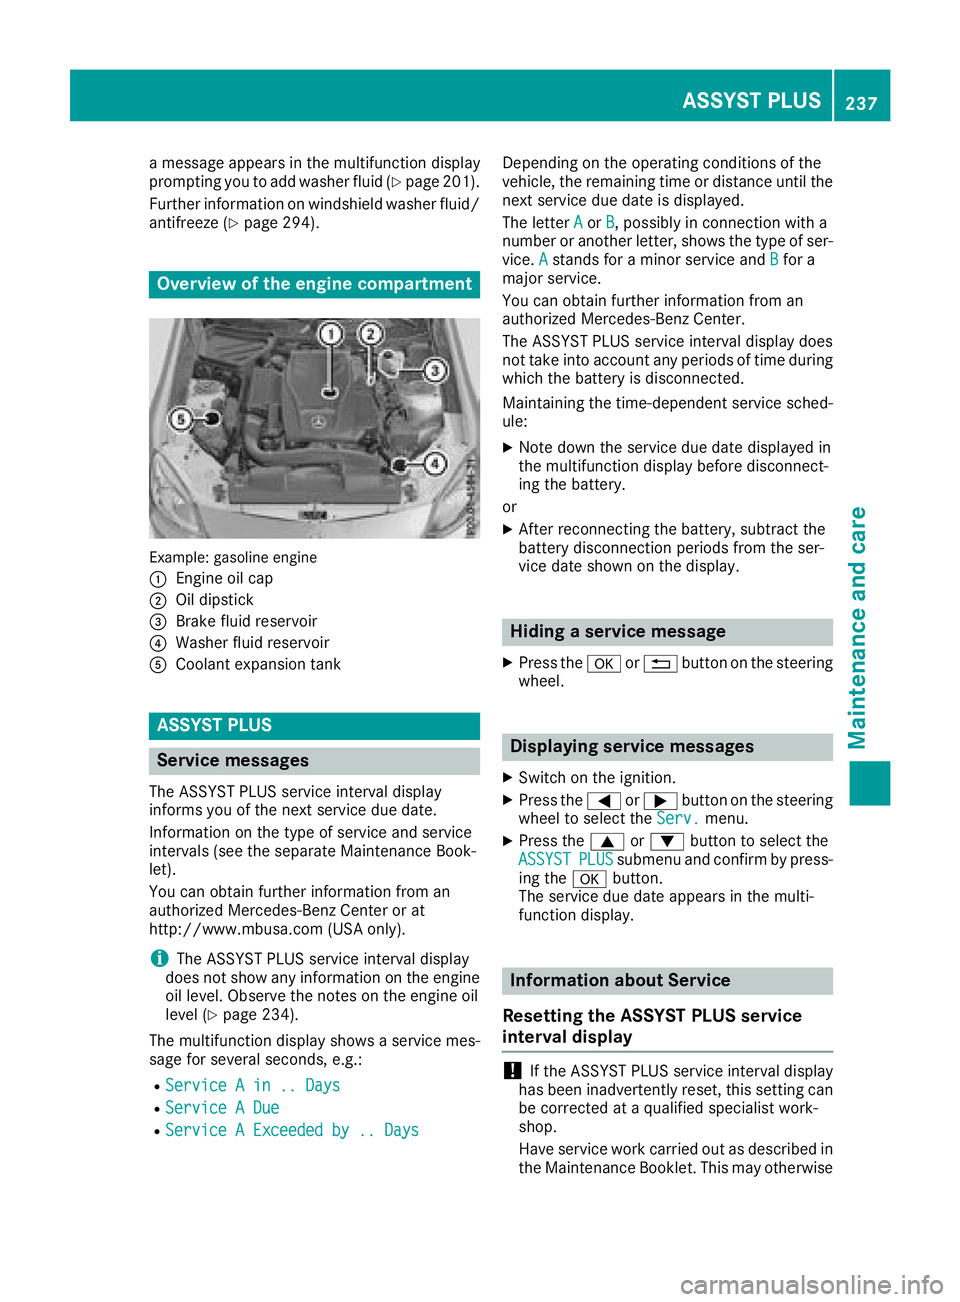
Overview of th eengine compartment
Example :gasoline engine
:
Engineo il cap
;Oil dipstick
=Brake fluid reservoir
?Washerf luid reservoir
ACoolante xpansion tank
ASSYST PLUS
Service messages
The ASSYS TPLUSs erviceinterval display
inform syou of th enexts ervic edue date.
Information on th etype of servic eand service
intervals (see th eseparate Maintenance Book-
let).
You can obtain further informatio nfroma n
authorized Mercedes-Ben zCenter or at
http://www.mbusa.com (USAo nly).
iThe ASSYS TPLUSs erviceinterval display
does no tshow any informatio nontheengine
oil level. Observ ethe note sont heengine oil
level(
Ypage 234).
The multifunction display showsas ervicemes-
sage for several seconds, e.g.:
RServiceAin..D ays
RServiceADue
RServiceAExceeded by .. Days
Dependingont heoperatin gconditionsoft he
vehicle ,the remainin gtimeord istanc euntil the
nex tservic edue dateisd isplayed.
The letter A
orB,possibly in connectio nwith a
number or another letter, showst hetype of ser-
vice. A
stands for aminor servic eand Bfor a
major service.
You can obtain further informatio nfroma n
authorized Mercedes-Ben zCenter.
The ASSYS TPLUSs erviceinterval display does
no ttak eintoa ccounta ny periods of tim eduring
whicht hebattery is disconnected.
Maintaining th etime-dependents ervicesched-
ule:
XNoted own th eservic edue dated isplayedin
th em ultifunction display before disconnect-
ing th ebattery.
or
XAfte rreconnectin gthe battery, subtrac tthe
battery disconnectio nperiods from th eser-
vic ed ates hownont hedisplay.
Hiding aservice message
XPres sthe a or% button on th esteering
wheel.
Displaying service messages
XSwitch on th eignition.
XPres sthe = or; button on th esteering
wheel to selectt heServ.menu.
XPres sthe 9 or: button to selectt he
ASSYSTPLUSsubmenu and confir mbypress-
ing the abutton.
The servic edue datea ppearsint hemulti-
function display.
Information abou tService
Resettin gthe ASSYST PLUS service
interval display
!If th eASSYSTP LUSs erviceinterval display
has been inadvertently reset,t hiss ettin gcan
be correcte dataqualified specialist work-
shop.
Hav eservic ework carried out as describe din
th eM aintenance Booklet. This may otherwise
ASSYST PLUS237
Maintenance and care
Z
Page 243 of 298
Observe the notes in the section on the care and
treatment of matt paintwork (Ypage 240);
these notes also apply to decorative film.
To clean, use plenty of water and amild cleaning
agent without additional or abrasive products,
e.g. acar shampoo approved by Mercedes-
Benz.
XRemove bird droppings, tree resin or fuel as
soon as possible.
The decorative film may be irreparably dam-
aged.
XDry vehicles covered with film using asoft,
absorbent cloth after every wash.
Water marks could otherwise form.
Scratches, corrosive deposits, areas affected by
corrosion and damage caused by inadequate
care cannot always be completely repaired. In
such cases, visit aqualified specialist workshop.
The cleaning product Paint Cleaner, which has
been approved and recommended by
Mercedes-Benz,s hould be used when dirt has
penetrated the decorative film surface or the
decorative film has become dull.
The manufacturer can provide you with infor-
mation on special care and cleaning products.
Surfaces covered with film may appears hinier
after the decorative film has been removed.
iHave work or repairs on decorative film car-
ried out at aqualified specialist workshop.
Mercedes-Benz recommends that you use an
authorized Mercedes-Benz Center for this
purpose.
Cleaning the vehiclep arts
Cleaning the wheels
GWARNING
The water jet from acircular jet nozzle (dirt
blasters) can cause invisible exterior damage
to the tires or chassis components. Compo-
nentsd amaged in this way may fail unexpect-
edly.T here is arisk of an accident.
Do not use power washers with circular jet
nozzles to clean the vehicle. Have damaged
tires or chassis componentsr eplaced imme-
diately.
!Do not use acidic wheel cleaning products
to remove brake dust. This could damage
wheel bolts and brake components.
!Do not park your vehicle for along period of
time directly after cleaning, particularlya fter
cleaning the wheel rim with wheel cleaner.
Wheel cleaner can lead to the increased cor-
rosion of the brake discs and pads. Therefore,
drive for afew minutes after cleaning. By
heating up the brakes, the brake discs and
pads dry. The vehicle can then be parked for a
long period of time.
Cleaning the windows
GWARNING
You could become trapped by the windshield wipers if they start moving while cleaning the
windshieldorw iper blades. There is arisk of
injury.
Alwayss witch off the windshieldw ipers and
the ignition before cleaning the windshieldo r
wiper blades.
!Do not use dry cloths, abrasive products,
solvents or cleaning agents containing sol-
vents to clean the inside of the windows. Do
not touch the insides of the windows with
hard objects, e.g. an ice scraper or ring. There
is otherwise arisk of damaging the windows.
!Cleant he water drainage channels of the
windshielda nd the rear window at regular
intervals. Deposits such as leaves, petals and pollen may under certain circumstances pre-
vent water from draining away. This can lead
to corrosion damage and damage to elec-
tronic components.
XCleant he inside and outside of the windows
with adamp cloth and acleaning product that
is recommended and approved by Mercedes-
Benz.
Cleaning wiper blades
GWARNING
If the windshieldw ipers are set in motion
while you are cleaning the windshield, you can be trapped by the wiper arm. There is arisk of
injury.
Care241
Maintenance and care
Z
Page 244 of 298
Alwaysswitch off the windshield wipers and
the ignition before cleaning the windshield.
!Do not pull the wipe rblade .Otherwise, the
wipe rblade could be damaged.
!Do not clean wipe rblade stoo oftena nd do
not rubt hem too hard. Otherwise, the graph-
ite coating could be damaged .Thisc ould
cause wipe rnoise.
!Hol dthe wipe rarm securel ywhenf olding
back. The windshield could be damaged if the
wipe rarm smacks against it suddenly.
XFoldt he windshield wipe rarm sawa yfrom the
windshield.
XCarefully clean the wipe rblade swithad amp
cloth.
XFoldt he windshield wipe rarm sb acka gain
before switching on the ignition.
Cleanin gthe exterior lighting
!Onlyu secleaning agents or cleaning cloths
which ar esuitabl efor plastic light lenses.
Unsuitabl ecleaning agents or cleaning cloths
could scratch or damage the plastic light len- ses.
XClea nthe plastic lenses of the exterio rlights
with awetsponge and amildc leaning agent,
e.g .M ercedes-Benz car shampo oorcleaning
cloths.
Cleanin gthe mirrort urn signals
!Onlyusecleaning agents or cleaning cloths
thata resuitabl efor plastic lenses .Unsuitable
cleaning agents or cleaning cloths could
scratch or damage the plastic lenses of the
mirror turn signals.
XClea nthe plastic lenses of the mirror turn sig-
nal sint he exterio rmirror housing using awet
sponge and mil dcleaning agent, e.g.
Mercedes-Benz car shampo oorwithc leaning
cloths.
Cleanin gthe sensors
!If yo uclean the sensors with apower
washer, make sure thaty oukee pad istance
of at leas t11.8 in (30 cm )between the vehicle
and the powe rwashern ozzle. Information aboutt
he correct distance is availabl efrom
the equipment manufacturer.
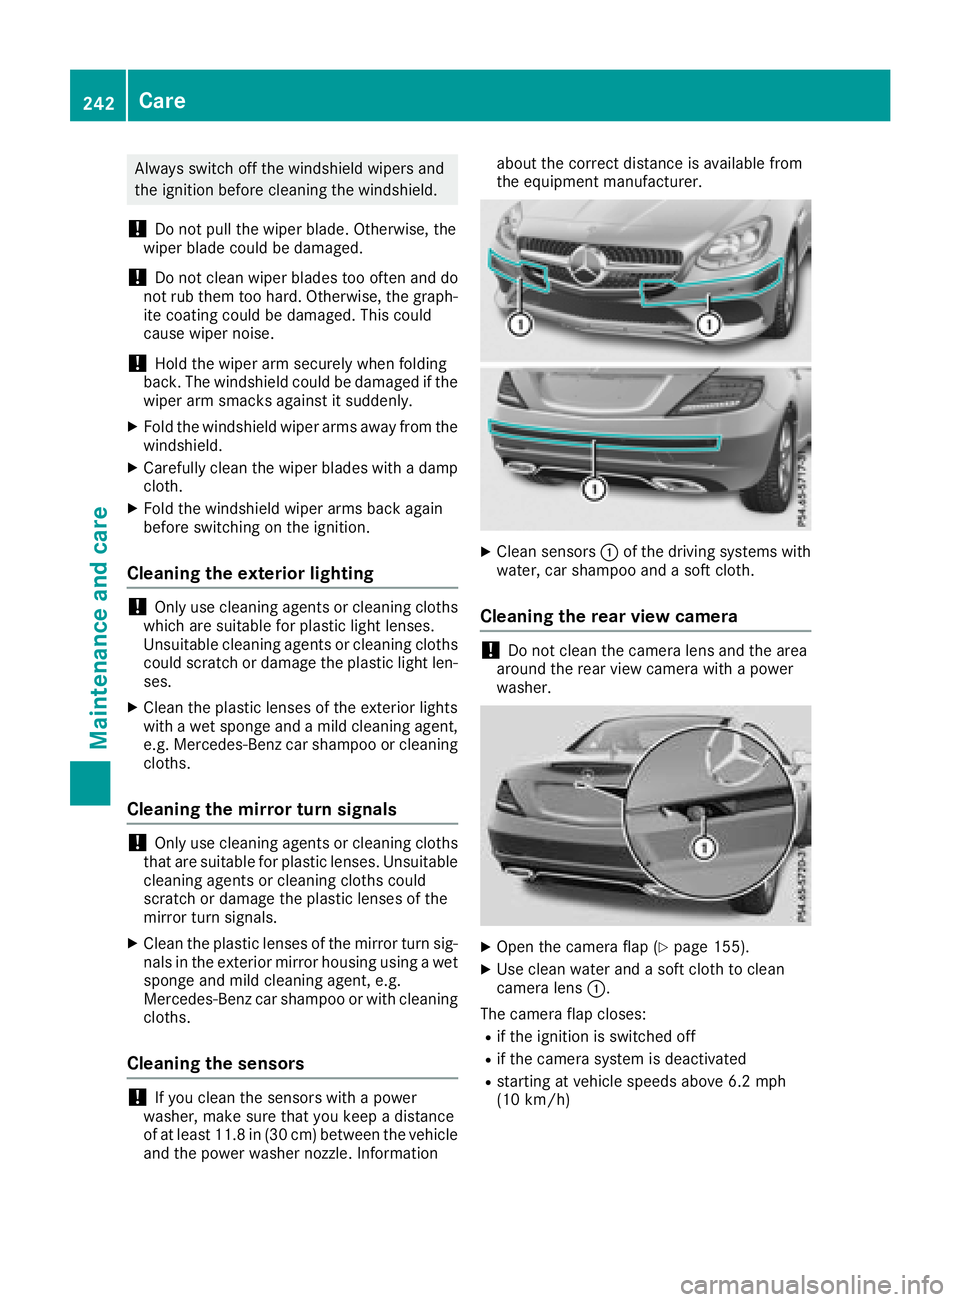
XClea nsensors :of the driving system swith
water, car shampo oand asoftc loth.
Cleanin gthe rear view camera
!Do not clean the camera lens and the area
around the rea rviewc amera with apower
washer.
XOpe nthe camera fla p(Ypage 155).
XUse clean water and asoftc loth to clean
camera lens :.
The camera fla pcloses:
Rif the ignition is switched off
Rif the camera system is deactivated
Rstarting at vehicl espeed sabove 6.2 mph
(10 km/h)
242Care
Maintenance and care
Page 248 of 298
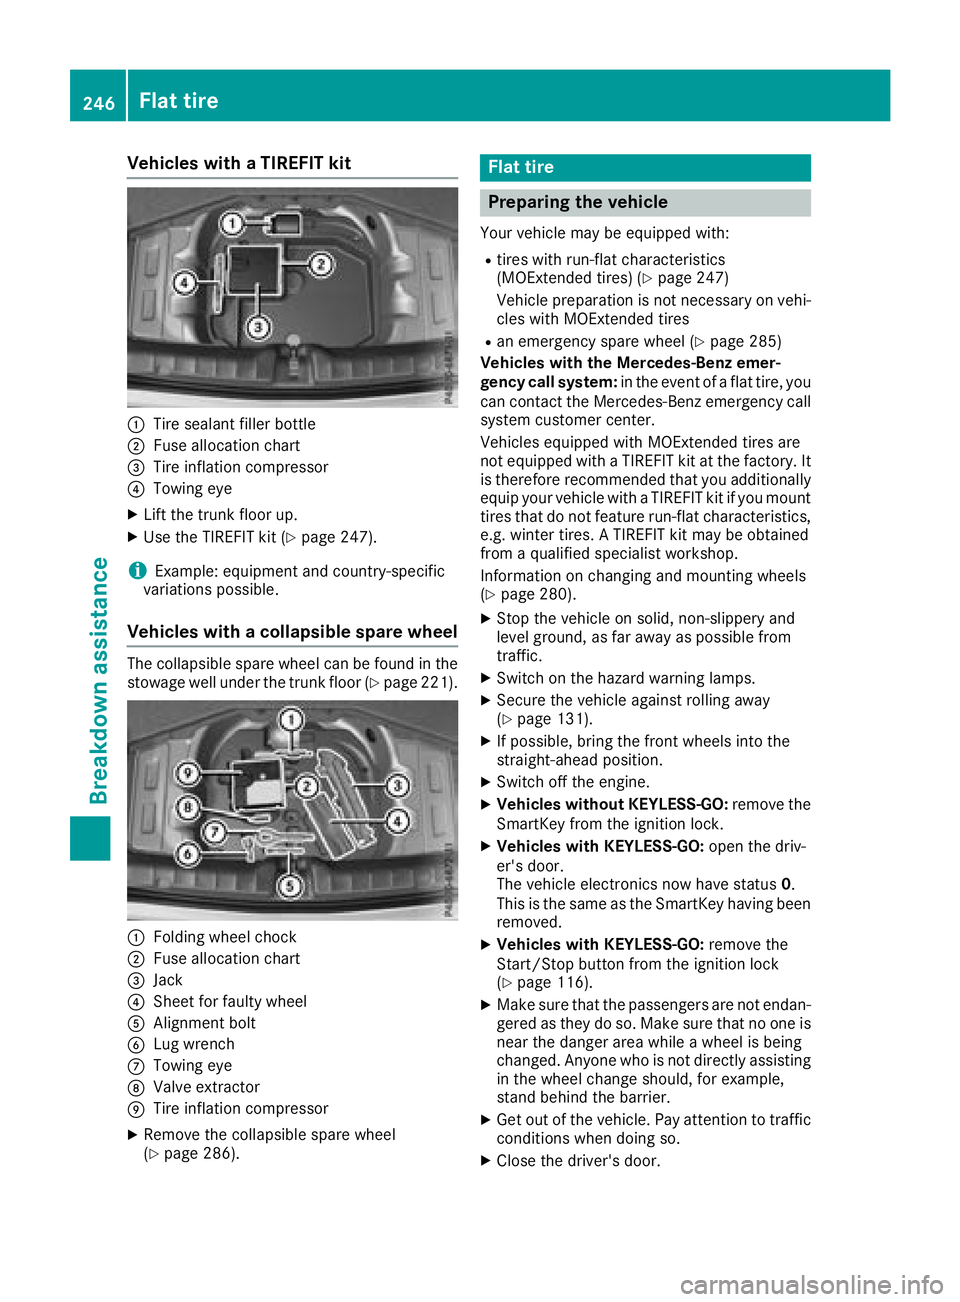
Vehicles withaTIREFI Tkit
:Tire sealant fille rbottle
;Fus ealloc ation chart
=Tire inflation compressor
?Towing eye
XLiftthe trunk floor up.
XUse the TIREFIT kit (Ypage 247).
iExample :equipment and country-specific
variations possible.
Vehicles with acolla psibl espare wheel
The collapsibl espare whee lcan be found in the
stowag ewellu nder the trunk floor (Ypage 221).
:Folding whee lchock
;Fus ealloc ation chart
=Jack
?Shee tfor faulty wheel
AAlignment bolt
BLugw rench
CTowing eye
DValve extractor
ETire inflation compressor
XRemove the collapsibl espare wheel
(Ypage 286).
Flat tire
Preparin gthe vehicle
Your vehicl emaybe equipped with:
Rtire sw ithr un-fla tcharacteristics
(MOExtended tires) (Ypage 247)
Vehicl epreparation is not necessary on vehi-
cle sw ithM OExtende dtires
Ran emergency spare whee l(Ypage 285)
Vehicles with the Mercedes-Benz emer-
genc ycalls ystem: in the event of aflatt ire ,you
can contact the Mercedes-Benz emergency call
system customerc enter.
Vehicles equipped with MOExtende dtiresa re
not equipped with aTIREFIT kit at the factory .It
is therefore recommende dthaty ouadditionally
equi pyourvehicl ewithaT IREFIT kit if yo umount
tire sthatd onot feature run-fla tcharacteristics,
e.g .winter tires. ATIREFIT kit maybeo btained
from aquali fied specialist workshop.
Informatio nonchanging and mounting wheels
(
Ypage 280).
XStop the vehicl eonsolid,non-slippery and
level ground ,asfar away as possibl efrom
traffic.
XSwitch on the hazard warning lamps.
XSecure the vehicl eagain st rolling away
(Ypage 131).
XIf possible, bring the front wheels into the
straight-ahea dposition.
XSwitch off the engine.
XVehicles withou tKEYLESS -GO:remove the
SmartKey from the ignition lock.
XVehicles with KEYLESS-GO: open the driv-
er' sd oor.
T he vehicl eelectronics now have status 0.
Thi sist he same as the SmartKey having been
removed.
XVehicles with KEYLESS-GO: remove the
Start/Stop button from the ignition lock
(
Ypage 116).
XMake sure thatt he passengersare not endan-
gered as they do so. Make sure thatnoo ne is
nea rthe danger are awhile awheel is being
changed .Anyone wh oisnot directlya ssisting
in the whee lchange should, for example,
stand behind the barrier.
XGe toutof the vehicle. Paya ttentiontotraffic
conditions when doing so.
XClose the driver'sd oor.
246Flat tire
Breakdo wn assis tance
Page 251 of 298
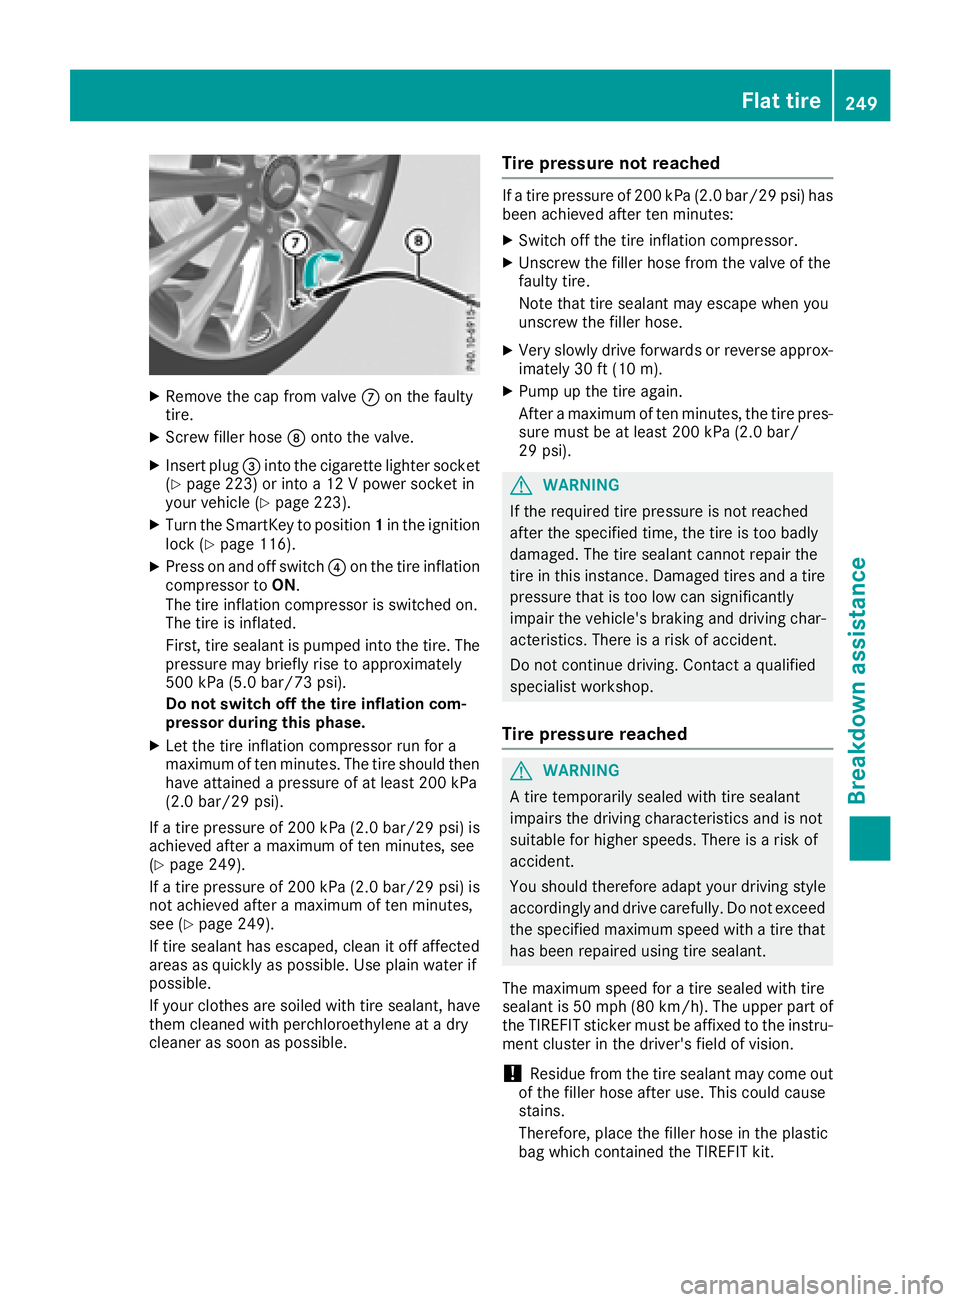
XRemove thecap from valv eC on th efault y
tire.
XScrew filler hos eD onto th evalve.
XInser tplug =intothe cigarette lighte rsocke t
(Ypage 223) or int oa12Vpower socke tin
your vehicl e(Ypage 223).
XTurn theSma rtKey to position 1in th eignition
loc k(Ypage 116).
XPress on and off switch ?on th etirei nflation
compressor to ON.
The tire inflation compressor is switched on .
The tire is inflated.
First ,tires ealan tispumped int othe tire. The
pressur emay briefly ris etoapproximately
50 0k Pa(5.0b ar/7 3psi).
Do not switch off th etirei nflation com -
pressor during this phase .
XLet thetirei nflation compressor run for a
maximum of te nminutes. The tire should then
hav eattained apressur eofatl east 200kPa
(2. 0b ar/29 psi) .
If at irep ressur eof200 kPa( 2.0b ar/29 psi) is
achieved after amaximum of te nminutes, see
(
Ypage 249).
If at irep ressur eof200 kPa( 2.0b ar/29 psi) is
no ta chieved after amaximum of te nminutes,
see (
Ypage 249).
If tire sealan thas escaped, clean it off affecte d
areas as quickly as possible. Use plain water if
possible.
If your clothes are soiled wit htires ealant, hav e
them cleane dwithp erchloroethylen eatadry
cleane rassoo
nasp o
ssible.
Tire pressure not reached
Ifat irep ressur eof200 kPa(2.0 bar/29 psi) has
beena chieved after ten minutes:
XSwitch off the tire inflation compressor.
XUnscrew the filler hose from the valve of the
faulty tire.
Note that tire sealant may escap ewheny ou
unscrew the filler hose.
XVery slowly drive forwards or reverse approx- imately 30 ft (10 m).
XPump up the tire again.
After amaximu moften minutes ,the tire pres-
sure must be at least 200 kPa (2.0 bar/
29 psi).
GWARNING
If the required tire pressure is not reached
after the specified time, the tire is too badly
damaged. The tire sealant cannot repair the
tire in this instance. Damaged tires and atire
pressure that is too low can significantly
impair the vehicle's braking and driving char-
acteristics. There is arisk of accident.
Do not continue driving. Contact aqualified
specialist workshop.
Tire pressure reached
GWARNING
At ire temporarily sealed with tire sealant
impairs the driving characteristics and is not
suitabl efor higher speeds. There is arisk of
accident.
You should thereforea dapt yourdriving style
accordingly and drive carefully .Donot exceed
the specified maximu mspeedw ithatire that
has beenr epaired using tire sealant.
The maximu mspeedf oratire sealed with tire
sealant is 50 mph (80 km/h). The upper part of
the TIREFIT sticker must be affixed to the instru-
ment cluster in the driver's fieldofv ision.
!Residuefrom the tire sealant may come out
of the filler hose after use .This coul dcause
stains.
Therefore, place the filler hose in the plastic
bag which contained the TIREFIT kit.
Flat tire249
Breakdowna ssistance
Z