2018 MERCEDES-BENZ SLC ROADSTER flat tire
[x] Cancel search: flat tirePage 287 of 298

These tires have been specially adapted for
use with the control systems, such as ABS or
ESP
®,and are marked as follows:
RMO = Mercedes-Benz Original
RMOE = Mercedes-Benz Original Extended
(tires featuring run-flat characteristics)
RMO1 = Mercedes-Benz Original (only cer-
tain AMG tires)
Mercedes-Benz Original Extended tires may
only be used on wheels that have been spe-
cifically approved by Mercedes-Benz.
Only use tires, wheels or accessories tested
and approved by Mercedes-Benz.C ertain
characteristics, e.g. handling, vehicle noise
emissions or fuel consumption, may other-
wise be adversely affected. In addition, when
driving with aload, tire dimension variations
could cause the tires to come into contact
with the bodywork and axle components .This
could result in damage to the tires or the vehi- cle.
Mercedes-Benz accepts no liability for dam-
age resulting from the use of tires, wheels or
accessories other than those tested and
approved.
Information on tires, wheels and approved
combinations can be obtained from any quali-
fied specialist workshop.
!Retreaded tires are neither tested nor rec-
ommended by Mercedes-Benz,s ince previ-
ous damage cannot alwaysbed etected on
retreaded tires. As aresult, Mercedes-Benz
cannot guarantee vehicle safety if retreaded
tires are mounted. Do not mount used tires if
you have no information about their previous
usage.
The recommended pressures for various oper-
ating conditions can be found:
Ron the Tire and Loading Information placard
on the B-pillar on the driver's side
Rin the tire pressure table on the fuel filler flap
Observe the notes on recommended tire pres-
sures under various operating conditions
(
Ypage 263).
Check tire pressures regularly, and only when
the tires are cold. Comply with the maintenance
recommendations of the tire manufacturer in
the vehicle document wallet. Notes on the vehicle equipment
–alwayse quip
the vehicle:
Rwith tires of the same size on agiven axle (left
and right)
Rwith the same type of tires at agiven time
(summer tires, winter tires, MOExtended
tires)
Exception: it is permissible to mount adiffer-
ent type or make in the event of aflat tire.
Observe t
he "MOExtended tires (tires with
run-flat characteristics)" section
(
Ypage 247).
Vehicles equipped with MOExtended tires are
not equipped with aTIREFIT kit at the factory. It
is therefor erecommended that you additionally
equip your vehicle with aTIREFIT kit if you mount
tires that do not feature run-flat characteristics,
e.g. winter tires. ATIREFIT kit may be obtained
from aqualified specialist workshop.
Emergency sparew heel
Important safety notes
GWARNING
The wheel or tire size as well as the tire type of the spare wheel or emergencys pare wheel
and the wheel to be replaced may differ.
Mountin ganemergencys pare wheel may
severely impair the driving characteristics.
There is arisk of an accident.
To avoid hazardous situations:
Radapt your driving style accordingly and
drive carefully.
Rnever mount more than one spare wheel or
emergencys pare wheel that differs in size.
Ronly useaspare wheel or emergencys pare
wheel of adifferent size briefly.
Rdo not switch ESP®off.
Rhave aspare wheel or emergencys pare
wheel of adifferent size replaced at the
nearest qualified specialist workshop.
Observe that the wheel and tire dimensions
as well as the tire type must be correct.
When using an emergencys pare wheel or spare
wheel of adifferent size, you must not exceed
the maximum speed of 50 mph (80 km/h).
Emergency sparew heel285
Wheels and tires
Z
Page 288 of 298

Snow chains mustnot be mounted on emer-
gency spare wheels.
General notes
You can as kfor information regarding permitted
emergency spare wheel satanauthorized
Mercedes-Benz Center.
You shoul dregularl ycheck the pressure of the
emergency spare wheel ,particularly prior to
long trips, and correct the pressure as neces-
sary (
Ypage 263). The value on the wheel is
valid.
An emergency spare wheel may also be moun-
ted against the direction of rotation. Observe
the time restriction on us easwellast he speed
limitation specified on the emergency spare
wheel.
Replace the tire saftersix years at the latest,
regardless of wear. Thisa lsoa pplies to the
emergency spare wheel.
Wheny ouare driving with the collapsibl espare
wheel mounted, the tire pressure loss warning
system or the tire pressure monitor canno tfunc-
tion reliably. Only restart the tire pressure loss
warning system or tire pressure monitor when
the defectiv ewheel hasb eenr eplaced with a
new wheel.
Vehicles with tire pressure monitor: after
mounting an emergency spare wheel ,the sys-
tem may stil ldisplay the tire pressure of the
removed wheel for afew minutes. The value dis-
played for the mounted emergency spare wheel
is not the same as the current tire pressure of
the emergency spare wheel.
Removin gthe emergencys pare wheel
Vehicles with acolla psibles pare wheel
The collapsibl espare wheel can be found in the
stowag ewellu nder the trunk floor (Ypage 221).
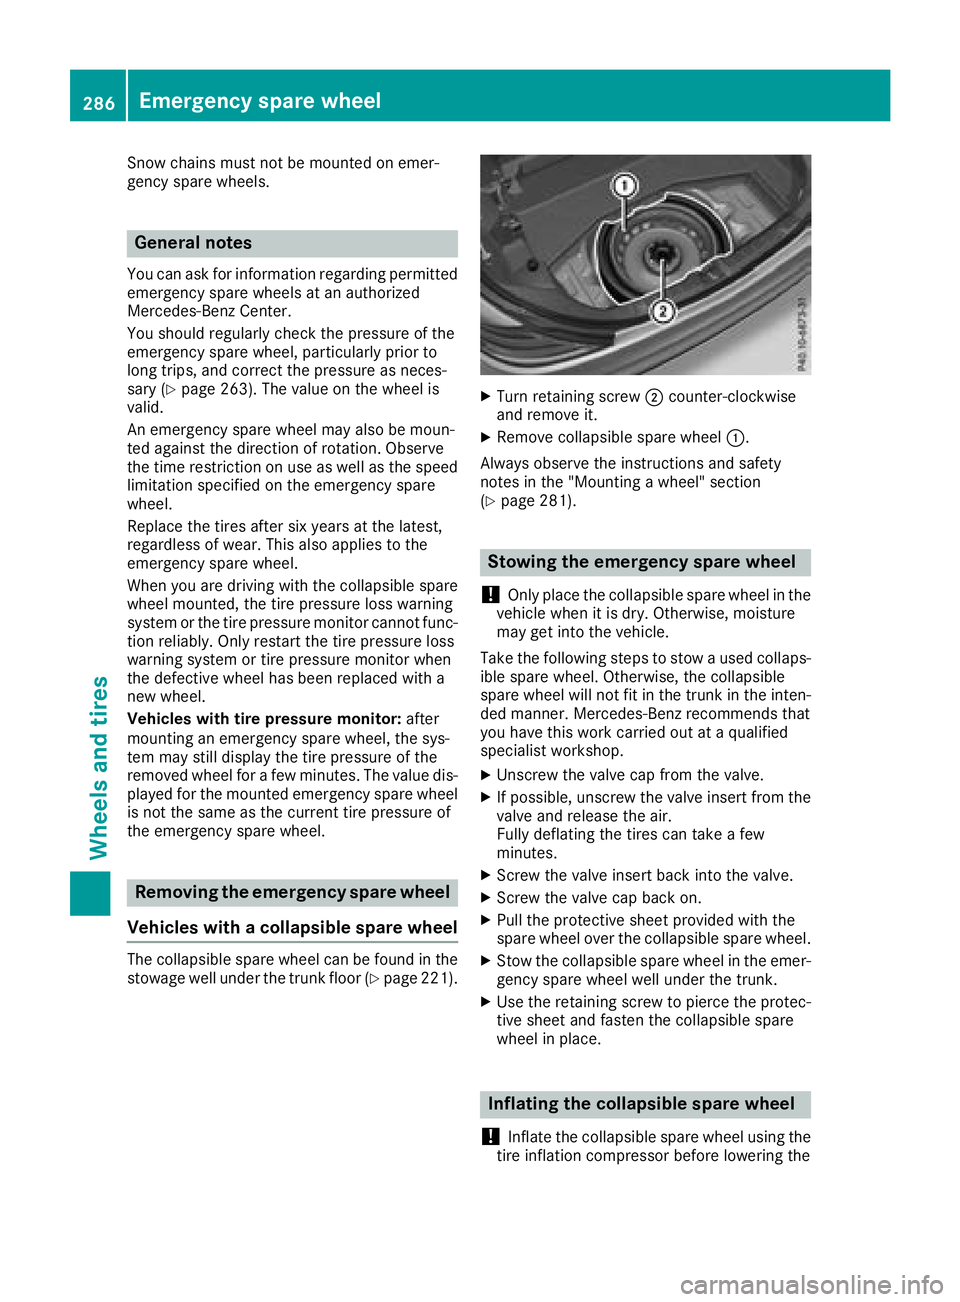
XTurn retaining screw ;counter-clockwise
and remove it.
XRemove collapsibl espare wheel :.
Alway sobserve the instructions and safety
notes in the "Mounting awheel"s ection
(
Ypage 281).
Stowin gthe emergencys pare wheel
!
Only place the collapsibl espare wheel in the
vehicl ewhenitisd ry.O therwise, moisture
may get into the vehicle.
Take the following stepstos towausedc ollaps-
ible spare wheel .Otherwise, the collapsible
spare wheel will not fit in the trunk in the inten-
ded manner. Mercedes-Benz recommendst hat
yo uh avet his work carrie doutataq uali fied
specialist workshop.
XUnscrewt he valve cap from the valve.
XIf possible ,unscrew the valve insert from the
valve and release the air.
Fully deflating the tire scan take afew
minutes.
XScrew the valve insert back into the valve.
XScrew the valve cap back on.
XPull the protectiv esheet provided with the
spare wheel overt he collapsiblespare wheel.
XStow the collapsibl espare wheel in the emer-
gency spare wheel well under the trunk.
XUse the retaining screwtop ierce the protec-
tive sheet and fasten the collapsibl espare
wheel in place.
Inflating the collapsibles pare wheel
!
Inflate the collapsibl espare wheel using the
tire inflation compressor before lowering the
286Emergencys pare wheel
Wheels and tires
Page 289 of 298

vehicle. The wheelrim could otherwise be
damaged.
!Do not operate the tire inflation compressor
for longer than eightm inutes atatime without
ab reak. It may otherwise overheat.
The tire inflation compressorc an be operated
again once it has cooled down.
XMount the collapsible spare wheelasd escri-
bed (Ypag e281).
The collapsible spare wheelm ust be mounted
before it is inflated.
XRemove the tire inflation compressorf rom
the stowage space under the trunk floor
(
Ypag e245).
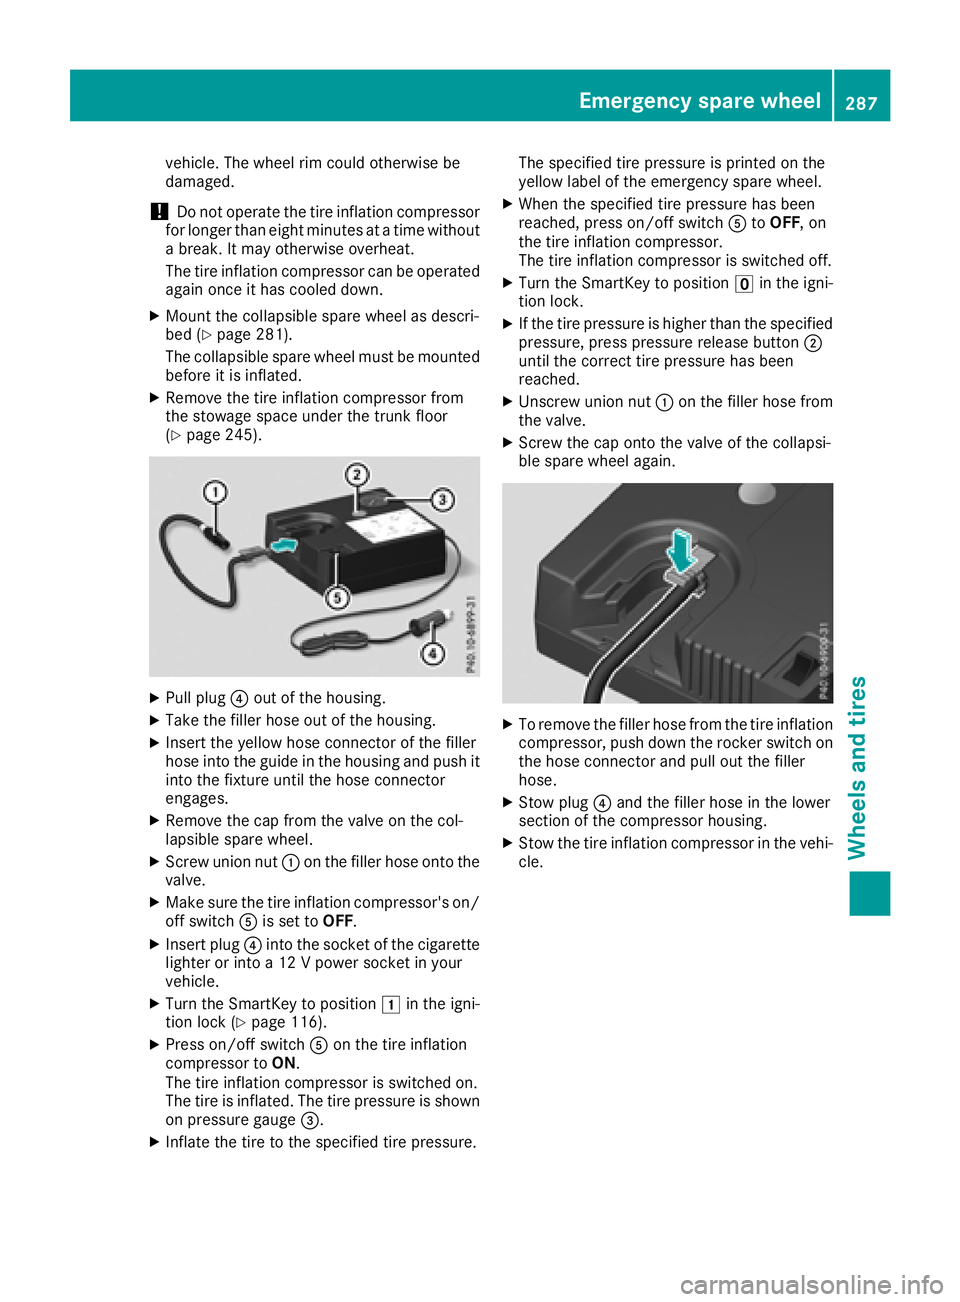
XPullplug ?out of the housing.
XTake the filler hose out of the housing.
XInsert the yellow hose connector of the filler
hose into the guide in the housing and push it
into the fixture until the hose connector
engages.
XRemove the cap from the valve on the col-
lapsibles pare wheel.
XScrew union nut :on the filler hose onto the
valve.
XMake sure the tire inflation compressor's on/
off switch Ais set to OFF.
XInsert plug ?into the socket of the cigarette
lighter or into a12Vpowers ocket in your
vehicle.
XTurn the SmartKey to position 1in the igni-
tion lock (Ypag e116).
XPress on/off switch Aon the tire inflation
compressort oON.
The tire inflation compressoriss witched on.
The tire is inflated. The tire pressure is shown
on pressure gauge =.
XInflate the tire to the specified tire pressure. The specified tire pressure is printed on the
yellow label of the emergency spare wheel.
XWhen the specified tire pressure has been
reached, press on/off switch
AtoOFF,o n
the tire inflation compressor.
The tire inflation compressoriss witched off.
XTurn the SmartKey to positionuin the igni-
tion lock.
XIf the tire pressure is highert han the specified
pressure, press pressure release button ;
until the correct tire pressure has been
reached.
XUnscrew union nut :on the filler hose from
the valve.
XScrew the cap onto the valve of the collapsi-
ble spare wheela gain.
XTo remove the filler hose from the tire inflation
compressor, push down the rocker switch on
the hose connector and pul lout the filler
hose.
XStow plug ?and the filler hose in the lower
section of the compressorh ousing.
XStow the tire inflation compressorint he vehi-
cle.
Emergency spare wheel287
Wheels and tires
Z