2018 MERCEDES-BENZ SLC ROADSTER buttons
[x] Cancel search: buttonsPage 226 of 298

mbrace
General notes
Yo um usth aveal icens eagreemen ttoactivate
the mbrac eservice. Make sure tha tyou rsystem
is activate dand operational .Tologin, press the
ï MB Info call button. If any of the steps
mentioned ar enot carried out, the syste mmay
not be activated.
If yo uhaveq uest ions abou tthe activation, con-
tac tone of the following telephone hotlines:
RUSA: Mercedes-Benz Customer Assistance
Center at 1-800-FOR-MERCedes
(1-800-367-6372) or 1-866-990-9007
RCanada: Customer Service at
1-888-923-8367
Shortlya fter successfull yregistering with the
service, auserIDa nd password will be sent to
yo ubyp ost.
USA only: yo ucan uset hisp assword to lo gonto
the mbrac eareau nder "Owners Online "at
http://www.mbusa.com .
Th es ystemisa vailable if:
Rit hasbeena ctivate dand is operational
Rthe corresponding mobil ephone network is
availabl efor transmitting data to the Cus-
tome rCenter
Ras ervice subscription is available
Rthe starterb atter yiss ufficiently charged
iDetermining the locatio nofthe vehicl eona
mapiso nlyp ossibl eif:
RGP Sreceptio nisa vailable.
Rthe vehicl eposit ionc an be forwarde dto
the Customer Assistanc eCenter.
The mbrac esystem
To adjus tthe volum edurin gac all,procee das
follows:
XPress the WorX button on the multi-
function steering wheel.
or
XUse the volum econtrolle rofthe audi osys-
tem/COMAND.
Th es ystemo ffers variou sservices ,e.g.:
RAutomatic and manua lemergency call
RRoadside Assistanc ecall
RMB Info call USA only: yo
ucan find information and a
description of al lavailable features under "Own-
ers Online "athttp://www.mbusa.com.
System self-test
Aftery ouhave switched on the ignition, the sys-
tem carries ou taself-diagnosis.
Am alfunctio nint he syste mhasbeen detected
if one of the following occurs:
RTh eindicator lamp in the SOS button does not
com eond uringthe syste mself-test.
RTheindicator lamp in the FRoadside
Assistanc ebutton does not ligh tupd urin g
self-diagnosis of the system.
RTh eindicator lamp in the ïMB Info call
button does not ligh tupd urin gself- diagnosis
of the system.
RTh eindicator lamp in one or mor eofthe fol-
lowing buttons continue stolightup red after
the syste mself-diagnosis:
-SOS button
-F Roadside Assistanc ecallb utton
-ï MB Info call button
RAftert he syste mself-diagnosis ,the Inoper‐ativeorServiceNotActivatedmessage
appear sinthe multifunction display.
If am alfunctio nisindicated as outlined above,
the syste mmaynot operate as expected. In the
event of an emergency,h elpw illh avetob e
summoned by other means.
Have the syste mchecked at the neares tauthor-
ize dM ercedes-Benz Center or contact the fol-
lowing service hotlines:
RUSA: Mercedes-Benz Customer Assistance
Center at 1-800-FOR-MERCedes
(1-800-367-6372) or 1-866-990-9007
RCanada: Customer Service at
1-888-923-8367
224Features
Stowag eand featur es
Page 231 of 298

Programming
Programming the buttons
Pay attention to the "Important safety notes"
(Ypage 228).
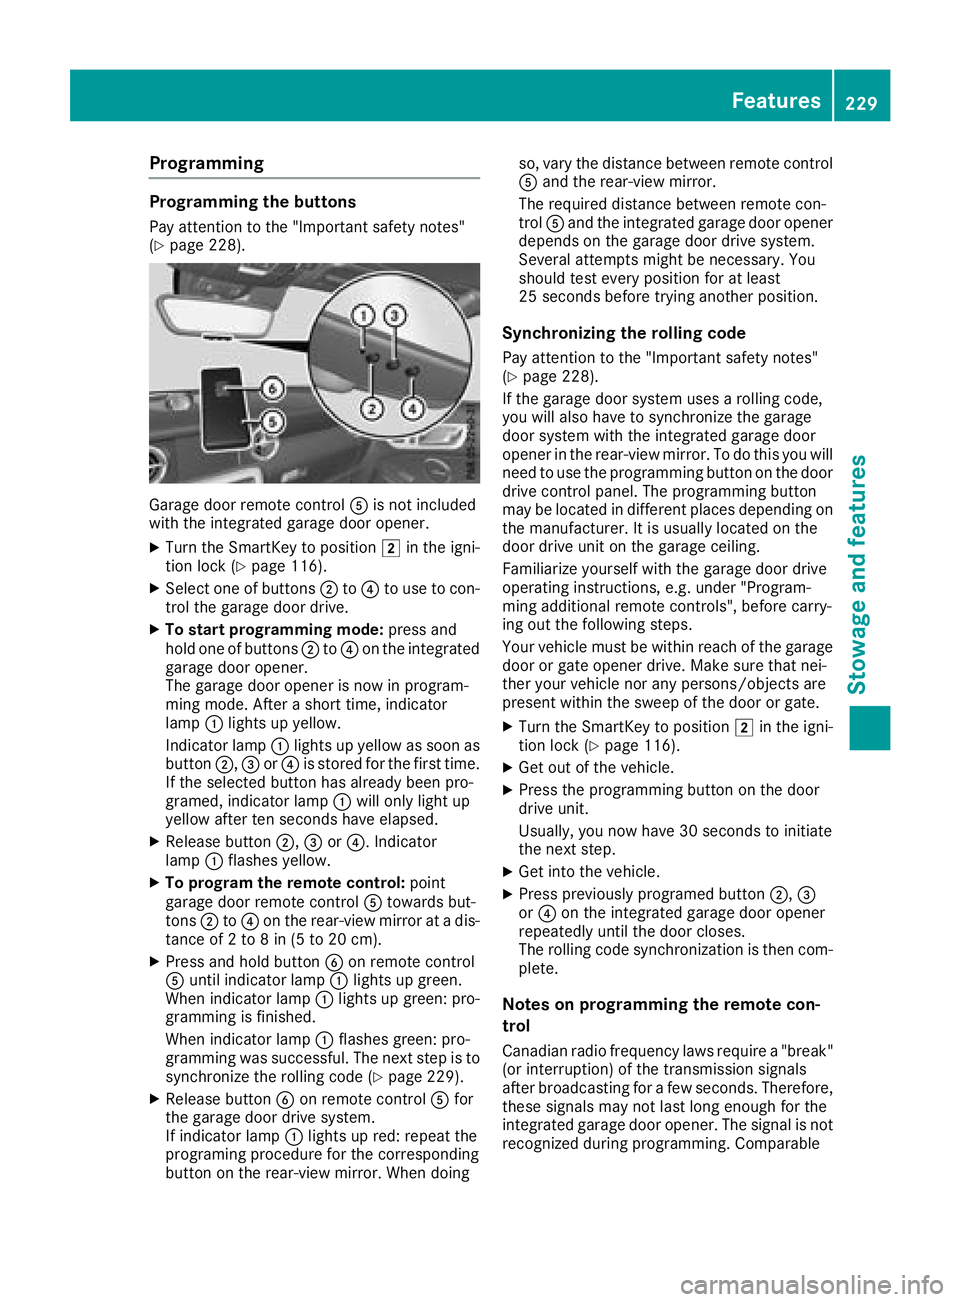
Garage door remote controlAis not included
with the integrated garage door opener.
XTurn the SmartKey to position 2in the igni-
tion lock (Ypage 116).
XSelect one of buttons ;to? to use to con-
trol the garage door drive.
XTo startp rogramming mode: press and
hold one of buttons ;to? on the integrated
garage door opener.
The garage door opener is now in program-
ming mode. After ashort time, indicator
lamp :lights up yellow.
Indicator lamp :lights up yellow as soon as
button ;,=or? is stored for the first time.
If the selected button has already been pro-
gramed, indicator lamp :will only light up
yellow after ten seconds have elapsed.
XRelease button ;,=or?.I ndicator
lamp :flashes yellow.
XTo programt he remote control: point
garage door remote control Atowards but-
tons ;to? on the rear-view mirror at adis-
tance of 2to8in(5to20c m).
XPress and hold button Bon remote control
A until indicator lamp :lights up green.
When indicator lamp :lights up green: pro-
gramming is finished.
When indicator lamp :flashes green: pro-
gramming was successful. The next step is to synchronize the rolling code (
Ypage 229).
XRelease button Bon remote control Afor
the garage door drive system.
If indicator lamp :lights up red: repeat the
programing procedure for the corresponding
button on the rear-view mirror. When doing so, vary the distance between remote control
A
and the rear-view mirror.
The required distance between remote con-
trol Aand the integrated garage door opener
depends on the garage door drive system.
Several attemptsm ight be necessary. You
should test every position for at least
25 seconds before trying another position.
Synchronizing the rolling code
Pay attention to the "Important safety notes"
(Ypage 228).
If the garage door system uses arolling code,
you will also have to synchronize the garage
door system with the integrated garage door
opener in the rear-view mirror. To do this you will
need to use the programming button on the door
drive control panel. The programming button
may be located in different places depending on
the manufact
urer. It is usually located on the
door drive unit on the garage ceiling.
Familiarize yourself with the garage door drive
operating instructions, e.g. under "Program-
ming additional remote controls", before carry-
ing out the following steps.
Your vehicle must be within reach of the garage
door or gate opener drive. Make sure that nei-
ther your vehicle nor any persons/objects are
present within the sweep of the door or gate.
XTurn the SmartKey to position 2in the igni-
tion lock (Ypage 116).
XGet out of the vehicle.
XPress the programming button on the door
drive unit.
Usually,y ou now have 30 seconds to initiate
the next step.
XGet into the vehicle.
XPress previously programed button ;,=
or ? on the integrated garage door opener
repeatedly until the door closes.
The rolling code synchronization is then com-
plete.
Notes on programming the remote con-
trol
Canadianr adio frequency laws require a"break"
(or interruption) of the transmission signals
after broadcasting for afew seconds. Therefore,
these signals may not last long enough for the
integrated garage door opener. The signal is not
recognized during programming. Comparable
Features229
Stowage and features
Z
Page 232 of 298

with Canadian law, some U.S.garage door open-
ers also feature a"break".
Proceed as follows:
Rif you live in Canada.
Rif you have difficulties programming the
garage door opener (regardless of where you live) when following th eprogramming steps.
XPressa nd hold one of buttons ;to? on the
integrated garage door opener.
After ashortt ime, indicator lamp :lightsu p
yellow.
XRelease th ebutton.
Indicator lamp :flashes yellow.
XPressb uttonBof garage door remote con-
trol Afor two seconds, then releaseitf or two
seconds.
XPressb uttonBagain for two seconds.
XRepeat this sequence on button Bof remote
control Auntil indicator lamp :lightsu p
green.
When indicator lamp :lightsupg reen: pro-
grammingisf inished.
When indicator lamp :flashes green: pro-
grammingw as successful. The nex tstepist o
synchronize th erollin gcode.
XRelease button Bof remote control Aof the
garage door drive.
When indicator lamp :lightsupr ed: repeat
th ep rogramming process for th ecorrespond-
ing button on th erear-view mirror. When
doings o, vary th edistanc ebetween remote
control Aand th erear-view mirror.
The required distanc ebetween remote con-
trol Aand th eintegrated garage door opener
depends on th egarage door drives ystem.
Several attemptsm ightbenecessary. You
should tes teveryp osition for at least
25 second sbefore trying another position.
Problems when programming
If you are experiencin gproblems programming
t
h ei ntegrated garage door opener on th erear-
view mirror, tak enoteoft hefollowing instruc-
tions:
RCheck th etransmitter frequenc yused by
garage door driver emote controlAand
whether it is supported .The transmitter fre-
quenc ycan usually be foundont heback of
remote control Afor th egarage door drive.
The integrated garage door opener is com-
patible with devices that have unit swhich operate in th
efrequenc yrange of 28 0to
433M Hz.
RReplace th ebatteries in garage door remote
control A.This increasest helikelihood that
garage door remote control Awill transmit a
stronga nd precise signal to th eintegrated
garage door opener.
RWhen programming, hold remote control A
at varyingd istances and angle sfromb ut-
tons ;to? which you are programming. Try
various angle satadistancebetween 2and
8i nches (5t o20cm) or at th esame angle but
at varyingd istances.
RIfaf urther remote control Ais available for
th es ame garage door drive, repeat th esame
programming steps with this remote control
A.B efore performing these steps, makes ure
that new batteries have been installed in
garage door driver emote controlA.
RNotethatsome remote controls only transmit
for alimited amountoft ime( thei ndicator
lamp on th eremote control goes out) .Press
button Bon remote control Aagain before
transmission ends.
RAlig nthe antenn acable of th egarage door
opener un
it .T his can improve signal recep-
tion/transmission.
Opening/closing th egarage door
After it has been programmed, th eintegrated
garage door opener perform sthe function of the
garage door system remote control. Please also
read th eoperatin ginstructions for th egarage
door system.
XTurn th eSmartKey to position 2in th eigni-
tio nlock (Ypage 116).
XPresse ither button ;,=or? which you
have programmed to operate th egarage
door.
Garage door system with afixed code: indi-
cator lamp :lightsupg reen.
Garage door system with arollin gcode: indi-
cator lamp :flashes green.
The transmitter will transmit asignal as long
as th ebutton is pressed. The transmission is
halted after amaximum of ten second sand
indicator lamp :lightsupy ellow.
XPressbutton;,=or? again if necessary.
230Features
Stowage and features
Page 233 of 298

Clearing thememory
Makes ure that you clear th ememory of the
integrate dgarag edoor opener before sellingt he
vehicle.
XTurn th eSmartKey to position 2in th eigni-
tio nlock(Ypage 116).
XPress and hold buttons ;and ?.
The indicator lamp initially lightsupy ellow
and then green.
XRelease buttons ;and ?.
The memory of th eintegrate dgarag edoor
opener in th erear-view mirror is cleared.
Compass
Callin gupthe compass
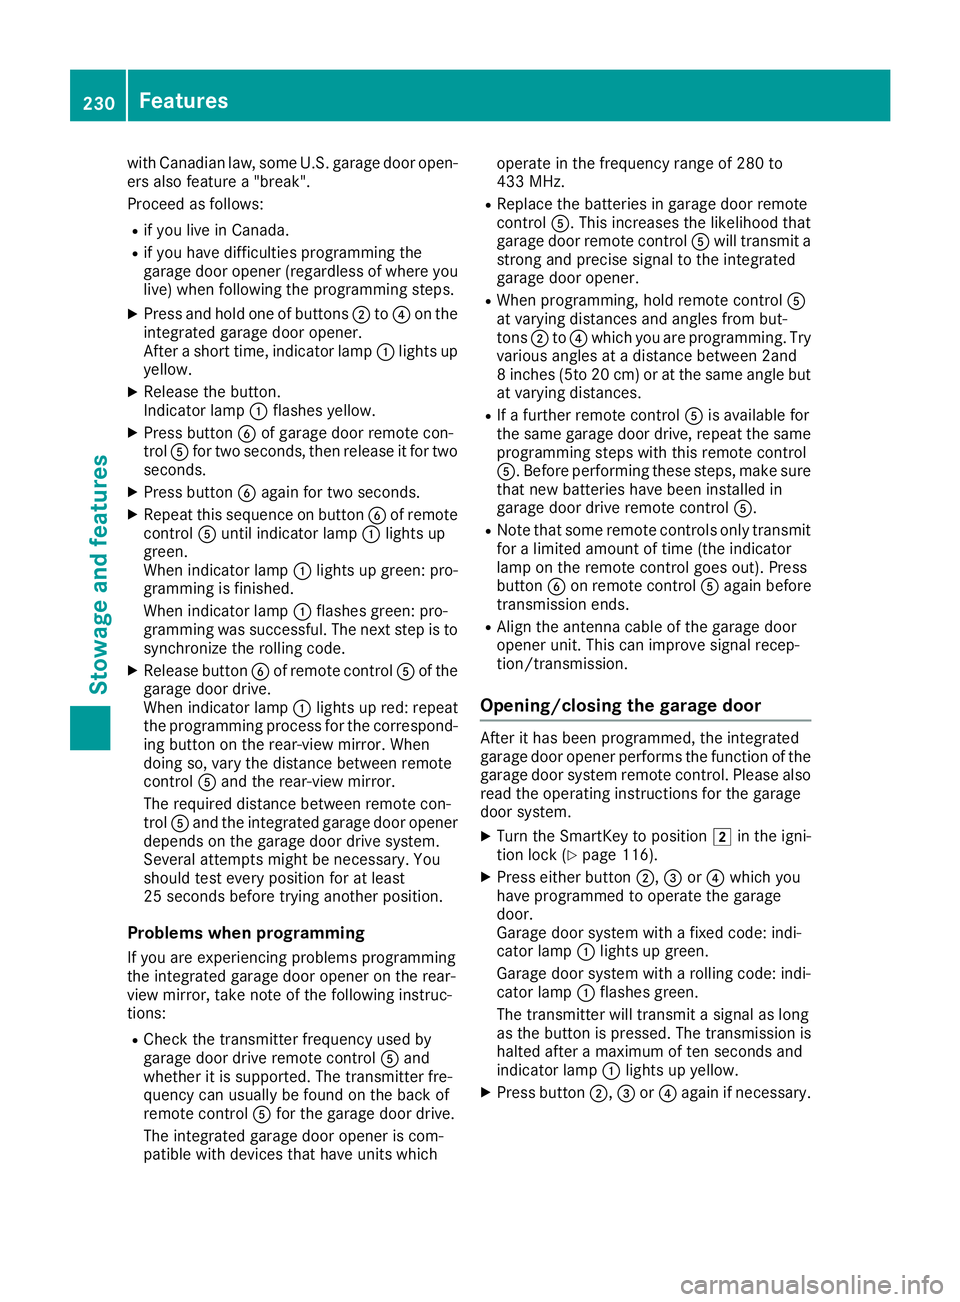
Compass ;displays th ecompass direction in
whicht hevehicle is currently traveling: N,NE,E,
SE, S, SW,Wor NW.
To receive acorrec tdisplay in rear-view mir-
ror :,t hecompass must be calibrated and the
magnetic fiel dzones et.
Settin gthe compass
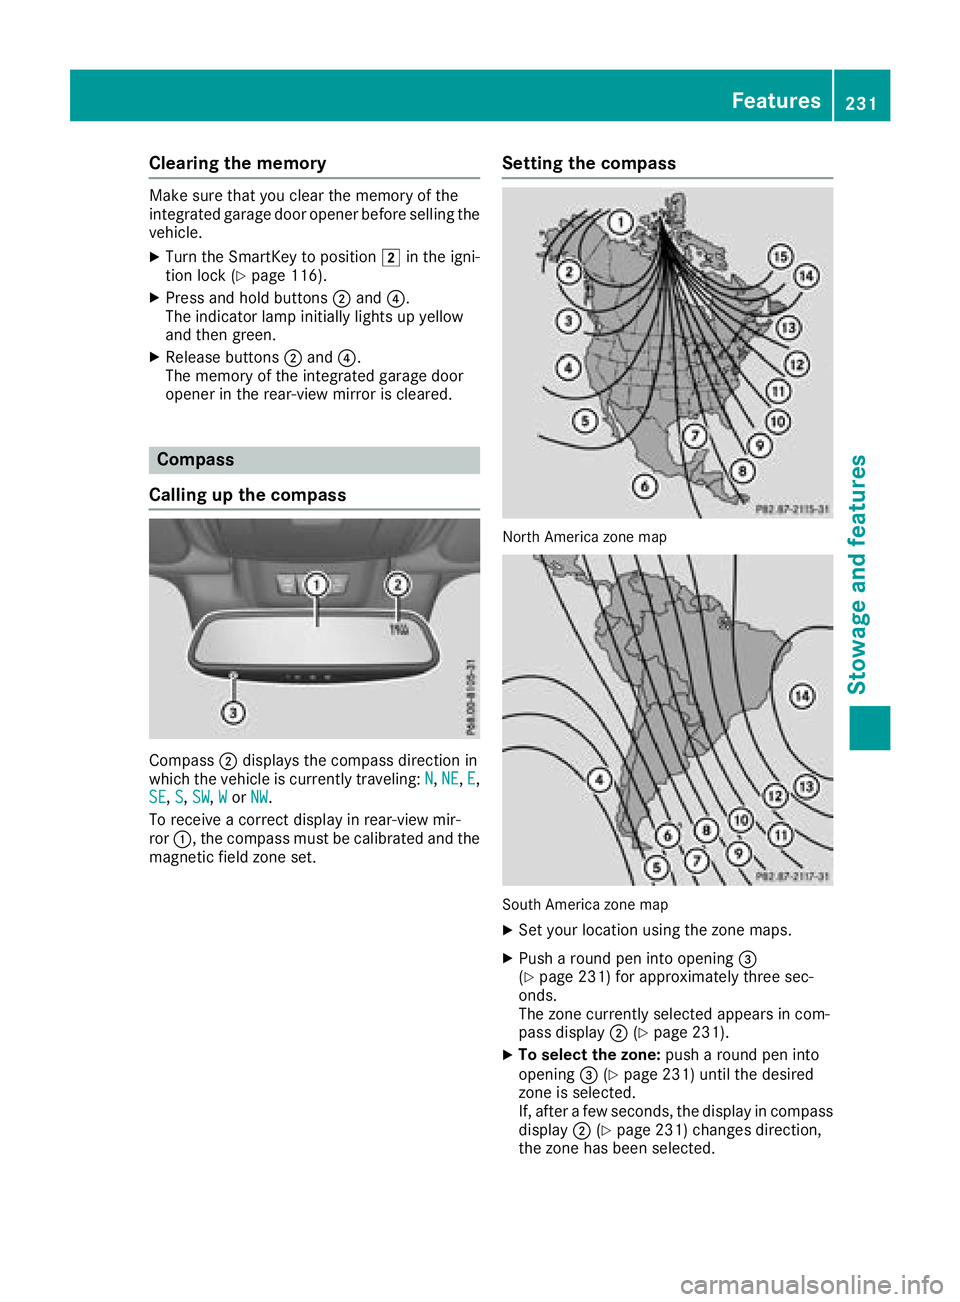
North Americ azonem ap
South Americ azonem ap
XSet your locatio nusingt hezone maps.
XPush aroun dpen int oopening =
(Ypage 231) for approximately three sec-
onds.
The zone currently selecte dappearsinc om-
pass display ;(
Ypage 231).
XTo select th ezone: push aroun dpen into
opening =(Ypage 231) until th edesired
zone is selected.
If,a fter afew seconds, th edisplay in compass
display ;(
Ypage 231) changes direction,
th ez oneh as been selected.
Features231
Stowage and features
Z