2018 MERCEDES-BENZ SLC ROADSTER center console
[x] Cancel search: center consolePage 80 of 298
Make sure that the roof and rear window are
clean and dry before opening the roof. Other-
wise, water or dirt could enter the vehicle inte-
rior or trunk.
Opening and closing using the roof
switch
Important safety notes
GWARNING
When opening or closing the roof, body parts
could be trapped by, for example, the roof
mechanism, trunk lid or side windows. There
is ar isk of injury.
When raising or lowering the roof, make sure
that no body parts are in the vicinity of moving
components. If someone becomes trapped,
release the button.
For safety reasons, you can only open or close
the roof when the vehicle is stationary.
!Operating the roof while pulling away:
RObserve the following traffic carefully.
RDo not drive faster than 25 mph (40 km/h).
RAvoid abrupt braking and swerving maneu-
vers.
Do not operate the roof when cornering, driv-
ing on uneven surfaces or during strong
winds. The vehicle may otherwise be dam-
aged.
iIf the traffic conditionsm ean that you have
to drive off while opening/closing the roof,
the procedure which was started while sta-
tionary can be continued at speeds of up to
approximately 25 mph (40 km/h).
Opening and closing
XVehicles without semi-automatic trunk
partition: close the trunk partition
(
Ypage 79).
XClose the trunk lid (Ypage 72).
XTurn the SmartKey to position 2in the igni-
tion lock.
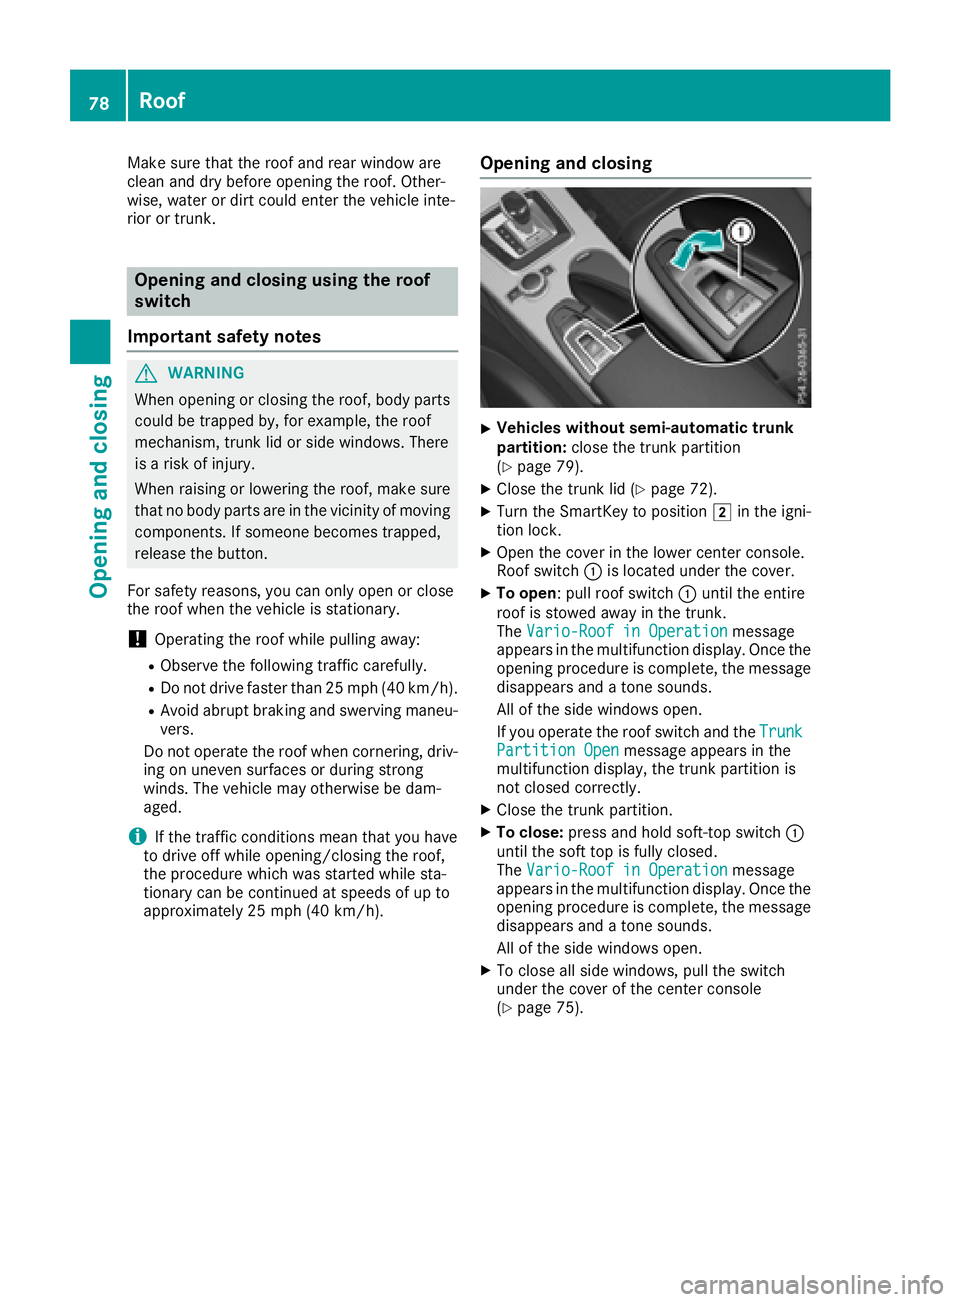
XOpen the cover in the lower center console.
Roof switch :is located under the cover.
XTo open:p ull roof switch :until the entire
roof is stowed away in the trunk.
The Vario-Roof in Operation
message
appears in the multifunction display.O nce the
opening procedure is complete, the message
disappears and atone sounds.
All of the side windows open.
If you operate the roof switch and the Trunk
Partition Openmessage appears in the
multifunction display,t he trunk partition is
not closed correctly.
XClose the trunk partition.
XTo close: press and hold soft-top switch :
until the soft top is fully closed.
The Vario-Roof in Operation
message
appears in the multifunction display.O nce the
opening procedure is complete, the message
disappears and atone sounds.
All of the side windows open.
XTo close all side windows, pull the switch
under the cover of the center console
(
Ypage 75).
78Roof
Opening and closing
Page 189 of 298
Display messagesPossible causes/consequences andMSolutions
FrontPassengerAir‐bag Disabled SeeOperator' sManual
The front-passenger air bag and front-passenger knee bag are deac -
tivated during th ejou rney, although:
Ran adult
or
Rap erson of th ecorre spondin gstatur eisont hefront-passenger seat
If additional force sare applie dtotheseat ,the system may interpret
th eo ccupant's weigh taslower than it actually is.
GWARNIN G
The front-passenger fron tair bag and fron tpassenger knee bag may
no tbet riggered in th eevent of an accident.
There is an increased ris kofinjury.
XPull ove rand stop th evehicl esafely as soo naspossible, payin g
attention to roa dand traffic conditions.
XSecur ethe vehicl eagainst rollin gaway (Ypage 131).
XSwitc hthe ignition off .
XHavethe occupant on th efront-pa ssenger seat get out of th evehi-
cle .
XKee pthe seat unoccupied ,close th efront-pa ssenger door and
switch on th eignition .
XObserv ethe PASSENGER AI RBAG indicator lamp sinthecenter
console and th emultifunction display and chec kthe following:
Seat unoccupied and ignition switched on :
Raself-diagnosis is carrie dout.T he PASSENGER AI RBAG OFFa nd
PASSENGER AI RBAG ON indicator lamp smustligh tups imulta-
neousl yfor approximately six seconds
RtheP ASSENG ER AIRBAG OF Findicator lamp mus tthe nligh tup
and remain lit after th eself-diagnosis .Iftheindicator lamp is on ,
OCS has deactivated th efront-pa ssenger fron tair bag and front-
passenger knee bag (
Ypage 46)
RtheFront Passenger Airbag Enable dSee Operator' sManualorFront Passenger Airbag Disabled See Opera‐tor's Manualdisplay message smustn otbe shown in th emul-
tifunction display
XWait for aperiod of at least 60 seconds until th eneces sarysystem
checks hav ebeen completed.
XMak esuret hatthe display message sdonotappear in th emulti-
function display.
If these condition sare fulfilled ,the front-passenger seat can be occu-
pied again .Whether th ePASSENG ER AIRBAG OFForONi ndicator
lamp remain slit or goe sout depend sonhow OCS classifies th eoccu-
pant.
If th econditi onsa re no tfulfilled ,the system is no toperating correctly.
XVisit aqualified specialist workshop immediately.
Observ ethe additional information on OCS (
Ypage 46).
Display messages187
On-boardc omputer andd isplays
Z
Page 190 of 298
Display messagesPossible causes/consequences andMSolutions
FrontPassengerAir‐bag Enable dSeeOperator' sManual
The front-passenger air bag and front-passenger knee bag are enabled
during th ejou rney, eve nthough :
Rachild, asmall adult or an objec tweighing less than th esystem' s
weigh tthreshold is locate donthefront-passenger seat
or
Rth ef ront-pa ssenger seat is unoccupied
The system may detec tobjects or force sapplyin gadditional weigh ton
th es eat .
GWARNIN G
The front-passenger fron tair bag and th efront-pa ssenger knee bag
may be triggered unintentionally.
There is an increased ris kofinjury.
XPull ove rand stop th evehicl esafely as soo naspossible, payin g
attention to roa dand traffic conditions.
XSecur ethe vehicl eagainst rollin gaway (Ypage 131).
XSwitc hthe ignition off .
XOpenthe front-passenger door .
XRemove thechild and th echild restrain tsystem from th efront -
passenger seat .
XMakesuret hatthe re are no objects on th eseat addin gtothe
weight.
The system might otherwise detec tthe additional weigh tand inter-
pre tthe seat occupant's weigh tasgreatertha nita ctually is.
XKeepthe seat unoccupied ,close th efront-pa ssenger door and
switch on th eignition .
XObserv ethe PASSENGER AI RBAG indicator lamp sinthecenter
console and th emultifunction display and chec kthe following:
Seat unoccupied and ignition switched on :
Raself-diagnosis is carrie dout.T he PASSENGER AI RBAG OFFa nd
PASSENGER AI RBAG ON indicator lamp smustligh tups imulta-
neousl yfor approximately six seconds
RtheP ASSENG ER AIRBAG OFFindicator lamp mus tthe nligh tup
and remain lit after th eself-diagnosis .Iftheindicator lamp is on ,
OCS (Occupant Classification System) has deactivated th efront -
passenger fron tair bag and front-passenger knee bag
(
Ypage 46)
Rth eFront Passenger Airbag Enable dSee Operator' sManualorFront Passenger Airbag Disabled See Opera‐tor's Manualdisplay message smustn otbe shown in th emul-
tifunction display
XWait for aperiod of at least 60 seconds until th eneces sarysystem
checks hav ebeen completed.
XMak esuret hatthe display message sdonotappear in th emulti-
function display.
If these condition sare fulfilled ,the front-passenger seat can be occu-
pied again .Whether th ePASSENG ER AIRBAG OFForONi ndicator
188Display messages
On-boardc omputer andd isplays
Page 214 of 298
Operating system
Overview
General notes
!Do not use the space in frontoft he display
for storage. Objects placed here could dam-
age the display or impair its function .Avoid
any direct contact with the display surface.
Pressure on the display surface may result in
impairment stothe display, which could be
irreversible.
Wearing polarized sunglasses may impair your
ability to read the display.
The display has an automatic temperature-con-
trolled switch-off feature. The brightness is
automatically reduced if the temperature is too
high. The display may temporarily switch off
completely.
Cleaning instructions
!Do not touch the display. The display has a
very sensitive high-gloss surface; there is a
risk of scratching .Ifyou have to clean the
screen,h owever, use amild cleanin gagent
and asoft,l int-free cloth.
The display must be switched off and have
cooled down before you start cleaning. Do not
apply pressure to the display surface when
cleanin git, as this could cause irreversible dam-
age to the display.
Switching the multimedia system
on/off
XPress the qcontrol knob.
Adjusting the volume
XTurn the qcontrol knob.
The volume is adjusted:
Rfor the currently selected media source
Rduring traffic or navigation announcements
Rin hands-free mode during an active call
Switching the sound on or off
XPress the 8button on the control panel.
If the audio output is switched off, the status
line will show the 8symbol. If you switch the media source or set the volume, the sound
is automatically switched on.
iNavigation announcements will be heard
even if the sound is muted.
Functions
The multimedia system has the following func-
tions:
RRadio mode
RMedia mode with media search
RSound systems
RNavigation system
COMAND :navigation via the hard drive
Audio 20: navigation via SD card
RCommunication functions
RSIRIUS Weather (COMAND)
RVehicle function swith system settings
RFavorites functions
Controller
The controller in the center console lets you:
Rselect menu items on the display
Renter characters
Rselect adestination on the map
Rsave entries
The controller can be:
Rturned 3
Rslid left or right 1
Rslid forwards or back 4
Rslid diagonally2
Rpressed briefly or pressed and held 7
Back button
You can use the%button to exit amenu or to
call up the main menu of the currento perating
mode.
XTo exit the menu: briefly press the%
button.
The multimedia system changes to the next
higher menu level in the currento perating
mode.
XTo call up the main menu: press the%
button for longer than two seconds.
The multimedia system changes to the main
menu of the currento peratingmode.
212Operating system
Multimedia system
Page 222 of 298
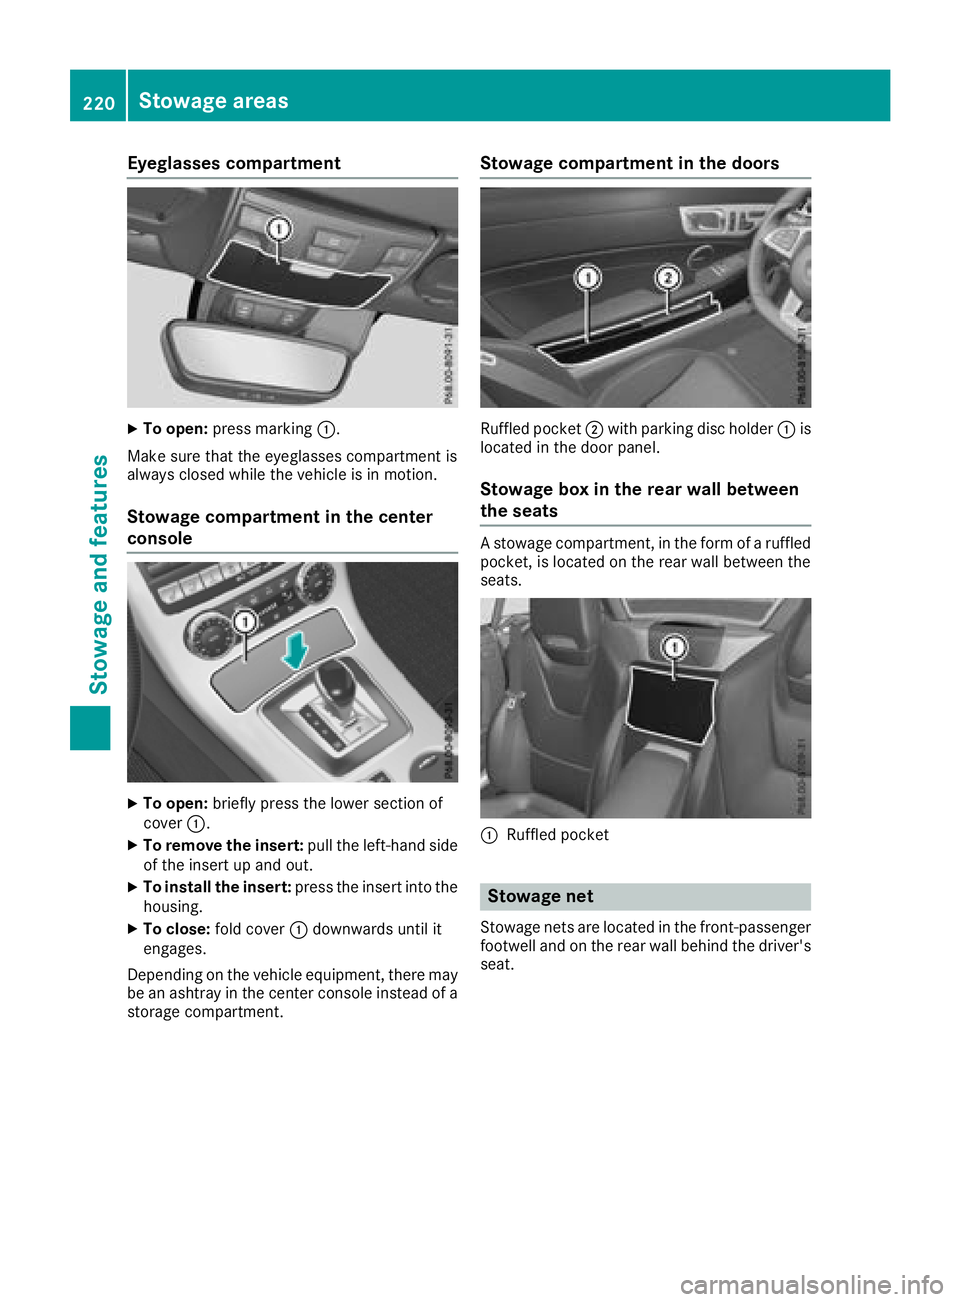
Eyeglasses compartment
XTo open:pressmarking :.
Makes ure that th eeyeglasses compartmen tis
always closed while th evehicle is in motion.
Stowage compartment in th ecenter
console
XTo open: briefly pres sthe lower sectio nof
cover :.
XTo remove th einsert: pull theleft-hand side
of th einsert up and out.
XTo install th einsert: pressthe insert int othe
housing.
XTo close: fold cover :downwards until it
engages.
Dependingont hevehicle equipment ,the re may
be an ashtray in th ecente rconsole instead of a
storag ecompartment.
Stowage compartment in th edoors
Ruffled pocket ;with parking disc holder :is
locate dinthedoor panel.
Stowage box in th erearw all between
th es eats
Astowage compartment, in th eformofar uffled
pocket, is locate dontherear wall between the
seats.
:Ruffled pocket
Stowage net
Stowage net sare locate dinthefront-passenger
footwell and on th erear wall behindt hedriver's
seat.
220Stowage areas
Stowage and features
Page 223 of 298
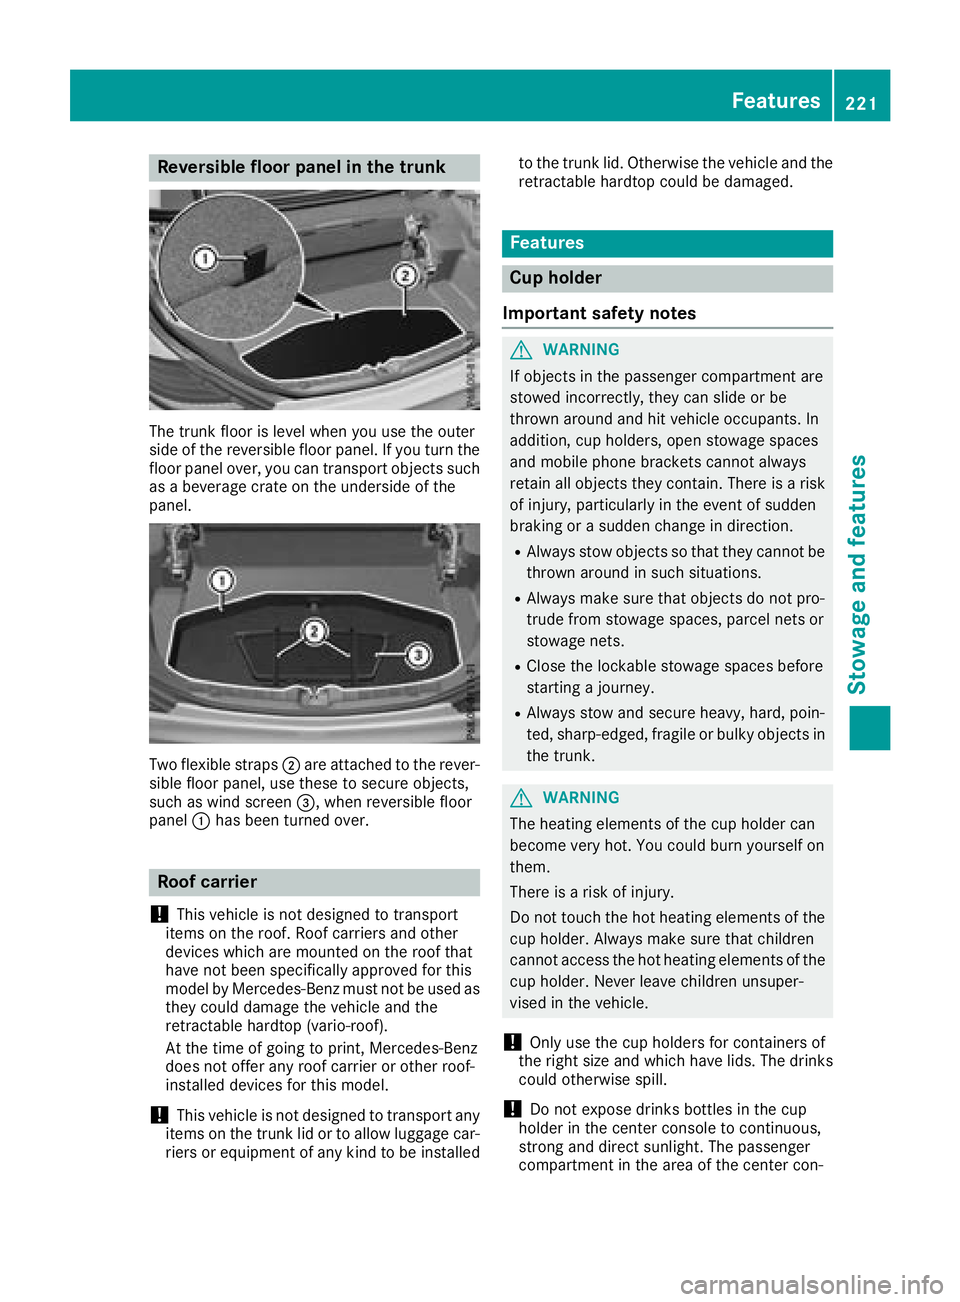
Reversible floor panelinthe trunk
The trunk floor is level when yo uusethe outer
sid eoft he reversibl efloor panel.Ify outurn the
floor panel over, yo ucan transpor tobjects such
as ab everage crate on the undersid eofthe
panel.
Twof lexible straps ;are attached to the rever-
sible floor panel,u sethesetos ecure objects,
such as wind screen =,whenr eversibl efloor
panel :hasb eent urne dover.
Roo fcarrier
!
Thisv ehicleisn ot designed to transport
item sont he roof. Roof carriers and other
device swhich are mounted on the rooft hat
have not bee nspecifically approved for this
model by Mercedes-Benz mus tnot be used as
they could damag ethe vehicl eand the
retractable hardto p(vario-roof).
At the time of going to print, Mercedes-Benz
doe snot offera ny roofcarrieroro therr oof-
installed device sfor this model.
!Thisv ehicleisn ot designed to transpor tany
item sont he trunk li dortoallowluggage car-
riers or equipment of any kind to be installed to the trunk lid. Otherwise the vehicl
eand the
retractable hardto pcould be damaged.
Features
Cup holder
Important safety notes
GWARNING
If objects in the passenger compartment are
stowed incorrectly, they can slide or be
throwna round and hit vehicl eoccupants. In
addition, cup holders, ope nstowag espaces
and mobil ephone brackets canno talway s
retain al lobjects they contain. There is arisk
of injury, particularly in the event of sudden
braking or asudde nchange in direction.
RAlway sstow objects so that they canno tbe
throwna round in such situations.
RAlwaysmake sure that objects do not pro-
trud efrom stowag espaces, parcel nets or
stowag enets.
RClose the lockable stowag espaces before
starting ajourney.
RAlway sstow and secure heavy, hard, poin-
ted, sharp-edged, fragile or bulky objects in
the trunk.
GWARNING
The heating elements of the cup holder can
become very hot. Yo ucould burn yourselfo n
them.
There is ariskofi njury.
Do not touch the hot heating elements of the
cup holder .Alway smake sure that children
canno taccess the hot heating elements of the
cup holder .Neverl eave children unsuper-
vised in the vehicle.
!Only us ethe cup holder sfor containers of
the right size and which have lids. The drinks could otherwise spill.
!Do not expose drinks bottles in the cup
holder in the center console to continuous,
strong and direct sunlight. The passenger
compartment in the are aofthe center con-
Features221
Stowage and features
Z
Page 224 of 298
sole can otherwise be damaged by the con-
centrated and reflected sunlight.
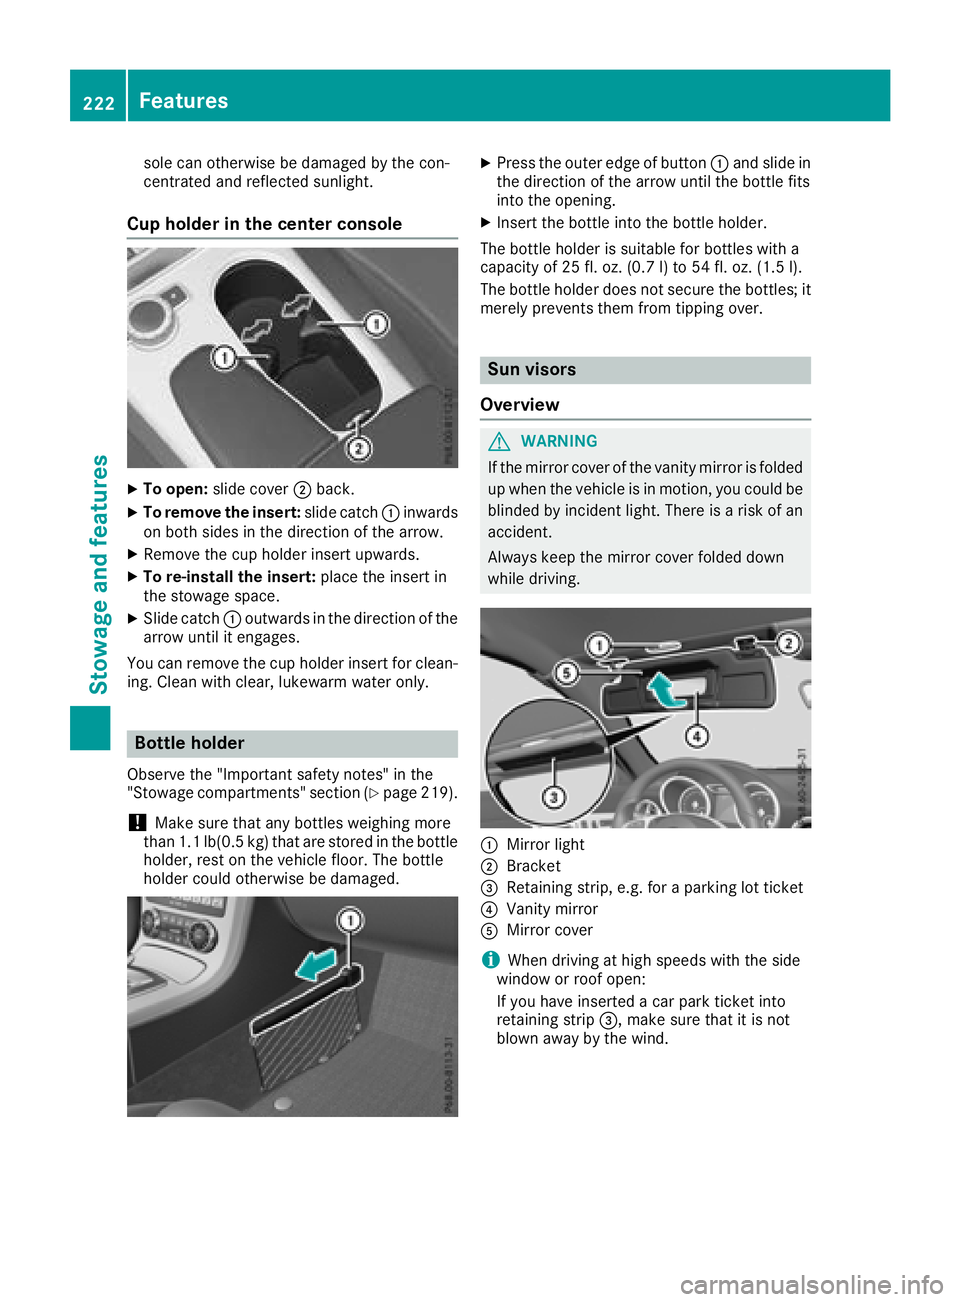
Cup holder in the center console
XTo open:slide cover ;back.
XTo remove the insert: slide catch:inwards
on both sides in the direction of the arrow.
XRemove the cup holder insert upwards.
XTo re-install the insert: place the insert in
the stowage space.
XSlide catch :outwards in the direction of the
arrow until it engages.
You can remove the cup holder insert for clean-
ing. Cleanw ith clear, lukewarm water only.
Bottle holder
Observe the "Important safety notes" in the
"Stowage compartments" section (Ypage 219).
!Make sure that any bottles weighing more
than 1.1 lb(0.5 kg) that are stored in the bottle
holder, rest on the vehicle floor. The bottle
holder could otherwise be damaged.
XPress the outer edge of button :and slide in
the direction of the arrow until the bottle fits
into the opening.
XInsert the bottle into the bottle holder.
The bottle holder is suitable for bottles with a
capacity of 25 fl. oz. (0.7 l)to 54 fl. oz. (1.5 l).
The bottle holde rdoesn ot secur ethe bottles; it
merel yprevents themf romtipping over.
Sun visors
Overview
GWARNING
If the mirrorc overoft he vanity mirrorisf olded
up when the vehicl eisinmotion, yo ucould be
blinded by incident light. There is ariskofa n
accident.
Alway skeept he mirrorc overfolde ddown
whil edriving.
:Mirrorl ight
;Bracket
=Retaining strip, e.g .for ap arking lo tticket
?Vanity mirror
AMirrorc over
iWhen drivin gathighs peeds with the side
windo worroofo pen:
If yo uhavei nserte dacar park ticke tinto
retaining strip =,makes uret hatiti snot
blow nawaybyt he wind.
222Features
Stowag eand featur es
Page 225 of 298
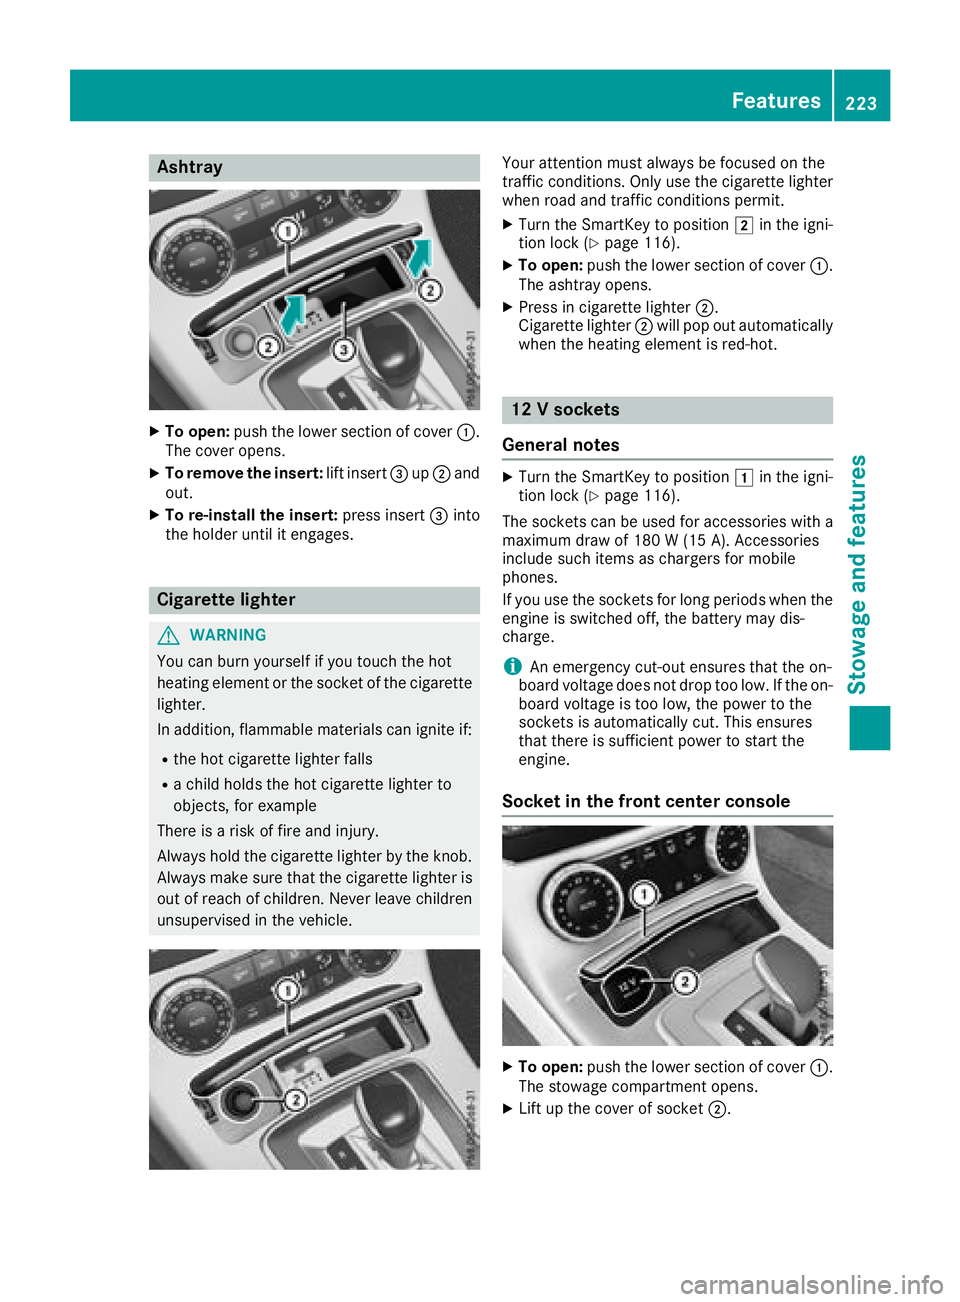
Ashtray
XTo open :push th elower section of cover :.
The cover opens.
XTo remove th einsert: lift insert =up; and
out .
XTo re-install th einsert: press insert =into
th eh older until it engages.
Cigarette lighter
GWARNIN G
You can burn yourself if you touch th ehot
heating elemen torthesocke tofthecigarette
lighter.
In addition ,flammabl ematerials can ignit eif:
Rtheh ot cigarette lighte rfall s
Rac hild hold sthe hot cigarette lighte rto
objects ,for exampl e
There is ariskoff irea nd injury.
Always hold th ecigarette lighte rbytheknob.
Always mak esuret hatthe cigarette lighte ris
out of reac hofchildren .Never leav echildren
unsupervised in th evehicle.
Your attention mus talways be focused on th e
traffic conditions. Only use th ecigarette lighte r
when road and traffic condition spermit .
XTurn th eSmartKey to position 2in th eigni-
tion loc k(Ypage 116).
XTo open :push th elower section of cover :.
The ashtray opens.
XPress in cigarette lighte r;.
Cigarette lighte r; will pop out automatically
when th eheating elemen tisred-hot .
12Vsocke ts
Gene raln otes
XTurn th eSmartKey to position 1in th eigni-
tion loc k(Ypage 116).
The sockets can be used for accessories wit ha
maximum draw of 18 0W(15 A) .Acces sorie s
include suc hitems as chargers for mobile
phones.
If you use th esockets for lon gperiods when th e
engin eisswitched off ,the battery may dis-
charge .
iAn emergenc ycut-out ensures that th eon-
boar dvoltag edoes no tdropt oo low. If th eon-
boar dvoltag eistoolow, th epowe rtot he
sockets is automatically cut .This ensures
that there is sufficien tpowe rtos tart th e
engine.
Socket in th efront center console
XTo open :push th elower section of cover :.
The stowage compartmen topens.
XLiftupt hecover of socke t;.
Features223
Stowage and features
Z