2018 MERCEDES-BENZ SLC ROADSTER warning
[x] Cancel search: warningPage 98 of 298
The daytime runninglamps improve the visibility
of your vehicle during the day. To do this, the
daytime runnin glamps function must be
switched on using the on-board computer
(
Ypage 172).
If the engine is runnin gand you turn the light
switch to TorL,t he manual settings
take precedenceo ver the daytime running
lamps.
Low-beam headlamps
GWARNING
When the light switch is set to Ã,the low-
beam headlamps may not be switched on
automatically if there is fog, snow or other
causes of poor visibility due to the weather
conditions such as spray. There is arisk of an
accident.
In such situations, turn the light switch to
L.
Even if the light sensor does not detect that it is
dark, the parking lamps and low-beam head-
lamps switch on when the ignition is switched on and the light switch is set to the Lposition.
This is aparticularly useful function in the event
of rain and fog.
XTo switch on the low-beam headlamps:
turn the SmartKey to position 2in the igni-
tion lock or start the engine.
XTurn the light switch to L.
The green Lindicator lamp in the instru-
ment cluster lights up.
Rear fog lamp
The rear fog lamp improves visibility of your
vehicle for the traffic behind in the event of thick
fog. Please take noteoft he country-specific
regulations for the use of rear fog lamps.
XTo switch on the rear fog lamp: turn the
SmartKey to position 2in the ignition lock or
start the engine.
XTurn the light switch to LorÃ.
XPress the Rbutton.
The yellow Rindicator lamp in the instru-
ment cluster lights up.
XTo switch off the rear fog lamp: press the
R button.
The yellow Rindicator lamp in the instru-
ment cluster goes out.
Parking lamps
!If the battery charge is very low, the parking
lamps or standin glamps are automatically
switched off to enable the next engine start.
Always park your vehicle safely and in awell lit
area, in accordanc ewith the relevant legal
stipulations. Avoid using the Tparking
lamps over aperiod of several hours. If pos-
sible, switch on the right-hand Xor left-
hand W standin glamps.
XTo switch on: turn the light switch to T.
The green Tindicator lamp in the instru-
ment cluster lights up.
Standing lamps
Switching on the standin glamps ensures the
corresponding side of the vehicle is illuminated.
XTo switch on the standing lam ps:the
SmartKey is not in the ignition lock or it is in
position uin the ignition lock.
XTurn the light switch to W(left-han dside of
the vehicle) or X(right-hand side of the
vehicle).
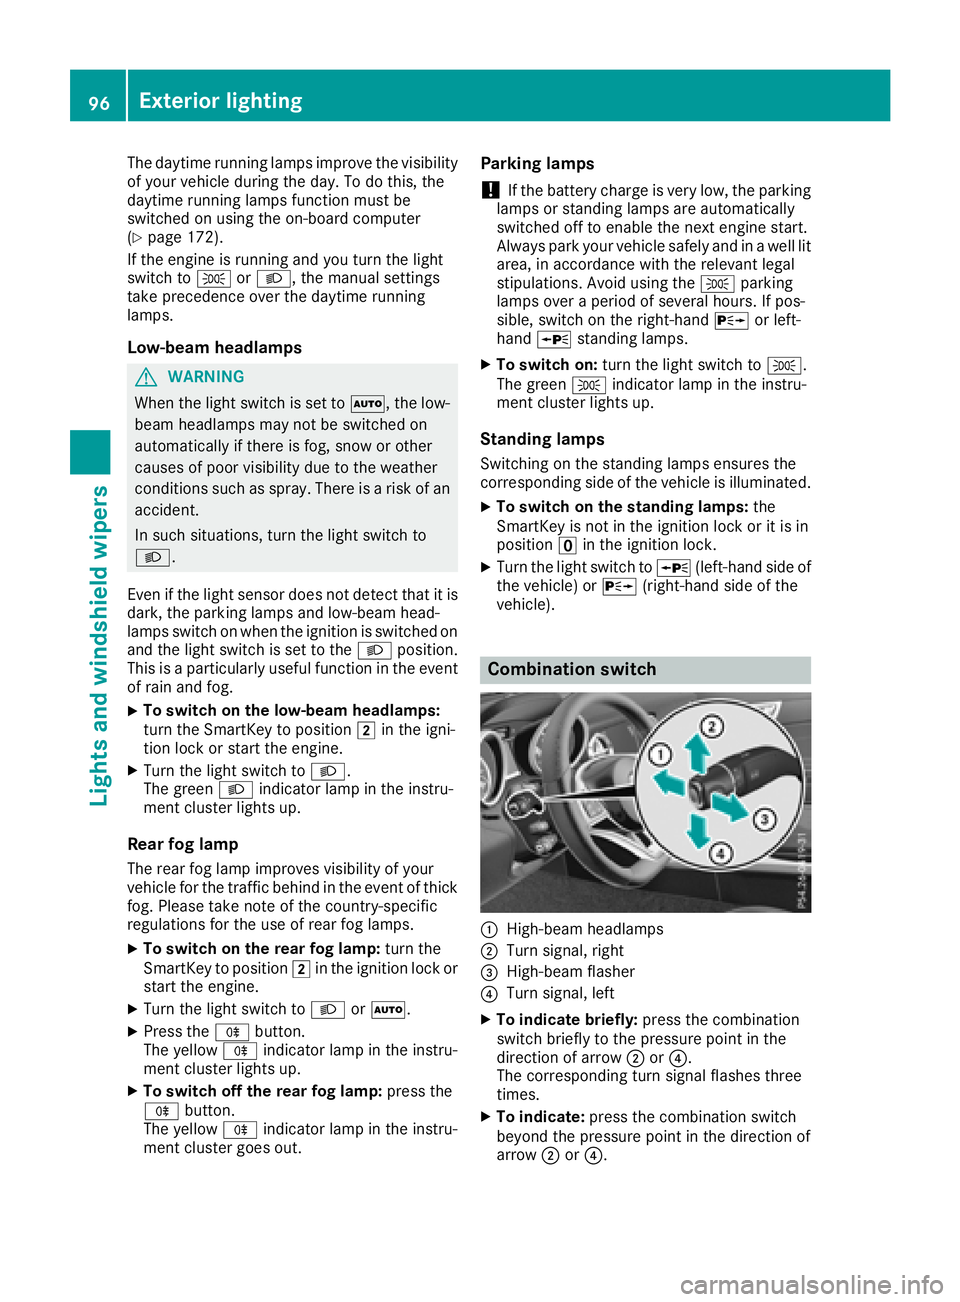
Combination switch
:High-beam headlamps
;Turn signal, right
=High-beam flasher
?Turn signal, left
XTo indicate briefly: press the combination
switch briefly to the pressure point in the
direction of arrow ;or?.
The corresponding turn signal flashes three
times.
XTo indicate: press the combination switch
beyond the pressure point in the direction of
arrow ;or?.
96Exterior lighting
Lights and windshield wipers
Page 99 of 298
XTo switchonthe high-beam headlamps:
turn the light switch to LorÃ.
XPress the combinatio nswitch beyond the
pressure point in the direction of arrow :.
In the Ãposition, the high-bea mhead-
lamps are onlys witched on when it is dark and
the engine is running.
The blue Kindicator lamp in the instru-
ment cluster lights up when the high-beam
headlamps are switched on.
XTo switc hoff the high-beam headlamps:
move the combinatio nswitch back to its nor-
malp osition.
The blue Kindicator lamp in the instru-
ment cluster goe sout.
Hazard warning lamps
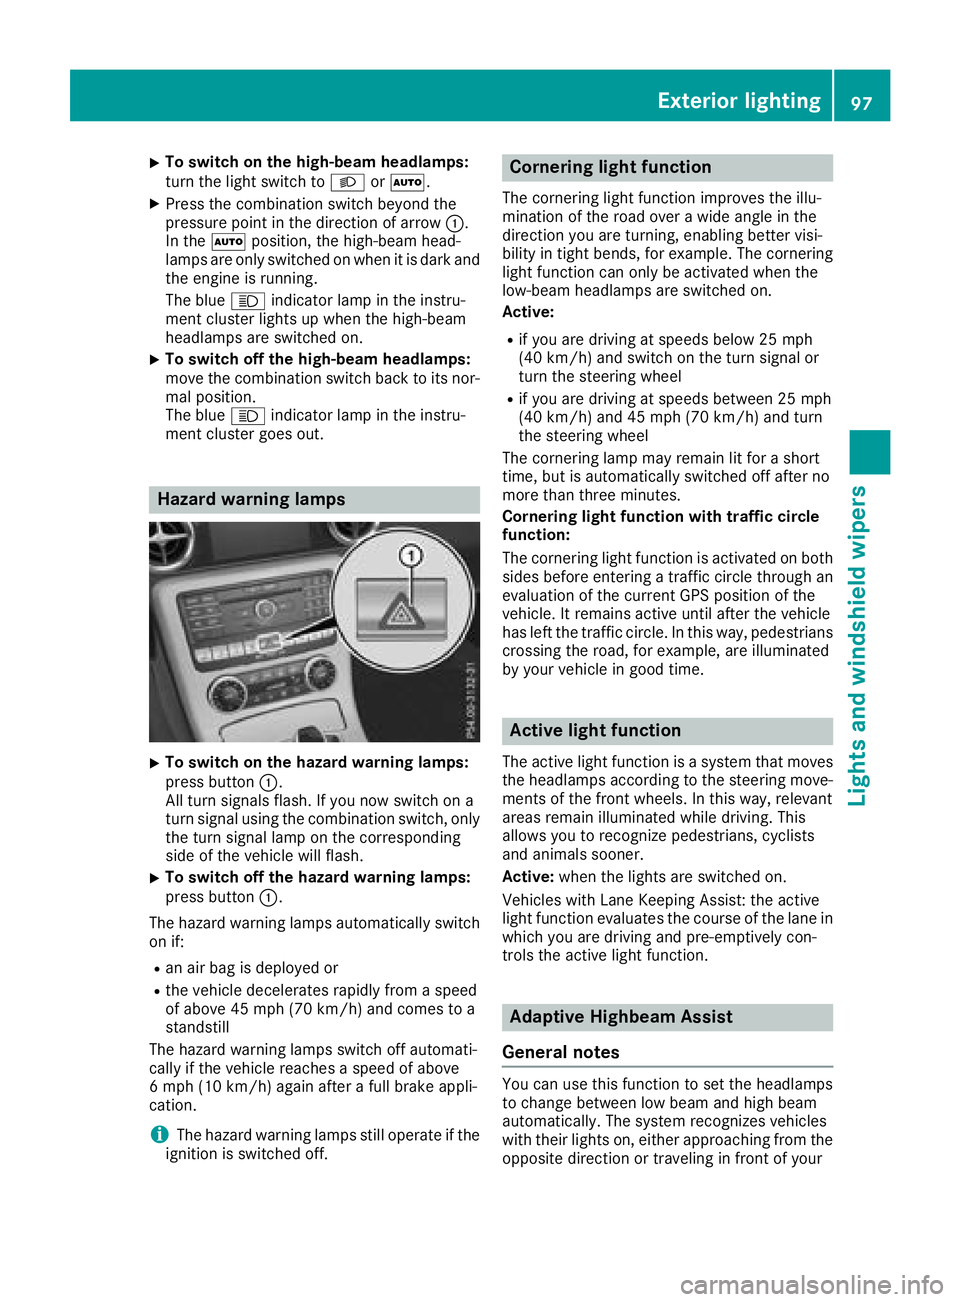
XTo switc honthe hazard warning lamps:
press button :.
All turn signals flash. If yo unow switch on a
turn signalu sing the combinatio nswitch ,only
the turn signall ampont he corresponding
side of the vehicl ewillf lash.
XTo switc hoff the hazard warning lamps:
press button :.
The hazard warning lamps automaticall yswitch
on if:
Ran ai rbag is deployed or
Rthe vehicl edecelerates rapidly from aspeed
of above 45 mph (70 km/h )and comestoa
standstill
The hazard warning lamps switch off automati-
cally if the vehicl ereachesas peed of above
6m ph (10 km/h )again afteraf ullb rake appli-
cation.
iThe hazard warning lamps stil lope rate if the
ignition is switched off.
Cornerin glight function
The cornering light functio nimprovest he illu-
minatio nofthe roado veraw idea ngle in the
direction yo uare turning, enabling better visi-
bility in tight bends, for example. The cornering
light functio ncan onlybea ctivatedwhent he
low-bea mheadlamps are switched on.
Active:
Rif yo uare driving at speed sbelow 25 mph
(40 km/h )and switch on the turn signalo r
turn the steering wheel
Rif yo uare driving at speed sbetween 25 mph
(40 km/h )and 45 mph (70 km/h )and turn
the steering wheel
The cornering lamp mayr emainlitfor ashort
time ,but is automaticall yswitched off afte rno
more thant hreeminutes.
Cornerin glight functio nwitht rafficc ircle
function:
The cornering light functio nisa ctivate donboth
side sbefore entering atraffic circle throug han
evaluation of the current GP Sposition of the
vehicle. It remains active unti lafte rthe vehicle
hasl eftt he traffic circle .Inthisw ay,pedes trians
crossing the road, for example, are illuminated
by your vehicl eingoodt ime.
Active light function
The active light functio nisas ystem thatm oves
the headlamps according to the steering move-
ments of the front wheels .Inthisw ay,relevant
areas remai nillum inated whil edriving .This
allows yo utorecognize pedestrians ,cyclists
and animals sooner.
Active: when the lights are switched on.
Vehicles with Lane Keeping Assist: the active
light functio nevaluate sthe course of the lane in
which yo uare driving and pre-emptively con-
trolst he active light function.
Adaptiv eHighbeam Assist
General notes
Yo uc an us ethisf unctio ntoset the headlamps
to change between lo wbeama nd high beam
automatically. The system recognizes vehicles
with thei rlights on, either approaching from the
opposite direction or traveling in front of your
Exterior lighting97
Lights and windshield wiper s
Z
Page 100 of 298
vehicle, and consequently switches the head-
lampsfrom high beamtol ow beam.
The system automatically adapts the low-beam
headlamp range depending on the distance to
the other vehicle. Once the system no longer
detects any other vehicles, it reactivates the
high-beam headlamps.
The system' soptical sensor is located behind
the windshieldn ear the overheadc ontrol panel.
Important safety notes
GWARNING
Adaptive Highbeam Assist does not recognize
road users:
Rwho have no lights, e.g. pedestrians
Rwho have poor lighting, e.g. cyclists
Rwhosel ighting is blocked,e .g. byabarrier
On very rare occasions, Adaptive Highbeam
Assist may fail to recognize other road users
that have lights, or may recognize them too
late. In this, or in similar situations, the auto-
matic high-beam headlamp swilln ot be deac-
tivated or wil lbeactivated regardless. There is
ar isk of an accident.
Always carefully observe the traffic conditions
and switch off the high-beam headlamp sin
good time.
Adaptive Highbeam Assist cannot take into
account road ,weather or traffic conditions.
Adaptive Highbeam Assist is only an aid .You are
responsible for adjusting the vehicle's lighting
to the prevailing light, visibility and traffic con-
ditions.
In particular, the detection of obstacles can be
restricted if there is:
Rpoor visibility, e.g. due to fog, heavy rain or
snow
Rdirt on the sensors or the sensors are
obscured
Switching Adaptive Highbeam Assist
on/off
XTo switch on: turn the light switch to Ã.
XPress the combination switch beyond the
pressure point in the directionofa rrow:.
The _ indicator lamp in the multifunction
display lights up when it is dark and the light
sensor activates the low-beam headlamps.
If you are driving at speeds above approx-
imatel y16m ph (25 km/h):
The headlamp range is set automatically
depending on the distance between the vehi-
cle and other road users.
If you are driving at speeds above approx-
imatel y19m ph (30 km/h )and no other road
users have been detected:
The high-beam headlamp sare switched on
automatically. The Kindicator lamp in the
instrument cluster als olights up.
If you are driving at speeds belowa pprox-
imatel y16m ph (25 km/h) or other road users
have been detected or the road sare ade-
quately lit:
The high-beam headlamp sare switched off
automatically. The Kindicator lamp in the
instrument cluster goes out. The _indi-
cator lamp in the multifunction display
remains lit.
XTo switch off: move the combination switch
back to its normal position or move the light
switch to another position.
The _ indicator lamp in the multifunction
display goes out.
98Exteriorl ighting
Lights and windshield wipers
Page 103 of 298
XTurn housing cover:counter-clockwise and
pull it out.
XAt the bulb holder, push the bulb upwards,
disconnect it and pull it out of bulb holder ;.
XInsert the new bulb into bulb holder;at the
top, push it down and secure it in place.
XAttach housing cover :and turn it clockwise
until it engages.
Side marker lamp s(halogen head-
lamps)
Due to their location, have the bulbs in the side
marker lamp changed at aqualified specialist
workshop.
Windshield wipers
Switching the windshield wipers
on/off
!
Do not operate the windshield wipers when
the windshield is dry, as this could damage
the wiper blades. Moreover, dust that has col-
lected on the windshield can scratc hthe glass
if wiping takes place when the windshield is
dry.
If it is necessary to switch on the windshield
wipers in dry weather conditions, alwaysu se
washer fluid when operating the windshield
wipers.
!If the windshield wipers leave smears on the
windshield after the vehicle has been washed
in an automatic car wash, wax or other resi-
dues may be the reason for this. Clean the
windshield using washer fluid after washing
the vehicle in an automatic car wash.
!Intermittent wiping with rain sensor: due to
optical influences and the windshield becom-
ing dirty in dry weather conditions, the wind-
shield wipers may be activated inadvertently.
This could then damage the windshield wiper
blades or scratc hthe windshield.
For this reason, you should alwayss witch off
the windshield wipers in dry weather.
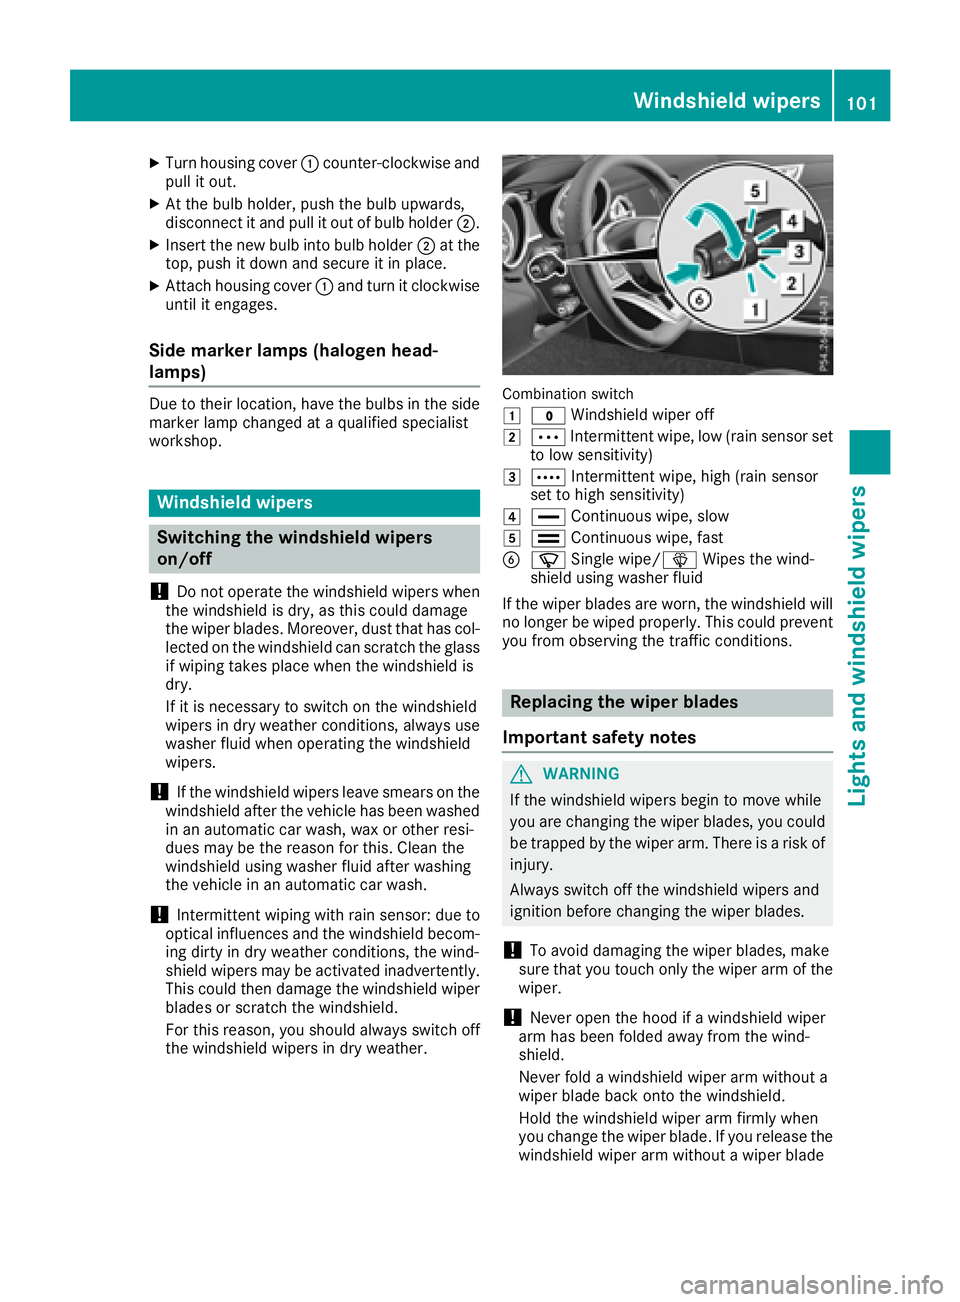
Combination switch
1
$ Windshield wiper off
2ÄIntermittent wipe, low (rain sensor set
to low sensitivity)
3Å Intermittent wipe, high (rain sensor
set to high sensitivity)
4° Continuous wipe, slow
5¯Continuous wipe, fast
BíSingle wipe/î Wipes the wind-
shield using washer fluid
If the wiper blades are worn, the windshield will
no longer be wiped properly. This could prevent
you from observing the traffic conditions.
Replacing the wiper blades
Important safety notes
GWARNING
If the windshield wipers begin to move while
you are changing the wiper blades, you could be trapped by the wiper arm. There is arisk of
injury.
Always switch off the windshield wipers and
ignition before changing the wiper blades.
!To avoid damaging the wiper blades, make
sure that you touch only the wiper arm of the
wiper.
!Never open the hood if awindshield wiper
arm has been folded away from the wind-
shield.
Never fold awindshield wiper arm without a
wiper blade back ontot he windshield.
Hold the windshield wiper arm firmly when
you change the wiper blade. If you release the
windshield wiper arm without awiper blade
Windshield wipers101
Lights and windshield wipers
Z
Page 115 of 298
iIf you activate the residual heat function at
high temperatures, only the ventilation willb e
activated. The blower runs at mediums peed.
XTo deactivate:press theÌorÁ but-
ton.
The indicator lamp in the ÌorÁ button
goes out.
Residualh eat is deactivated automatically:
Rafter approximately 30 minutes
Rwhen the ignition is switched on
Rif the battery voltage drops
Setting the air vents
Important safety notes
GWARNING
Very hot or very cold air can flow from the air
vents. This could resultinb urns or frostbite in
the immediate vicinity of the air vents. There
is ar isk of injury.
Make sure that all vehicle occupants always
maintain asufficient distance to the air out-
lets. If necessary,r edirect the airflow to
another area of the vehicle interior.
GWARNING
When AIRSCARF is switched on, very hot air
can flow from the vents in the head restraints. This could resultinb urns in the immediate
vicinity of the air vents. There is arisk of injury.
Reduce the heater outputb efore it becomes
too hot.
In order to ensure the direct flow of fresh air
through the air vents into the vehicle interior,
please observe the following notes:
Rkeep the air inlet grilleont he hood and in the
engine compartment on the front-passenger
side free of blockages, such as ice, snow or
leaves.
Rnever cover the air vents or air intake grilles in
the vehicle interior.
iYou can move the adjusters for the air vents
verticallyorh orizontally to set the direction of
the airflow.
iFor optimal climate control in the vehicle,
open the air vents completely and set the
adjusters to the central position.
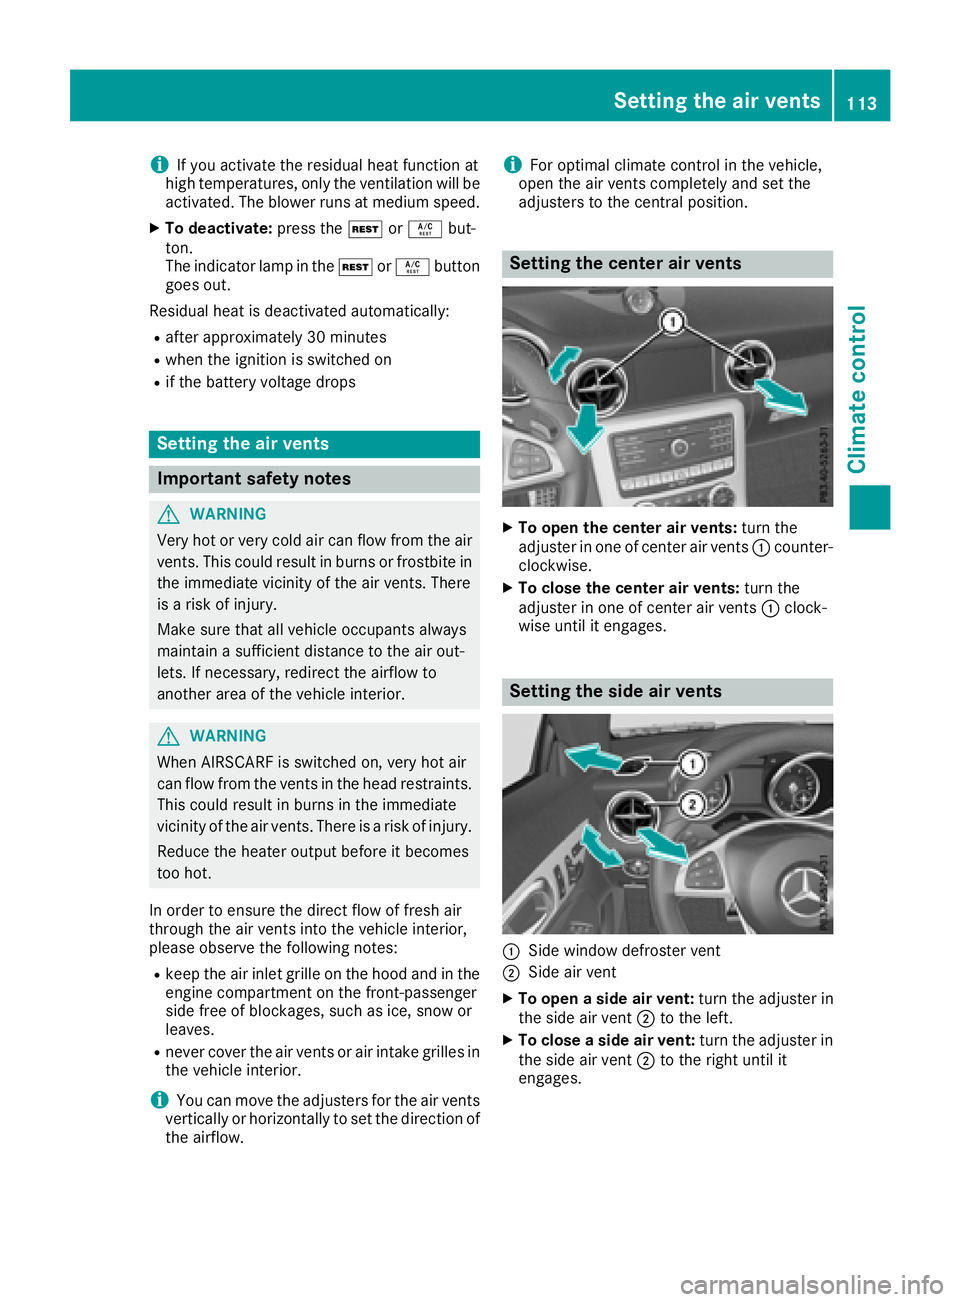
Setting the center air vents
XTo open the center air vents: turn the
adjuster in one of center air vents :counter-
clockwise.
XTo close the center air vents: turn the
adjuster in one of center air vents :clock-
wise until it engages.
Setting the side air vents
:Side window defroster vent
;Side air vent
XTo open aside air vent: turn the adjuster in
the side air vent ;to the left.
XTo close aside air vent: turn the adjuster in
the side air vent ;to the right until it
engages.
Setting the air vents113
Climate control
Z
Page 116 of 298
Setting the blower outputofthe AIR-
SCARF vents
GWARNING
When AIRSCARF is switched on, very hot air
can flow from the ventsint he head restraints.
This could result in burns in the immediate
vicinity of the air vents. There is arisk of injury.
Reduce the heater output before it becomes
too hot.
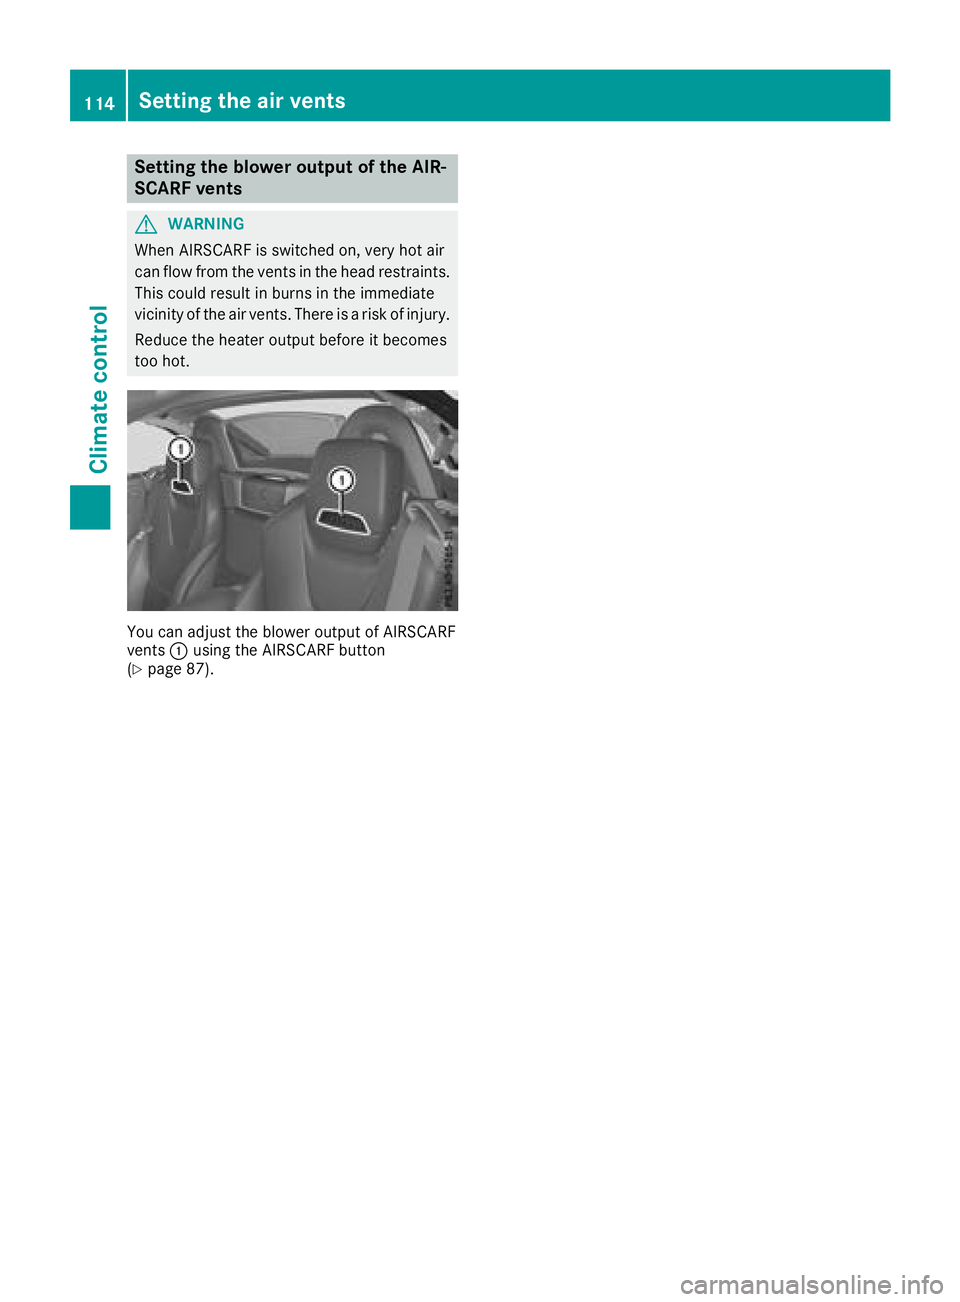
You can adjust the blower output of AIRSCARF
vents :using the AIRSCARF button
(
Ypage 87).
114Setting the air vents
Climatec ontrol
Page 117 of 298
Notesonb reaking-in anew vehicle
Important safety notes
Thes ensors ystemofs omedriving and driving
safety systems adjusts automaticall ywhile a
certai ndistance is being driven after the vehicle
ha sb eend elivere dorafter repairs. Full system
effectiveness is not reachedu ntilthe end of this
teach-inp rocedure.
New and replaced brake pads and discs only
reach their optimum braking effect after several hundred kilometers of driving. Compensate for
thi sb yapplyin ggreate rforce to the brake pedal.
The first 1000 miles (150 0km)
Them orey ou look after the engine when it is
new ,the mor esatisfied yo uwillbew ithi ts per-
formance in the future.
RYo us houl dtherefore drive at varying vehicle
and engine speeds for the first 1,000 miles
(1,500 km).
RAvoi dheavy loads, e.g .driving at full throttle,
during thi speriod.
RChang egearing oodt ime, befor ethe tach-
ometer needl eisÔ of the wa ytothe red area
of the tachometer.
RDo not manuall yshift to alower gear to brake
the vehicle.
RTry to avoi ddepressing the accelerator pedal
beyond the point of resistanc e(kickdown).
After 1000 mile s(1500 km),y oucan increase
the engine spee dgradually and accelerate the
vehicl etofulls peed.
Yo us houl dalsoo bser ve these note sonbreak-
ing in if the engine or parts of the drive train on
your vehicl ehaveb eenr eplaced.
Alway sobser ve the maximum permissible
speed.
Driving
Important safety notes
GWARNING
Objects in the driver's footwell mayr estrict
the clearanc earound the pedals or block a
depresse dpedal. This jeopardizes the oper-
ating and roa dsafety of the vehicle. There is a
risk of an accident.
Stow al lobjects securel yinthe vehicl esothat
the ydon ot getinto the driver's footwell.
When using floormats or carpets, make sure
tha tthe ya reproperlys ecured so tha tthe yd o
not slip or obstruct the pedals .Donot place
several floormats or carpets on top of one
another.
GWARNING
Unsuitabl efootwear can hinde rcorrec tusage
of the pedals ,e.g.:
Rshoes with thick soles
Rshoes with high heels
Rslippers
There is ariskofana ccident.
Wear suitabl efootwear to ensur ecorrect
usag eoft he pedals.
GWARNING
If yo uswitch off the ignition whil edriving,
safety-relevant functions ar eonlya vailable
with limitations ,ornot at all. This could affect,
for example, the powe rsteering and the brake
boosting effect. Yo uwillr equire considerably
mor eeffort to steer and brake. There is arisk
of an accident.
Do not switch off the ignition whil edriving.
GWARNING
If the parking brake ha snot been fully
releasedw hend riving, the parking brake can:
Roverheat and cause afire
Rlose its hold function.
There is ariskoff irea nd an accident. Release
the parking brake full ybefor ed riving off.
!Do not warm up the engine whil estationary.
Pull away immediately. Avoi dhighe ngine
speeds and full throttle unti lthe engine has
reachedi ts operating temperature.
In vehicles with automatic transmission,
engag eposit ions Pand Ro nlyw hent he vehi-
cle is stationary.
Driving115
Dr iving an dparking
Z
Page 119 of 298
As soonasthe ignition is switched on, al lthe
indicator lamps in the instrument cluster light
up .Further informatio nonsituations where an
indicator lamp either fails to go outa fterstarting
the engine or lights up whil edriving
(
Ypage 204).
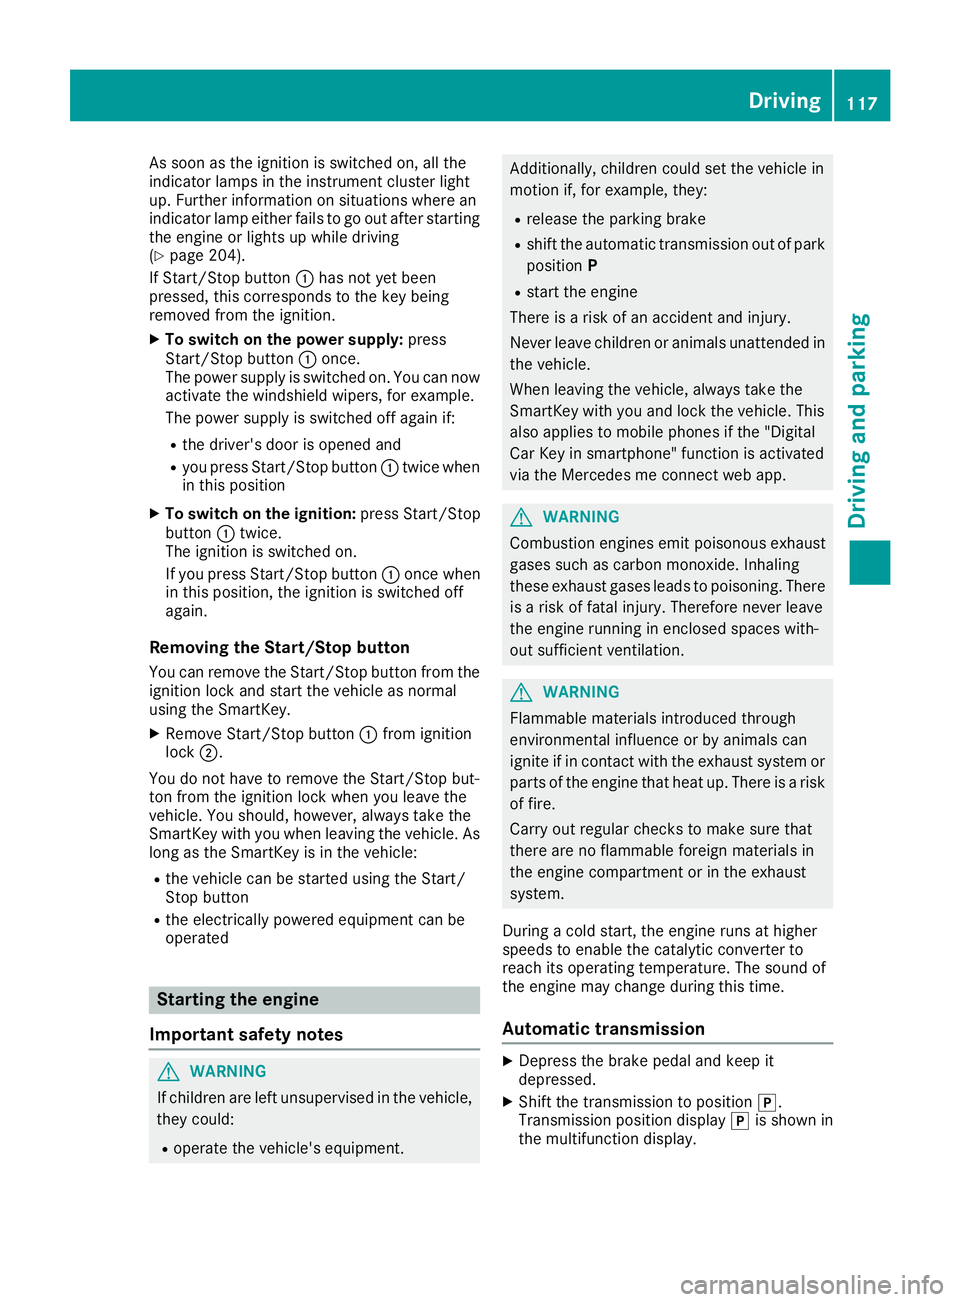
If Start/Stop button :hasn ot yetbeen
pressed, thisc orrespondstot he key being
removedf rom the ignition.
XTo switchonthe power supply: press
Start/Stop button :once.
The powe rsuppl yiss witched on. Yo ucan now
activate the windshield wipers, for example.
The powe rsuppl yiss witched off agai nif:
Rthe driver's door is opene dand
Ryoup ress Start/Stop button :twice when
in thisp osition
XTo switc honthe ignition: press Start/Stop
button :twice.
The ignition is switched on.
If yo upress Start/Stop button :once when
in thisp osition, the ignition is switched off
again.
Removing the Start/Stopb utton
Youc an remove the Start/Stop button from the
ignition lock and start the vehicl easnormal
using the SmartKey.
XRemove Start/Stop button :from ignition
lock ;.
Yo udon ot have to remove the Start/Stop but-
ton from the ignition lock when yo uleave the
vehicle. Yo ushould, however, always take the
SmartKeyw ithy ou when leaving the vehicle. As
long as the Sma rtKey
isint
he vehicle:
Rthe vehiclecan be started using the Start/
Stop button
Rthe electrically powered equipment can be
operated
Starting the engine
Important safety notes
GWARNING
If children ar eleftu nsupervised in the vehicle,
they could:
Roperate the vehicle's equipment.
Additionally, children could set the vehicl ein
motion if, for example, they:
Rrelease the parking brake
Rshift the automatic transmission outofp ark
position P
Rstart the engine
There is ariskofana ccident and injury.
Never leav echildren or animals unattended in
the vehicle.
Whe nleavi ng the vehicle, always take the
SmartKeyw ithy ou and lock the vehicle. This
also applie stomobilephones if the "Digital
Ca rK ey in smartphone"f unctio nisa ctivated
via the Mercedes me connect we bapp.
GWARNING
Combustion engine semitp oiso nousexhaust
gases such as carbo nmonoxide. Inhaling
thes eexhaus tgases lead stopoisoning. There
is ar iskoff atalinjury.T herefore neve rleave
the engine running in enclose dspaces with-
outs ufficient ventilation.
GWARNING
Flammabl ematerial sintroduced through
environmentali nfluence or by animals can
ignite if in contact with the exhaus tsystem or
parts of the engine thath eatu p.There is arisk
of fire.
Carry outr egular checks to make sure that
ther eareno flammabl eforeig nmaterial sin
the engine compartment or in the exhaust
system.
During acolds tart, the engine runs at higher
speed stoenablethe catalytic converter to
reach its operating temperature .The sound of
the engine mayc hange during thist ime.
Automatictransmission
XDepres sthe brake peda land kee pit
depressed.
XShift the transmission to position j.
Transmission positio ndisplay jis shown in
the multifunctio ndisplay.
Driving117
Driving an dparking
Z