2018 MERCEDES-BENZ SLC phone
[x] Cancel search: phonePage 216 of 298
Traffic reports on the route for the route guid-
ance are taken into account (not availabl ei n
all countries). R
Dynamic TRF. Route After Request
You can decide whether or not current traffic
reports should be included in the route cal-
culation (not availabl eina ll countries).R
Calculate Alternative Routes
Different routes are being calculated. In order
to do so, instead of Start ,s elect the menu
item Continue .X
To avoid/use rout eo ptions: select Avoid
Options .X
Select ar oute option.
Notes for route options: R
Use Toll Roads
The route calculation includes roads which
require you to pay au sage fee (toll).R
Number of Occupants in the Vehicle:
(only availabl eint he USA)
Prerequisite: your vehicle meets the access
conditions for carpool lanes.
Carpool lanes will be included if the carpool
lanes option is activated.
Entering an address Multimedia system: X
Select Navi �{ Navigation .
The map shows the vehicle's current position. X
Slide 6 the controller.X
Select Destination �{ Address Entry .
Enter an address, e.g. as follows: R
city or ZIP code, street ,h ouse numberR
state/province, city or ZIP code R
city or ZIP code, center R
street ,c ity or ZIP code, intersectionX
Select City .
The city in which the vehicle is currently loca-
ted (current vehicle position) is at the top.
Below this, you will see locations for which
route guidance has already been carried out. X
Enter the city.
The �C symbol: the location is contained on
the digital map multiple times. X
To switch to the list: slide 5 the control-
ler. X
Select the location.
If available, the ZIP code is shown. If there are
different ZIP codes availabl ef or the location,
the corresponding digits are displayed with an
X . X
Enter the street and house number.
The address is in the menu.
Further options for destination entry: R
search for ak eyword
The keyword search finds destinations using
fragment sofw ords. R
select the last destination R
select ac ontact R
select aP OI
You can search for aP OI by location, name or
telephone number. R
select destination on the map R
enter intermediate destination
You can map the route to the destination
yourself with up to four intermediate destina-
tions. R
select destinations from Mercedes-Benz
Apps R
select geo-coordinates
Calculating the route Prerequisite: the address has been entered and
is in the menu. X
Select Start or Continue .
The route is calculated with the selected route
type and the selected route options.
If route guidance has already been activated,
ap rompt will appear asking whether you wish
to end the current route guidance. X
Select Cancel Active Route Guidance or
Set as Intermediat eD estination .
Cancel Active Route Guidance cancels
the current route guidance and start sr oute
calculation to the new destination.
Set as Intermediat eD estination adds
the new destination in addition to the existing
destination and opens the intermediate des-
tinations list.214
Operating system
Multimedia system
Page 217 of 298
Connecting am obile phone
(COMAND)
Requirements For telephony via th eB luetooth ®
interface, you
require aB luetooth ®
-capable mobile phone. The
mobile phon em ust support Hands-Free Profile
1. 0ora bove.
Multimedia system: X
Select Vehicle �{ Sy stem Set‐
tings �{ Activate Bluetooth .X
Activate Bluetooth ®
�s .
Mobil ep hone:X
Activate Bluetooth ®
and ,ifn ec essary, Blue-
tooth ®
visibilit yf or other devices (see the
manufacturer' so peratin gi nstructions).
The Bluetooth ®
device names for all of on em an-
ufacturer' sp roduct sm igh tbei dentical. To
mak eitp ossible to clearly identif yy our mobile
phone, chang et he device nam e( see th em an-
ufacturer' so peratin gi nstructions).
If th em obile phon es upport st he PBA P( P hone
B oo k A ccess P rofile) and MA P( M essage
A cc ess P rofile )B luetooth ®
profiles, th ef ollow-
ing informatio nw ill be transmitte da fter you
connect: R
Phon eb ookR
Call lists R
Tex tm essages and e-mail
i Further informatio nons uitable mobile
phones can be foun da t: http://
www.mercedes-benz.com/connect
i In th eU SA ,y ou can get in touch wit ht he
Mercedes-Ben zC ustome rA ss istanc eC enter
on 1-800-FOR-MERCedes (1-800-367-6372 ).
In Canada, you can get in touch with the Cus-
tomer Relations Center on 1-800-387-0100.
Searchin gf or and authorizing (connect-
ing) am obile phone
Before using you rm obil ep hone with the multi-
media system for the first time, you wil ln eed to
search for the phone and then authorize (con-
nect) it. Depending on the mobil ep hone, author-
ization either takes place by means of Secure
Simple Pairing or by entering ap asskey .T he
multimedia system automatically makes the procedure that is relevant for you rm obil ep hone
available. The mobil ep hone is always connec-
ted automatically after authorization. Further
information on using am obil ep hone with the
multimedia system (see the Digital Operator's
Manual).
If the multimedia system does not detect your
mobil ep hone, this may be due to particular
security settings on you rm obil ep hone (see the
manufacturer's operating instructions).
Only one mobil ep hone can be connected to the
multimedia system at any one time.
Searchin gf or am obile phone
Multimedia system: X
Select Tel/ �
Page 218 of 298
Authorization by entering ap as ske y( pass code):X
Select the Bluetooth ®
nam eoft he mobile
phone.
The input menu for the passke yisd is played.X
Choos eao ne to sixteen-digi tn umbe rc ombi-
nation as ap as skey.X
Enter the passke yont he multimedia system.X
Press �T to confirm.X
Enter and confirm the passke yont he mobile
phone. Depending on the mobil ep hone used,
confirm the connectio ntot he multimedia sys-
tem and for the PBAP and MAP Bluetooth ®
profiles. The prompt to confirm ma yt ake up
to two minutes to be displayed (se et he man-
ufacturer's operating instructions).
Connectin gam obil ep hon e( Au dio 20)
Requirements For telephony via the Bluetooth ®
interface, you
require at leas to ne Bluetooth ®
-capable mobile
phone depending on us eo f one-telephone
mode or two-telephon em ode .T he mobile
phone must support Hands-Fre eP rofil e1 .0 or
above.
In two-telephon em ode yo uc an us ea ll the
functions of the multimedia system with the
main telephone .W it ht he additional tele-
phone ,y ou can receive incoming calls.
Multimedia system: X
Select Vehicle �{ Sy stem Set‐
tings �{ Activate Bluetooth .X
Activate Bluetooth ®
�s .
Mobil ep hone:X
Activate Bluetooth ®
and ,ifn ecessary ,B lue-
tooth ®
visibility for othe rd ev ice s( se et he
manufacturer's operating instructions).
The Bluetooth ®
device names for al lofo ne man-
ufacturer's products might be identical .T o
make it possibl etoc learly identify your mobile
phone, change the device nam e( se et he man-
ufacturer's operating instructions). If the mobil ep hone supports the PBAP ( P hone
B ook A ccess P rofile )a nd MAP ( M es sage
A ccess P rofile) Bluetooth ®
profiles, the follow-
ing informatio ni st ransmitte da fte ry ou connect
the main telephone: R
Phone book R
Call lists R
Text messages and e-mail
i Further informatio nons ui tabl em obile
phones can be found at: http://
www.mercedes-benz.com/connect
i In the USA, yo uc an ge tint ouch with the
Mercedes-Benz Customer Assistance Center
on 1-800-FOR-MERCedes (1-800-367-6372).
In Canada, yo uc an ge tint ouch with the Cus-
tome rR elat ions Center on 1-800-387-010 0.
Searching for and authorizing (connect-
ing) am obile phoneBefore using your mobile phone with the multi-
media system for the first time, you will need to
search for the phone and then authorize (con-
nect )i t. Depending on the mobile phone, author-
ization either takes place by means of Secure
Simple Pairing or by enterin gap asskey. The
multimedia system automatically makes the
procedure that is relevant for your mobile phone
available. The mobile phone is always connec-
ted automatically after authorization. Further
information on using am obile phone with the
multimedia system (see the Digital Operator's
Manual).
If the multimedia system does not detect your
mobile phone, this may be due to particular
security settings on your mobile phone (see the
manufacturer's operating instructions).
Searching for am obile phone
Multimedia system: X
Select Tel/ �
Page 219 of 298
X
Authorizatio nu sin gS ecur eS imple Pai r-
ing:
Ac od eisd ispl ayed in th em ultimed ia system
and on th em ob ile phone.X
Confir mc od eont he mob ile phone. Depen d-
ing on th em ob ile phon eu sed, confirm the
connection to th em ultimed ia system and for
th eP BA Pa nd MA PB luetooth ®
pro file s. The
prompt to confirm may tak euptot wo
minute stobed ispl ayed (see th em anufactur-
er' so peratin gi nstructions).X
If th ec od es are diff erent :s elect No on the
multimed ia system.
The proces sisc anceled.
Repeat authorization.
or X
Authorizatio nbye ntering ap as skey
(passcode): ente ra ny one- to sixteen-digit
number sequenc ew hic hy ou have chosen
yourself int ot he passke yi nput menu.X
Press �T to confirm.X
Ente ra nd confirm th ep asske yo nt he mob ile
phone. Depen din gont he mob ile phon eu sed,
confirm th ec onnectio ntot he multimed ia sys-
te ma nd for th eP BA Pa nd MA PB luetooth ®
pro file s. The prompt to confirm may tak eu p
to two minute stobed ispl ayed (see th em an-
ufacturer' so peratin gi nstructions).
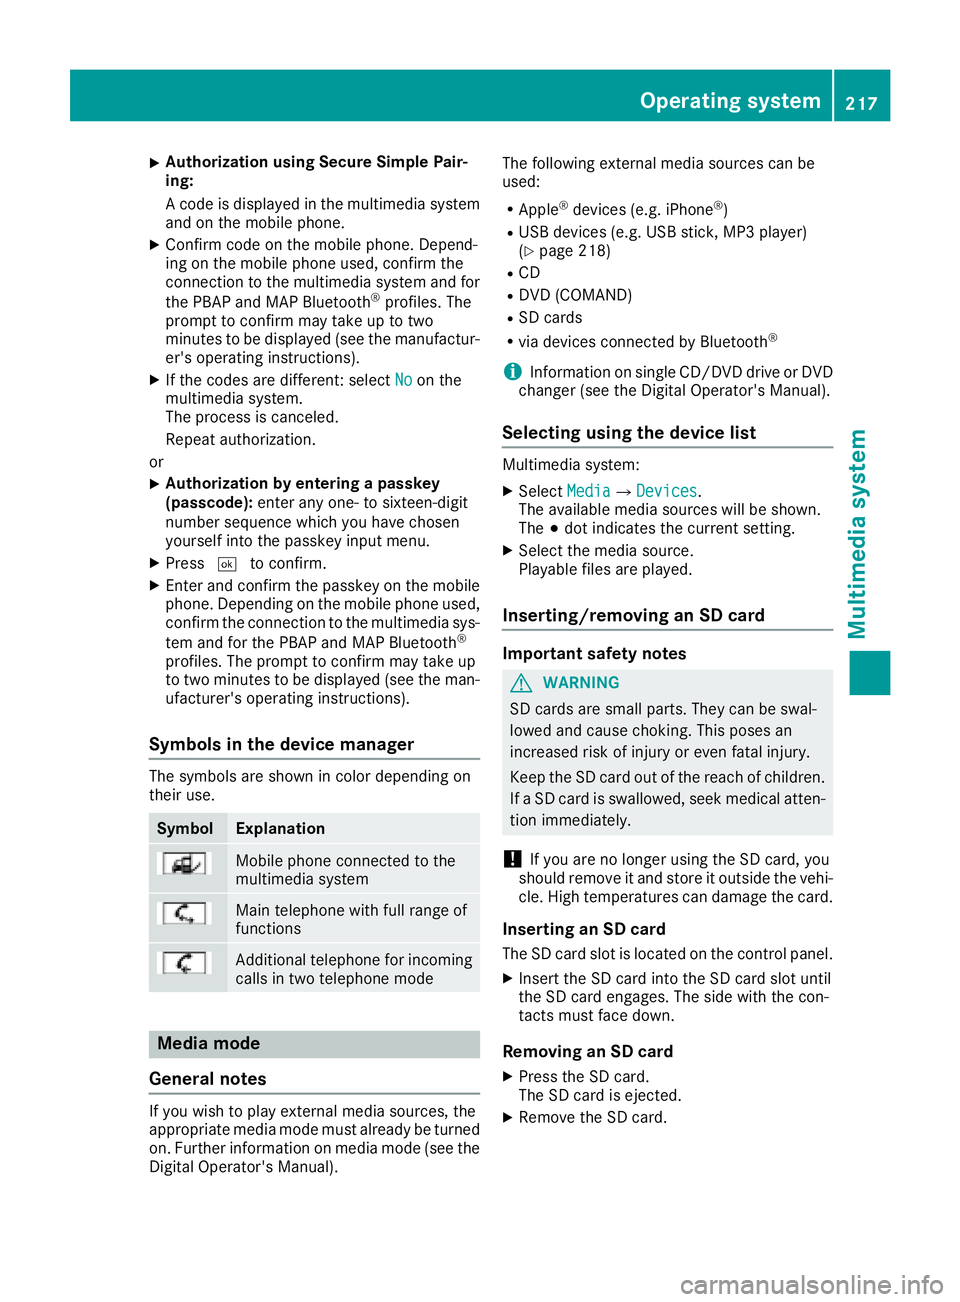
Symbols in th ed evice managerThe symbols are sho wn in color depen din go n
their use.
Symbol Explanation
Mobi le phon ec onnected to the
multimed ia system
Main telephone wit hf ull range of
functions
Ad dit ional telephone for incoming
calls in two telephone mode
Media mode
General notes
If you wish to play external medi as ources ,t he
appropriat em edi am od em ust alread ybet urned
on .F urther informatio nonm edi am od e( see the
Digital Operator's Manual). The followin ge xterna lm edi as ources can be
used: R
Apple ®
device s( e.g. iPhone ®
)R
US Bd evice s( e.g. US Bs ti ck ,M P3 player)
( Y
page 218) R
CD R
DV D( COMAND) R
SD cards R
via device sc onnected by Bluetooth ®
i In formation on single CD/DV Dd riv eorD VD
changer (see th eD ig ital Operator's Manual).
Selecting usin gt he device listMultimed ia system: X
Select Media �{ Devices .
The available medi as ources will be shown.
The �; dot indicates th ec urren ts etting.X
Select th em edi as ource.
Playable file sa re played.
Inserting/removing an SD card
Important safety notes
G WARNING
SD car ds are smal lp arts. They can be swal-
lowed and caus ec hoking. This pose sa n
increased ris kofi njury or eve nf atal injury.
Keep th eS Dc ar do ut of th er eac hofc hi ldren.
If aS Dc ar diss wallo wed, seek medical atten-
tio ni mmediately.
! If you are no longer usin gt he SD car d, you
should remove it and store it out side th ev eh i-
cle .H ig ht em peratures can damag et he card.
Insertin ganSDc ard
The SD car ds lot is locate dont he control panel.X
In ser tt he SD car di nt ot he SD car ds lot until
th eS Dc ar de ng ages .T he side wit ht he con-
tacts must fac ed own.
Removing an SD card X
Press th eS Dc ard.
The SD car dise je cted.X
Remo ve th eS Dc ar d.Operatin gs ystem 217
Multimedia system Z
Page 221 of 298
Stowage areas
Stowage spaces
Important safety notes
G WARNING
If object sint he passenger compartmen ta re
stowed incorrectly, they can slide or be
thrown around and hit vehicle occupants. In
addition, cup holders, open stowage spaces
and mobile phone brackets cannot always
retain all object st hey contain. There is ar isk
of injury, particularly in the event of sudden
braking or as udden change in direction.R
Always stow object ssot hat they cannot be
thrown around in such situations. R
Always make sure that object sdon ot pro-
trude from stowage spaces, parcel nets or
stowage nets. R
Close the lockable stowage spaces before
startin gaj ourney.R
Always stow and secure heavy, hard, poin-
ted, sharp-edged, fragile or bulky object si n
the trunk.
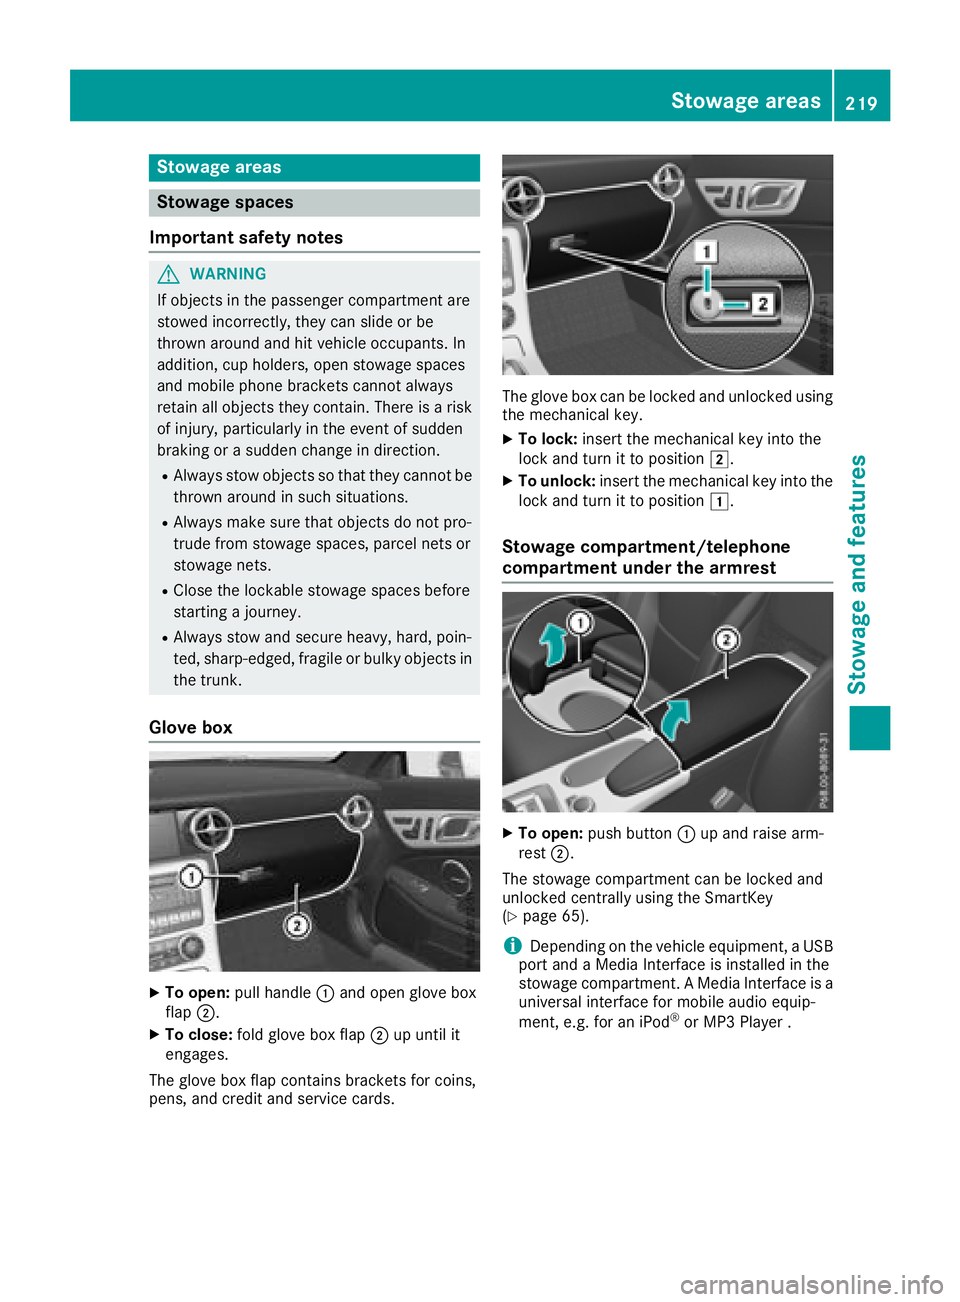
Glove box
X
To open: pull handle �C and open glove box
flap �D .X
To close: fold glove box flap �D up until it
engages.
The glove box flap contains brackets for coins,
pens, and credit and service cards. The glove box can be locked and unlocked using
the mechanical key. X
To lock: insert the mechanical key into the
lock and turn it to position �H .X
To unlock: insert the mechanical key into the
lock and turn it to position �G .
Stowage compartment/telephone
compartment under the armrest
X
To open: push button �C up and raise arm-
rest �D .
The stowage compartmen tc an be locked and
unlocked centrally using the SmartKey
( Y
page 65).
i Depending on the vehicle equipment, aU SB
port and aM edia Interface is installed in the
stowage compartment. AM edia Interface is a
universal interface for mobile audio equip-
ment ,e .g. for an iPod ®
or MP3 Playe r.Stowage areas 219
Stowage and features Z
Page 229 of 298
X
Press MB Info call button �C .
This initiates ac all to the Mercedes-Benz Cus-
tomer Assistance Center.
The indicator lamp in MB Info call button �C
flashes while the connection is being made.
The multifunction display shows the Con‐
necting Call message. The audio system is
muted.
If ac onnection can be made, the Call Con‐
nected message appears in the multifunction
display.
If am obile phone networ ka nd GPS reception
are available, the system transfers data to the
Mercedes-Benz Customer Assistance Center,
for example: R
curren tl ocation of the vehicleR
vehicle identification number
i The display of the multimedia system indi-
cates that ac all is active. During the call, you
can change to the navigation menu by press-
ing the NAVI button on COMAND ,f or exam-
ple.
Voice output is not available.
Av oice connection is established between the
Mercedes-Benz Customer Assistance Center
and the vehicle occupants.
You receive information about operating your
vehicle, about the nearest authorized
Mercedes-Benz Center and about other prod-
ucts and services from Mercedes-Benz.
USA only: you can find further information on
the mbrace system under "Owners Online" at
http://www.mbusa.com.
i The system has not been able to initiate an
MB Info call, if: R
the indicator lamp in MB Info call button �C
is flashing continuously. R
no voice connection to the Mercedes-Benz
Customer Assistance Center was estab-
lished.
This can occur if the relevant mobile phone
networ kisn ot available, for example.
The Call Failed message appears in the
multifunction display. X
To end ac all: press the �v button on the
multifunction steerin gw heel.
or X
Press the corresponding multimedia system
button for ending ap hone call. Call priority When service calls are active, e.g. Roadside
Assistance or MB Info calls, an emergenc yc all
can still be initiated. In this case, an emergency
call will take priority and override all other active
calls.
The indicator lamp of the respective button
flashes until the call is ended.
An emergenc yc all can only be terminated by the
Mercedes-Benz Customer Assistance Center.
All other calls can be ended by pressing: R
the �v button on the multifunction steering
wheel R
the corresponding button on the audio sys-
tem or on COMAND for ending at elephone
call
i When ac all is initiated, the audio system is
muted. The mobile phone is no longer con-
nected to COMAND .H owever, if you want to
use your mobile phone, do so only when the
vehicle is stationary and in as afe location.
Vehicle Health Check With the Vehicle Health Check, the Customer
Assistance Center can provide improved sup-
port for problems with your vehicle. During an
existin gc all, vehicle data is transferred to the
Customer Assistance Center. The customer ser-
vice representative can use the received data to
decide what kind of assistanc eisr equired. You
are then ,f or example, guided to the nearest
Mercedes-Benz Servic eC enter or ar ecovery
vehicle is called.
If vehicle data needs to be transferred during an
MB Info call or aR oadside Assistance call, this is
initiated by the Customer Assistance Center.
You will see the Roadside Assistance Con‐
nected message in the COMAND display. If the
vehicle remot em alfunction diagnosis can be
started, the Request for vehicle diagno‐
sis received. Start vehicle diagnosis?
message appears in the display. X
Confirm the message with Yes .X
When the Vehicle diagnosis: Please
start ignition message appears, turn the
SmartKey to position �H in the ignition lock
( Y
page 116). X
When the Please follow the instruc‐
tions received by phone and move
your vehicle to as afe position mes-Features 227
Stowage and features Z
Page 230 of 298
sage appears, follow the customer service
representative's instructions.
The message in the displa yd isappears.
If you select Cancel the remote malfunction
diagnosis is canceled completely.
The vehicle operating state check begins. You
will see the Vehicle diagnosis activated
message.
When the diagnosis is completed, the Trans‐
fer vehicle diagnostics data (Voice
connection may be interrupted during
data transfer) message appears. The vehicle
data can now be sent to the Customer Assis-
tance center. X
Press OK to confirm the message.
The voice connection with the Customer
Assistance Center is terminated.
You will see the Vehicle diagnosis:
Transferring data... message.
The vehicle data is sent to the Customer
Assistance Center.
Depending on what the customer service rep-
resentative agreed with you, the voice connec-
tion is re-established after the transfer is com-
plete. If necessary, you will be contacted at a
later time by another means, e.g. by e-mail or
phone.
Another function of the Vehicle Health Check is
the transfer of service data to the Customer
Assistance Center. If as ervice is overdue, the
COMAND displa ys hows am essage about vari-
ous special offers at your workshop.
USA only: this information can also be called up
under "Owners Online" at http://
www.mbusa.com.
Information on the data stored in the vehicle
( Y
page 28).
Information on Roadside Assistance
( Y
page 25).
Garage door opener
General notes
The HomeLink ®
garage door opener integrated
in the rear-view mirror allow sy ou to operate up
to three different door and gate systems.
Use the integrated garage door opener only on
garage doors that: R
have safety stop and reverse features and R
meet current U.S. federal safety standards Once programed, the integrated garage door
opener in the rear-view mirror will assume the
function of the garage door system's remote
control. Please also read the operating instruc-
tions for the garage door system.
When programming ag arage door opener, park
the vehicle outside the garage. Do not run the
engine while programming.
Certain garage door drives are incompatible
with the integrated garage door opener. If you
have difficulty programing the integrated garage
door opener, contact an authorized Mercedes-
Benz Center.
Alternatively, you can call the following tele-
phone assistance services: R
USA: Mercedes-Benz Customer Assistance
Center at 1-800-FOR-MERCedes R
Canada: Customer Service at
1-800-387-0100 R
HomeLink ®
hotline 1-800-355-3515 (free of
charge)
More information on HomeLink ®
and/or com-
patible products is also available online at
http://www.homelink.com.
Notes on the declaration of conformity
( Y
page 26).
USA: FCC ID: CB2HMIHL4
Canada :I C: 279B-HMIHL4
Important safety notes
G WARNING
When you operate or program the garage door
with the integrated garage door opener, per-
sons in the range of movement of the garage
door can become trapped or struck by the
garage door. There is ar isk of injury.
When using the integrated garage door
opener, always make sure that nobody is
within the range of movement of the garage
door.
G WARNING
Combustion engines emit poisonous exhaust
gases such as carbon monoxide. Inhaling
these exhaust gases leads to poisoning. There
is ar isk of fatal injury. Therefore never leave
the engine running in enclosed spaces with-
out sufficient ventilation.228
Features
Stowage and features
Page 271 of 298
The tire pressure monitor has ay ellow warning
lamp in the instrument cluster for indicating
pressure loss or am alfunction. Whether the
warning lamp flashes or lights up indicates
whether at ire pressure is too low or the tire
pressure monitor is malfunctioning: R
if the warning lamp is lit continuously, the tire
pressure on one or more tires is significantly
too low. The tire pressure monitor is not mal-
functioning. R
if the warning lamp flashes for approximately
am inute and then remains lit constantly, the
tire pressure monitor is malfunctioning.
In addition to the warning lamp, am essage
appears in the multifunction display .O bserve
the information on display messages
( Y
page 196).
It may take up to ten minutes for am alfunction
of the tire pressure monitor to be indicated. A
malfunction will be indicated by the tire pres-
sure warning lamp flashing for approximately
one minute and then remaining lit. When the
malfunction has been rectified, the tire pressure
warning lamp goes out after af ew minutes of
driving.
The tire pressure values indicated by the on-
board computer may differ from those meas-
ured at ag as station with ap ressure gage. The
tire pressures shown by the on-board computer
refer to those measured at sea level. At high
altitudes, the tire pressure values indicated by a
pressure gage are higher than those shown by
the on-board computer. In this case, do not
reduce the tire pressures.
The operation of the tire pressure monitor can
be affected by interferenc ef rom radio transmit-
ting equipment (e.g. radio headphones, two-way
radios) that may be being operated in or near the
vehicle.
Checking the tire pressur ee lectroni-
cally X
Make sure that the SmartKey is in position �H
( Y
page 116) in the ignition lock. X
Press the �Y or �e button on the steering
wheel to select the Serv. menu.X
Press the �c or �d button to select
Tire Pressure .X
Press �v .
The current tire pressure of each tire is shown
in the multifunction display. If the vehicle has been parked for over
20 minutes, the Tire pressure will be
displayed after driving af ew minutes
message appears.
After at each-in process, the tire pressure mon-
itor automatically detect sn ew wheels or new
sensors. As long as ac lear allocation of the tire
pressure value to the individual wheels is not
possible, the Tire Pressure Monitor Active
display message is shown instead of the tire
pressure display .T he tire pressures are already
being monitored.
If an emergenc ys pare wheel is mounted, the
system may continue to show the tire pressure
of the wheel that has been removed for af ew
minutes. Be aware that the value displayed for
the position where the emergenc ys pare wheel
is fitted is not the same as the current tire pres-
sure of the emergenc ys pare wheel.
Tire pressur em onitor warning mes-
sages The tire pressure monitor detect sap ressure
loss in one or more tires: R
If the tire pressure monitor detect sap ressure
loss in one or more tires, aw arning message
is shown in the multifunction display .T he yel-
low tire pressure warning lamp then lights up. R
If the Please Correct Tire Pressure
message appears in the multifunction display,
the tire pressure in at least one tire is too low.
The tire pressure must be corrected when the
opportunit ya rises. R
If the Check Tires message appears in the
multifunction display ,t he tire pressure in at
least one tire has dropped significantly. The
tires must be checked. R
If the Warning Tire Malfunction message
appears in the multifunction display ,t he tire
pressure in at least one tire has dropped sud-
denly. The tires must be checked.
Observe the instructions and safety notes in the
display messages in the "Tires" section
( Y
page 196).
If the wheel positions on the vehicle are rotated,
the tire pressures may be displayed for the
wrong positions for as hort time. This is rectified
after af ew minutes of driving, and the tire pres-
sures are displayed for the correc tp ositions.Tir ep re ssure 269
Wheels and tires Z