Page 406 of 562
#Duringthest arting assist ance proce‐
dure: start the engine of the donor vehicle
and run at idle speed.
#Connect the negative pole of the donor bat‐
te ry and ground po int5 ofyour ow nve hicle
by using the jumper cable/charging cable.
Begin with the donor battery firs t.
#Du ring starting assist ance:start the
engine of your ow nve hicle.
#During thech arging process: start the
ch arging process.
#During starting assist ance:letthe engines
ru nfo r se veral minutes.
#During starting assist ance:before discon‐
necting the jumper cable, switch on an elec‐
trical consumer on your ow nve hicle, e.g. the
re ar wind owheater or lighting.
When thest arting assis tance/charging process
is compl ete:
#Fir st,re mo vethe jumper cable/charging
cable from ground point 5and negative
pole of the donor batter y,then from positive
clamp 4and positive pole of the donor bat‐
te ry. Begin each time with the conta cts on
yo ur ow nve hicle firs t.
#Af terre moving the jumper cable/charging
cable, close co ver3 of positive clamp 4.
#Vehicles with ground point co ver:replace
ground point co ver1 and turn scr ews2
clockwise.
Yo u can obtain fur ther information on starting
assis tance at any qualified specialist workshop.
To w starting or towing away
Perm itted towing me thods
Plug-in hybrid: obser vethe no tes in the Supple‐
ment. Otherwise, you may not recognize dan‐
ge rs.
Mercedes-Benz recommends transporting your
ve hicle in the case of a breakdown, rath er than
to wing it away.
* NO
TEDama getotheve hicle due to tow‐
ing away incor rectly
#Obser vethe instructions and no tes on
to wing away.
404
Breakdown assis tance
Page 411 of 562
*NO
TEDama getothe driv etra in due to
incor rect positioning
#Do not position theve hicle abo vethe
connection point of the transport vehi‐
cle.
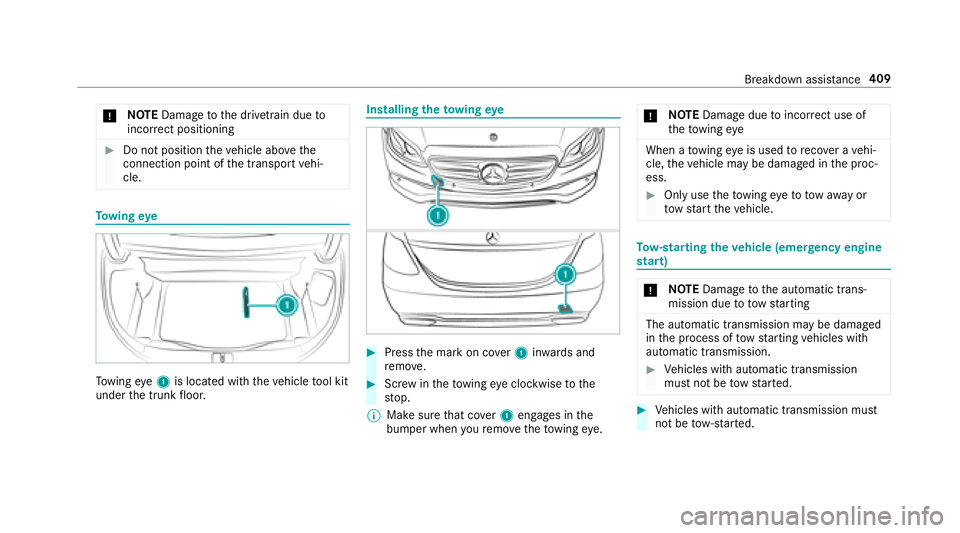
To wing eye
Towing eye1 is located with theve hicle tool kit
under the trunk floor.
Installing theto wing eye
#Press the mark on co ver1 inwa rds and
re mo ve.
#Scr ew intheto wing eyeclockwise tothe
st op.
% Make sure that co ver1 engages in the
bumper when youre mo vetheto wing eye. *
NO
TEDama gedue toincor rect use of
th eto wing eye
When a towing eye is used toreco ver a vehi‐
cle, theve hicle may be damaged in the proc‐
ess.
#Only use theto wing eyeto to waw ay or
to w start theve hicle.
To w- starting theve hicle (eme rgency engine
st art)
* NO
TEDama getothe automatic trans‐
mission due to towstarting
The automatic transmission may be damaged
in the process of tow starting vehicles with
automatic transmission.
#Ve hicles with automatic transmission
must not be tow star ted.
#Ve hicles with automatic transmission must
not be tow- star ted.
Breakdown assis tance 409
Page 439 of 562
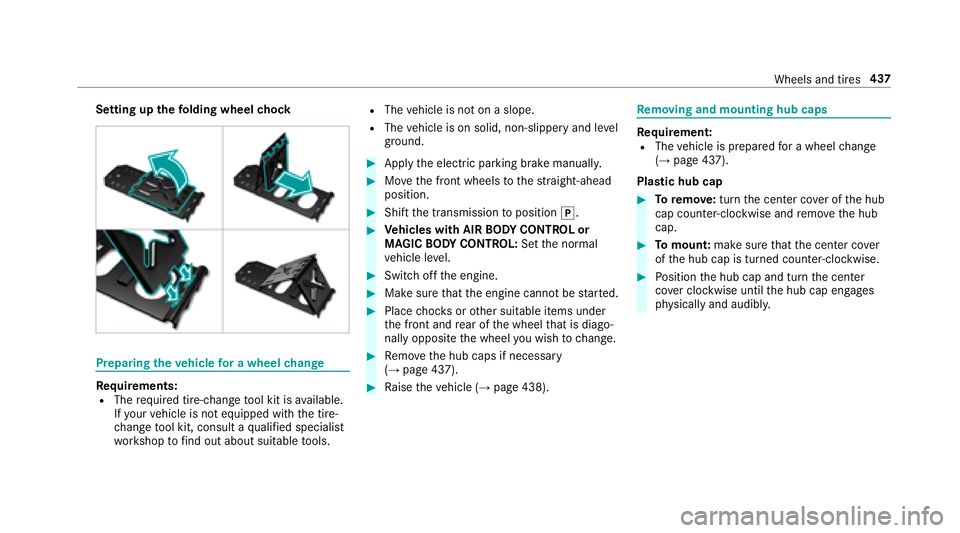
Setting upthefo lding wheel chock
Prepa ring theve hicle for a wheel change
Re quirements:RThe requ ired tire-change tool kit is available.
If yo ur vehicle is not equipped with the tire-
ch ange tool kit, consult a qualified specialist
wo rkshop tofind out about suitable tools.
RThe vehicle is not on a slope.
RThe vehicle is on solid, non-slippery and le vel
ground .
#Applythe electric parking brake manually.
#Mo vethe front wheels tothest ra ight-ahead
position.
#Shift the transmission toposition j.
#Vehicles with AIR BODY CONT ROL or
MAGIC BODY CONT ROL:Set the normal
ve hicle le vel.
#Swit choff the engine.
#Make sure that the engine cannot bestar ted.
#Place choc ks orother suitable items under
th e front and rear of the wheel that is diago‐
nally opposite the wheel youwish tochange.
#Re mo vethe hub caps if necessary
(→page 437).
#Ra ise theve hicle (→page 438).
Re moving and mounting hub caps
Requirement:RThe vehicle is prepared for a wheel change
(→page 437).
Plast ic hub cap
#Toremo ve:turn the center co ver of the hub
cap counter-clockwise and remo vethe hub
cap.
#To mount: makesurethat the center co ver
of the hub cap is turned counter-clockwise.
#Po sition the hub cap and turn the center
co ver clockwise until the hub cap engages
ph ysically and audibly.
Wheels and tires 437
Page 440 of 562
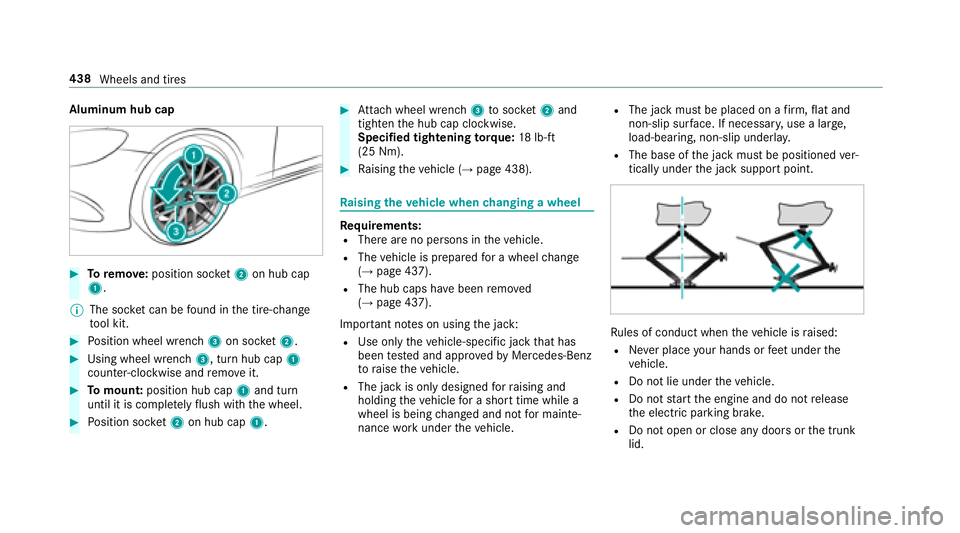
Aluminum hub cap
#Toremo ve:position soc ket2 on hub cap
1.
% The soc ket can be found inthe tire-change
to ol kit.
#Po sition wheel wrench 3on soc ket2.
#Using wheel wrench 3, turn hub cap1
counter-clo ckwise and remo veit.
#To mount: position hub cap 1and turn
until it is compl etely flush withth e wheel.
#Po sition soc ket2 on hub cap 1.
#Attach wheel wrench 3tosoc ket2 and
tighten the hub cap clockwise.
Specified tightening torq ue: 18lb-ft
(25 Nm).
#Ra ising theve hicle (→page 438).
Ra ising theve hicle when changing a wheel
Re quirements:RThere are no persons in theve hicle.
RThe vehicle is prepared for a wheel change
(→page 437).
RThe hub caps ha vebeen remo ved
(→page 437).
Impor tant no tes on using the jack:
RUse only theve hicle-specific jack that has
been tested and appr oved byMercedes-Benz
to raise theve hicle.
RThe jack is only designed forra ising and
holding theve hicle for a short time while a
wheel is being changed and not for mainte‐
nance workunder theve hicle.
RThe jack must be placed on a firm ,fl at and
non-slip sur face. If necessar y,use a lar ge,
load-bearing, non-slip underla y.
RThe base ofthe jack must be positioned ver‐
tically under the jack support point.
Ru les of conduct when theve hicle is raised:
RNe ver place your hands or feet under the
ve hicle.
RDo not lie under theve hicle.
RDo not start the engine and do not release
th e electric parking brake.
RDo not open or close any doors or the trunk
lid.
438 Wheels and tires
Page 442 of 562
#Position jack 2at jack support point 1.
#Turn box wrench 3clockwise until jack 2
sits comple tely on jack support point 1and
th e base of the jack lies evenly on the
ground .
#Continue toturn box wrench 3until the tire
is raised a maximum of 1.2 in (3 cm) off the
ground .
#Loosen andremo vethe wheel (→page 440).
Re moving a wheel
Requirement:RThe vehicle is raised (→page 438).
When changing a wheel, avoid applying any forc e
to the brake discs, since this could impair the
le ve l of com fort when braking.
* NO
TEDama getothre ading from dirt on
wheel bolts
#Do not place wheel bolts in sand or on
a dirty sur face.
#Un scr ew the uppermost wheel bolt com‐
ple tely.
#Scr ew centering pin 1instead of the wheel
bolt into theth re ading.
#Un scr ew there maining wheel bolts fully.
#Re mo vethe wheel.
#Mount the new wheel (→page 440).
Moun ting a new wheel
Requirement:RThe wheel is remo ved (→page 440).
44 0
Wheels and tires
Page 443 of 562
&WARNING Risk of accident from losing a
wheel
Oiled, greased or damaged wheel bolt/wheel
nut thre ads or wheel hub/wheel mounting
bolt thre ads can cause the wheel bolts/
wheel nuts tocome loose.
As a result, you could lose a wheel while driv‐
ing.
#Ne ver oil or grease theth re ads.
#In theeve nt of damage totheth re ads,
con tact a qualified specialist workshop
immediatel y.
#Have the damaged wheel bolts or dam‐
aged hub thre ads replaced.
#Do not continue driving.
#Obser vethe information on thech oice of
tires (→page 433).
Fo r tires with a specified direction of rotation, an
ar row onthe side wall of the tire indicates the
cor rect dire ction of rotation. Observ eth e direc‐
tion of rotation when ins talling.
#Slide the wheel tobe mounted onto the cen‐
te ring pin and push it on.
&
WARNING Risk of injury from tightening
wheel bolts and nuts
If yo u tighten the wheel bolts or wheel nuts
when theve hicle is raised, the jack could tip.
#Only tighten wheel bolts or wheel nuts
when theve hicle is on the ground.
#Fo r saf etyre asons, only use wheel bolts
which ha vebeen appr ovedfo r Mercedes-
Benz and the wheel in question.
* NO
TEDama getopaintwork of the wheel
ri m when scr ewing on thefirs t wheel bolt
If th e wheel has too much play when scr ew‐
ing in thefirs t wheel bolt, the wheel rim paint
can be dama ged.
#Press the wheel firm lyagainst the
wheel hub when scr ewing on thefirs t
wheel bolt.
#Ti ghten the wheel bolts until they are finger-
tight.
#Un scr ew the centering pin.
#Tighten the last wheel bolt until it is finger-
tight.
#Lo we rth eve hicle (→page 441).
Lo weri ngtheve hicle af ter a wheel change
Re quirements:RThe new wheel has been mounted
(→page 440).
#Plac eth era tchet wrench onto the he xagon
nut of the jack so that the letters "AB" are
visible.
#To lowe r the vehicle: turnthera tchet
wrench of the jack counter-clockwise.
Wheels and tires 44
1