2018 MERCEDES-BENZ METRIS fold seats
[x] Cancel search: fold seatsPage 90 of 318

Guide rails:of the seat rail system allow you
to:
Rsecure rear bench seats in up to two rear seat rows
The only way to ensure that the rear bench seats
will engage securely is to always keep the seat
anchorages clean and free of foreign objects.
Seating variants
GWARNING
If the rear bench seats are not installed as
described, the safety precautions integrated
into the rear bench seats cannot protect as
intended. There is an increased risk of injury.
Only install the rear bench seats as described.
Only use rear bench seats approved for the
vehicle.
You can install rear bench seats with two or
three seats.
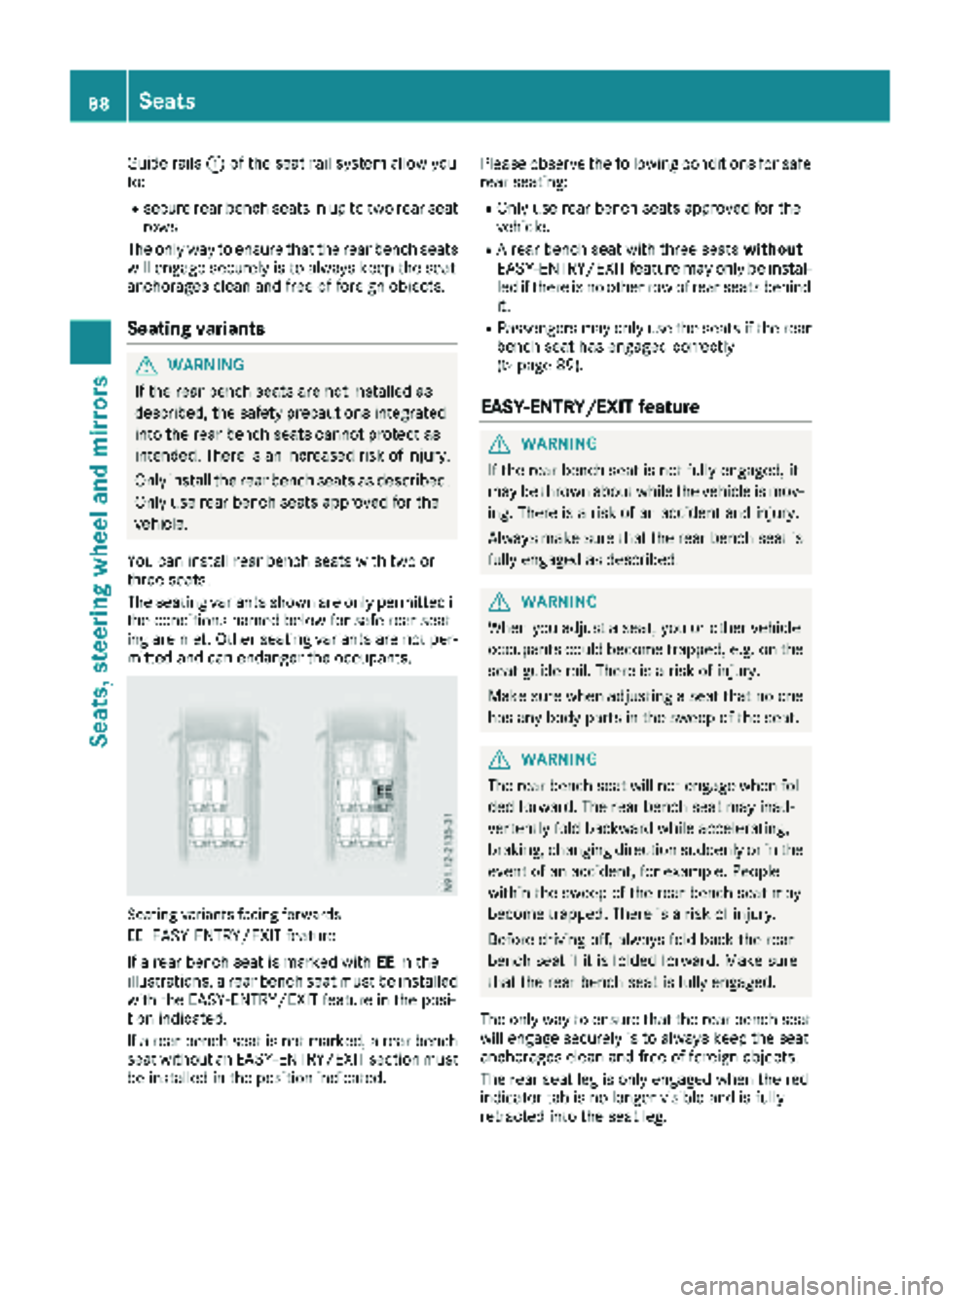
The seating variants shown are only permitted if the conditions named below for safe rear seat-
ing are met. Other seating variants are not per-
mitted and can endanger the occupants.
Seating variants facing forwards
EE
EASY-ENTRY/EXIT feature
If a rear bench seat is marked with EEin the
illustrations, a rear bench seat must be installed
with the EASY-ENTRY/EXIT feature in the posi-
tion indicated.
If a rear bench seat is not marked, a rear bench
seat without an EASY-ENTRY/EXIT section must
be installed in the position indicated. Please observe the following conditions for safe
rear seating:
ROnly use rear bench seats approved for the
vehicle.
RA rear bench seat with three seats
without
EASY-ENTRY/EXIT feature may only be instal- led if there is no other row of rear seats behind
it.
RPassengers may only use the seats if the rear
bench seat has engaged correctly
(
Ypage 89).
EASY-ENTRY/EXIT feature
GWARNING
If the rear bench seat is not fully engaged, it
may be thrown about while the vehicle is mov-
ing. There is a risk of an accident and injury.
Always make sure that the rear bench seat is
fully engaged as described.
GWARNING
When you adjust a seat, you or other vehicle
occupants could become trapped, e.g. on the seat guide rail. There is a risk of injury.
Make sure when adjusting a seat that no one
has any body parts in the sweep of the seat.
GWARNING
The rear bench seat will not engage when fol-
ded forward. The rear bench seat may inad-
vertently fold backward while accelerating,
braking, changing direction suddenly or in the
event of an accident, for example. People
within the sweep of the rear bench seat may
become trapped. There is a risk of injury.
Before driving off, always fold back the rear
bench seat if it is folded forward. Make sure
that the rear bench seat is fully engaged.
The only way to ensure that the rear bench seat
will engage securely is to always keep the seat
anchorages clean and free of foreign objects.
The rear seat leg is only engaged when the red
indicator tab is no longer visible and is fully
retracted into the seat leg.
88Seats
Seats, steering wheel and mirrors
Page 91 of 318

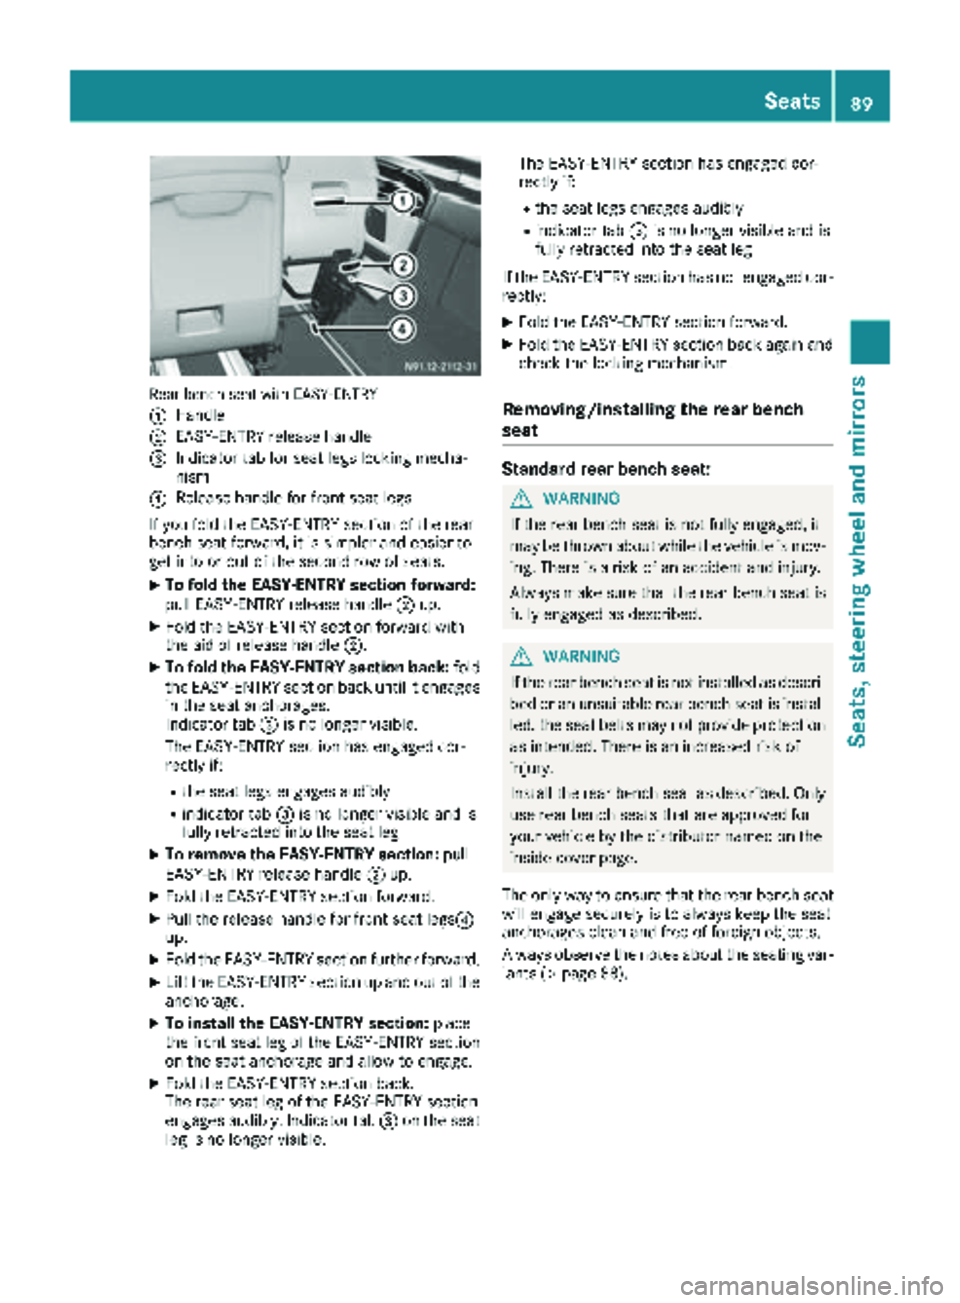
Rear bench seat withEASY-ENTRY
:
Han dle
;EASY-EN TRY release handle
=Indicator tab for seat legs locking mecha-
nis m
?Release handle for front seat legs
If you fold the EASY-ENTRY section ofthe rear
bench seat forward, it issimpler and easier to
get intoor out ofthe secon d rowofseats.
XTo fold the EASY-ENTRY section forward:
pull EASY-EN TRY release handle ;up.
XFold the EASY-EN TRY section forward with
the aid ofrelease handle ;.
XTofold the EASY-ENTRY sectionback:fold
the EASY-EN TRY section back unt il itengages
in the seat anc horages.
Indic ator tab =is no lon ger visible.
The EASY-EN TRY section has engaged cor-
rectly if:
Rthe seat legs engages audibly
Rindicat ortab =is no lon ger visibleand is
fully retracted into the seat leg
XTo rem ove the EASY-ENTRY section:pull
EASY-EN TRY release handle ;up.
XFold the EASY-EN TRY section forward.
XPullthe release handle for front seat legs ?
up.
XFold the EASY-EN TRY section further forward.
XLift theEASY-EN TRY section up and out ofthe
anc horage.
XToinstall the EASY-ENTRY section:place
the fr ont seat leg ofthe EASY-EN TRY section
on the seat anc horage and allowto engage.
XFold the EASY-EN TRY section back.
The rear seat leg ofthe EASY-EN TRY section
en
gages audibly. Indic ator tab=onthe seat
leg is no lon ger visible. The
EASY-EN TRY section has engaged cor-
rectly if:
Rthe seat legs engages audibly
Rindicat ortab =isno longer vis ibleand is
fully retracted into the seat leg
If the EASY-EN TRY section has not engaged cor-
rectly:
XFold the EASY-EN TRY section forward.
XFold theEASY-EN TRY section back again and
check the locking mechanism.
Removing/installing the rear bench
seat
Standard rear bench seat:
GWARNIN G
If the rear bench seat is not fully engaged, it
may bethrown about whilethe vehicle is mov-
ing. There isa risk ofan acc ident and injury.
Alw ays make sure that the rear bench seat is
fully engaged as described.
GWARNIN G
If the rear bench seat is not installed as descri-
bed oran unsuita blerear bench seat is instal-
led, the seat belts may not pro videprotection
as intended. Thereisan increased risk of
inj ury.
In stall the rear bench seat as described. Only
use rear bench seats that are approved for
your vehicle bythe distribut ornamed onthe
inside cover page.
The only way to ensure that the rear bench seat
will engage securely is to always keep the seat
anc horages clean and free offoreign objects.
Alw ays obse rve the notes about the seating var-
iant s (
Ypage 88).
Seats89
Seats, steering wheel and mirrors
Z
Page 92 of 318

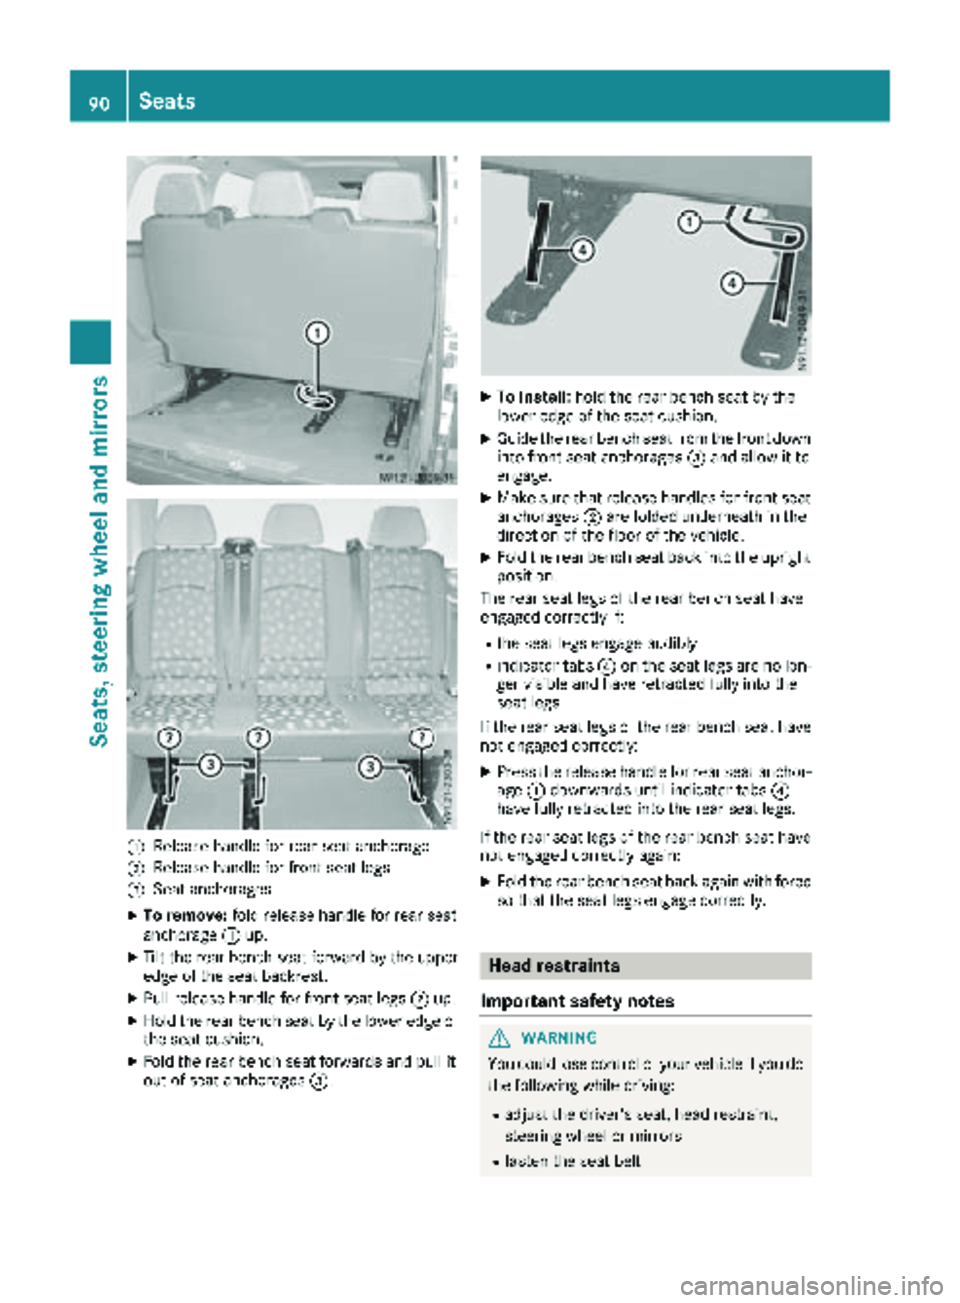
:Releasehandle for rear seat anchorage
;Releas ehandle for fron tseat legs
=Seat anchorages
XTo remove: foldrelease handle for rear seat
anchorage :up.
XTilt th erear bench seat forward by th eupper
edge of th eseat backrest .
XPull release handle for fron tseat legs ;up.
XHold th erear bench seat by th elower edge of
th eseat cushion .
XFold therear bench seat forwards and pull it
out of seat anchorages =.
XTo install:hold th erear bench seat by th e
lower edge of th eseat cushion .
XGuide therear bench seat from th efron tdown
int ofron tseat anchorages =and allow it to
engage .
XMakesur ethat release handles for fron tseat
anchorages ;are folded underneat hin th e
direction of th efloor of th evehicle.
XFold th erear bench seat bac kint oth eupright
position .
The rear seat legs of th erear bench seat hav e
engage dcorrectl yif:
Rth eseat legs engage audibly
Rindicator tab s? on th eseat legs are no lon -
ger visible and hav eretracte dfully int oth e
seat legs
If th erear seat legs of th erear bench seat hav e
no tengage dcorrectly:
XPress th erelease handle for rear seat anchor -
age :downwards until indicator tab s?
hav efully retracte dint oth erear seat legs .
If th erear seat legs of th erear bench seat hav e
no tengage dcorrectl yagain :
XFold th erear bench seat bac kagain wit hforce
so that th eseat legs engage correctly.
Head restraints
Important safety notes
GWARNIN G
You could lose control of your vehicl eif you do
th efollowin gwhile driving :
Radjust thedriver' sseat ,head restraint,
steering whee lor mirror s
Rfastenth eseat belt
90Seats
Seats, steering wheel and mirrors
Page 94 of 318

XTo adjust the height:turn the key in the igni-
tion lock to position 2.
or
XOpen the door.
XSlide switch :up or down in the direction of
the arrow.
iIf the ignition is not switched on, you can
adjust the head restraint height within
30 seconds of unlocking the vehicle.
XTo move forward: pull the head restraint
forward until it engages in the required posi-
tion.
XTo move back: press and hold down release
knob ;and slide the head restraint back to
the desired position.
XLet go of release button ;.
XEnsure that the head restraint has engaged
properly.
Armrests
XTo adjust the armrest angle: fold the arm-
rest up by more than 45° to position 2.
The armrest is released.
XFold armrest 3forward to the stop.
XSlowly fold the armrest up to the desired posi-
tion.
XTo fold the armrest up: if necessary, fold the
armrest up by more than 90° to position 1.
Seat heating
GWARNING
Repeatedly switching on the seat heating can
cause the seat cushion and backrest pads to
become very hot. The health of persons with
limited temperature sensitivity or a limited
ability to react to high temperatures may be
affected or they may even suffer burn-like
injuries. There is a risk of injury.
Therefore, do not switch the seat heating on
repeatedly.
!When you leave your seat, do not place any-
thing on the seat and switch off the seat heat-
ing. Do not switch the seat heating on when
the seat is not occupied, e.g. when driving
without a front passenger. The seat heating
may otherwise overheat, causing damage to
the seat.
The three red indicator lamps in the Íbutton
show the activated heating level 1to 3.
The seat heating automatically switches down
from level 3to level 2after approximately seven
minutes.
The system automatically switches down from
level 2to level 1after approximately ten
minutes.
At level 1the seat heating switches off auto-
matically after approximately 20 minutes.
XMake sure that the key is in position 1or 2in
the ignition lock.
XTo switch on: press theÍbutton repeat-
edly until the desired heating level has been
set.
XTo switch off: press theÍbutton repeat-
edly until all indicator lamps go out.
If the on-board voltage is too low, the seat heat-
ing will either switch itself off prematurely or not
come on at all. In this case, too many electrical
consumers are switched on or the battery
charge is not sufficient. The seat heating will
automatically switch back to the current heating level when enough on-board voltage is available
again.
92Seats
Seats, steering wheel and mirrors
Page 248 of 318

XAlways transport loads in the cargo compart-
ment and with the seat backrests folded up
and properly locked in position.
XAlways place the load against the backrests ofthe front or rear seats.
XMove large and heavy loads as far towards thefront of the vehicle as possible against the
front or rear seats. Stow the load flush with
the rear or front seats.
XAlways additionally secure the load with suit-
able load-securing aids or tie downs.
Observe the following notes:
RDo not stack loads higher than the upper edge
of the backrests.
RTransport loads behind seats that are not
occupied.
RIf the rear bench seat is not occupied, insert
the seat belts crosswise into the buckle of the
opposite seat belt.
Cargo compartment variations
You can vary the cargo compartment according
to your transportation requirements as follows:
Rby folding the seat backrests forward to the
table position.
Rby removing the rear bench seat.
You will find information about rear bench seats in the "Rear bench seats" section (
Ypage 87).
Securing loads
Important safety notes
GWARNING
If you attach the tie-down incorrectly when
securing the load, the following may occur in
the event of abrupt changes in direction, brak- ing maneuvers or an accident:
Rthe cargo tie-down rings may become
detached or the tie-down may tear if the
permissible load is exceeded
Rthe load may not be restrained.
This may cause the load to slip, tip over or be
tossed about, striking vehicle occupants.
There is a risk of an accident and injury.
Always tension the tie-downs in the proper
manner and only between the described
cargo tie-down rings. Always use tie-downs
designed specifically for the loads.
!Observe the information on the maximum
loading capacity of the individual cargo tie-
down points.
If you use several cargo tie-down points to
secure a load, you must always take the max-
imum loading capacity of the weakest cargo
tie-down point into account.
If you brake hard, for example, the forces act- ing could be up to several times the weight
force of the load. Always use multiple cargo
tie-down points in order to distribute the force
absorption. Load the anchorages evenly.
Spread the load evenly across the cargo tie-
down points/cargo tie-down rings. You will find information on the maximum loading capacity of
the cargo tie-down points under "Cargo tie-
down points and carrier systems" (
Ypage 314).
Do not attempt to modify or repair the cargo tie-
down points/cargo tie-down rings or tie downs.
Read the information on qualified specialist
workshops: (
Ypage 31).
As the driver, you are responsible for ensuring
that:
RThe load is secured against slipping, tipping,
rolling or falling off in normal traffic condi-
tions, should the vehicle swerve to avoid an
obstacle, in the event of full brake application
and on poor road surfaces.
RThe applicable requirements and guidelines
relating to load-securing practices must be
met.
If this is not the case, this may constitute a
punishable offense, depending on local legis-
lation and any ensuing consequences.
Always observe the legal requirements for the country you are currently in.
Make sure that the load is secure before every
journey and at regular intervals during a long
journey. Correct an incorrectly or inadequately
secured load if necessary.
Always observe the operating instructions or the
notes of the lashing strap manufacturer for the
operation of the lashing strap.
You can obtain information about securing the
load correctly from the manufacturer of the load
securing aids or tie down for securing the load.
246Securing loads
Transporting loads
Page 252 of 318

GWARNING
If vehicle occupants are seated behind a load
protection net, they may be squeezed up
against the load protection net. There is a risk
of injury, particularly in the event of braking
maneuvers or abrupt changes in direction.
Never allow vehicle occupants to sit behind
the load protection net.
The load protection net borders the cargo com- partment. It protects vehicle occupants from
light objects and/or luggage slipping or tipping
over. Always observe the notes on securing
loads (
Ypage 246).
You can install the load protection net at an
angle behind the front seats or behind the first
row of back seats.
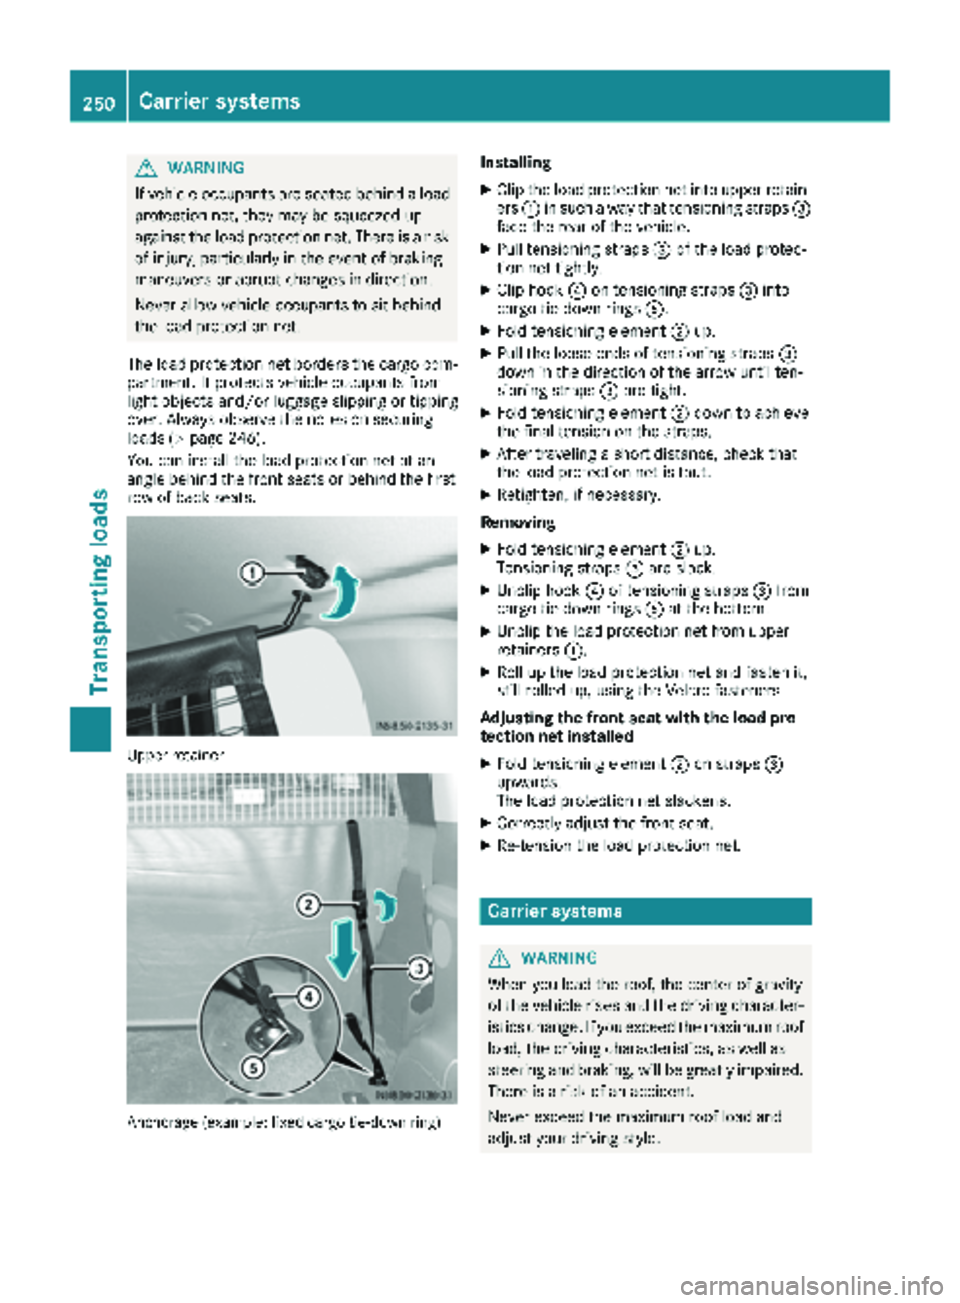
Upper retainer
Anchorage (example: fixed cargo tie-down ring)
Installing
XClip the load protection net into upper retain-
ers :in such a way that tensioning straps =
face the rear of the vehicle.
XPull tensioning straps =of the load protec-
tion net tightly.
XClip hook ?on tensioning straps =into
cargo tie-down rings A.
XFold tensioning element ;up.
XPull the loose ends of tensioning straps =
down in the direction of the arrow until ten-
sioning straps =are tight.
XFold tensioning element ;down to achieve
the final tension on the straps.
XAfter traveling a short distance, check that
the load protection net is taut.
XRetighten, if necessary.
Removing
XFold tensioning element ;up.
Tensioning straps =are slack.
XUnclip hook ?of tensioning straps =from
cargo tie-down rings Aat the bottom.
XUnclip the load protection net from upper
retainers :.
XRoll up the load protection net and fasten it,
still rolled up, using the Velcro fasteners.
Adjusting the front seat with the load pro-
tection net installed
XFold tensioning element ;on straps =
upwards.
The load protection net slackens.
XCorrectly adjust the front seat.
XRe-tension the load protection net.
Carrier systems
GWARNING
When you load the roof, the center of gravity
of the vehicle rises and the driving character-
istics change. If you exceed the maximum roof
load, the driving characteristics, as well as
steering and braking, will be greatly impaired.
There is a risk of an accident.
Never exceed the maximum roof load and
adjust your driving style.
250Carrier systems
Transporting loads