Page 289 of 318
.
Important safety notes
GWARNING
Each tire, including the")
For further information on displaying the current
tire pressures, refer to "Checking the tire pres-
sure electronically" (
Ypage 288).
Important safety notes
GWARNING
Each tire, including the spare (if provided),
should be checked at least once a month
when cold and inflated to the pressure rec-
ommended by the vehicle manufacturer on
the Tire and Loading Information placard on
the driver's door B-pillar or the tire pressure
label on the inside of the fuel filler flap. If your
vehicle has tires of a different size than the
size indicated on the Tire and Loading Infor-
mation placard or the tire pressure label, you
should determine the proper tire pressure for
those tires.
As an added safety feature, your vehicle has
been equipped with a tire pressure monitoring
system (TPMS) that illuminates a low tire pres-
sure telltale when one or more of your tires
are significantly underinflated. Accordingly,
when the low tire pressure telltale illuminates,
you should stop and check your tires as soon
as possible, and inflate them to the proper
pressure. Driving on a significantly underin-
flated tire causes the tire to overheat and can lead to tire failure. Underinflation also
reduces fuel efficiency and tire tread life, and
may affect the vehicle's handling and stop-
ping ability.
Please note that the TPMS is not a substitute
for proper tire maintenance, and it is the driv-
er's responsibility to maintain correct tire
pressure, even if underinflation has not
reached the level to trigger illumination of the
TPMS low tire pressure telltale.
USA only:
Your vehicle has al so b
een equipped with a
TPMS malfunction indicator to indicate if the
system is not operating properly. The TPMS
malfunction indicator is combined with the
low tire pressure telltale. When the system
detects a malfunction, the warning lamp will
flash for approximately a minute and then
remain continuously illuminated. This
sequence will be repeated every time the vehi-
cle is started as long as the malfunction
exists.
When the malfunction indicator is illuminated,
the system may not be able to detect or signal
low tire pressure as intended. TPMS malfunc-
tions may occur for a variety of reasons,
including the mounting of incompatible
replacement or alternate tires or wheels on
the vehicle that prevent the TPMS from func-
tioning properly. Always check the TPMS mal-
function telltale after replacing one or more
tires or wheels on your vehicle to ensure that the replacement or alternate tires and wheels
allow the TPMS to continue to function prop-
erly.
It is the driver's responsibility to set the tire
pressure to the recommended cold tire pressure
suitable for the operating conditions
(
Ypage 282).
Note that the correct tire pressure for the cur-
rent operating conditions must first be pro-
gramed into the tire pressure monitor. If a sub-
stantial pressure loss occurs, the warning
threshold for the warning message is aligned to
the taught-in reference values. Restart the tire
pressure monitor after adjusting the cold tire
pressure (
Ypage 289). The current pressures
are saved as new reference values. This will
ensure that a warning message will only appear
if the tire pressure drops significantly.
The tire pressure monitor does not warn you if a
tire pressure is incorrect. Observe the notes on
the recommend
ed tire pressure (Ypage 282).
The tire pressure monitor is not able to warn you
of a sudden loss of pressure, e.g. following pen- etration by a foreign object. In this event, brake
the vehicle until it comes to a standstill. Avoid
sudden steering movements.
The tire pressure monitor has a yellow h
warning lamp in the instrument cluster for indi-
cating pressure loss/malfunctions (USA) or
pressure loss (Canada). Depending on how the
warning lamp flashes or lights up, an underin-
flated tire or a malfunction in the tire pressure
monitor is displayed:
Rif the h warning lamp is lit continuously,
the tire pressure on one or more tires is sig-
Tire pressure287
Wheels and tires
Z
Page 290 of 318

nificantly too low. The tire pressure monitor is
not malfunctioning.
RUSA only: if thehwarning lamp flashes for
60 seconds and then remains lit constantly,
the tire pressure monitor is malfunctioning.
The display also shows a message:
Ron vehicles without steering wheel buttons
(Ypage 203)
Ron vehicles with steering wheel buttons
(Ypage 219)
USA only: if the tire pressure monitor is mal-
functioning, it may be more than ten minutes
before the malfunction is shown. The htire
pressure warning lamp flashes for 60 seconds
and then remains lit. When the malfunction has
been rectified, the htire pressure warning
lamp goes out after a few minutes of driving.
The tire pressure values indicated by the on-
board computer may differ from those meas-
ured at a gas station with a pressure gauge.
The tire pressures shown by the on-board com-
puter refer to those measured at sea level. At
high altitudes, the tire pressure values indicated
by a pressure gauge are higher than those
shown by the on-board computer. In this case,
do not reduce the tire pressures.
If radio transmitting equipment (e.g. wireless
headphones, two-way radios) is operated inside
the vehicle or in the vicinity of the vehicle, this
can interfere wi th th
e operation of the tire pres-
sure monitor.
Checking the tire pressure electroni-
cally on vehicles with steering wheel
buttons
You can only check the tire pressure electroni-
cally on vehicles with steering wheel buttons.
Using the steering wheel buttons
XTurn the key to position 2in the ignition
lock.
XPress the =or; button to select the
Servicemenu.
XUse the 9or: button to select TirePressure.
XPressato confirm.
The current tire pressure of each wheel is
shown in the display.
If the vehicle has been parked for over
20 minutes, the Tire pressure will be
displayed after driving a few minutesmessage appears.
After a teach-in period, the tire pressure monitor
automatically detects new wheels or new sen-
sors. As long as a clear allocation of the tire
pressure value to the individual wheels is not
possible, theTire
PressureMonitorActivemessage is shown instead of the tire pressure
display. The tire pressures are already being
monitored.
Tire pressure monitor warning mes-
sages
If the tire pressure monitor detects a loss in
pressure in one or more tires, a warning mes-
sage is shown in the display. The hwarning
lamp lights up.
Vehicles without steering wheel buttons
RIf the Correct Tire Pressuremessage is
shown in the display, the tire pressure in at
least one tire is too low. The tire pressure
must be corrected at the next opportunity.
RIf the CheckTirePressureSoonmessage
is shown in the display, the tire pressure in
one or more tires has dropped significantly.
The tires must be checked.
RIf the Warning Tire Malfunc.message is
shown in the display, the tire pressure in one
or more tires has dropped suddenly. The tires
must be checked.
Vehicles with steering wheel buttons
RIf the Adjust Tire Pressuremessage is
shown in the display, the tire pressure in at
least one tire is too low. The tire pressure
must be corrected at the next opportunity.
RIf the Check Tiresmessage is shown in the
display, the tire pressure in one or more tires has dropped significantly. The tires must be
checked.
RIf the WarningTireMalfunctionmessage
is shown in the display, the tire pressure in
one or more tires has dropped suddenly. The
tires must be checked.
Always read and follow the instructions and
safety notes related to the display messages,
which can be found in the "Tires" section.
Rfor vehicles without steering wheel buttons
(Ypage 203)
Rfor vehicles with steering wheel buttons
(Ypage 219)
288Tire pressure
Wheels and tires
Page 291 of 318

Vehicles with steering wheel buttons:if the
wheel positions on the vehicle are rotated, the
tire pressures may be displayed for the wrong
positions for a short time. This is rectified after a
few minutes of driving; the tire pressures are
then displayed for the correct positions.
Restarting the tire pressure monitor
General notes
When you restart the tire pressure monitor, all
existing warning messages are deleted and the
warning lamp goes out. The monitor uses the
currently set tire pressures as the reference val-
ues for monitoring. In most cases, the tire pres-
sure monitor will automatically detect the new
reference values after you have changed the tire
pressure. However, you can also set reference
values manually as described here. The tire
pressure monitor then monitors the new tire
pressure values.
Vehicles without steering wheel buttons
The vehicle must be stationary. Use the buttons
in the instrument cluster.
XTurn the key to position 2in the ignition
lock.
XUsing Èselect the Tire Pressuremenu.
XPress3to confirm.
The display shows the Monitoring Active
message.
XPress3to confirm.
The display shows the Tire Pressure OK?
message.
If you wish to confirm the restart:
XPress the fbutton.
The display shows the distance menu.
After you have driven for a few minutes, the
system checks whether the current tire pres-
sures are within the specified range. The new tire pressure levels are then accepted as ref-
erence values and monitored.
If you wish to cancel the restart:
XPress the gbutton.
The display shows the tire pressure menu.
The tire pressure values stored at the last
restart will continue to be monitored.
Vehicles with steering wheel buttons
Using the steering wheel buttons
XMake sure that the tire pressure of all four
wheels is set correctly for the current oper-
ating conditions. When doing so, observe the
notes under "Tire pressure" (
Ypage 282).
XTurn the key to position 2in the ignition
lock.
XPress the =or; button to select the
Servicemenu.
XSelect the Tire Pressuresubmenu with
9 or:.
XPress ato confirm.
The display shows either the current tire pres-
sure for the individual tires, or the Tire
pressure will be displayed afterdriving a few minutesmessage.
XPress the:button.
The display shows the Use Current Pres‐
sures as New Reference Values:mes-
sage.
If you wish to confirm the restart:
XPress the abutton.
The display shows the Tire Press. Moni‐
tor Restartedmessage.
After you have driven for a few minutes, the
system checks whether the current tire pres-
sures are within the specified range. The new
tire pressure levels are then accepted as ref-
erence values and monitored.
If you wish to cancel the restart:
XPress the %button.
The tire pressure values stored at the last
restart will continue to be monitored.
Tire pressure289
Wheels and tires
Z
Page 292 of 318

!The pressure difference between tires on any one axle must be no greater than 10 kPa (0.1 ba r/
1.5 psi).
The following")
Tire pressure tables
Vehicles with a gross vehicle weight of 6,724 lbs (3.05 t)
!The pressure difference between tires on any one axle must be no greater than 10 kPa (0.1 ba r/
1.5 psi).
The following tire pressure values apply to vehicles with:
Ra gross vehicle weight of 6,724 lbs (3.05 t)
Ra gross axle weight rating of 3,418 lbs(1,550 kg)on the rear axle and
Rthe tires referred to under "Wheel and tire combinations" (Ypage 302)
Always observe the notes under "Information on tire pressures" (
Ypage 282).
The tire pressure for the spare wheelis 340 kPa (3.4 bar/49 psi).
Partially laden vehicleFully laden vehicle
Tire sizeFront axleRear axleFront axleRear axle
225/55 R 17 XL270 kPa
(2.7 bar/ 39 psi)270 kPa
(2.7 bar/ 39 psi)300 kPa
(3.0 bar/ 44 psi)310 kPa
(3.1 bar/45 psi)
Loading the vehicle
Instruction labels for tires and loads
GWARNING
Overloaded tires can overheat, causing a
blowout. Overloaded tires can also impair the steering and driving characteristics and lead
to brake failure. There is a risk of accident.
Observe the load rating of the tires. The load
rating must be at least half of the GAWR of
your vehicle. Never overload the tires by
exceeding the maximum load.
Example: Tire and Loading Information placard on
the B-pillar, driver's side
Two instruction labels on your vehicle show themaximum possible load.
(1) Tire and Loading Information placard :is
on the B-pillar on the driver's side. Tire and
Loading Information placard :shows the
permissible number of occupants and the
maximum permissible load of the vehicle. It also contains details of the tire sizes and
corresponding pressures for tires mounted
at the factory.
(2) The vehicle identification plate is on the B-pillar on the driver's side. The vehicle
identification plate informs you of the per-
missible gross weight. It is made up of the
vehicle weight, all vehicle occupants, the
fuel and the cargo. You can also find infor-
mation about the maximum Gross Axle
Weight Rating on the front and rear axle.
The maximum gross axle weight rating is
the maximum weight that can be carried by
one axle (front or rear axle). Do not exceed the permissible gross weight or the maxi-
mum gross axle weight rating for the front
or rear axle.
290Loading the vehicle
Wheels and tires
Page 293 of 318

Tire and Loading Information placard
Maximum permissible gross weight
:Maximum number of seats
;Maximum permissible gross weight
XSpecification for maximum permissible gross
weight ;is listed in the Tire and Loading
Information placard: "The gross weight of
occupants and luggage must not exceed XXX
kilograms or XXX lbs."
The gross weight of all vehicle occupants, cargo,
luggage and trailer load/noseweight (if applica-
ble) must not exceed the specified value.
iThe details on the Tire and Loading Infor-
mation placard illustration are only an exam-
ple. The maximum permissible gross weight is
vehicle-specific and may deviate from the
data shown here. The maximum permissible
gross weight that applies to your vehicle can
be found on your vehicle's Tire and Loading
Information placard.
Number of seats
:Maximum number of seats
;Maximum permissible gross weight Maximum number of seats
:determines the
maximum number of occupants allowed to
travel in the vehicle. This information can be
found on the Tire and Loading Information plac- ard.
iThe details on the Tire and Loading Infor-
mation placard illustration are only an exam-
ple. The number of seats is vehicle-specific
and can differ from the details shown. The
number of seats in your vehicle can be found
on the Tire and Loading Information placard.
Determining the maximum load
Individual steps
The following steps have been developed as
required of all manufacturers under Title 49,
Code of U.S. Federal Regulations, Part 575 in
accordance with the "National Traffic and Motor
Vehicle Safety Act of 1966".
XStep 1: Locate the statement "The combined
weight of occupants and cargo should never
exceed XXX kg or XXX lbs." on your vehicle's
Tire and Loading Information placard.
XStep 2: Determine the combined weight of
the driver and passengers that will be travel-
ing in your vehicle.
XStep 3: Subtract the combined weight of the
driver and passengers from XXX kilograms or
XXX lbs.
XStep 4: The resulting figure equals the avail-
able amount of cargo and luggage load capa-
city. For example, if the "XXX" amount equals
1400 lbs and there will be five 150-pound
passengers in your vehicle, the amount of
available cargo and luggage load capacity is
650 lbs (1400 Ò750 (5 x 150) = 650 lbs).
XStep 5: Determine the combined weight of
luggage and cargo being loaded on the vehi-
cle. For reasons of safety, that weight must
not exceed the available cargo and luggage
cargo capacity calculated in step 4.
XStep 6 (if applicable): If your vehicle is tow-
ing a trailer, load from the trailer will be trans-
ferred to your vehicle. Please consult the Tire
and Loading Information placard, to deter-
mine how this reduces the available cargo and
luggage load capacity of your vehicle.
Loading the vehicle291
Wheels and tires
Z
Page 294 of 318

Example: Steps 1 to 3
The following table shows examples of how to calculate total load and cargo capacities with varyingseating configurations and number and size of occupants. The following examples use a maximum
load of 1500 lbs (680 kg). This is for illustration purposes only. Make sure you are using the
actual load limit for your vehicle stated on your vehicle's Tire and Loading Information placard .
Example 1Example 2Example 3
Step 1Combined maximum
weight of occupants
and cargo (data from
the Tire and Loading
Information placard)1500 lbs
(680 kg)1500 lbs
(680 kg)1500 lbs
(680 kg)
Example 1Example 2Example 3
Step 2Number of people in
the vehicle (driver and
occupants)531
Distribution of the
occupantsFront: 2
Rear: 3Front: 1
Rear: 2Front: 1
Weight of the occu-
pantsOccupant 1:
150 lbs (68 kg)
Occupant 2:
180 lbs (82 kg)
Occupant 3:
160 lbs (73 kg)
Occupant 4:
140 lbs (63 kg)
Occupant 5:
120 lbs (54 kg)Occupant 1:
200 lbs (91 kg)
Occupant 2:
190 lbs (86 kg)
Occupant 3:
150 lbs (68 kg)Occupant 1:
150 lbs (68 kg)
Gross weight of all
occupants750 lbs (340 kg)540 lbs (245 kg)150 lbs (68 kg)
Example 1Example 2Example 3
Step 3Permissible load and
trailer load/nose-
weight (maximum per-
missible gross weight
from the Tire and
Loading Information
placard minus the
gross weight of all
occupants)1500 lbs
(680 kg) Ò750 lbs
(340 kg) =
750 lbs (340 kg)1500 lbs
(680 kg) Ò540 lbs
(245 kg) =
960 lbs (435 kg)1500 lbs
(680 kg) Ò150 lbs
(68 kg) =
1350 lbs
(612 kg)
The greater the combined weight of the occupants, the lower the maximum luggage load.
You can find further information under: "Trailer tow hitch" (
Ypage 316).
292Loading the vehicle
Wheels and tires
Page 295 of 318

Vehicle identification plate
Even if you have calculated the total load care-
fully, you should still make sure that the permis-
sible gross weight and the gross axle weight rat-
ing of your vehicle are not exceeded. This data
can be found on the vehicle identification plate
on the B-pillar of your vehicle (
Ypage 305).
Permissible gross vehicle weight: the gross
weight of the vehicle, all occupants, load and
trailer load/noseweight (if applicable) must not
exceed the permissible gross vehicle weight.
Gross axle weight rating: the maximum per-
missible load that can be carried by one axle
(front or rear axle).
To ensure that your vehicle does not exceed the
maximum permissible values (gross vehicle
weight and maximum gross axle weight rating),
have your loaded vehicle (including driver, occu-
pants, load, and full trailer load if applicable)
weighed on a suitable vehicle weighbridge.
Trailer load/noseweight
The trailer load/noseweight affects the gross
weight of the vehicle. If a trailer is attached, the trailer load/noseweight is included in the load
along with occupants and luggage. The trailer
load/noseweight is usually approximately 10%
of the gross weight of the trailer and its load.
What you should know about wheels
and tires
Tire labeling
Tire labeling
:DOT, Tire Identification Number
(Ypage 295)
;Maximum tire load (Ypage 295)
=Maximum tire pressure (Ypage 286)
?Manufacturer
ATire material (Ypage 296)
BTire size designation, load-bearing capacity
and speed index (Ypage 293)
CTire name
The markings described above are on the tire in
addition to the tire name (sales designation) and
the manufacturer's name.
iTire data is vehicle-specific and may deviate
from the data in the example.
Tire size designation, load bearing index
and speed index
GWARNING
Exceeding the stated tire load-bearing capa-
city and the approved maximum speed could
lead to tire damage or the tire bursting. There is a risk of accident.
Therefore, only use tire types and sizes
approved for your vehicle model. Observe the
What you should know about wheels and tires293
Wheels and tires
Z
Page 296 of 318

tire load rating and speed rating required for
your vehicle.
:Tire width
;Nominal aspect ration in %
=Tire code
?Rim diameter
ALoad bearing index
BSpeed index
Tire width: tire width:shows the nominal tire
width in millimeters.
Aspect ratio: aspect ratio;is the size ratio
between the tire height and tire width and is
shown in percent. The aspect ratio is calculated
by dividing the tire width by the tire height.
Tire code: tire code=specifies the tire type.
"R" represents radial tires. "D" represents diag-
onal tires, "B" represents diagonal radial tires.
Rim diameter: rim diameter?is the diameter
of the bead seat, not the diameter of the rim
flange. The rim diameter is specified in
inches (in).
Load-bearing index: load-bearing indexAis a
numerical code that specifies the maximum
load-bearing capacity of a tire.
Do not overload the tires by exceeding the
specified load limit. The maximum permissible
load can be found on the vehicle's Tire and
Loading Information placard on the B-pillar on
the driver's side (
Ypage 290).
Example:
The load-bearing index 101 indicates a maxi-
mum load of 1819 lb (825 kg) for the tire. If two load-bearing indices are specified, the first num-
ber specifie s th
e load-bearing capacity for single
tires, the second the load-bearing capacity for
twin tires. For further information on the maxi-
mum tire load in kilograms and pounds, see
(
Ypage 295). For further information on the load-bearing
index, see "Load index" (
Ypage 295).
Speed rating: speed ratingBspecifies the
approved maximum speed of the tire.
Regardless of the speed index always observe
the speed limits. Drive carefully and adapt your
driving style to the traffic conditions.
iTire data is vehicle-specific and may deviate
from the data in the example.
IndexSpeed rating
Qup to 100 mph (160 km/h)
Rup to 106 mph (170 km/h)
Sup to 112 mph (180 km/h)
Tup to 118 mph (190 km/h)
Hup to 130 mph (210 km/h)
Vup to 149 mph (240 km/h)
Wup to 168 mph (270 km/h)
Yup to 186 mph (300 km/h)
iNot all tires that have the M+S identification
offer the driving characteristics of winter
tires. In addition to the M+S marking, winter
tires also have the isnowflake symbol on
the tire wall. Tires with this marking fulfill the
requirements of the Rubber Manufacturers
Association (RMA) and the Rubber Associa-
tion of Canada (RAC) regarding the tire trac-
tion on snow. They have been especially
developed for driving on snow.
Further information on the reading of tire infor-
mation can be obtained at any qualified special-
ist workshop.
294What you should know about wheels and tires
Wheels and tires
 1
1 2
2 3
3 4
4 5
5 6
6 7
7 8
8 9
9 10
10 11
11 12
12 13
13 14
14 15
15 16
16 17
17 18
18 19
19 20
20 21
21 22
22 23
23 24
24 25
25 26
26 27
27 28
28 29
29 30
30 31
31 32
32 33
33 34
34 35
35 36
36 37
37 38
38 39
39 40
40 41
41 42
42 43
43 44
44 45
45 46
46 47
47 48
48 49
49 50
50 51
51 52
52 53
53 54
54 55
55 56
56 57
57 58
58 59
59 60
60 61
61 62
62 63
63 64
64 65
65 66
66 67
67 68
68 69
69 70
70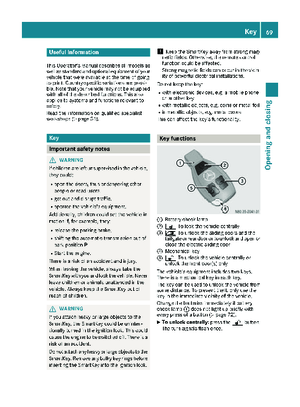 71
71 72
72 73
73 74
74 75
75 76
76 77
77 78
78 79
79 80
80 81
81 82
82 83
83 84
84 85
85 86
86 87
87 88
88 89
89 90
90 91
91 92
92 93
93 94
94 95
95 96
96 97
97 98
98 99
99 100
100 101
101 102
102 103
103 104
104 105
105 106
106 107
107 108
108 109
109 110
110 111
111 112
112 113
113 114
114 115
115 116
116 117
117 118
118 119
119 120
120 121
121 122
122 123
123 124
124 125
125 126
126 127
127 128
128 129
129 130
130 131
131 132
132 133
133 134
134 135
135 136
136 137
137 138
138 139
139 140
140 141
141 142
142 143
143 144
144 145
145 146
146 147
147 148
148 149
149 150
150 151
151 152
152 153
153 154
154 155
155 156
156 157
157 158
158 159
159 160
160 161
161 162
162 163
163 164
164 165
165 166
166 167
167 168
168 169
169 170
170 171
171 172
172 173
173 174
174 175
175 176
176 177
177 178
178 179
179 180
180 181
181 182
182 183
183 184
184 185
185 186
186 187
187 188
188 189
189 190
190 191
191 192
192 193
193 194
194 195
195 196
196 197
197 198
198 199
199 200
200 201
201 202
202 203
203 204
204 205
205 206
206 207
207 208
208 209
209 210
210 211
211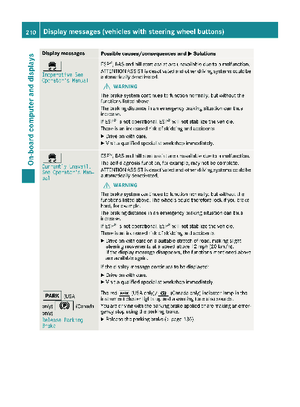 212
212 213
213 214
214 215
215 216
216 217
217 218
218 219
219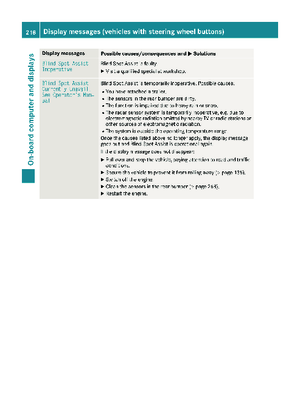 220
220 221
221 222
222 223
223 224
224 225
225 226
226 227
227 228
228 229
229 230
230 231
231 232
232 233
233 234
234 235
235 236
236 237
237 238
238 239
239 240
240 241
241 242
242 243
243 244
244 245
245 246
246 247
247 248
248 249
249 250
250 251
251 252
252 253
253 254
254 255
255 256
256 257
257 258
258 259
259 260
260 261
261 262
262 263
263 264
264 265
265 266
266 267
267 268
268 269
269 270
270 271
271 272
272 273
273 274
274 275
275 276
276 277
277 278
278 279
279 280
280 281
281 282
282 283
283 284
284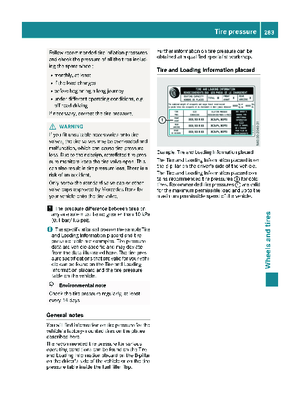 285
285 286
286 287
287 288
288 289
289 290
290 291
291 292
292 293
293 294
294 295
295 296
296 297
297 298
298 299
299 300
300 301
301 302
302 303
303 304
304 305
305 306
306 307
307 308
308 309
309 310
310 311
311 312
312 313
313 314
314 315
315 316
316 317
317