2018 MERCEDES-BENZ GLS SUV individual
[x] Cancel search: individualPage 152 of 398
The arrows in the transmission position display
show how and into which transmission positions
you can shift using the DIRECT SELECT lever.
If the transmission position display on the mul-
tifunction display is not working, you should pull
away carefully to check whether the desired
transmission position is engaged. Ideally, you
should select transmission position hand, in
Mercedes-AMG vehicles, drive program Cor S.
Transmission positions
BPark position
Only shift the transmission into posi-
tion Pwhen the vehicle is stationary
(
Ypage 161). The parking lock
should not be used as a brake when
parking. Always apply the electronic
parking brake in addition to the park-
ing lock in order to secure the vehi-
cle.
If the vehicle electronics are malfunc- tioning, the transmission may be
locked in position P. Have the vehicle
electronics checked immediately at a
qualified specialist workshop.
Park position Pis automatically
engaged if:
Ryou switch off the engine using the
SmartKey and remove the Smart-
Key
Ryou switch off the engine using the
SmartKey or using the Start/Stop
button and open the driver's door
or front-passenger door
Rthe driver's door is opened when
the vehicle is stationary or driving
at very low speed and the trans-
mission is in position Dor R
CReverse gear
Only shift the transmission into posi-
tion Rwhen the vehicle is stationary.
ANeutral
Do not shift the transmission to N
while driving. Otherwise, the auto-
matic transmission could be dam-
aged.
No power is transmitted from the
engine to the drive wheels.
Releasing the brakes will allow you to
move the vehicle freely, e.g. to push
it or tow it.
If ESP
®is deactivated or faulty: shift
the transmission to position Nif the
vehicle is in danger of skidding, e.g.
on icy roads.
If you switch the engine off with the
transmission in position Ror D, the
automatic transmission shifts to N
automatically.
!Coasting in neutral imay
cause damage to the drive train.
7Drive
The automatic transmission changes
gear automatically. All forward gears
are available.
Driving tips
Changing gear
The automatic transmission shifts through the
individual gears automatically when it is in trans-
mission position h. This automatic gear shift-
ing behavior is determined by:
Rthe selected drive program
Rthe position of the accelerator pedal
Rthe road speed
Accelerator pedal position
Your style of driving influences how the auto-
matic transmission shifts gear:
Rlittle throttle: early upshifts
Rmore throttle: late upshifts
150Automatic transmission
Driving and parking
Page 154 of 398
Individual drive program
In theIndividua ldriv eprogram ,th efollowin g
properties of th edriv eprogram can be selected:
Rth edriv e(engin eand transmission manage-
ment)
Rth etransmission
Rth esuspension
Rall vehicles (except Mercedes-AM Gvehicles):
th esteering
Rall vehicles (except Mercedes-AM Gvehicles):
availabilit yof th eECO start/sto pfunction
To select th egear sin th eIndividua ldriv epro -
gram permanentl yusin gth esteering whee lpad-
dle shifters, select th epermanen tmanual gear -
shif tprogram .
Information about configuring th eIndividua l
driv eprogram wit hth emultimedia system can
be foun din th eDigital Operator's Manual.
Manual gear shifting
General notes
You can chang egear yourself usin gth esteering
whee lpaddle shifters. The transmission must be
in position hto do this.
Dependin gon whic hsteering whee lpaddle
shifte ris pulled ,th eautomatic transmission
immediately shifts int oth enext gear down or
up, if permitted.
To use manual shifting ,you have two options:
Rtemporar ysetting
Rpermanen tsetting
If you activat emanual gearshifting ,th ecurren t
gear appear sin th emultifunction display
instead of transmission position h.
If manual gearshifting is deactivated, th egear s
will be selected automatically.
Temporary setting
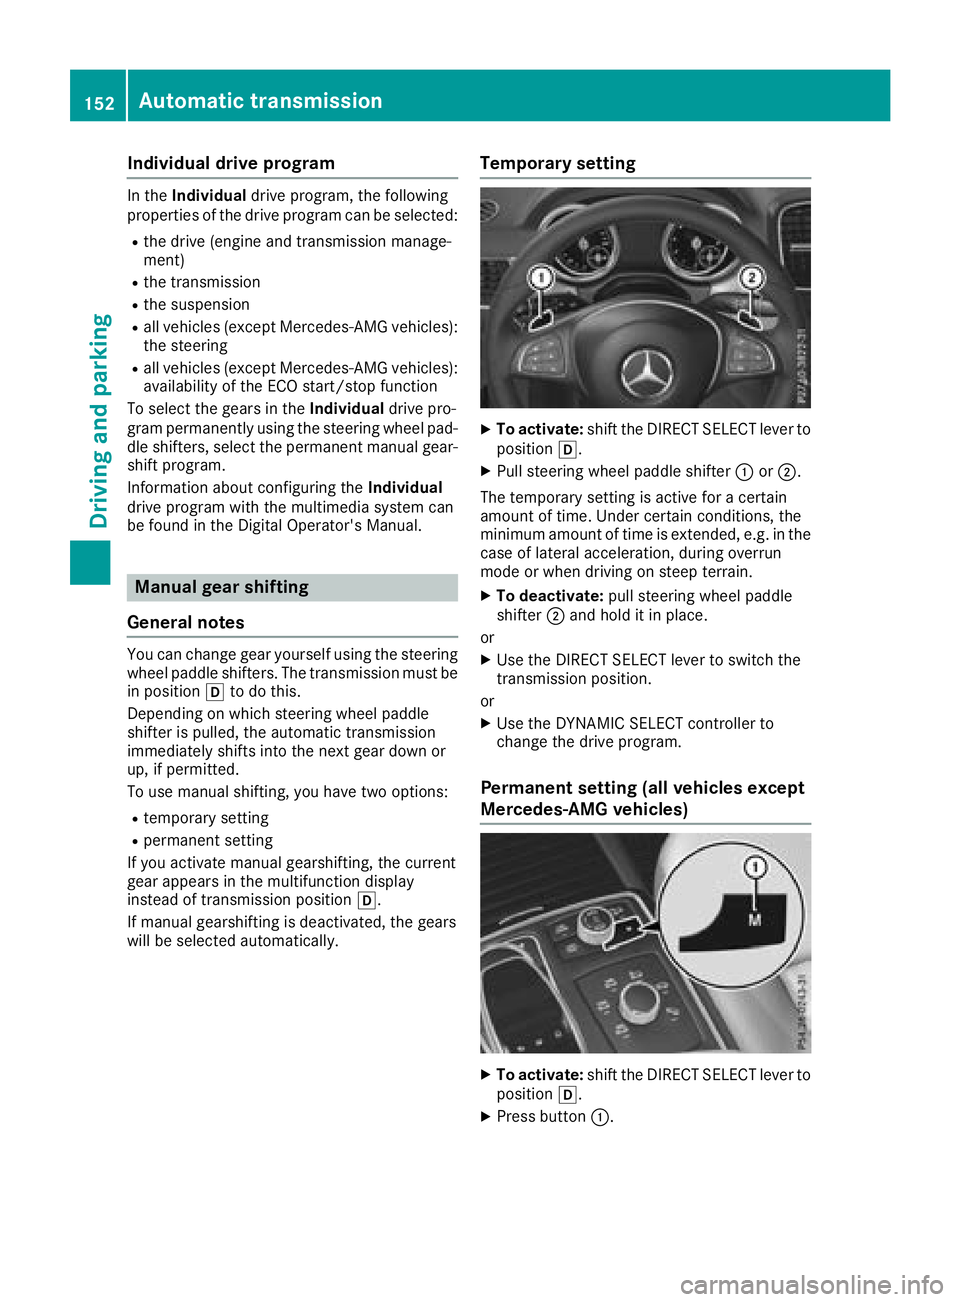
XTo activate: shiftth eDIRECT SELECT lever to
position h.
XPull steering whee lpaddle shifte r: or;.
The temporar ysetting is active for acertain
amoun tof time. Under certain conditions, th e
minimum amoun tof time is extended, e.g. in th e
cas eof lateral acceleration ,during overrun
mod eor when driving on steep terrain .
XTo deactivate:pull steering whee lpaddle
shifte r; and hold it in place.
or
XUse th eDIRECT SELECT lever to switch th e
transmission position .
or
XUse th eDYNAMIC SELECT controller to
chang eth edriv eprogram .
Permanent setting (all vehicles except
Mercedes-AMG vehicles)
XTo activate: shiftth eDIRECT SELECT lever to
position h.
XPress butto n:.
152Automatic transmission
Driving and parking
Page 155 of 398
XTo deactivate:press button:.
or
XUse the DYNAMIC SELECT controller to
change the drive program.
Permanent setting (Mercedes-AMG
vehicles)
XTo activate: shift the DIRECT SELECT lever to
position h.
XPress button :.
Indicator lamp ;lights up.
XTo deactivate: press button:.
or
XUse the DYNAMIC SELECT controller to
switch to the Individualdrive program.
Indicator lamp ;goes out.
Shifting gears
!Mercedes-AMG vehicles: the automatic
transmission does not shift up automatically
even when the engine limiting speed for the
current gear is reached. When the engine lim-
iting speed is reached, the fuel supply is cut to
prevent the engine from overrevving. Always
make sure that the engine speed does not
reach the red area of the tachometer. There is
otherwise a risk of engine damage.
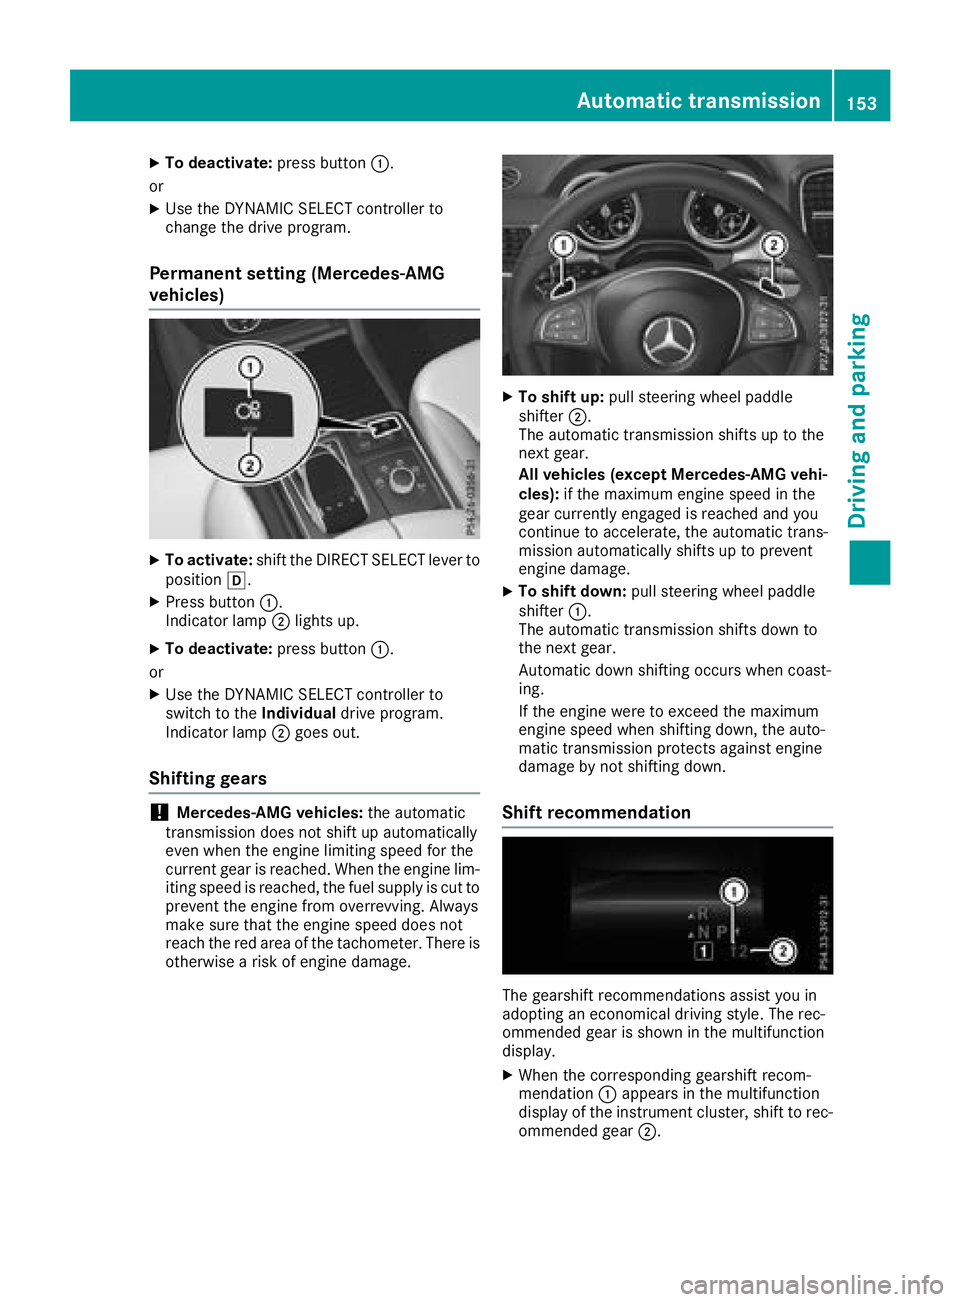
XTo shift up: pull steering wheel paddle
shifter ;.
The automatic transmission shifts up to the
next gear.
All vehicles (except Mercedes-AMG vehi-
cles): if the maximum engine speed in the
gear currently engaged is reached and you
continue to accelerate, the automatic trans-
mission automatically shifts up to prevent
engine damage.
XTo shift down: pull steering wheel paddle
shifter :.
The automatic transmission shifts down to
the next gear.
Automatic down shifting occurs when coast-
ing.
If the engine were to exceed the maximum
engine speed when shifting down, the auto-
matic transmission protects against engine
damage by not shifting down.
Shift recommendation
The gearshift recommendations assist you in
adopting an economical driving style. The rec-
ommended gear is shown in the multifunction
display.
XWhen the corresponding gearshift recom-
mendation :appears in the multifunction
display of the instrument cluster, shift to rec-
ommended gear ;.
Automatic transmission153
Driving and parking
Z
Page 170 of 398
parking brake is being tested on a brake dyna-
mometer (maximum 10 seconds).
Braking triggered automatically by ESP
®may
seriously damage the brake system.
All checks and maintenance work on the brake
system must be carried out at a qualified spe-
cialist workshop.
Have brake pads installed and brake fluid
replaced at a qualified specialist workshop.
If the brake system has only been subject to
moderate loads, you should test the functional-
ity of your brakes at regular intervals. To do so,
depress the brake pedal firmly when driving at a high speed. This improves the grip of the brake
pads.
You can find a description of Brake Assist (BAS)
on (
Ypage 67) or of BAS PLUS on (Ypage 72).
Mercedes-Benz recommends that you only have
brake pads/linings installed on your vehicle
which have been approved for Mercedes-Benz
vehicles or which correspond to an equivalent
quality standard. Brake pads/linings which have
not been approved for Mercedes-Benz vehicles
or which are not of an equivalent quality could
affect your vehicle's operating safety.
Mercedes-Benz recommends that you only use
brake fluid that has been specially approved for
your vehicle by Mercedes-Benz, or which corre-
sponds to an equivalent quality standard. Brake
fluid which has not been approved for
Mercedes-Benz vehicles or which is not of an
equivalent quality could affect your vehicle's
operating safety.
High-performance brake system
(Mercedes-AMG vehicles)
The high-performance brake system is designed
for heavy loads. This may lead to noise when
braking. This will depend on:
RSpeed
RBraking force
REnvironmental conditions, such as tempera-
ture and humidity
The wear of individual components of the brake
system, such as the brake pads/linings or brake
discs, depends on the individual driving style
and operating conditions.
For this reason, it is impossible to state a mile-
age that will be valid under all circumstances. An
aggressive driving style will lead to high wear. You can obtain further information about this
from your authorized Mercedes-Benz Center.
New and replaced brake pads and discs only
reach their optimum braking effect after several
hundred kilometers of driving. Compensate for
this by applying greater force to the brake pedal.
Keep this in mind, and adapt your driving and
braking accordingly during this break-in period.
Excessive heavy braking results in correspond-
ingly high brake wear. Observe the #brake
wear warning lamp in the instrument cluster and
note any brake status messages in the multi-
function display. Especially for high perform-
ance driving, it is important to maintain and have
the brake system checked regularly.
Driving on wet roads
Hydroplaning
If water has accumulated to a certain depth on
the road surface, there is a danger of hydro-
planing occurring, even if:
Ryou drive at low speeds.
Rthe tires have adequate tread depth.
For this reason, in the event of heavy rain or in
conditions in which hydroplaning may occur,
you must drive in the following manner:
Rlower your speed.
Ravoid ruts.
Ravoid sudden steering movements.
Rbrake carefully.
Driving on flooded roads
!Do not drive through flooded areas. Check
the depth of any water before driving through it. Drive slowly through standing water. Oth-
erwise, water may enter the vehicle interior or
the engine compartment. This can damage
the electronic components in the engine or
the automatic transmission. Water can also
be drawn in by the engine's air suction nozzles
and this can cause engine damage.
iVehicles with the AIRMATIC package:
select the raised vehicle level before driving
through a body of water.
168Driving tips
Driving and parking
Page 174 of 398
Before driving off-road, check the wheels and
replace them if necessary.
Checklist after driving off-road
!If you detect damage to the vehicle after
driving off-road, have the vehicle checked
immediately at a qualified specialist work-
shop.
Driving over rough terrain places greater
demands on your vehicle than driving on normal
roads. After driving off-road, check the vehicle.
This allows you to detect damage promptly and
reduce the risk of an accident to yourself and
other road users.
XIf the Offroad orOffroad Plus drive program
is selected: select the Individual,Sport ,
Comfort orSlippery drive program
(
Ypage 147).
XDeactivate the LOW RANGE off-road gear
(Ypage 221).
XDeactivate DSR (Ypage 218).
XLower the vehicle level again to a level suita-
ble to the road conditions, e.g. to the normal
level.
XClean the headlamps and rear lights and
check for damage.
XClean the front and rear license plates.
XClean the wheels and tires with a water jet
and remove any foreign objects.
XClean the wheels, wheel housings and the
vehicle underside with a water jet; check for
any foreign objects and damage.
XCheck whether twigs or other parts of plants
have become trapped. These increase the risk of fire and can damage fuel pipes, brake
hoses or the rubber bellows of the axle joints
and propeller shafts.
XAfter the trip, examine without fail the entire
undercarriage, wheels, tires, brakes, body-
wor k stru
cture, steering, chassis and exhaust
system for damage.
XAfter driving for extended periods across
sand, mud, gravel, water or in similarly dirty
conditions, have the brake discs, wheels,
brake pads/linings and axle joints checked
and cleaned.
XIf you detect strong vibrations after off-road
travel, check for foreign objects in the wheels
and drive train and remove them if necessary.
Foreign objects can disturb the balance and
cause vibrations.
Driving on sand
Observe the following rules when driving on
sand:
RSelect the Offroaddrive program (vehicles
without Off-Road Engineering package)
(
Ypage 219).
RSelect the Offroaddrive program (vehicles
with Off-Road Engineering package)
(
Ypage 220).
RSelect a higher vehicle level.
RAvoid high engine speeds.
RUse the left-hand steering wheel paddle
shifter to shift to a lower gear appropriate to
the terrain.
RDrive quickly to overcome the rolling resist-
ance. Otherwise the vehicle's wheels could
become stuck in loose ground.
RDrive in the tracks of other vehicles if possi-
ble. Make sure that:
-the tire ruts are not too deep.
-the sand is sufficiently firm.
-the ground clearance of the vehicle is suf-
ficient.
Tire ruts and gravel roads
!Check that the ruts are not too deep and
that your vehicle has sufficient clearance.
Otherwise, your vehicle could be damaged or
bottom out and get stuck.
Observe the following rules when driving along
ruts in off-road terrain or on roads with loose
gravel:
RSelect the Offroaddrive program (vehicles
without Off-Road Engineering package)
(
Ypage 219).
RSelect the Offroaddrive program (vehicles
with Off-Road Engineering package)
(
Ypage 220).
RSelect a higher vehicle level.
RAvoid high engine speeds.
RShift to a lower gear using the left-hand steer-
ing wheel paddle shifter.
RDrive slowly.
RWhere ruts are too deep, drive with the
wheels of one side on the center grassy area,
if possible.
172Driving tips
Driving and parking
Page 187 of 398
Roffroad level 1 for driving on easily negotiableoff-road terrain
Roffroad level 2 for driving on normal off-road
terrain
Roffroad level 3 for freeing the vehicle in par-
ticularly rough terrain at low speeds only
The individual vehicle levels differ from the nor- mal level as follows:
R–0.6 in (–15 mm) in the Sportdrive program
R+/–0 in (+/–0 mm) in the Comfortdrive pro-
gram
R+ 1.2 in (+ 30 mm) in the Offroaddrive pro-
gram
R+ 2.4 in (+ 60 mm) in the Offroad Plusdrive
program
R+ 1.2 in (+ 30 mm) in offroad level 1
R+ 2.4 in (+ 60 mm) in offroad level 2
R+ 3.5 in (+ 90 mm) in offroad level 3
Setting the vehicle level
!Make sure that there is enough ground
clearance when the vehicle is being lowered.
It could otherwise hit the ground, damaging
the underbody.
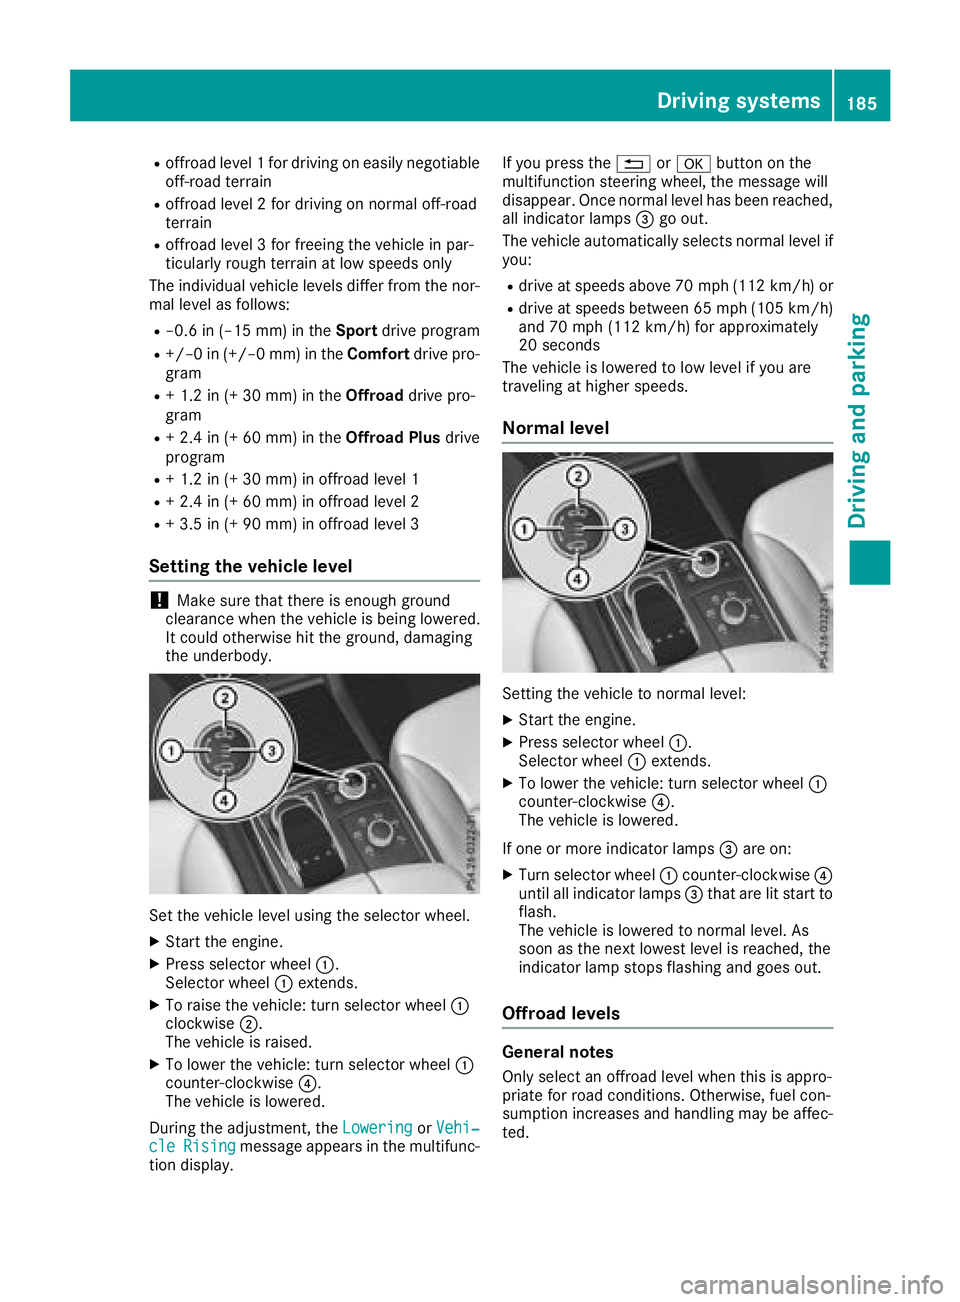
Set the vehicle level using the selector wheel.
XStart the engine.
XPress selector wheel :.
Selector wheel :extends.
XTo raise the vehicle: turn selector wheel :
clockwise ;.
The vehicle is raised.
XTo lower the vehicle: turn selector wheel :
counter-clockwise ?.
The vehicle is lowered.
During the adjustment, the Lowering
orVehi‐cleRisingmessage appears in the multifunc-
tion display. If you press the
%ora button on the
multifunction steering wheel, the message will
disappear. Once normal level has been reached, all indicator lamps =go out.
The vehicle automatically selects normal level if
you:
Rdrive at speeds above 70 mph (112 km/h) or
Rdrive at speeds between 65 mph (105 km/h)
and 70 mph (112km/ h)for approximately
20 seconds
The vehicle is lowered to low level if you are
traveling at higher speeds.
Normal level
Setting the vehicle to normal level:
XStart the engine.
XPress selector wheel :.
Selector wheel :extends.
XTo lower the vehicle: turn selector wheel :
counter-clockwise ?.
The vehicle is lowered.
If one or more indicator lamps =are on:
XTurn selector wheel :counter-clockwise ?
until all indicator lamps =that are lit start to
flash.
The vehicle is lowered to normal level. As
soon as the next lowest level is reached, the
indicator lamp stops flashing and goes out.
Offroad levels
General notes
Only select an offroad level when this is appro-
priate for road conditions. Otherwise, fuel con-
sumption increases and handling may be affec-
ted.
Driving systems185
Driving and parking
Z
Page 190 of 398
When the HOLD function is activated, the trans-
mission is automatically shifted to positionj
if:
Rthe driver's door is open and the driver's seat
belt is unfastened
Rthe engine is switched off, unless it is auto-
matically switched off by the ECO start/stop
function
The electric parking brake secures the vehicle
automatically if the HOLD function is activated
when the vehicle is stationary and:
Ra system malfunction occurs
Rthe power supply is insufficient
On steep uphill or downhill gradients or if there
is a malfunction, the transmission may also be
automatically shifted to position j.
AIRMATIC package
General notes
AIRMATIC is an air suspension system with var-
iable damping for improved driving comfort.
Level control ensures the best possible suspen-
sion and constant ground clearance, even with a
laden vehicle. When you drive fast, the vehicle is
lowered automatically to improve driving safety
and to reduce fuel consumption. There is also
the option to manually adjust the vehicle level.
AIRMATIC consists of:
Rlevel settings
Rlevel control and
RADS or ADS PLUS (Adaptive Damping Sys-
tem)
All vehicles (except Mercedes-AMG vehi-
cles): your vehicle may also be equipped with
the ACTIVE CURVE SYSTEM (
Ypage 189).
Mercedes-AMG vehicles: your vehicle is equip-
ped with the ACTIVE CURVE SYSTEM
(
Ypage 189).
Observe the notes on driving with a trailer
(
Ypage 225).
The vehicle level can be set using the DYNAMIC
SELECT controller (
Ypage 147) or the level but-
ton (Ypage 190). The setting always corre-
sponds to the last selected function.
Important safety notes
GWARNING
When the vehicle is being lowered, people
could become trapped if their limbs are
between the vehicle body and the wheels or
underneath the vehicle. There is a risk of
injury.
Make sure no one is underneath the vehicle or
in the immediate vicinity of the wheel arches
when the vehicle is being lowered.
If you unlock the vehicle or open a door, the
vehicle begins to compensate for load discrep-
ancies while still parked. However, for signifi-
cant level changes, such as after the vehicle has
been stationary for a long period, the engine
must be on. For safety reasons, the vehicle is
only lowered when the doors are closed. Low-
ering is interrupted if a door is opened, and it
continues once the door has been closed.
ADS and ADS PLUS (Adaptive Damping
System)
General notes
The Adaptive Damping System automatically
controls the calibration of the dampers. The
damping characteristics adapt to the current
operating and driving situation.
The damping is tuned individually to each wheel
and depends on:
Ryour driving style, e.g. sporty
Rthe road surface conditions
Rthe drive program selected
Rthe vehicle level setting
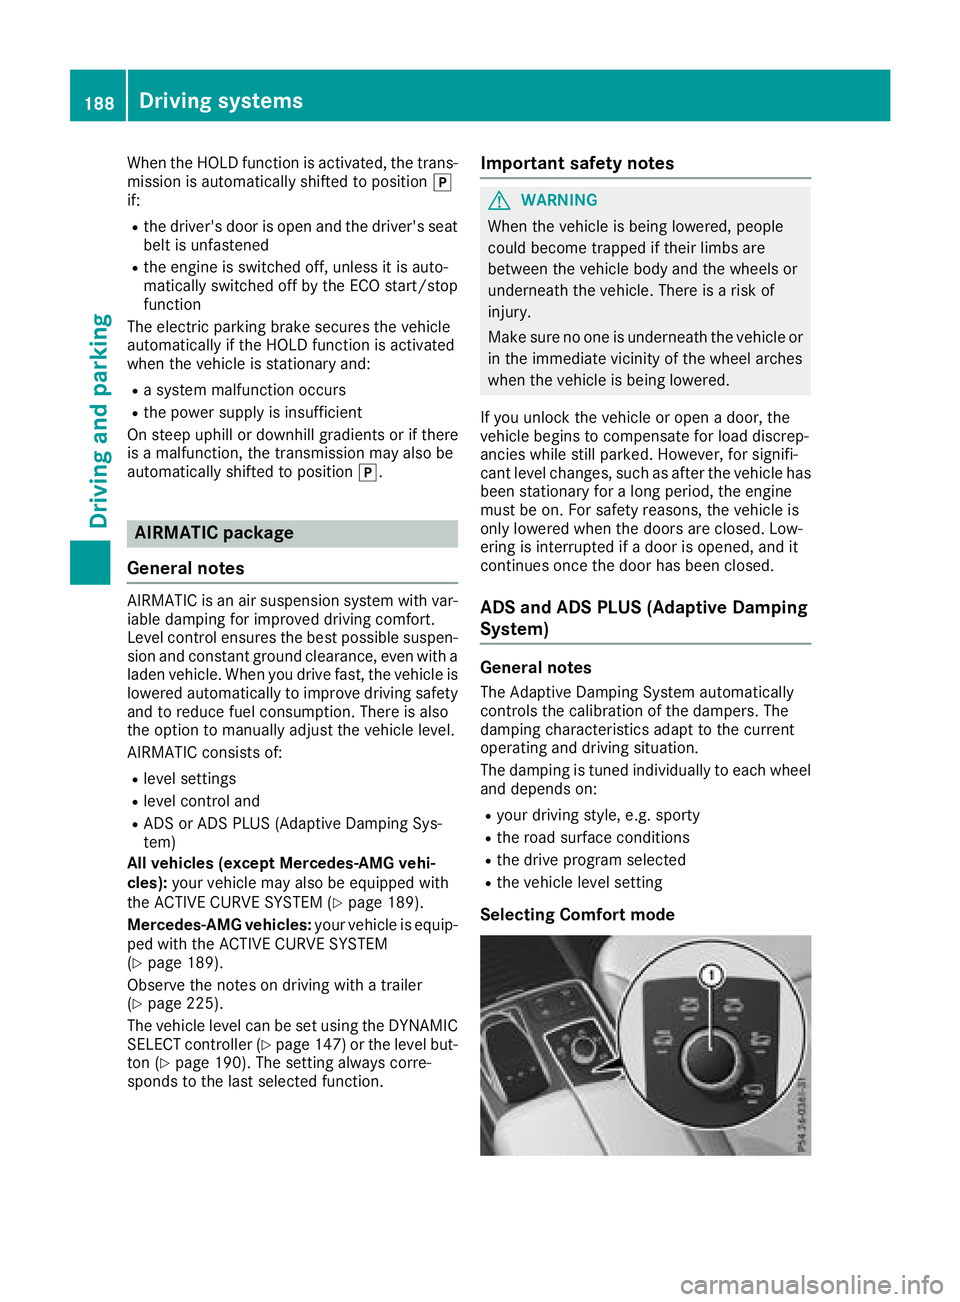
Selecting Comfort mode
188Driving systems
Driving and parking
Page 193 of 398
Vehicles with a trailer coupled:below a speed
of 19 mph (30 km/h), you can choose between
the normal and raised vehicle level.
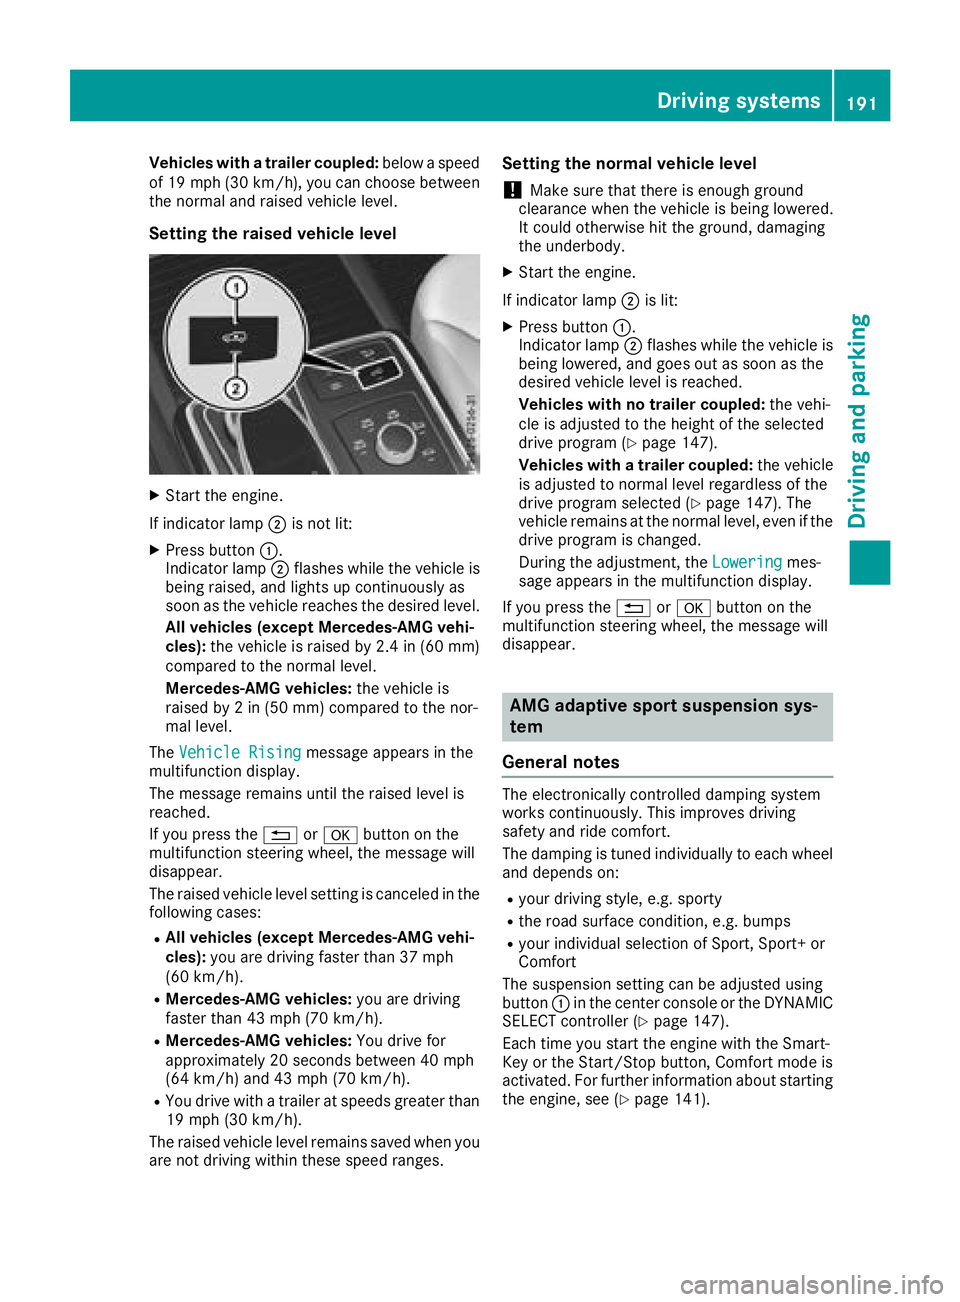
Setting the raised vehicle level
XStart the engine.
If indicator lamp ;is not lit:
XPress button :.
Indicator lamp ;flashes while the vehicle is
being raised, and lights up continuously as
soon as the vehicle reaches the desired level.
All vehicles (except Mercedes-AMG vehi-
cles): the vehicle is raised by 2.4 in (60 mm)
compared to the normal level.
Mercedes-AMG vehicles: the vehicle is
raised by 2 in (50 mm) compared to the nor-
mal level.
The Vehicle Rising
message appears in the
multifunction display.
The message remains until the raised level is
reached.
If you press the %ora button on the
multifunction steering wheel, the message will
disappear.
The raised vehicle level setting is canceled in the
following cases:
RAll vehicles (except Mercedes-AMG vehi-
cles): you are driving faster than 37 mph
(60 km/h).
RMercedes-AMG vehicles: you are driving
faster than 43 mph (70 km/h).
RMercedes-AMG vehicles: You drive for
approximately 20 seconds between 40 mph
(64 km/h) and 43 mph (70 km/h).
RYou drive with a trailer at speeds greater than
19 mph (30 km/h).
The raised vehicle level remains saved when you
are not driving within these speed ranges.
Setting the normal vehicle level
!Make sure that there is enough ground
clearance when the vehicle is being lowered.
It could otherwise hit the ground, damaging
the underbody.
XStart the engine.
If indicator lamp ;is lit:
XPress button :.
Indicator lamp ;flashes while the vehicle is
being lowered, and goes out as soon as the
desired vehicle level is reached.
Vehicles with no trailer coupled: the vehi-
cle is adjusted to the height of the selected
drive program (
Ypage 147).
Vehicles with a trailer coupled: the ve
hicle
is adjusted to normal level regardless of the
drive program selected (
Ypage 147). The
vehicle remains at the normal level, even if the
drive program is changed.
During the adjustment, the Lowering
mes-
sage appears in the multifunction display.
If you press the %ora button on the
multifunction steering wheel, the message will
disappear.
AMG adaptive sport suspension sys-
tem
General notes
The electronically controlled damping system
works continuously. This improves driving
safety and ride comfort.
The damping is tuned individually to each wheel
and depends on:
Ryour driving style, e.g. sporty
Rthe road surface condition, e.g. bumps
Ryour individual selection of Sport, Sport+ or
Comfort
The suspension setting can be adjusted using
button :in the center console or the DYNAMIC
SELECT controller (
Ypage 147).
Each time you start the engine with the Smart-
Key or the Start/Stop button, Comfort mode is
activated. For further information about starting
the engine, see (
Ypage 141).
Driving systems191
Driving and parking
Z