2018 MERCEDES-BENZ GLS SUV cooling
[x] Cancel search: coolingPage 132 of 398

ODirects the airflow through the rear air vents (Ypage 133)
PDirects the airflow through the footwell vents (Ypage 133)
QSwitches the re")
NSets rear-compartment climate control to automatic (Ypage 132)
ODirects the airflow through the rear air vents (Ypage 133)
PDirects the airflow through the footwell vents (Ypage 133)
QSwitches the rear climate control on/off (Ypage 131)
RReduces the airflow (Ypage 133)
Canada only
Front control panel
:Sets the temperature, left (Ypage 132)
;Defrosts the windshield (Ypage 133)
=Switches the ZONE function on/off (Ypage 133)
?Switches cooling with air dehumidification on/off (Ypage 131)
Switches the residual heat on or off (
Ypage 135)
ASwitches the rear window defroster on/off (Ypage 134)
BSets the temperature, right (Ypage 132)
CSwitches the rear climate control on/off
DActivates/deactivates climate control (Ypage 131)
ESets the air distribution (Ypage 133)
FIncreases the airflow (Ypage 133)
GReduces the airflow (Ypage 133)
HDisplay
IAdjusts the climate mode settings (Ypage 132)
JSwitches air-recirculation mode on/off (Ypage 135)
KSets climate control to automatic (Ypage 132)
Rear control panel
LIncreases the airflow (Ypage 133)
MSets the temperature (Ypage 132)
NSets rear-compartment climate control to automatic (Ypage 132)
ODirects the airflow through the rear air vents (Ypage 133)
PDirects the airflow through the footwell vents (Ypage 133)
130Overview of climate control systems
Climate control
Page 133 of 398

RReduces the airflow (Ypage 133)
Optimum use of automatic climate
control
The following contains notes and recommenda-
tions on optimum use of the")
QSwitches the rear climate control on/off (Ypage 131)
RReduces the airflow (Ypage 133)
Optimum use of automatic climate
control
The following contains notes and recommenda-
tions on optimum use of the dual-zone auto-
matic climate control or 3-zone automatic cli-
mate control.
RYou can switch on climate control by using the
Ãand¿ orà andÁ buttons.
The indicator lamps in the Ãand
¿ buttons or the ÃandÁ buttons
light up.
RVehicles with 3-zone automatic climate
control: in automatic mode, you can also use
the ñ button to set a climate mode
(FOCUS/MEDIUM/DIFFUSE). The MEDIUM
level is recommended.
RSet the temperature to 72 ‡ (22 †).
ROnly use the "Windshield defrosting" function
briefly until the windshield is clear again.
ROnly use air-recirculation mode briefly, e.g. if
there are unpleasant outside odors or when in
a tunnel. The windows could otherwise fog up,
since no fresh air is drawn into the vehicle in
air-recirculation mode.
RVehicles with 3-zone automatic climate
control: use the ZONE function to adopt the
temperature settings on the driver's side for
the front-passenger side and the rear com-
partment as well. The indicator lamp above
the á button goes out.
RVehicles with 3-zone automatic climate
control: use the "residual heat" function if
you want to heat or ventilate the vehicle inte- rior when the ignition is switched off. The
residual heat function can only be activated or
deacti
vated with the ignition switched off.
RIf you change the settings of the climate con-
trol system, the climate status display
appears for approximately three seconds at
the bottom of the screen in the multimedia
system display. You will see the current set-
tings of the various climate control functions.
During automatic engine switch-off, the climate
control system only operates at a reduced capa-
city. If you require the full climate control output,
you can switch off the ECO start/stop function
by pressing the ECO button (
Ypage 145).
Operating the climate control sys-
tems
Activating/deactivating climate con-
trol
General notes
When the climate control is switched off, the air
supply and air circulation are also switched off.
The windows could fog up. Therefore, switch off
climate control only briefly
Activate climate control primarily using the
à button (
Ypage 132).
In the rear compartment, you can also switch
climate control on and off using the Ãand
^ buttons.
Activating/deactivating
XTurn the SmartKey to position 2in the igni-
tion lock (Ypage 140).
XTo activate: press theÃbutton.
The indicator lamp in the Ãbutton lights
up. Airflow and air distribution are set to auto-
matic mode.
XTo deactivate: press the^button.
The indicator lamp in the ^button lights
up.
Switching cooling with air dehumidi-
fication on/off
Activating/deactivating
XTo activate: press the¿orÁ button.
The indicator lamp in the ¿orÁ button
lights up.
XTo deactivate: press the¿orÁ but-
ton.
The indicator lamp in the ¿orÁ button
goes out. The "Cooling with air dehumidifica-
tion" function has a delayed switch-off fea-
ture.
Operating the climate control systems131
Climate control
Page 134 of 398

Problems with the "Cooling with air dehumidification" function
ProblemPossible causes/consequences andMSolutions
The indicator lamp in the
¿orÁ button
flashes three times or
remains off. The "Cool-
ing with air dehumidifi-
cation" function cannot
be switched on.Cooling with air dehumidification has been deactivated due to a mal-
function.
XVisit a qualified specialist workshop.
Setting climate control to automatic
General notes
In automatic mode, the set temperature is main-
tained automatically at a constant level. The
system automatically regulates the temperature
of the dispensed air, the airflow and the air dis-
tribution.
The "Cooling with air dehumidification" function
is activated automatically in automatic mode.
In the rear compartment, you can also switch
climate control for the rear seats to automatic
mode using the Ãbutton.
Automatic control
XTurn the SmartKey to position 2in the igni-
tion lock (Ypage 140).
XSet the desired temperature.
XTo activate: press theÃbutton.
The indicator lamp in the Ãbutton lights
up. Automatic air distribution and airflow are
activated.
XTo switch to manual mode: press the_
button.
3-zone automatic climate control: when auto-
matic mode is activated, you can select a cli-
mate mode (
Ypage 132).
Adjusting the climate mode settings
You can select the following climate mode set-
tings in automatic mode:
FOCUS high airflow, slightly cooler setting
MEDIUM medium airflow, standard setting
DIFFUSE low airflow, slightly warmer and draft- free setting
XTurn the SmartKey to position 2in the igni-
tion lock (Ypage 140).
XPress the Ãbutton.
XPress the ñbutton repeatedly until the
desired climate mode appears in the display.
Setting the temperature
Dual-zone automatic climate control
Different temperatures can be set for the driv-
er's and front-passenger sides.
XTurn the SmartKey to position 2in the igni-
tion lock (Ypage 140).
XTo increase or decrease: turn control:or
B counter-clockwise or clockwise
(
Ypage 125).
Only change the temperature setting in small
increments. Start at 72 ‡ (22 †).
3-zone automatic climate control
You can select different temperature settings
for the driver's and front-passenger sides as well
as for the rear compartment.
XTurn the SmartKey to position 2in the igni-
tion lock (Ypage 140).
XTo increase or decrease temperature in
the front compartment: turn control:or
B counter-clockwise or clockwise
(
Ypage 127).
Only change the temperature setting in small
increments. Start at 72 ‡ (22 †).
XTo increase or reduce the temperature in
the rear compartment using the front con- trol panel: press theábutton.
The indicator lamp in the ábutton goes
out.
132Operating the climate control systems
Climate control
Page 136 of 398
.
XTo activate: press the¬ button.
The indicator lamp in th e¬ buttonlights
up.
The climat econtrol system s")
Activating/deactivating
XTurn theSmartKey to position 2in th eigni-
tion loc k (Ypage 140).
XTo activate: press the¬ button.
The indicator lamp in th e¬ buttonlights
up.
The climat econtrol system switches to th e
followin gsettings:
Rhigh airflow
Rhigh temperature
Rair distribution to th ewindshield and fron t
side windows
Rair-recirculation mod eoff
XTo deactivate: press the¬ button.
The indicator lamp in th e¬ buttongoe s
out .The previously selected setting sare
restored .Air-recirculation mod eremain s
deactivated.
MAX COOL maximum cooling
The MA XCOOL function is only available in vehi-
cle sfor th eUSA.
MA XCOOL is only operational when th eengin e
is running.
XTo activate: press theÙ button.
The indicator lamp in th eÙ buttonlights
up.
XTo deactivate: press theÙ button.
The indicator lamp in th eÙ buttongoe s
out .The previously selected setting sare
restored .
When you activat eMA XCOOL ,climat econtrol
switches to th efollowin gfunctions:
Rmaximum coolin g
Rmaximum airflow
Rair-recirculation mod eon
Defrosting the windows
Windows fogged up onthe inside
XActivat eth e¿ orÁ coolin gwit hair
dehumidification function .
XActivateautomatic mod eÃ.
XIf th ewindows continu eto fog up, activat eth e
"windshield defrosting "function
(
Ypage 133).
iYou should only select this setting until th e
windshield is clear again .
Windows fogged uponthe outside
XActivat eth ewindshield wipers.
XPress th e_ buttonrepeatedly until th e
P orO symbol appear sin th edisplay.
iYou should only select this setting until th e
windshield is clear again .
iIf you clean thewindows regularly, they do
no tfog up so quickly.
Rear window defros ter
Genera l notes
The rear window defroste rhas ahigh curren t
draw .You should therefor eswitch it off as soo n
as th erear window is clear. Otherwise ,th erear
window defroste rswitches off automatically
after several minutes.
If th ebattery voltag eis to olow, th erear window
defroste rmay switch off .
Activating/deactivating
XTurn theSmartKey to position 2in th eigni-
tion loc k (Ypage 140).
XPress th e¤ button.
The indicator lamp in th e¤ buttonlights
up or goe sout .
134Operating the climate control systems
Climate control
Page 137 of 398

Problems with the rear window defroster
ProblemPossible causes/consequences andMSolutions
The rear window
defroster has deactiva-
ted prematurely or can-
not be activated.The battery has not been sufficiently charged.
XSwitch off any consumers that are not required, e.g. reading lamps,
interior lighting or the seat heating.
When the battery is sufficiently charged, the rear window defroster
can be activated again.
Switching air-recirculation mode
on/off
General notes
You can deactivate the flow of fresh air if
unpleasant odors are entering the vehicle from
outside. The air already inside the vehicle will
then be recirculated.
If you switch on air-recirculation mode, the win-
dows can fog up more quickly, in particular at
low temperatures. Only use air-recirculation
mode briefly to prevent the windows from fog-
ging up.
Activating/deactivating
XTurn the SmartKey to position 2in the igni-
tion lock (Ypage 140).
XTo activate: press thedbutton.
The indicator lamp in the dbutton lights
up.
iIn the event of high pollution levels (3-zone
automatic climate control only) or at high out-
side temperatures, air-recirculation mode is
automatically activated. When air-recircula-
tion mode is activated automatically, the indi-
cator lamp in the dbutton is not lit.
Outside air is added after about 30 minutes.
XTo deactivate: press thedbutton.
The indicator lamp in the dbutton goes
out.
iAir-recirculation mode deactivates auto-
matically:
Rafter approximately five minutes at outside
temperatures below approximately 41 ‡
(5 †)
Rafter approximately five minutes if cooling
with air dehumidification is deactivated
Rafter approximately 30 minutes at outside
temperatures above approximately 41 ‡ (5 †) if the "Cooling with air dehumidifi-
cation" function is activated
Switching the residual heat on or off
General notes
The residual heat function is only available on
vehicles for Canada.
It is possible to make use of the residual heat of
the engine to continue heating the stationary
vehicle for up to 30 minutes after the engine has
been switched off. The heating time depends on
the set interior temperature.
Activating/deactivating
XTo activate: press theÌorÁ button.
The indicator lamp in the ÌorÁ button
lights up.
iThe blower will run at a low speed regardless
of the airflow setting.
iIf you activate the residual heat function at
high temperatures, only the ventilation will be
activated. The blower runs at medium speed.
XTo deactivate: press theÌorÁ but-
ton.
The indicator lamp in the ÌorÁ button
goes out.
Residual heat is deactivated automatically:
Rafter approximately 30 minutes
Rwhen the ignition is switched on
Rif the battery voltage drops
Ionization
Ionization is used to purify the air in the vehicle
interior and attain an improved interior climate.
Operating the climate control systems135
Climate control
Page 138 of 398
The ionization of the interior air is odorless and
cannot be perceived directly in the vehicle inte-
rior.
You can switch ionization on and off via the mul-
timedia system (see the Digital Operator's Man-
ual).
Ionization can only be operated when the auto-
matic climate control is switched on. The side air
vent on the driver's side must be open.
Setting the air vents
Important safety notes
GWARNING
Very hot or very cold air can flow from the air
vents. This could result in burns or frostbite in
the immediate vicinity of the air vents. There
is a risk of injury.
Make sure that all vehicle occupants always
maintain a sufficient distance to the air out-
lets. If necessary, redirect the airflow to
another area of the vehicle interior.
In order to ensure the direct flow of fresh air
through the air vents into the vehicle interior,
please observe the following notes:
Rkeep the air inlet grille on the hood and in the
engine compartment on the front-passenger
side free of blockages, such as ice, snow or
leaves.
Rnever cover the air vents or air intake grilles in
the vehicle interior.
iFor virtually draft-free ventilation, adjust the
sliders of the air vents to the center position.
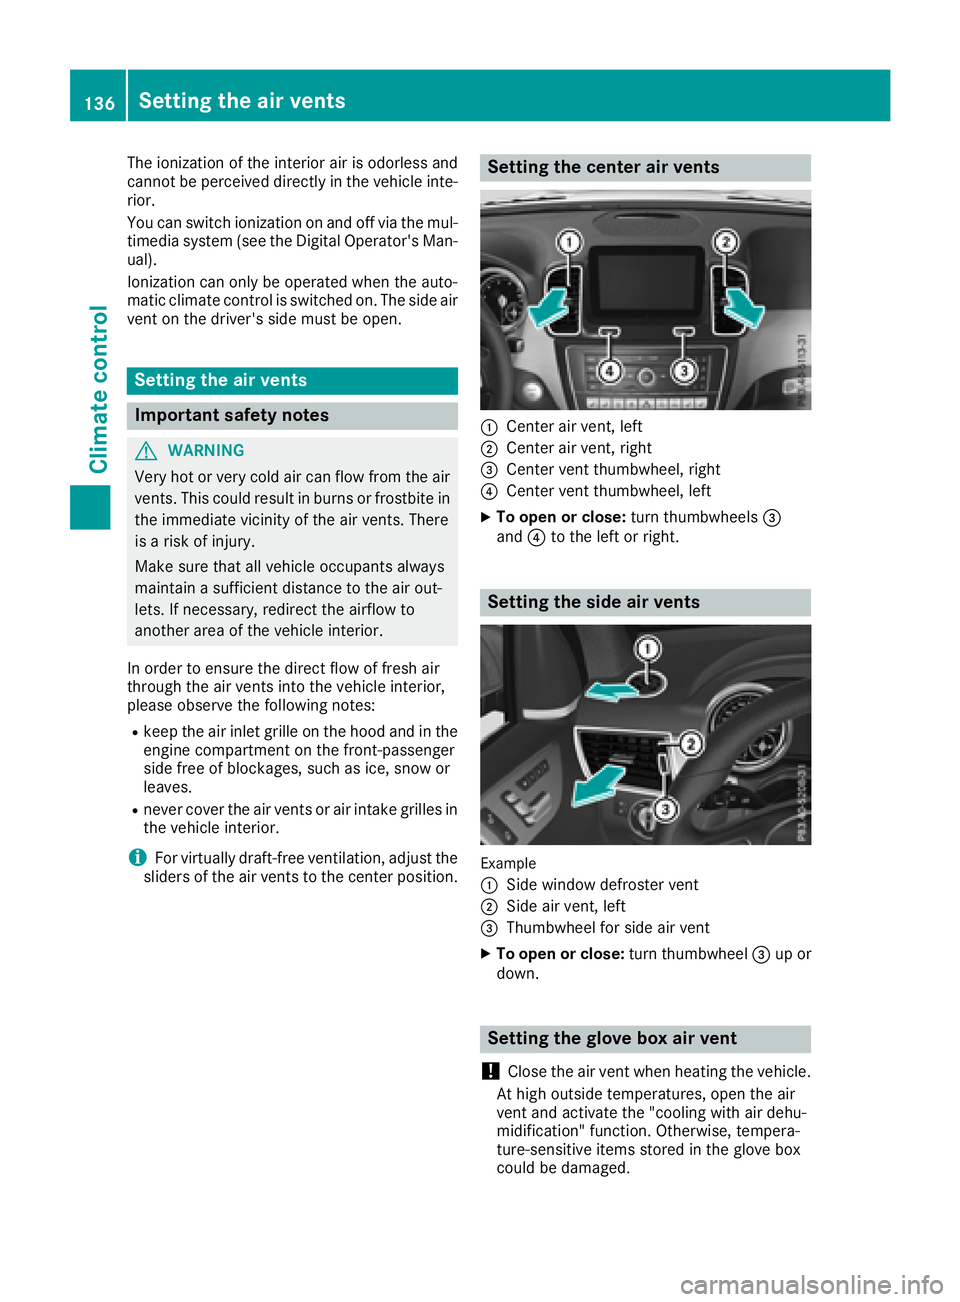
Setting the center air vents
:Center air vent, left
;Center air vent, right
=Center vent thumbwheel, right
?Center vent thumbwheel, left
XTo open or close: turn thumbwheels=
and ?to the left or right.
Setting the side air vents
Example
:
Side window defroster vent
;Side air vent, left
=Thumbwheel for side air vent
XTo open or close: turn thumbwheel=up or
down.
Setting the glove box air vent
!
Close the air vent when heating the vehicle.
At high outside temperatures, open the air
vent and activate the "cooling with air dehu-
midification" function. Otherwise, tempera-
ture-sensitive items stored in the glove box
could be damaged.
136Setting the air vents
Climate control
Page 227 of 398

Ris affected more by strong crosswinds
Rdemands more sensitive steering
Rhas a larger turning circle
This could impair the handling characteristics.
When towing a trailer, always adjust your speed
to the current road and weather conditions. Do
not exceed the maximum permissible speed for
your vehicle/trailer combination.
Notes on towing a trailer
General notes
!If you have a trailer tow hitch retrofitted,
changes to the cooling system and drive train
may be necessary, depending on the vehicle
type.
If you have a trailer tow hitch retrofitted,
observe the anchorage points on the chassis
frame.
RDo not exceed the legally prescribed maxi-
mum speed for vehicle/trailer combinations
in the relevant country.
This lowers the risk of an accident.
ROnly install an approved trailer coupling on
your vehicle.
More information on availability and installa-
tion can be obtained at any qualified special-
ist workshop.
RThe bumpers of your vehicle are not suitable
for installing detachable trailer couplings.
RDo not install hired trailer couplings or other
detachable trailer couplings on the bumpers
of your vehicle.
RIf you no longer need the ball coupling,
remove it from the ball coupling recess. This
will reduce the risk of damage to the ball cou-
pling.
When towing a trailer, set the tire pressure on
the rear axle of the towing vehicle for the max-
imum load. You will find the values in the tire
pressure table in the fuel filler flap of the vehicle (
Ypage 372).
Please note that when towing a trailer, the fol-
lowing driving systems have limited availability
or are not available at all:
RParking Assist PARKTRONIC (Ypage 192)
RBlind Spot Assist (Ypage 209)
RActive Lane Keeping Assist (Ypage 215) On vehicles without level control, the height of
the ball coupling will alter according to the load
placed on the vehicle. If necessary, use a trailer
with a height-adjustable drawbar.
You will find installing dimensions and loads
under "Technical data" (
Ypage 395).
Driving tips
Also observe the notes on pulling away with a
trailer (Ypage 143).
The maximum permissible speed for vehicle/
trailer combinations depends on the type of
trailer. Before beginning the journey, check the
trailer's documents to see what the maximum
permissible speed is for your trailer. Observe the
legally permissible maximum speed in the rele-
vant country.
For certain Mercedes-Benz vehicles, the maxi-
mum permissible rear axle load is increased
when towing a trailer. See "Technical data" to
find out whether this applies to your vehicle
(
Ypage 395). If you utilize any of the added
maximum rear axle load when towing a trailer,
the vehicle/trailer combination may not exceed
a maximum speed of 60 mph (100 km/h) for
reasons concerning the operating permit. This
also applies in countries in which the maximum
permissible speed for car/trailer combinations
is greater than 60 mph (100 km/h).
When towing a trailer, your vehicle's handling
characteristics will be different in comparison
with when driving without a trailer.
Use the left-hand steering wheel paddle shifter
to shift into a lower gear in good time on long
and steep downhill gradients.
This also applies if you have activated cruise
control or Distance Pilot DISTRONIC.
This will use the braking effect of the engine, so that less braking will be required to maintain the
speed. This relieves the load on the brake sys-
tem and prevents the brakes from overheating
and wearing too quickly. If you need additional
braking, depress the brake pedal repeatedly
rather than continuously.
Driving tips
If the trailer swings from side to side:
XDo not accelerate.
XDo not counter-steer.
XBrake if necessary.
Towing a trailer225
Driving and parking
Z
Page 291 of 398

Warning/
indicator
lampNSignal type
Possible causes/consequences and M
Solutions
?NThe red coolant warning lamp comes on while the engine is running.
The coolant level is too low.
If the coolant level is correct, the airflow to the engine radiator may be blocked or
the electric engine radiator fan may be defective.
The coolant is too hot and the engine is no longer being cooled sufficiently.
XObserve the additional display messages in the multifunction display.
XPull over and stop the vehicle safely and switch off the engine, paying attention
to road and traffic conditions.
XSecure the vehicle against rolling away (Ypage 161).
XLeave the vehicle and keep a safe distance from the vehicle until the engine has cooled down.
XCheck the coolant level and add coolant, observing the warning notes
(Ypage 328).
XIf you have to add coolant frequently, have the engine cooling system checked.
XMake sure that the air supply to the engine radiator is not blocked, e.g. by snow,
slush or ice.
XDo not start the engine again until the coolant temperature is below 248 ‡
(120 †). Otherwise, the engine could be damaged.
XDrive to the nearest qualified specialist workshop.
XAvoid heavy loads on the engine as you do so, e.g. driving in mountainous terrain
and stop-and-go traffic.
?N The red coolant warning lamp comes on while the engine is running.
The coolant temperature has exceeded 248 ‡ (120 †). The airflow to the engine
radiator may be blocked or the coolant level may be too low.
GWARNING
The engine is not being cooled sufficiently and may be damaged.
Do not drive when your engine is overheated. This can cause some fluids which
may have leaked into the engine compartment to catch fire.
Steam from the overheated engine can also cause serious burns which can occur
just by opening the hood.
There is a risk of injury.
XObserve the additional display messages in the multifunction display.
XPull over and stop the vehicle safely and switch off the engine, paying attention
to road and traffic conditions.
XSecure the vehicle against rolling away (Ypage 161).
XLeave the vehicle and keep a safe distance from the vehicle until the engine has
cooled down.
XCheck the coolant level and add coolant, observing the warning notes
(Ypage 328).
XIf you have to add coolant frequently, have the engine cooling system checked.
XMake sure that the air supply to the engine radiator is not blocked, e.g. by snow,
slush or ice.
Warning and indicator lamps in the instrument cluster289
On-board computer and displays
Z