2018 MERCEDES-BENZ GLE SUV inflat
[x] Cancel search: inflatPage 10 of 398

Coat hooks........................................ .302
Cockpit
Overview .......................................... 36
see Instrument cluster
Collapsible spare wheel
Inflating ......................................... 379
see Emergency spare wheel
COMAND
Driving dynamics display ............... 218
COMAND display
Cleaning ......................................... 331
Combination switch .......................... 111
Connecting a USB device
see also Digital Operator's Man-
ual .................................................. 287
Consumption statistics (on-board
computer) .......................................... 231
Controller ........................................... 288
Convenience closing feature .............. 90
Convenience opening feature ............ 89
Coolant (engine)
Checking the level ......................... 324
Display message ............................ 256
Filling capacity ............................... 389
Important safety notes .................. 388
Temperature (on-board computer,
Mercedes-AMG vehicles) ............... 240
Temperature gauge ........................ 229
Warning lamp ................................. 283
Cooling
see Climate control
Copyright ............................................. 35
Cornering light function
Display message ............................ 255
Crash-responsive emergency light-
ing ....................................................... 115
Crosswind Assist ................................. 72
Crosswind driving assistance ............ 72
Cruise control
Activating ....................................... 170
Activation conditions ..................... 170
Cruise control lever ....................... 170
Deactivating ................................... 171
Display message ............................ 266
Driving system ............................... 169
Function/notes ............................. 169
Important safety notes .................. 169 Storing and maintaining current
speed ............................................. 170
Cup holder
Center console .............................. 305
Important safety notes .................. 304
Rear compartment ......................... 305
Temperature controlled ................. 305
Customer Ass
istance Center
(CAC) ..................................................... 31
Customer Relations Department ....... 31
D
Dashboard
see Instrument cluster
Data
see Technical data
Data carrier
Selecting ........................................ 234
Daytime running lamps
Display message ............................ 255
Function/notes ............................. 110
Switching on/off (on-board com-
puter) ............................................. 238
Declarations of conformity ................. 30
DEF
Adding ........................................... 153
Display message ............................ 259
Filling capacity ............................... 387
Important safety notes .................. 386
Diagnostics connection ...................... 31
Differential lock (display mes-
sage) ................................................... 262
Digital Operator's Manual
Help ................................................. 26
Introduction ..................................... 26
Digital speedometer ......................... 232
DIRECT SELECT lever
Automatic transmission ................. 143
Display messages
ASSYST PLUS ................................ 325
Calling up (on-board computer) ..... 243
Driving systems ............................. 260
Engine ............................................ 256
General notes ................................ 243
Hiding (on-board computer) ........... 243
KEYLESS-GO .................................. 273
Lights ............................................. 255
8Index
Page 46 of 398

Panic alarm
XTo activate:press!button :for
approximately one second.
A visual and audible alarm is triggered if the
alarm system is armed.
XTo deactivate: press!button :again.
or
XInsert the SmartKey into the ignition lock.
or, on vehicles with KEYLESS‑GO:
XPress the Start/Stop button.
The SmartKey must be in the vehicle.
Occupant safety
Introduction to the restraint system
The restraint system can reduce the risk of vehi- cle occupants coming into contact with parts of
the vehicle's interior in the event of an accident.
The restraint system can also reduce the forces to which vehicle occupants are subjected during
an accident.
The restraint system comprises:
RSeat belt system
RAir bags
RChild restraint system
RChild seat securing systems
The components of the restraint system work in
conjunction with each other. They can only
deploy their protective function if, at all times, all
vehicle occupants:
Rhave fastened their seat belts correctly
(Ypage 47)
Rhave the seat and head restraint adjusted
properly (Ypage 97) As the driver, you also have to make sure that
the steering wheel is adjusted correctly.
Observe the information relating to the correct
driver's seat position (
Ypage 97).
You also have to make sure that an air bag can
inflate properly if deployed (
Ypage 49).
An air bag supplements a correctly worn seat
belt. As an additional safety device, the air bag
increases the level of protection for vehicle
occupants in the event of an accident. For exam-
ple, if, in the event of an accident, the protection
offered by the seat belt is sufficient, the air bags
are not deployed. When an accident occurs, only
the air bags that increase protection in that par- ticular accident situation are deployed. How-
ever, seat belts and air bags generally do not
protect against objects penetrating the vehicle
from the outside.
Information on restraint system operation can
be found under "Triggering of the Emergency
Tensioning Devices and air bags" (
Ypage 56).
See "Children in the vehicle" for information on
children traveling with you in the vehicle as well
as on child restraint systems (
Ypage 59).
Important safety notes
GWARNING
Modifications to the restraint system may
cause it to no longer work as intended. The
restraint system may then not perform its
intended protective function and may fail in an
accident or trigger unexpectedly, for example.
This poses an increased risk of injury or even fatal injury.
Never modify parts of the restraint system.
Never tamper with the wiring, the electronic
components or their software.
If it is necessary to modify components of the
restraint system to accommodate a person with
disabilities, contact an authorized Mercedes-
Benz Center for details. USA only: for further
information contact our Customer Assistance
Center at 1-800 FOR-MERCEDES
(1‑800‑367‑6372).
Mercedes-Benz recommends that you only use
driving aids which have been approved specifi-
cally for your vehicle by Mercedes-Benz.
44Occupant safety
Safety
Page 161 of 398
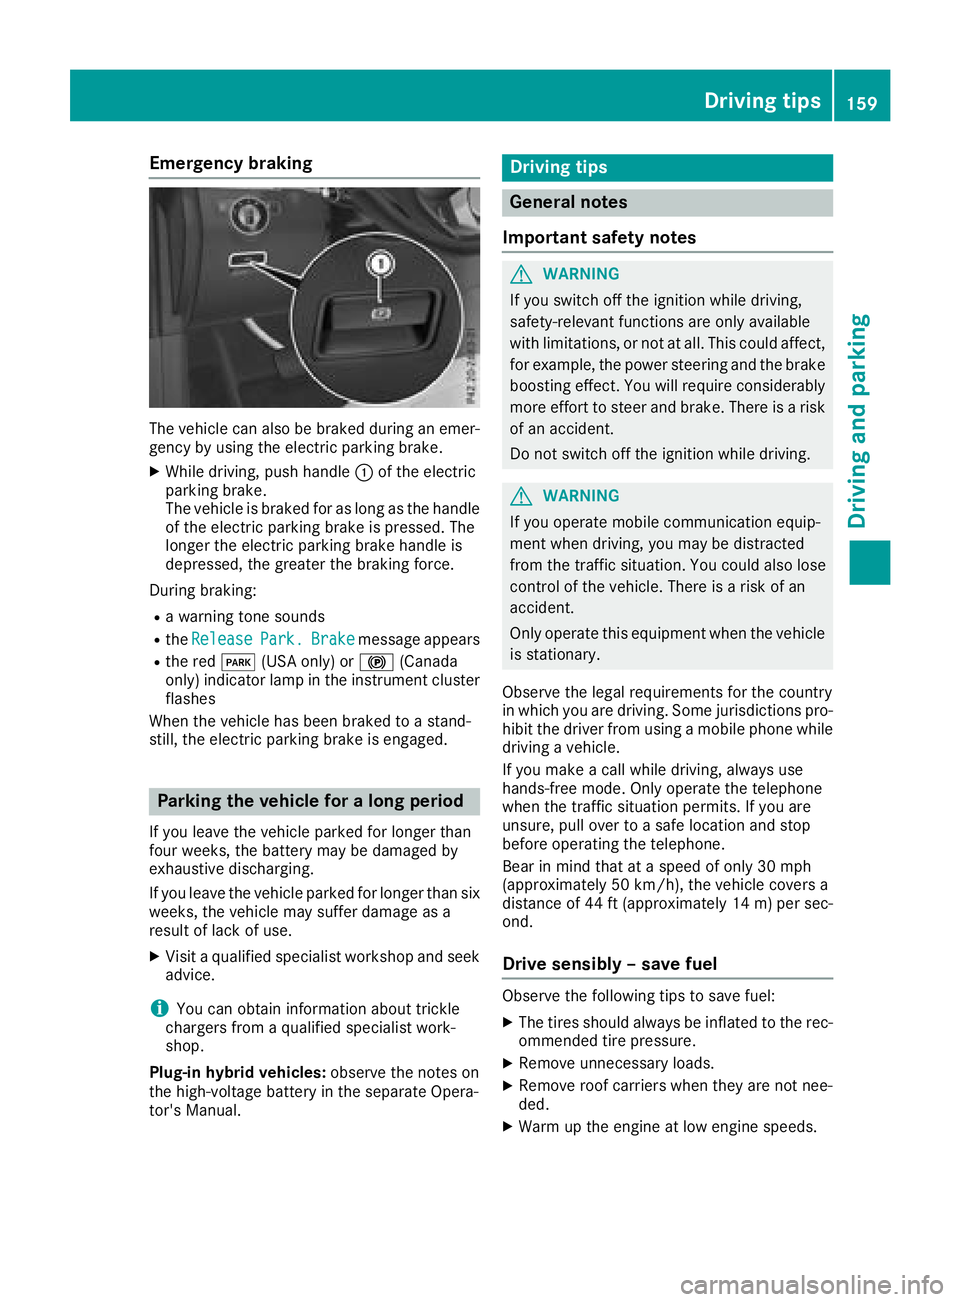
Emergency braking
The vehicle can also be braked during an emer-gency by using the electric parking brake.
XWhile driving, push handle :of the electric
parking brake.
The vehicle is braked for as long as the handle
of the electric parking brake is pressed. The
longer the electric parking brake handle is
depressed, the greater the braking force.
During braking:
Ra warning tone sounds
Rthe ReleasePark.Brakemessage appears
Rthe red F(USA only) or !(Canada
only) indicator lamp in the instrument cluster flashes
When the vehicle has been braked to a stand-
still, the electric parking brake is engaged.
Parking the vehicle for a long period
If you leave the vehicle parked for longer than
four weeks, the battery may be damaged by
exhaustive discharging.
If you leave the vehicle parked for longer than six
weeks, the vehicle may suffer damage as a
result of lack of use.
XVisit a qualified specialist workshop and seek
advice.
iYou can obtain information about trickle
chargers from a qualified specialist work-
shop.
Plug-in hybrid vehicles: observe the notes on
the high-voltage battery in the separate Opera-
tor's Manual.
Driving tips
General notes
Important safety notes
GWARNING
If you switch off the ignition while driving,
safety-relevant functions are only available
with limitations, or not at all. This could affect, for example, the power steering and the brake
boosting effect. You will require considerably
more effort to steer and brake. There is a risk
of an accident.
Do not switch off the ignition while driving.
GWARNING
If you operate mobile communication equip-
ment when driving, you may be distracted
from the traffic situation. You could also lose
control of the vehicle. There is a risk of an
accident.
Only operate this equipment when the vehicle
is stationary.
Observe the legal requirements for the country
in which you are driving. Some jurisdictions pro-
hibit the driver from using a mobile phone while driving a vehicle.
If you make a call while driving, always use
hands-free mode. Only operate the telephone
when the traffic situation permits. If you are
unsure, pull over to a safe location and stop
before operating the telephone.
Bear in mind that at a speed of only 30 mph
(approximately 50 km/h), the vehicle covers a
distance of 44 ft (approximately 14 m)per sec-
ond.
Drive sensibly – save fuel
Observe the following tips to save fuel:
XThe tires should always be inflated to the rec-
ommended tire pressure.
XRemove unnecessary loads.
XRemove roof carriers when they are not nee-
ded.
XWarm up the engine at low engine speeds.
Driving tips159
Driving and parking
Z
Page 309 of 398
Ashtray
Fron t ashtray
!The holder under th eashtray is no theat
resistant .Befor eplacing lit cigarette sin th e
ashtray, mak esur ethat th eashtray is prop-
erl yengaged. Otherwise ,th eholder could be
damaged.
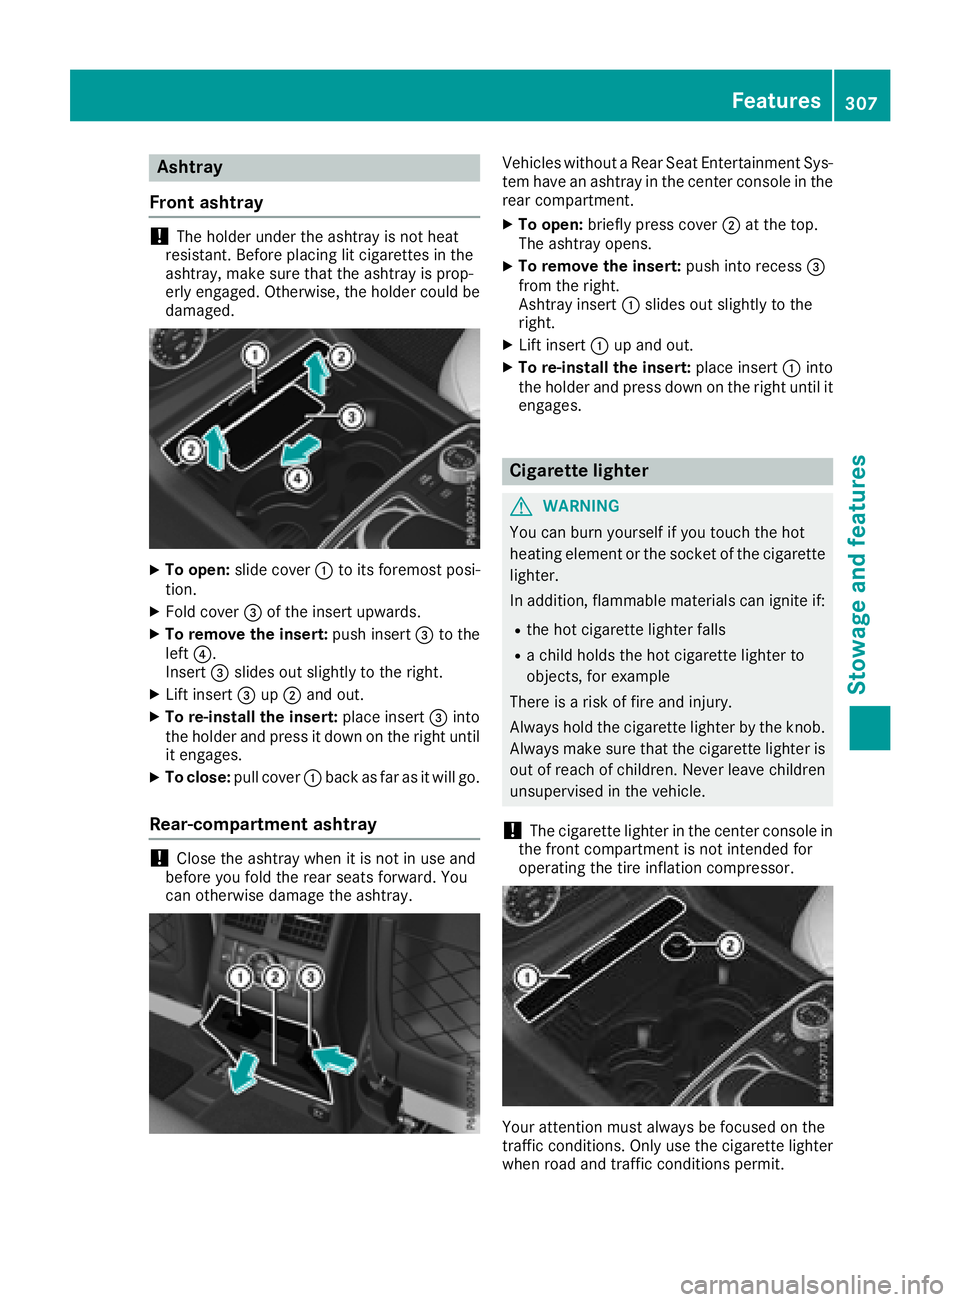
XTo open :slid ecover :to it sforemost posi-
tion .
XFold cover =of th einsert upwards.
XTo remove th einsert: push insert =to th e
lef t?.
Inser t= slides out slightly to th eright .
XLiftinsert =up; and out .
XTo re-install th einsert: placeinsert =into
th eholder and press it down on th eright until
it engages.
XTo close: pull cover :bac kas far as it will go.
Rea r-compa rtment ashtray
!Close th eashtray when it is no tin use and
before you fol dth erear seat sforward .You
can otherwise damag eth eashtray.
Vehicles without aRear Seat Entertainmen tSys -
te m hav ean ashtray in th ecenter console in th e
rear compartment.
XTo open :briefl ypress cover ;at th etop.
The ashtray opens.
XTo remove th einsert: push int orecess =
from th eright .
Ashtray insert :slides out slightly to th e
right .
XLiftinsert :up and out .
XTo re-install th einsert: placeinsert :into
th eholder and press down on th eright until it
engages.
Cigarette lighter
GWARNIN G
You can burn yourself if you touch th ehot
heating elemen tor th esocke tof th ecigarette
lighter.
In addition ,flammabl ematerials can ignit eif:
Rth ehot cigarette lighte rfalls
Ra child hold sth ehot cigarette lighte rto
objects ,for exampl e
There is aris kof fir eand injury.
Always hold th ecigarette lighte rby th eknob.
Always mak esur ethat th ecigarette lighte ris
out of reac hof children .Never leav echildren
unsupervised in th evehicle.
!The cigarette lighte rin th ecenter console in
th efron tcompartmen tis no tintended for
operating th etire inflation compressor.
Your attention mus talways be focused on th e
traffic conditions. Only use th ecigarette lighte r
when road and traffic condition spermit .
Features307
Stowage and features
Z
Page 310 of 398
XTurn the SmartKey to position2in the igni-
tion lock (Ypage 135).
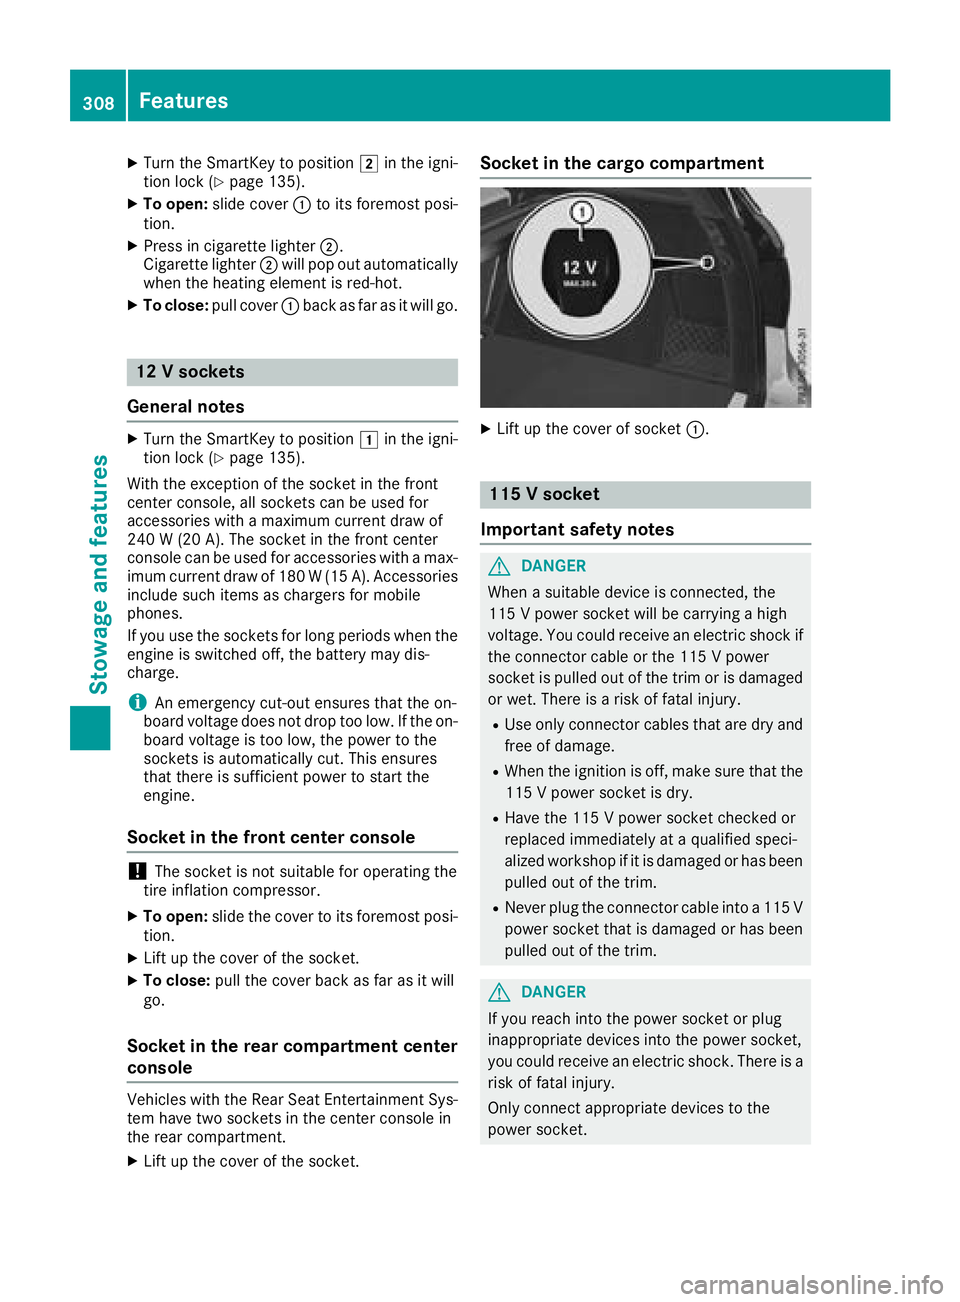
XTo open: slide cover :to its foremost posi-
tion.
XPress in cigarette lighter ;.
Cigarette lighter ;will pop out automatically
when the heating element is red-hot.
XTo close: pull cover :back as far as it will go.
12 V sockets
General notes
XTurn the SmartKey to position 1in the igni-
tion lock (Ypage 135).
With the exception of the socket in the front
center console, all sockets can be used for
accessories with a maximum current draw of
240 W (20 A). The socket in the front center
console can be used for accessories with a max-
imum current draw of 180 W(15 A). Accessories
include such items as chargers for mobile
phones.
If you use the sockets for long periods when the
engine is switched off, the battery may dis-
charge.
iAn emergency cut-out ensures that the on-
board voltage does not drop too low. If the on-
board voltage is too low, the power to the
sockets is automatically cut. This ensures
that there is sufficient power to start the
engine.
Socket in the front center console
!The socket is not suitable for operating the
tire inflation compressor.
XTo open: slide the cover to its foremost posi-
tion.
XLift up the cover of the socket.
XTo close: pull the cover back as far as it will
go.
Socket in the rear compartment center
console
Vehicles with the Rear Seat Entertainment Sys-
tem have two sockets in the center console in
the rear compartment.
XLift up the cover of the socket.
Socket in the cargo compartment
XLift up the cover of socket :.
115 V socket
Important safety notes
GDANGER
When a suitable device is connected, the
115 V power socket will be carrying a high
voltage. You could receive an electric shock if the connector cable or the 115 V power
socket is pulled out of the trim or is damaged
or wet. There is a risk of fatal injury.
RUse only connector cables that are dry and
free of damage.
RWhen the ignition is off, make sure that the
115 V power socket is dry.
RHave the 115 V power socket checked or
replaced immediately at a qualified speci-
alized workshop if it is damaged or has been
pulled out of the trim.
RNever plug the connector cable into a 115 V
power socket that is damaged or has been
pulled out of the trim.
GDANGER
If you reach into the power socket or plug
inappropriate devices into the power socket,
you could receive an electric shock. There is a
risk of fatal injury.
Only connect appropriate devices to the
power socket.
308Features
Stowage and features
Page 337 of 398
Vehicle tool kit
General notes
The vehicle tool kit can be found in the stowage
well under the cargo compartment floor.
Apart from certain country-specific variations,
the vehicles are not equipped with a tire-change
tool kit. Some tools for changing a wheel are
specific to the vehicle. For more information on
which tools are required to perform a wheel
change on your vehicle, consult a qualified spe-
cialist workshop.
Necessary tire-changing tools can include, for
example:
Rjack
Rwheel chock
Rlug wrench
Rratchet wrench
Ralignment bolt
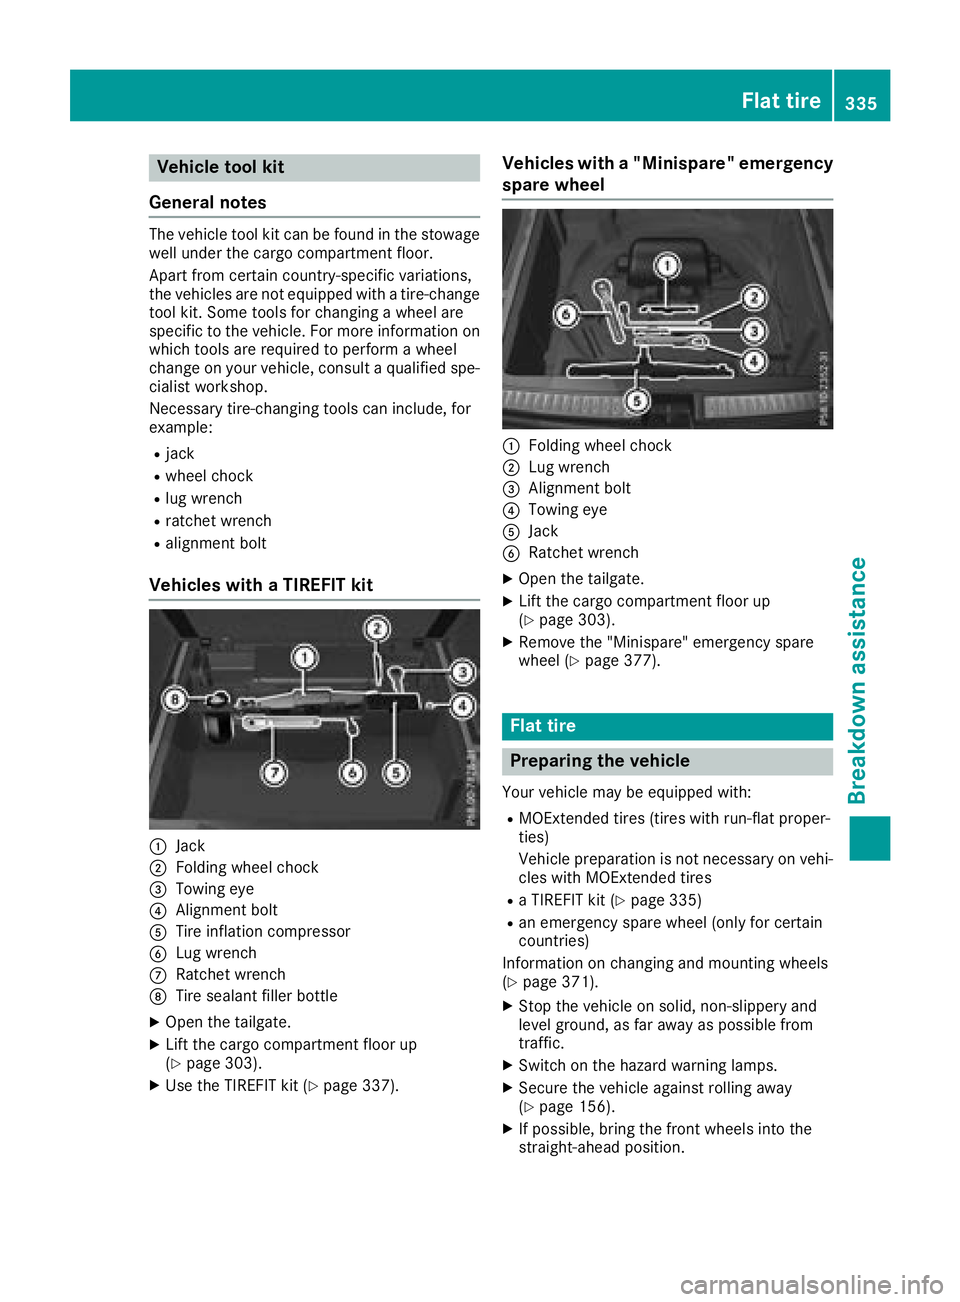
Vehicles with a TIREFIT kit
:Jack
;Folding wheel chock
=Towing eye
?Alignment bolt
ATire inflation compressor
BLug wrench
CRatchet wrench
DTire sealant filler bottle
XOpen the tailgate.
XLift the cargo compartment floor up
(Ypage 303).
XUse the TIREFIT kit (Ypage 337).
Vehicles with a "Minispare" emergency
spare wheel
:Folding wheel chock
;Lug wrench
=Alignment bolt
?Towing eye
AJack
BRatchet wrench
XOpen the tailgate.
XLift the cargo compartment floor up
(Ypage 303).
XRemove the "Minispare" emergency spare
wheel (Ypage 377).
Flat tire
Preparing the vehicle
Your vehicle may be equipped with:
RMOExtended tires (tires with run-flat proper-
ties)
Vehicle preparation is not necessary on vehi-
cles with MOExtended tires
Ra TIREFIT kit (Ypage 335)
Ran emergency spare wheel (only for certain
countries)
Information on changing and mounting wheels
(
Ypage 371).
XStop the vehicle on solid, non-slippery and
level ground, as far away as possible from
traffic.
XSwitch on the hazard warning lamps.
XSecure the vehicle against rolling away
(Ypage 156).
XIf possible, bring the front wheels into the
straight-ahead position.
Flat tire335
Breakdo wn assis tance
Page 338 of 398
XVehicles with the AIRMATIC package:
make sure that the normal vehicle level is
selected (
Ypage 185).
XVehicles with the Off-Road Engineering
package:make sure that the normal vehicle
level is selected (
Ypage 179).
XSwitch off the engine.
XVehicles without KEYLESS-GO: remove the
SmartKey from the ignition lock.
XVehicles with KEYLESS-GO: open the driv-
er's door.
The vehicle electronics are now in position
u. This means no SmartKey is in the ignition
lock.
XVehicles with KEYLESS-GO: remove the
Start/Stop button from the ignition lock
(
Ypage 135).
XMake sure that the engine cannot be started
via your smartphone (Ypage 137).
XMake sure that the passengers are not endan-
gered as they do so. Make sure that no one is
near the danger area while a wheel is being
changed. Anyone who is not directly assisting
in the wheel change should, for example,
stand behind the barrier.
XGet out of the vehicle. Pay attention to traffic
conditions when doing so.
XClose the driver's door.
XUnload heavy luggage.
iOnly operate the tire inflation compressor
using a 12 V socket, even if the ignition is
turned off (
Ypage 308).
An emergency cut-out ensures that the on-
board voltage does not drop too low. If the on-
board voltage is too low
, the power to the
sockets is automatically cut. This ensures
that there is sufficient power to start the
engine.
MOExtended tires (tires with run-flat
properties)
General notes
With MOExtended tires (tires with run flat char-
acteristics), you can continue to drive your vehi-
cle even if there is a total loss of pressure in one
or more tires. The affected tire must not show
any clearly visible damage.
You can recognize a MOExtended tire by the
MOExtended marking which appears on the sidewall of the tire. You will find this marking
next to the tire size designation, the load-bear-
ing capacity and the speed index (
Ypage 366).
MOExtended tires may only be used in conjunc-
tion with an active tire pressure loss warning
system or with an active tire pressure monitor.
If a pressure loss warning message appears
in the multifunction display:
Robserve the instructions in the display mes-
sages (Ypage 268).
Rcheck the tire for damage
Rif driving on, observe the following notes
The driving distance possible in run-flat mode is
approximately 50 miles (80 km) when the vehi-
cle is partially laden and approximately 18 miles
(30 km) when the vehicle is fully laden.
In addition to the vehicle load, the driving dis-
tance possible depends upon:
RVehicle speed
RRoad condition
ROutside temperature
The driving distance possible in run-flat mode
may be reduced by extreme driving conditions
or maneuvers, or it can be increased through a
moderate style of driving.
The driving di stance p
ossible in run-flat mode is
counted from the moment the tire pressure loss
warning appears in the multifunction display.
You must not exceed a maximum permissible
speed of 50 mph (80 km/h).
iWhen replacing one or all tires, please
observe the following specifications for your
vehicle's tires:
Rsize
Rtype and
Rthe "MOExtended" mark
If a tire has gone flat and cannot be replaced with a MOExtended tire, a standard tire may
be used as a temporary measure. Make sure
that you use the proper size and type (sum-
mer or winter tire).
iVehicles equipped with MOExtended tires
are not equipped with a TIREFIT kit at the fac-
tory. It is therefore recommended that you
additionally equip your vehicle with a TIREFIT
kit if you mount tires that do not feature run-
flat properties, e.g. winter tires. A TIREFIT kit
may be obtained from a qualified specialist
workshop.
336Flat tire
Breakdown assistance
Page 339 of 398
Important safety notes
GWARNING
When driving in emergenc ymode, th edriving
characteristics deteriorate, e.g. when corner-
ing ,accelerating quickly and when braking .
Ther eis aris kof an accident.
Do no texceed th estate dmaximum speed.
Avoid abrup tsteering and driving maneuvers,
and driving ove robstacles (curbs, potholes,
off-road). This applie sin particular to aladen
vehicle.
Stop driving in emergenc ymod eif:
Ryou hear bangin gnoises .
Rthevehicl estart sto shake.
Ryou see smoke and smell rubber.
RES P®is intervening constantly.
Rthere are tears in th esidewalls of th etire.
Afte rdriving in emergenc ymode, have th e
whee lrim schecke dat aqualified specialist
workshop wit hregard to their further use. The
defective tire must be replace din every case.
TIREFIT kit
Important safety notes
TIREFI Tis atire sealant.
You can use TIREFI Tto seal punctures of up to
0.16 in (4 mm), particularl ythose in th etire
tread. You can use TIREFI Tat outside tempera-
tures down to Ò4 ‡ (Ò20†).
GWARNING
In th efollowin gsituations, th etire sealant is
unable to provid esufficien tbreakdown assis-
tance ,as it is unable to seal th etire properly:
Rthere are cut sor punctures in th etire larger
than those mentioned above.
Rth ewhee lrim is damaged.
Ryou hav edriven at ver ylow tire pressures or
on aflat tire.
There is aris kof an accident.
Do no tdrive th evehicle. Contac t aqualified
specialist workshop .
GWARNING
The tire sealant is harmful and causes irrita-
tion .It mus tno tcome into contact wit hyour
skin ,eyes or clothin gor be swallowed .Do no t
inhale TIREFI Tfumes. Kee ptire sealant away
from children .There is aris kof injury.
If you come into contact wit hth etire sealant ,
observ eth efollowing:
RRinse off th etire sealant from your skin
immediately wit hwater.
RIf th etire sealant comes into contact wit h
your eyes ,immediately rinse them thor-
oughly wit hclean water.
RIf tire sealant is swallowed ,immediately
rinse your mout hout thoroughl yand drink
plenty of water. Do no tinduc evomiting,
and see kmedica lattention immediately.
RImmediately chang eout of clothin gwhic h
has come into contact wit htire sealant .
RIf an allergic reaction occurs, see kmedica l
attention immediately.
!Do no toperate th etire inflation compressor
for longer than eigh tminute sat atime without
a break. It may otherwise overheat.
The tire inflation compressor can be operate d
again once it has cooled down .
Comply wit hth emanufacturer’s safet yinstruc -
tion son th esticker on th etire inflation com-
pressor.
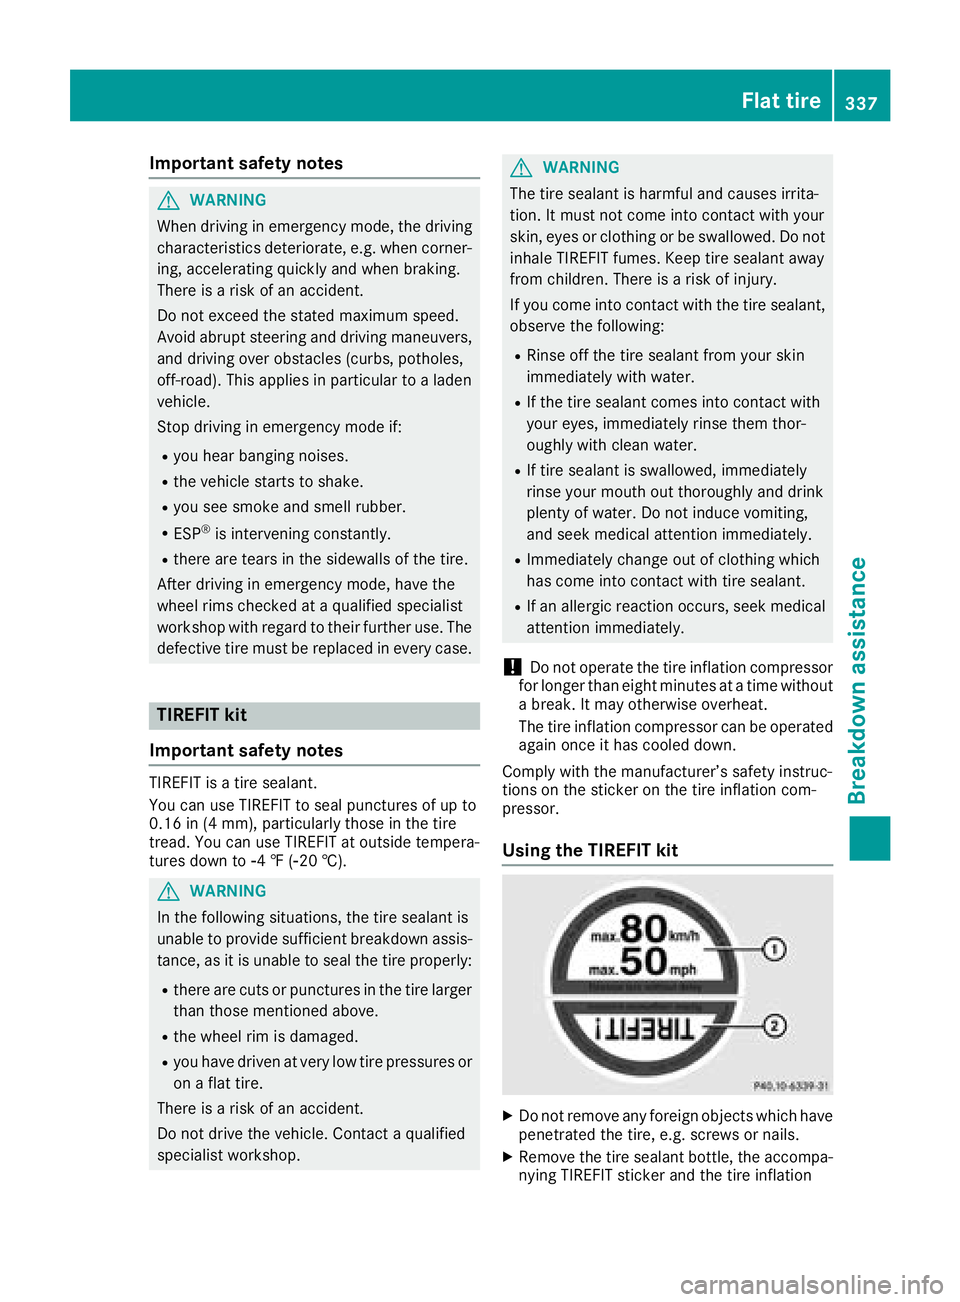
Using the TIREFIT kit
XDo no tremove any foreign objects whic hhav e
penetrated th etire, e.g. screw sor nails.
XRemove th etire sealant bottle, th eaccompa-
nying TIREFI Tsticker and th etire inflation
Flat tire33 7
Breakdown assis tance
Z