2018 MERCEDES-BENZ GLE SUV transmission
[x] Cancel search: transmissionPage 218 of 398
multifunction display. The last active drive pro-
gram is selected again.
Selecting the Offroad program
XTo select a drive program: turn DYNAMIC
SELECT controller:until indicator lamp ;
lights up.
The Drive program "Offroad" Max.
speed 60 mphmessage appears in the mul-
tifunction display.
The vehicle is raised by +1.2 in (30 mm).
The vehicle changes from the Offroaddrive pro-
gram to the Comfortdrive program if you drive
faster than 70 mph (112 km/h).
The Drive more slowly
message appears in
the multifunction display.
Offroad Plus drive program
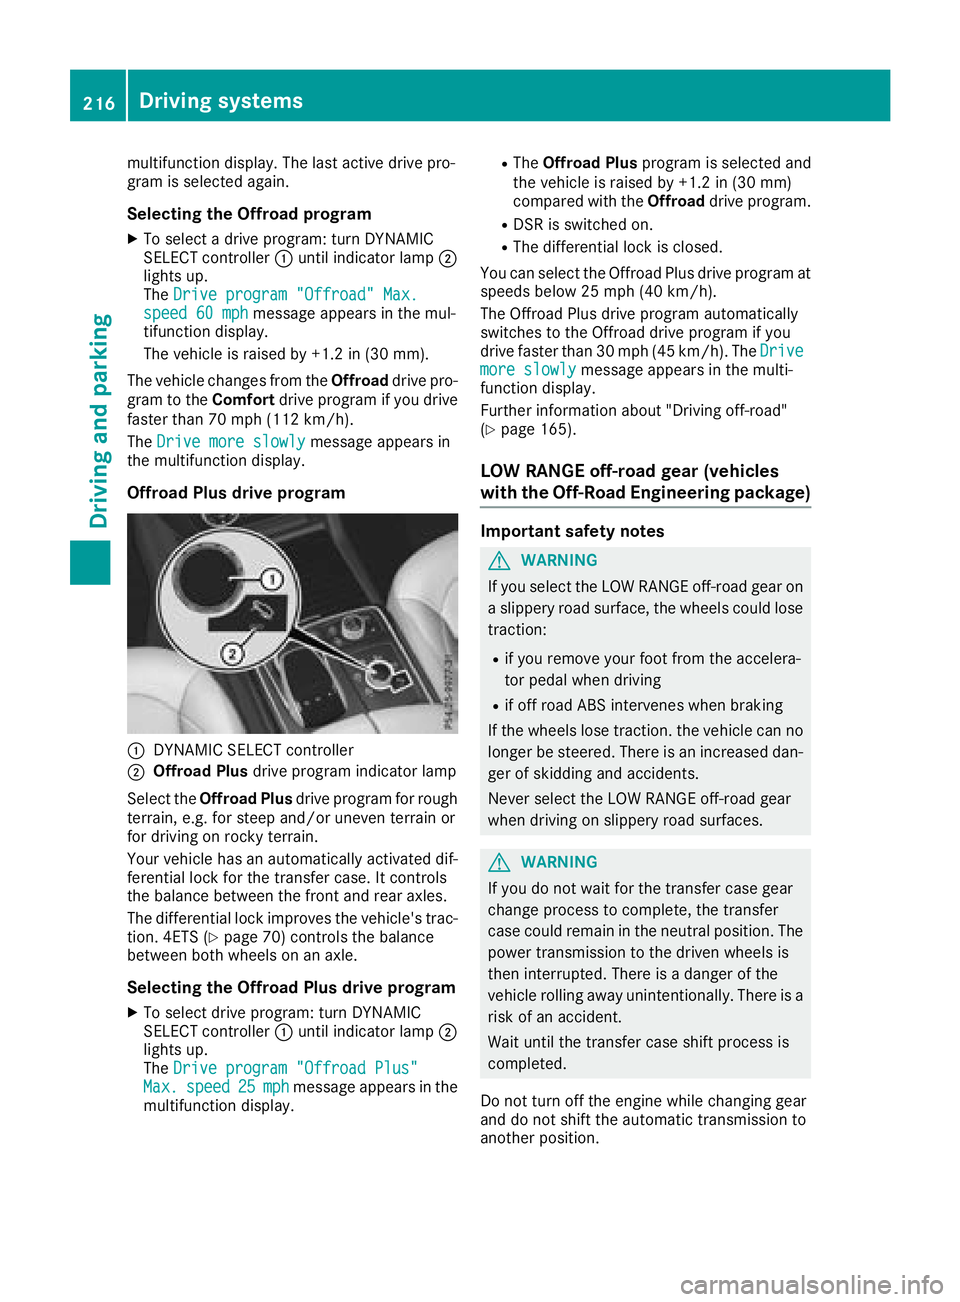
:DYNAMIC SELECT controller
;Offroad Plus drive program indicator lamp
Select the Offroad Plus drive program for rough
terrain, e.g. for steep and/or uneven terrain or
for driving on rocky terrain.
Your vehicle has an automatically activated dif-
ferential lock for the transfer case. It controls
the balance between the front and rear axles.
The differential lock improves the vehicle's trac-
tion. 4ETS (
Ypage 70) controls the balance
between both wheels on an axle.
Selecting the Offroad Plus drive program
XTo select drive program: turn DYNAMIC
SELECT controller :until indicator lamp ;
lights up.
The Drive program "Offroad Plus"
Max.speed25mphmessage appears in the
multifunction display.
RThe Offroad Plus program is selected and
the vehicle is raised by +1.2 in (30 mm)
compared with the Offroaddrive program.
RDSR is switched on.
RThe differential lock is closed.
You can select the Offroad Plus drive program at
speeds below 25 mph (40 km/h).
The Offroad Plus drive program automatically
switches to the Offroad drive program if you
drive faster than 30 mph (45 km/h). The Drive
more slowlymessage appears in the multi-
function display.
Further information about "Driving off-road"
(
Ypage 165).
LOW RANGE off-road gear (vehicles
with the Off-Road Engineering package)
Important safety notes
GWARNING
If you select the LOW RANGE off-road gear on
a slippery road surface, the wheels could lose traction:
Rif you remove your foot from the accelera-
tor pedal when driving
Rif off road ABS intervenes when braking
If the wheels lose traction. the vehicle can no
longer be steered. There is an increased dan-
ger of skidding and accidents.
Never select the LOW RANGE off-road gear
when driving on slippery road surfaces.
GWARNING
If you do not wait for the transfer case gear
change process to complete, the transfer
case could remain in the neutral position. The power transmission to the driven wheels is
then interrupted. There is a danger of the
vehicle rolling away unintentionally. There is a
risk of an accident.
Wait until the transfer case shift process is
completed.
Do not turn off the engine while changing gear
and do not shift the automatic transmission to
another position.
216Driving systems
Driving and parking
Page 219 of 398
General notes
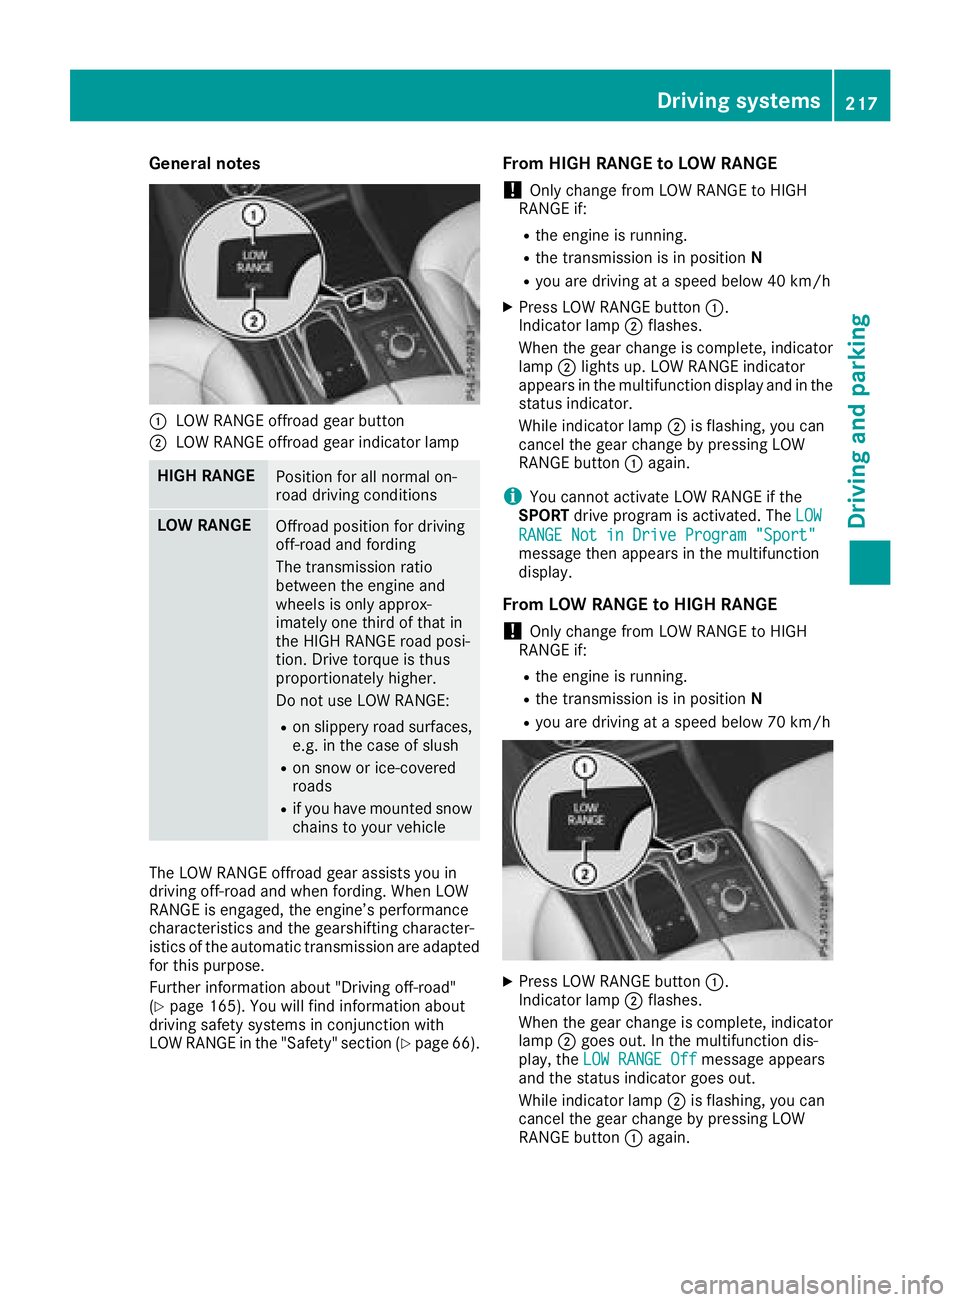
:LOW RANGE offroad gear button
;LOW RANGE offroad gear indicator lamp
HIGH RANGEPosition for all normal on-
road driving conditions
LOW RANGEOffroad position for driving
off-road and fording
The transmission ratio
between the engine and
wheels is only approx-
imately one third of that in
the HIGH RANGE road posi-
tion. Drive torque is thus
proportionately higher.
Do not use LOW RANGE:
Ron slippery road surfaces,
e.g. in the case of slush
Ron snow or ice-covered
roads
Rif you have mounted snow
chains to your vehicle
The LOW RANGE offroad gear assists you in
driving off-road and when fording. When LOW
RANGE is engaged, the engine’s performance
characteristics and the gearshifting character-
istics of the automatic transmission are adapted
for this purpose.
Further information about "Driving off-road"
(
Ypage 165). You will find information about
driving safety systems in conjunction with
LOW RANGE in the "Safety" section (
Ypage 66).
From HIGH RANGE to LOW RANGE
!Only change from LOW RANGE to HIGH
RANGE if:
Rthe engine is running.
Rthe transmission is in position N
Ryou are driving at a speed below 40 km/h
XPress LOW RANGE button:.
Indicator lamp ;flashes.
When the gear change is complete, indicator
lamp ;lights up. LOW RANGE indicator
appears in the multifunction display and in the
status indicator.
While indicator lamp ;is flashing, you can
cancel the gear change by pressing LOW
RANGE button :again.
iYou cannot activate LOW RANGE if the
SPORT drive program is activated. The LOW
RANGE Not in Drive Program "Sport"message then appears in the multifunction
display.
From LOW RANGE to HIGH RANGE
!Only change from LOW RANGE to HIGH
RANGE if:
Rthe engine is running.
Rthe transmission is in position N
Ryou are driving at a speed below 70 km/h
XPress LOW RANGE button:.
Indicator lamp ;flashes.
When the gear change is complete, indicator
lamp ;goes out. In the multifunction dis-
play, the LOW RANGE Off
message appears
and the status indicator goes out.
While indicator lamp ;is flashing, you can
cancel the gear change by pressing LOW
RANGE button :again.
Driving systems217
Driving and parking
Z
Page 220 of 398
Messages in the multifunction display
If a gear change process has not been successful, the following messages may be displayed in the
multifunction display:
Display messagesPossible causes/consequences andMSolutions
LOW RANGE Max.Speed 24 mphYou have been driving faster than 24 mph (40 km/h). Additionally, the
indicator lamp on the button in the center console is flashing.
XSlow down to change gear.
LOW RANGE Shift toPosition N BrieflyThe transmission is in positionDand you are driving at below
40 km/h.
XShift the transmission to Nto complete the gear change process.
LOW RANGE ShiftingCanceled PleaseReactivate
The gear change process was not carried out.
XEnsure that all gear change conditions are fulfilled and carry out the
gear change process again.
LOW RANGE StopApply Parking BrakeA warning tone also sounds. The gear change process has not been
completed. LOW RANGE is in the neutral position. There is no con-
nection between the engine and the drive wheels.
!Do not drive any further. You could otherwise damage the vehi-
cle's drive train.
XStop the vehicle. Take into account the road and traffic conditions
when doing this.
XDepress the electric parking brake (Ypage 157).
XCarry out the gear change process again.
If the gear change process has been carried out, the LOW RANGE
Stop Apply Parking Brakemessage disappears.
Driving dynamics display in the
COMAND display (vehicles with the Off-
Road Engineering package)
General notes
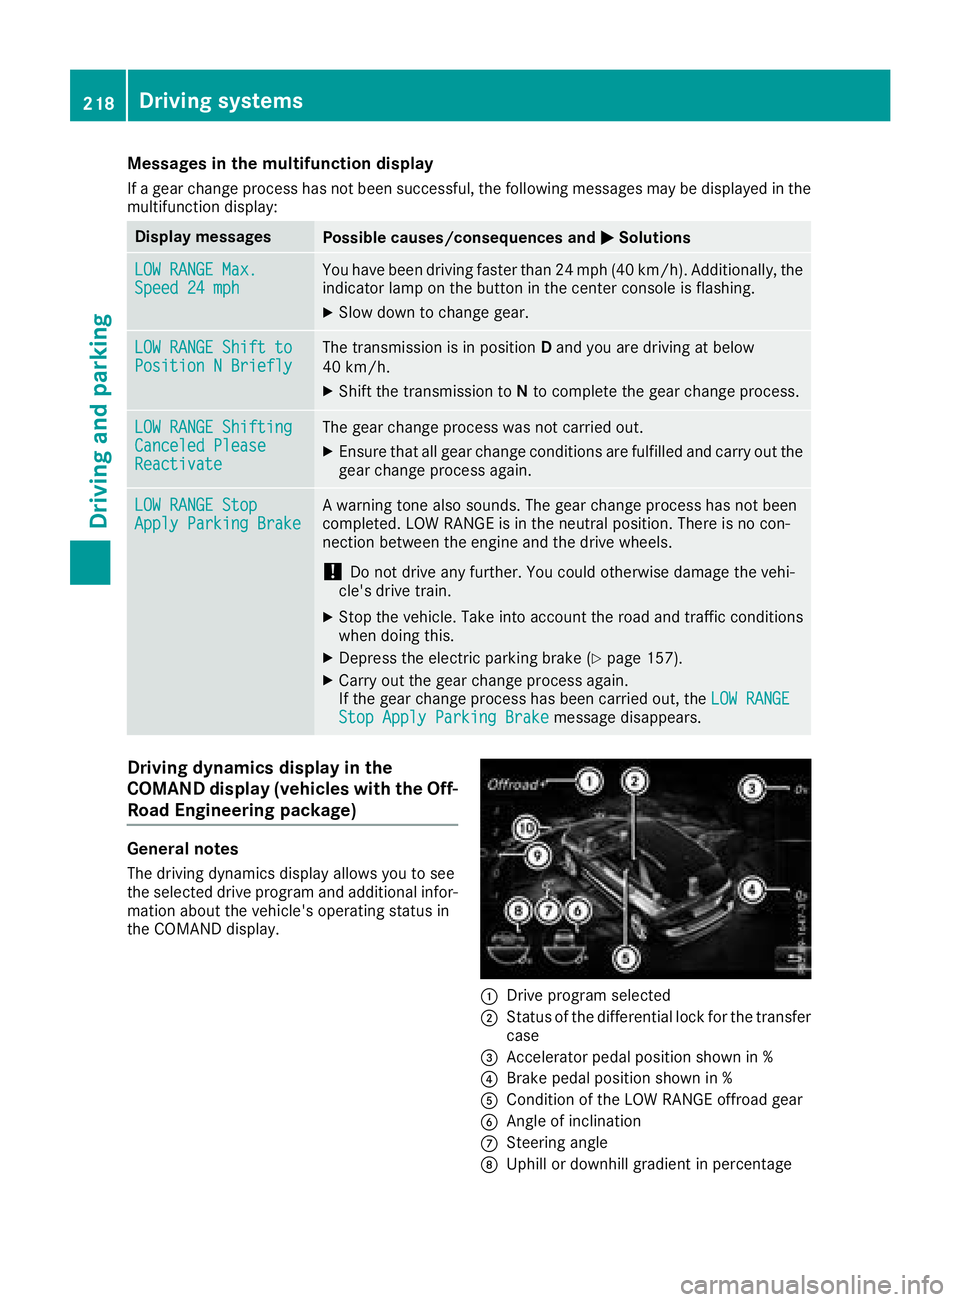
The driving dynamics display allows you to see
the selected drive program and additional infor-
mation about the vehicle's operating status in
the COMAND display.
:Drive program selected
;Status of the differential lock for the transfer
case
=Accelerator pedal position shown in %
?Brake pedal position shown in %
ACondition of the LOW RANGE offroad gear
BAngle of inclination
CSteering angle
DUphill or downhill gradient in percentage
218Driving systems
Driving and parking
Page 224 of 398

XSlide boltAinto the hole in the ball coupling
recess and the ball coupling to the stop.
XSecure the bolt using spring cotter B.
XCheck the ball coupling, bolt and spring cotter
for correct installation.
If the ball coupling cannot be correctly mounted,
remove the ball coupling. Under these circum-
stances, the ball coupling must not be used for
trailer towing.
Have the entire trailer tow hitch checked at a
qualified specialist workshop.
Coupling up a trailer
!
Do not connect the trailer's brake system (if
featured) to the hydraulic brake system of the
towing vehicle, as the latter is equipped with
an anti-lock brake system. Doing so will result
in a loss of function of the brake systems of
both the vehicle and the trailer.
XShift the transmission to position P.
XApply the vehicle's electric parking brake.
XStart the engine.
XVehicles with AIRMATIC package: select
normal level and the Comfortdrive program.
XSwitch off the engine.
XClose the doors and tailgate.
XCouple up the trailer.
XEstablish the electrical connection between
the vehicle and the trailer.
XCheck that the trailer lighting system is work-
ing.
XPush the combination switch upwards/down-
wards and check whether the corresponding
turn signal on the trailer flashes.
A trailer that is connected is recognized only
when the electrical connection is established
correctly and when the lighting system is work-
ing properly. The function of other systems also
depends on this, for example:
RESP®
RParking Assist PARKTRONIC
RParking Pilot
RActive Blind Spot Assist
RActive Lane Keeping Assist
iVehicles with the AIRMATIC package: if you
couple up a trailer, the vehicle always remains
at normal level. When coupling up a trailer,
please observe the foll
owing:
RIf the normal level has not been set man-
ually, the vehicle is automatically lowered
to normal level. This is the case if a speed of
5 mph (8 km/h) is reached.
RThe
Sport drive program is not available.
These restrictions apply to all accessories
powered through a connection to the trailer
power socket of your vehicle, e.g. a bicycle
carrier.
Observe the maximum permissible trailer
dimensions (width and length).
222Towing a trailer
Driving and parking
Page 225 of 398
Most U.S. states and all Canadian provinces
require by law:
RSafety chains between the towing vehicle and
the trailer. The chains should be cross-wound
under the trailer drawbar. They must be fas-
tened to the vehicle's trailer coupling, not to
the bumper or the axle.
Leave enough play in the chains to make tight
cornering possible.
RA separate brake system for certain types of
trailer.
RSafety switch for braked trailers. Check the
specific legal requirements applicable to your
state.
If the trailer becomes detached from the tow-
ing vehicle, the safety feature triggers the
trailer brakes.
Towing a trailer
There are numerous legal requirements con-
cerning the towing of a trailer, e.g. speed restric-
tions. Make sure that your car/trailer combina-tion complies with the local regulations:
Rin your place of residence
Rin the location to which you are driving
The police and local authorities can provide reli-
able information.
Observe the following when towing a trailer:
RTo gain driving experience and to become
accustomed to the new handling characteris-
tics, you should practice the following in a
traffic-free location:
-cornering
-stopping
-backing up
RBefore driving, check:
-trailer tow hitch
-safety switch for braked trailers
-safety chains
-electrical connections
-lights
-wheels
RAdjust the exterior mirrors to provide an
unobstructed view of the rear section of the
trailer.
RIf the trailer has electronically controlled
brakes, pull away carefully. Brake manually using the brake controller and check whether
the brakes function correctly.
RSecure any objects on the trailer to prevent
the cargo from slipping when the vehicle is in
motion.
RWhen you couple up a trailer, check at regular
intervals that the load is firmly secured. If the
trailer is equipped with trailer lights and
brakes, check the trailer to ensure that these
are working.
RBear in mind that the handling will be less
stable when towing a trailer than when driving
without one. Avoid sudden steering move-
ments.
RThe vehicle/trailer combination is heavier,
accelerates more slowly, has a decreased
gradient climbing capability and a longer
braking distance.
It is more susceptible to side winds and
requires more careful steering.
RIf possible, do not brake suddenly, but instead
depress the brake pedal moderately at first so
that the trailer can activate its brakes. Then
increase the pressure on the brake pedal.
RIf the automatic transmission repeatedly
shifts between gears on uphill or downhill gra-
dients, shift to a lower gear using the left-hand
steering wheel paddle shifter.
A lower gear and lower speed reduce the risk
of engine failure.
RWhen driving downhill, shift to a lower gear to
utilize the engine's braking effect.
Avoid continuous brake application as this
may overheat the vehicle brakes and, if instal-
led, the trailer brakes.
RIf the coolant temperature increases dramat-
ically while the air-condit ioning system is
switched on, switch off the air-conditioning
system.
Coolant heat can also be dissipated by open-
ing the windows and switching the ventilation blower and the interior temperature to the
highest level.
RWhen overtaking, pay particular attention to
the extended length of your vehicle/trailer
combination.
Due to the length of the vehicle/trailer com-
bination, you require additional road space in
relation to the vehicle you are overtaking
before you can change back to the original
lane.
Towing a trailer223
Driving and parking
Z
Page 232 of 398
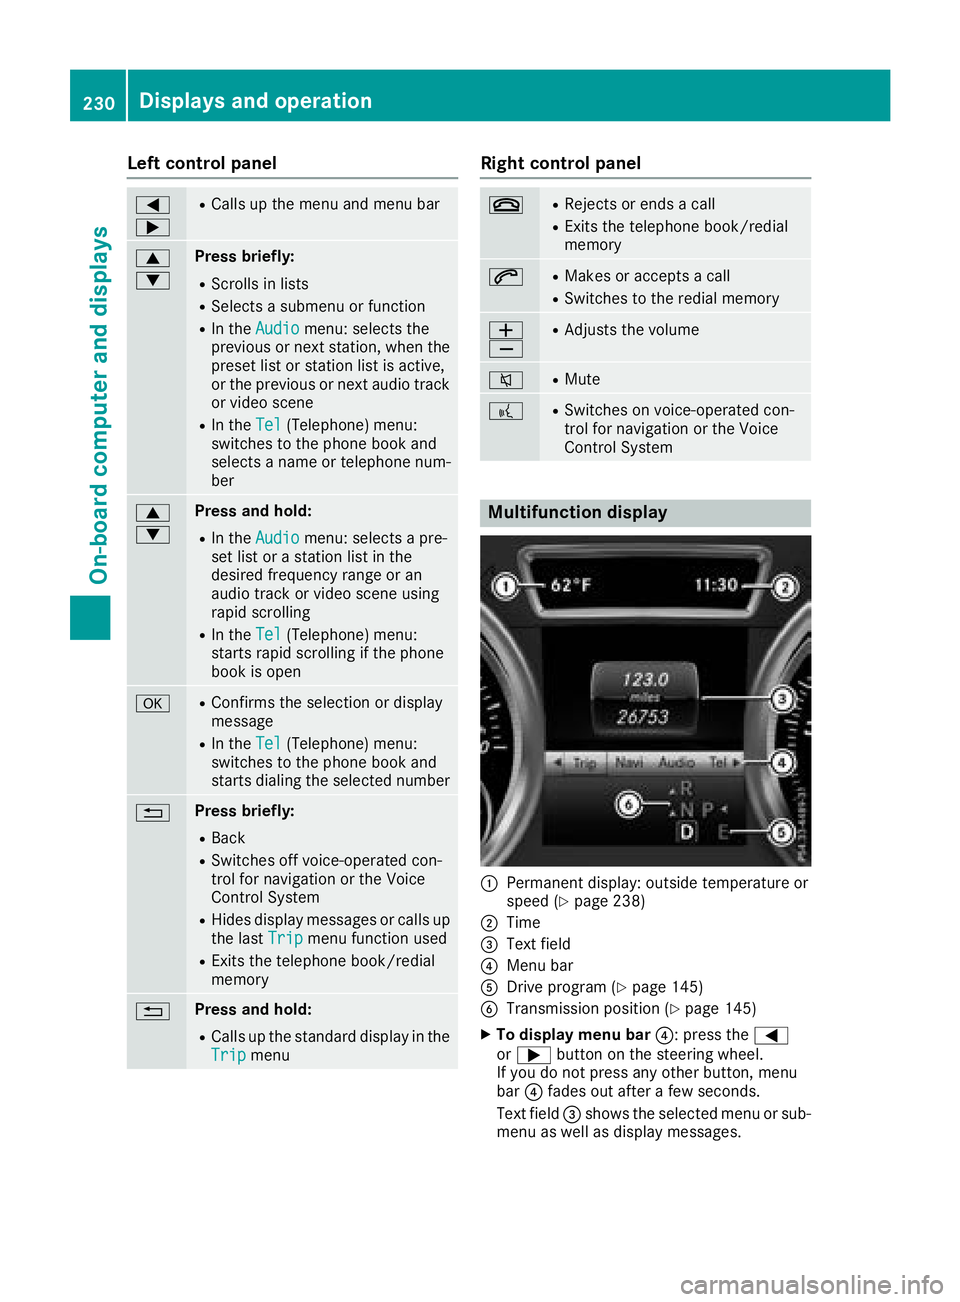
Left control panel
=
;RCalls up the menu and menu bar
9
:Press briefly:
RScrolls in lists
RSelects a submenu or function
RIn theAudiomenu: selects the
previous or next station, when the
preset list or station list is active,
or the previous or next audio track
or video scene
RIn the Tel(Telephone) menu:
switches to the phone book and
selects a name or telephone num-
ber
9
:Press and hold:
RIn the Audiomenu: selects a pre-
set list or a station list in the
desired frequency range or an
audio track or video scene using
rapid scrolling
RIn the Tel(Telephone) menu:
starts rapid scrolling if the phone
book is open
aRConfirms the selection or display
message
RIn the Tel(Telephone) menu:
switches to the phone book and
starts dialing the selected number
%Press briefly:
RBack
RSwitches off voice-operated con-
trol for navigation or the Voice
Control System
RHides display messages or calls up
the last Tripmenu function used
RExits the telephone book/redial
memory
%Press and hold:
RCalls up the standard display in the
Tripmenu
Right control panel
~RRejects or ends a call
RExits the telephone book/redial
memory
6RMakes or accepts a call
RSwitches to the redial memory
W
XRAdjusts the volume
8RMute
?RSwitches on voice-operated con-
trol for navigation or the Voice
Control System
Multifunction display
:Permanent display: outside temperature or
speed (Ypage 238)
;Time
=Text field
?Menu bar
ADrive program (Ypage 145)
BTransmission position (Ypage 145)
XTo display menu bar ?: press the=
or ; button on the steering wheel.
If you do not press any other button, menu
bar ?fades out after a few seconds.
Text field =shows the selected menu or sub-
menu as well as display messages.
230Displays and operation
On-board computer and displays
Page 242 of 398
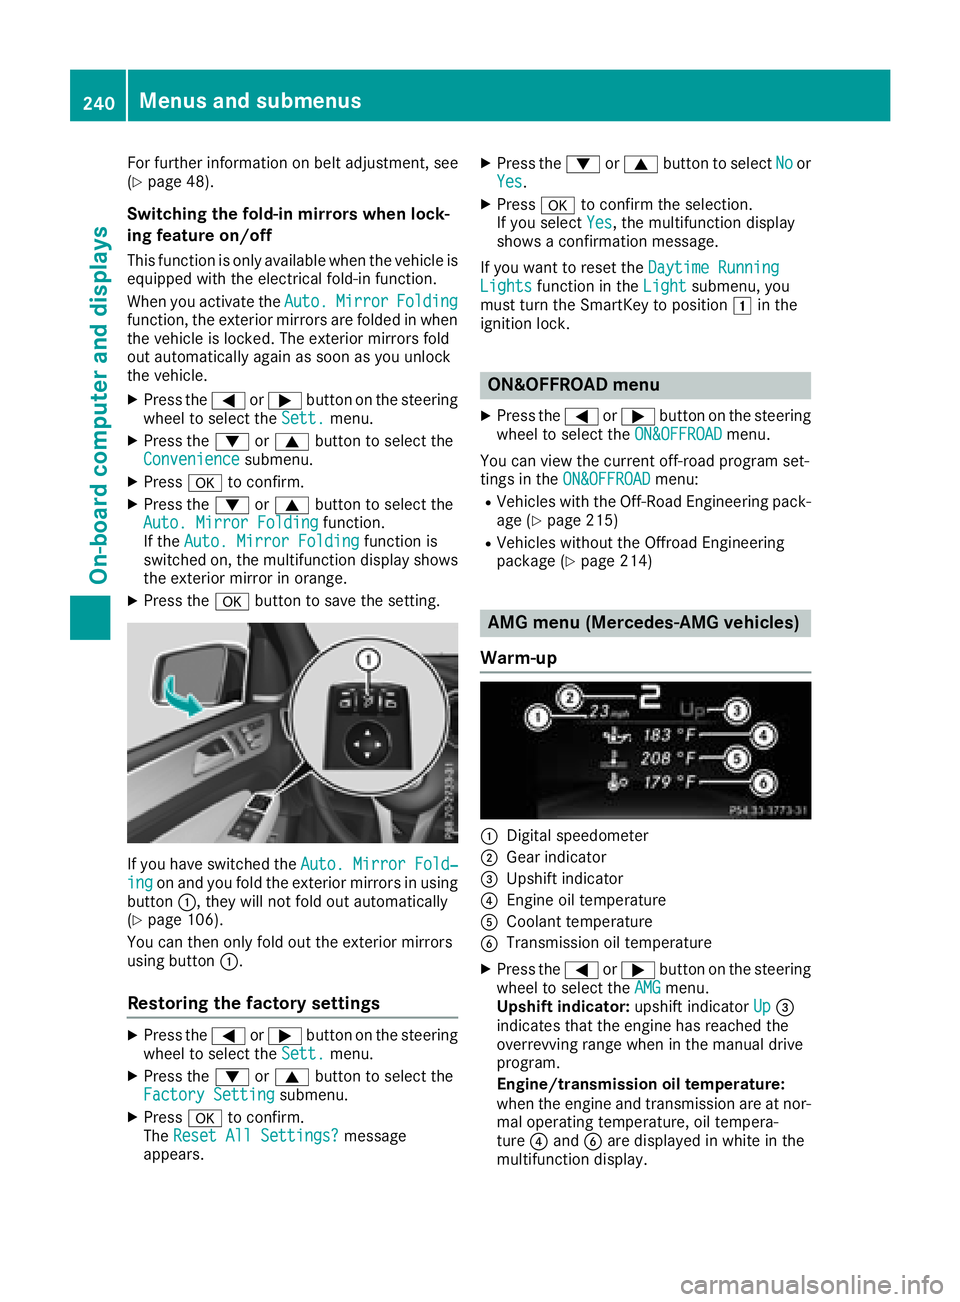
For further information on belt adjustment, see
(Ypage 48).
Switching the fold-in mirrors when lock-
ing feature on/off
This function is only available when the vehicle is
equipped with the electrical fold-in function.
When you activate theAuto.
MirrorFoldingfunction, the exterior mirrors are folded in when
the vehicle is locked. The exterior mirrors fold
out automatically again as soon as you unlock
the vehicle.
XPress the =or; button on the steering
wheel to select the Sett.menu.
XPress the:or9 button to select the
Conveniencesubmenu.
XPress ato confirm.
XPress the :or9 button to select the
Auto. Mirror Foldingfunction.
If the Auto. Mirror Foldingfunction is
switched on, the multifunction display shows
the exterior mirror in orange.
XPress the abutton to save the setting.
If you have switched the Auto. Mirror Fold‐ingon and you fold the exterior mirrors in using
button :, they will not fold out automatically
(
Ypage 106).
You can then only fold out the exterior mirrors
using button :.
Restoring the factory settings
XPress the=or; button on the steering
wheel to select the Sett.menu.
XPress the:or9 button to select the
Factory Settingsubmenu.
XPress ato confirm.
The Reset All Settings?message
appears.
XPress the :or9 button to select Noor
Yes.
XPress ato confirm the selection.
If you select Yes, the multifunction display
shows a confirmation message.
If you want to reset the Daytime Running
Lightsfunction in theLightsubmenu, you
must turn the SmartKey to position 1in the
ignition lock.
ON&OFFROAD menu
XPress the =or; button on the steering
wheel to select the ON&OFFROADmenu.
You can view the current off-road program set-
tings in the ON&OFFROAD
menu:
RVehicles with the Off-Road Engineering pack-
age (Ypage 215)
RVehicles without the Offroad Engineering
package (Ypage 214)
AMG menu (Mercedes-AMG vehicles)
Warm-up
:Digital speedometer
;Gear indicator
=Upshift indicator
?Engine oil temperature
ACoolant temperature
BTransmission oil temperature
XPress the =or; button on the steering
wheel to select the AMGmenu.
Upshift indicator: upshift indicatorUp=
indicates that the engine has reached the
overrevving range when in the manual drive
program.
Engine/transmission oil temperature:
when the engine and transmission are at nor-
mal operating temperature, oil tempera-
ture ?and Bare displayed in white in the
multifunction display.
240Menus and submenus
On-board computer and displays
Page 243 of 398
If the multifunction display shows oil temper-
ature?orB in blue, the engine or the
transmission are not yet at normal operating
temperature. Avoid driving at full engine out-
put during this time.
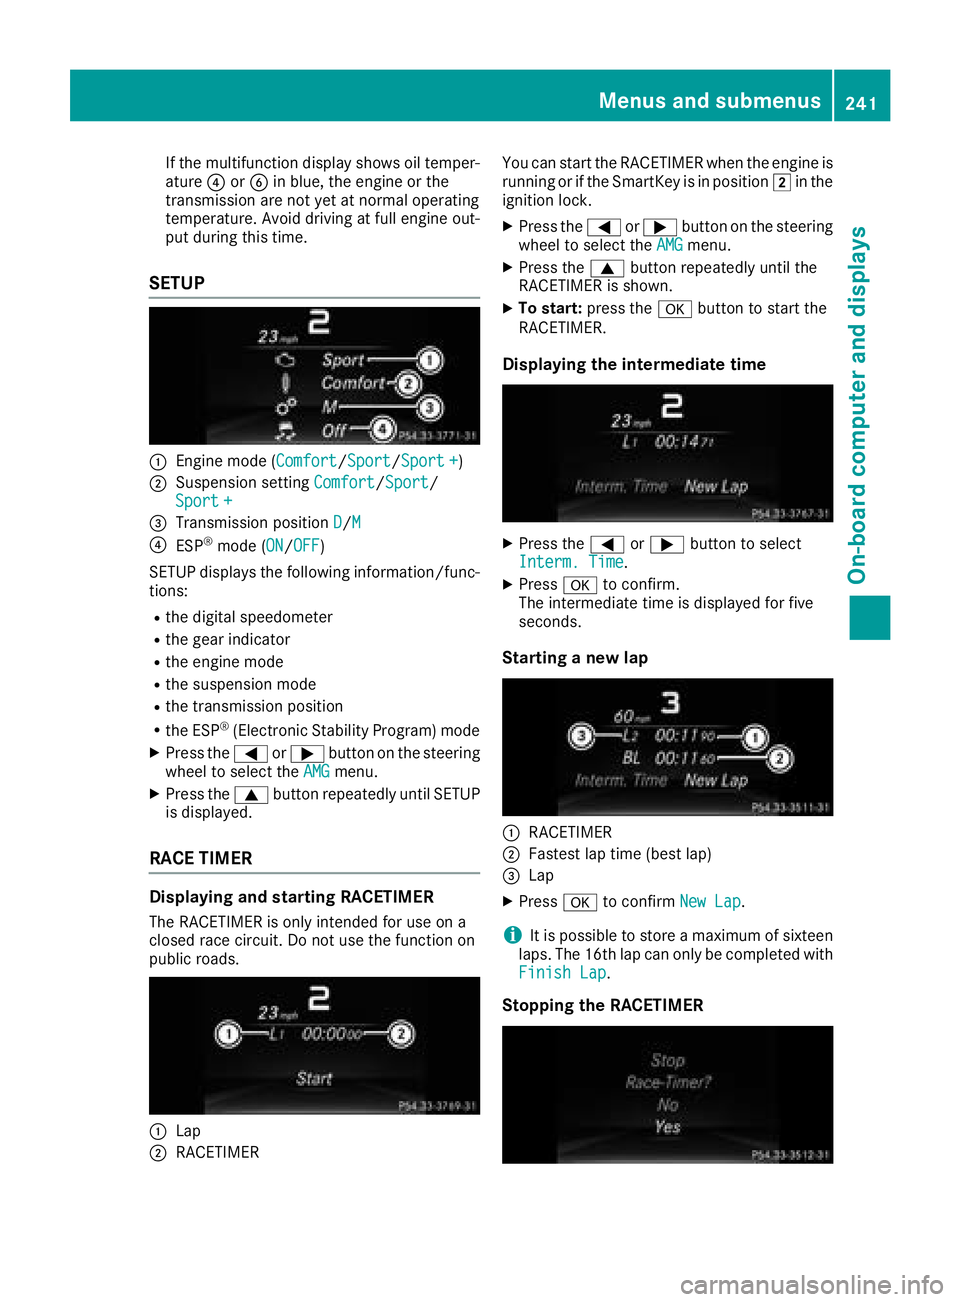
SETUP
:Engine mode (Comfort/ Sport/Sport +)
;Suspension setting Comfort/Sport/
Sport +
=Transmission position D/M
?ESP®mode (ON/OFF)
SETUP displays the following information/func- tions:
Rthe digital speedometer
Rthe gear indicator
Rthe engine mode
Rthe suspension mode
Rthe transmission position
Rthe ESP®(Electronic Stability Program) mode
XPress the =or; button on the steering
wheel to select the AMGmenu.
XPress the9button repeatedly until SETUP
is displayed.
RACE TIMER
Displaying and starting RACETIMER
The RACETIMER is only intended for use on a
closed race circuit. Do not use the function on
public roads.
:Lap
;RACETIMER You can start the RACETIMER when the engine is
running or if the SmartKey is in position
2in the
ignition lock.
XPress the =or; button on the steering
wheel to select the AMGmenu.
XPress the9button repeatedly until the
RACETIMER is shown.
XTo start: press the abutton to start the
RACETIMER.
Displaying the intermediate time
XPress the =or; button to select
Interm. Time.
XPress ato confirm.
The intermediate time is displayed for five
seconds.
Starting a new lap
:RACETIMER
;Fastest lap time (best lap)
=Lap
XPress ato confirm New Lap.
iIt is possible to store a maximum of sixteen
laps. The 16th lap can only be completed with
Finish Lap
.
Stopping the RACETIMER
Menus and submenus241
On-board computer and displays
Z