2018 MERCEDES-BENZ GLE SUV towing
[x] Cancel search: towingPage 225 of 398
Most U.S. states and all Canadian provinces
require by law:
RSafety chains between the towing vehicle and
the trailer. The chains should be cross-wound
under the trailer drawbar. They must be fas-
tened to the vehicle's trailer coupling, not to
the bumper or the axle.
Leave enough play in the chains to make tight
cornering possible.
RA separate brake system for certain types of
trailer.
RSafety switch for braked trailers. Check the
specific legal requirements applicable to your
state.
If the trailer becomes detached from the tow-
ing vehicle, the safety feature triggers the
trailer brakes.
Towing a trailer
There are numerous legal requirements con-
cerning the towing of a trailer, e.g. speed restric-
tions. Make sure that your car/trailer combina-tion complies with the local regulations:
Rin your place of residence
Rin the location to which you are driving
The police and local authorities can provide reli-
able information.
Observe the following when towing a trailer:
RTo gain driving experience and to become
accustomed to the new handling characteris-
tics, you should practice the following in a
traffic-free location:
-cornering
-stopping
-backing up
RBefore driving, check:
-trailer tow hitch
-safety switch for braked trailers
-safety chains
-electrical connections
-lights
-wheels
RAdjust the exterior mirrors to provide an
unobstructed view of the rear section of the
trailer.
RIf the trailer has electronically controlled
brakes, pull away carefully. Brake manually using the brake controller and check whether
the brakes function correctly.
RSecure any objects on the trailer to prevent
the cargo from slipping when the vehicle is in
motion.
RWhen you couple up a trailer, check at regular
intervals that the load is firmly secured. If the
trailer is equipped with trailer lights and
brakes, check the trailer to ensure that these
are working.
RBear in mind that the handling will be less
stable when towing a trailer than when driving
without one. Avoid sudden steering move-
ments.
RThe vehicle/trailer combination is heavier,
accelerates more slowly, has a decreased
gradient climbing capability and a longer
braking distance.
It is more susceptible to side winds and
requires more careful steering.
RIf possible, do not brake suddenly, but instead
depress the brake pedal moderately at first so
that the trailer can activate its brakes. Then
increase the pressure on the brake pedal.
RIf the automatic transmission repeatedly
shifts between gears on uphill or downhill gra-
dients, shift to a lower gear using the left-hand
steering wheel paddle shifter.
A lower gear and lower speed reduce the risk
of engine failure.
RWhen driving downhill, shift to a lower gear to
utilize the engine's braking effect.
Avoid continuous brake application as this
may overheat the vehicle brakes and, if instal-
led, the trailer brakes.
RIf the coolant temperature increases dramat-
ically while the air-condit ioning system is
switched on, switch off the air-conditioning
system.
Coolant heat can also be dissipated by open-
ing the windows and switching the ventilation blower and the interior temperature to the
highest level.
RWhen overtaking, pay particular attention to
the extended length of your vehicle/trailer
combination.
Due to the length of the vehicle/trailer com-
bination, you require additional road space in
relation to the vehicle you are overtaking
before you can change back to the original
lane.
Towing a trailer223
Driving and parking
Z
Page 226 of 398
Decouplingatrailer
GWARNING
If you uncoupl e atrailer wit hth eoverrun
brake engaged, you could trap your han d
between th evehicle and th etrailer drawbar .
There is aris kof injury.
Do no tuncoupl e atrailer if th eoverrun brake
is engaged.
GWARNING
Vehicles wit hlevel control:
The vehicle is lowered as soo nas you discon-
nect th etrailer cable. Thi scould result in your
limbs or those of other people that are
between th evehicle bod yand tires or under-
neat hth evehicle bein gtrapped. There is a
ris kof injury.
Mak esur ethat nobod yis in th eimmediate
vicinit yof th ewhee lhousings or under th e
vehicle when you disconnec tth etrailer cable.
!Do no tdisconnec t atrailer wit han engage d
overrun brake .Otherwise ,your vehicle could
be damaged by th ereboundin gof th eoverrun
brake .
XShift th etransmissio nto position P.
XApply thevehicle' selectric parking brake .
XStart theengine.
XClos eth edoors and tailgate.
XApply th etrailer's parking brake .
XDetach thetrailer cable and decoupl eth e
trailer .
XSwitchof fth eengine.
Permissible trailer loads an ddrawbar
loads
Weight specifications
Maximum allowable gross mass
The gross vehicle weight of th etrailer is calcu-
lated by addin gth eweight of th etrailer to th e
weight of th eload and equipmen ton th etrailer .
You will fin dinstallin gdimensions and load s
under "Technical data" (
Ypage 394).
Permissible noseweigh t
You will findinstallin gdimensions and load s
under "Technical data" (Ypage 394).
Loadingatrailer
RWhe nloadin gth etrailer ,mak esur ethat nei-
ther th epermissible gross weight of th etrailer
no rth egross vehicle weight are exceeded.
The permissible gross vehicle weight is indi-
cated on th eidentification plat elocated on
th eB-pilla ron th edriver's sid eof th evehicle.
You can fin dth emaximum permissible values
on th etyp eplates of your vehicle and th e
trailer .Whe ncalculatin ghow muc hweight
th evehicle and trailer may carry, pay atten-
tion to th erespective lowest values.
RThe trailer drawbar load on th eball couplin g
mus tbe adde dto th erea raxl eload to avoid
exceedin gth epermissible gross axl eweight .
The permissible gross vehicle weight is indi-
cated on th eidentification plat elocated on
th eB-pilla ron th edriver's sid eof th evehicle.
iMercedes-Ben zrecommends atrailer load
wher eth etrailer drawbar noseweigh t
accounts fo r 8 %to 15 %of th etrailer's per -
missible gross weight .
iThe weight of additional accessories ,pas-
sengers, and cargo reduce sth epermissible
trailer load and drawbar load fo ryour vehicle.
Checking th evehicle an dtrailer weigh t
RTo checkthat th eweight sof th etowin gvehi-
cl e and th etrailer compl ywit hth emaximum
permissible values, hav eth evehicle/trailer
combination (includin gth edriver ,passen -
gers, and cargo wit h afullylade ntrailer )
weighed on acalibrated weighbridge .
RCheckth egross axl eweight ratin gof th efron t
and rea raxles, th egross weight of th etrailer
and th etrailer drawbar noseweight.
Removin gth eball coupling
XRemov eth esprin gcotter.
XRemov eth ebolt from th eball couplin g
recess .
XRemov eth eball couplin gfrom th eball cou-
plin grecess .
224Towing a trailer
Driving and parking
Page 266 of 398
Display messagesPossible causes/consequences andMSolutions
Blind SpotAssistCurrently Unavaila‐ble See Operator' sManualorActiveBlind Spo tAssistCurrently Unavaila‐ble See Operator' sManual
Blind Spot Assistor Active Blind Spot Assis tis temporarily inoperative.
Possibl ecauses are:
RThe radar sensor system is outside th eoperating temperature
range.
RThe radar sensor system is temporarily inoperative, e.g. due to
electromagneti cradiation emitted by nearby TV or radi ostation sor
other source sof electromagneti cradiation .
The yellow 9indicator lamp salso ligh tup in th eexterio rmirrors.
Whe nth ecauses state dabov eno longer apply, th edisplay message
disappears.
Blind Spot Assis tor Active Blind Spot Assis tis operational again .
If th edisplay message does no tdisappear :
XPull overand stop th evehicl esafely as soo nas possible, payin g
attention to roa dand traffic conditions.
XSecur eth evehicl eagainst rollin gaway (Ypage 156).
XRestart th eengine.
Blind Spo tAssistNot Available Whe nTowingaTraile rSee Operator' sMan ‐ualorActive BlindSpo tAssist NotAvailable Whe nTow ‐ing aTraile rSeeOperator' sManual
Blind Spot Assis tor Active Blind Spot Assis tis deactivated while tow-
ing atrailer .
You hav eestablished th eelectrical connection between th etrailer and
your vehicle.
XPress aon thesteering whee lto confirm th edisplay message .
Blind SpotAssistInoperativeor
Active Blind Spo t
Assist Inoperative
Blind Spot Assistor Active Blind Spot Assis tis malfunctioning .
The yellow 9indicator lamp salso ligh tup in th eexterio rmirrors.
XVisit aqualified specialist workshop .
ParkingPilot Can ‐celedThe driver's door is open .
XRepeat theparking gap measuremen tand parking process wit hth e
driver's door closed .
You haveinadvertentl ytouched th emultifunction steering whee lwhile
steering intervention was active .
XWhilesteering intervention is active ,mak esur ethat th emultifunc-
tion steering whee lis no ttouched unintentionally.
The vehicl ehas started to skid and ES P®has intervened.
XUse Parking Pilotagain later (Ypage 190).
264Display messages
On-board computer and displays
Page 298 of 398
RAlways stow objects in such a way that they
cannot be tossed about in these or similar
situations.
RAlways make sure that objects do not pro-
trude out of the stowage spaces, luggage
nets or stowage nets.
REnsure that closable stowage spaces are
shut before beginning your journey.
RAlways stow and secure heavy, hard, poin-
ted, sharp-edged, fragile or large objects in
the cargo compartment.
Observe the loading guidelines (
Ypage 295).
Glove box
XTo open: pull handle :and open glove box
flap ;.
XTo close: fold glove box flap ;up until it
engages.
iThe glove box can be cooled (Ypage 132).
1Glove box unlocked
2Glove box locked
The glove box can be locked and unlocked using the mechanical key.
Partition :for stowing flat objects is located in
the upper section of the glove box. It can be
removed to increase the stowage space in the
glove box.
XTo remove: pull out partition :.
XTo install:insert partition :and push it back
until it engages.
Stowage compartment under the arm-
rest
Vehicles without touchpad
XTo open: pull handle :up.
The armrest folds out.
296Stowage areas
Stowag ean d features
Page 314 of 398
The indicator lamp in Roadside Assistance
button:flashes while the call is active. The
Connecting Call
message appears in the
multifunction display. The audio output is
muted.
If a connection can be established, the Call
Connectedmessage appears in the multifunc-
tion display.
If a mobile phone network and GPS reception
are available, the system transfers data to the
Mercedes-Benz Customer Assistance Center,
for example:
RCurrent location of the vehicle
RVehicle identification number
The multimedia system display indicates that a
call is active. During the call, you can change to
the navigation menu by pressing the NAVI but-
ton on the multimedia system, for example.
Voice output is not available in this case.
A voice connection is established between the
Mercedes-Benz Customer Assistance Center
and the vehicle occupants.
From the remote malfunction diagnosis, the
Mercedes-Benz Customer Assistance Center
can ascertain the nature of the problem
(
Ypage 315).
The Mercedes-Benz Customer Assistance Cen-
ter either sends a qualified Mercedes-Benz tech-
nician or makes arrangements for your vehicle
to be transported to the nearest Mercedes-Benz
Service Center.
You may be charged for services such as repair
work and/or towing.
You can find more information in the separate
mbrace manual.
The system has not been able to initiate a Road- side Assistance call, if:
Rthe F indicator lamp for the Roadside
Assistance call button is flashing continu-
ously.
Rno voice connection to the Mercedes-Benz
Customer Assistance Center was estab-
lished.
This can occur if the relevant mobile phone net-
work is not available, for example.
The Call Failed
message appears in the mul-
tifunction display.
XTo end a call: press the~button on the
multifunction steering wheel.
or
XPress the corresponding multimedia system
button for ending a phone call.
Info call button
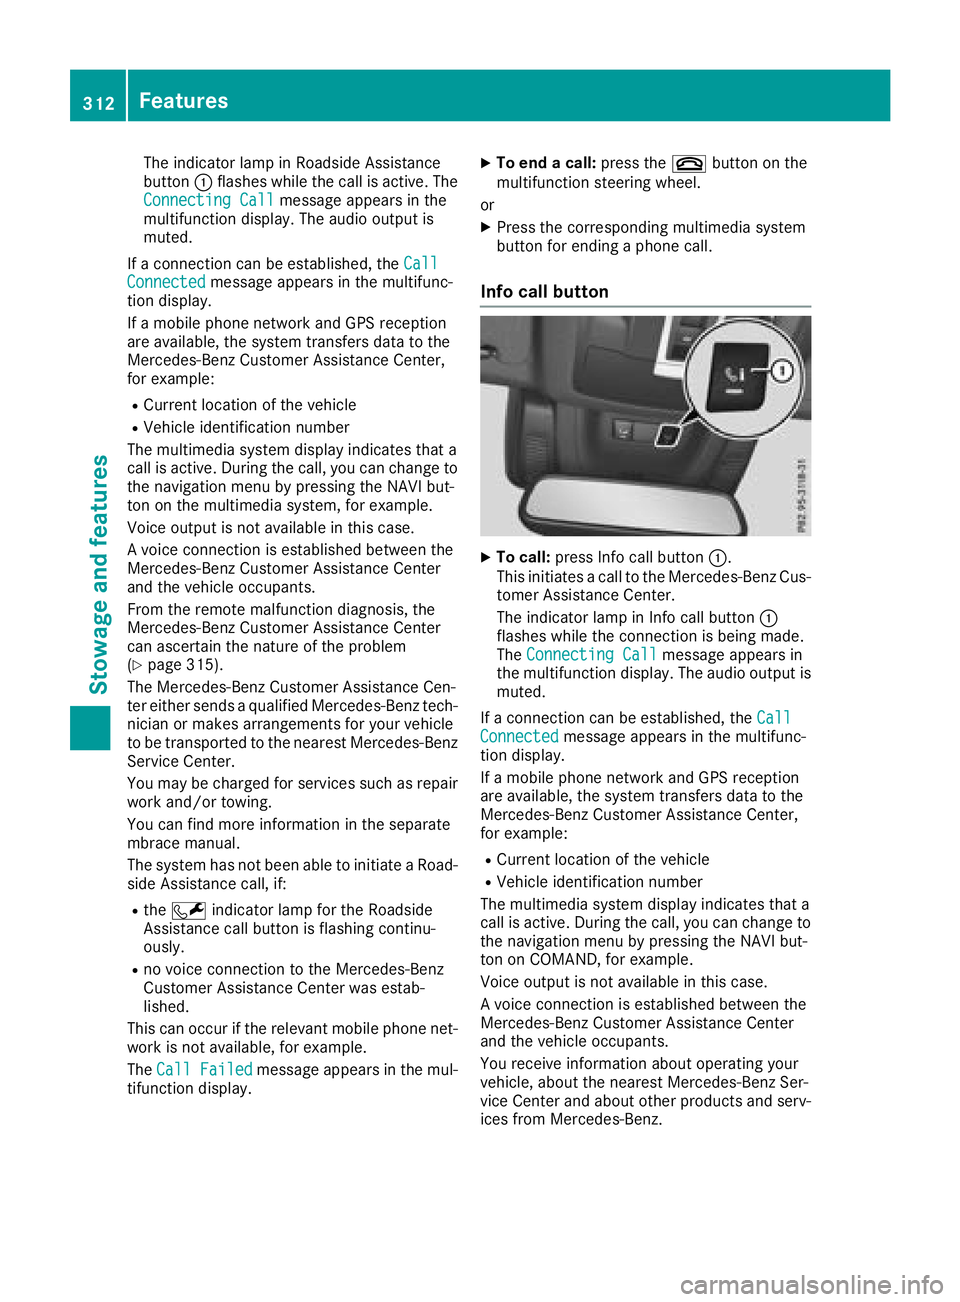
XTo call: press Info call button :.
This initiates a call to the Mercedes-Benz Cus-
tomer Assistance Center.
The indicator lamp in Info call button :
flashes while the connection is being made.
The Connecting Call
message appears in
the multifunction display. The audio output is muted.
If a connection can be established, the Call
Connectedmessage appears in the multifunc-
tion display.
If a mobile phone network and GPS reception
are available, the system transfers data to the
Mercedes-Benz Customer Assistance Center,
for example:
RCurrent location of the vehicle
RVehicle identification number
The multimedia system display indicates that a
call is active. During the call, you can change to
the navigation menu by pressing the NAVI but-
ton on COMAND, for example.
Voice output is not available in this case.
A voice connection is established between the
Mercedes-Benz Customer Assistance Center
and the vehicle occupants.
You receive information about operating your
vehicle, about the nearest Mercedes-Benz Ser-
vice Center and about other products and serv-
ices from Mercedes-Benz.
312Features
Stowage and features
Page 329 of 398
To avoid damage to the vehicle, deactivate
Distance Pilot DISTRONIC and the HOLD
function in the following or similar situations:
Rwhen towing the vehicle
Rin the car wash
!Never clean your vehicle in a Touchless
Automatic Car Wash as these use special
cleaning agents. These cleaning agents can
damage the paintwork or plastic parts.
!Make sure that:
Rthe side windows and the sliding sunroof
are fully closed.
Rthat the blower of the ventilation/heating
system is switched off (OFF button has
been pressed).
Rthe windshield wiper switch is at position
g.
The vehicle may otherwise be damaged.
!In car washes with a towing mechanism,
make sure that the automatic transmission is
in transmission position i; otherwise, the
vehicle could be damaged.
RVehicles with a SmartKey:
Do not remove the SmartKey from the igni-
tion lock. Do not open the driver's door or
front-passenger door when the engine is
switched off. Otherwise, the automatic
transmission selects park position jauto-
matically and locks the wheels. You can
prevent this by shifting the automatic trans-
mission to ibeforehand.
RVehicles with KEYLESS-GO:
Do not open the driver's door or front-
passenger door when the engine is
switched off. Otherwise, the automatic
transmission selects park position jauto-
matically and locks the wheels.
Observe the following to make sure that the
automatic transmission stays in position i:
XMake sure the vehicle is stationary and the
ignition is switched off.
XTurn the SmartKey to position in the ignition
lock2(Ypage 135).
Use the SmartKey instead of the Start/Stop
button on vehicles with KEYLESS-GO.
XDepress and hold the brake pedal.
XShift the automatic transmission to position
i.
XRelease the brake pedal.
XRelease the electric parking brake.
XSwitch off the ignition and leave the SmartKey
in the ignition lock.
You can wash the vehicle in an automatic car
wash from the very start.
If the vehicle is very dirty, pre-wash it before
cleaning it in an automatic car wash.
After using an automatic car wash, wipe off wax
from the windshield and the wiper blades. This
will prevent smears and reduce wiping noises caused by residue on t
he windshield.
Washing by hand
In some countries, washing by hand is only
allowed at specially equipped washing bays.
Observe the legal requirements in all countries
concerned.
XDo not use hot water and do not wash the
vehicle in direct sunlight.
XUse a soft sponge to clean.
XUse a mild cleaning agent, such as a car
shampoo approved by Mercedes-Benz.
XThoroughly hose down the vehicle with a gen-
tle jet of water.
XDo not point the water jet directly towards the
air inlets.
XUse plenty of water and rinse out the sponge
frequently.
XRinse the vehicle with clean water and dry
thoroughly with a chamois.
XDo not let the cleaning agent dry on the paint-
work.
When using the vehicle in winter, remove all
traces of road salt deposits carefully and as
soon as possible.
Power washers
GWARNING
The water jet from a circular jet nozzle (dirt
blasters) can cause invisible exterior damage
to the tires or chassis components. Compo-
nents damaged in this way may fail unexpect-
edly. There is a risk of an accident.
Do not use power washers with circular jet
nozzles to clean the vehicle. Have damaged
tires or chassis components replaced imme-
diately.
Care327
Maintenance and care
Z
Page 337 of 398
Vehicle tool kit
General notes
The vehicle tool kit can be found in the stowage
well under the cargo compartment floor.
Apart from certain country-specific variations,
the vehicles are not equipped with a tire-change
tool kit. Some tools for changing a wheel are
specific to the vehicle. For more information on
which tools are required to perform a wheel
change on your vehicle, consult a qualified spe-
cialist workshop.
Necessary tire-changing tools can include, for
example:
Rjack
Rwheel chock
Rlug wrench
Rratchet wrench
Ralignment bolt
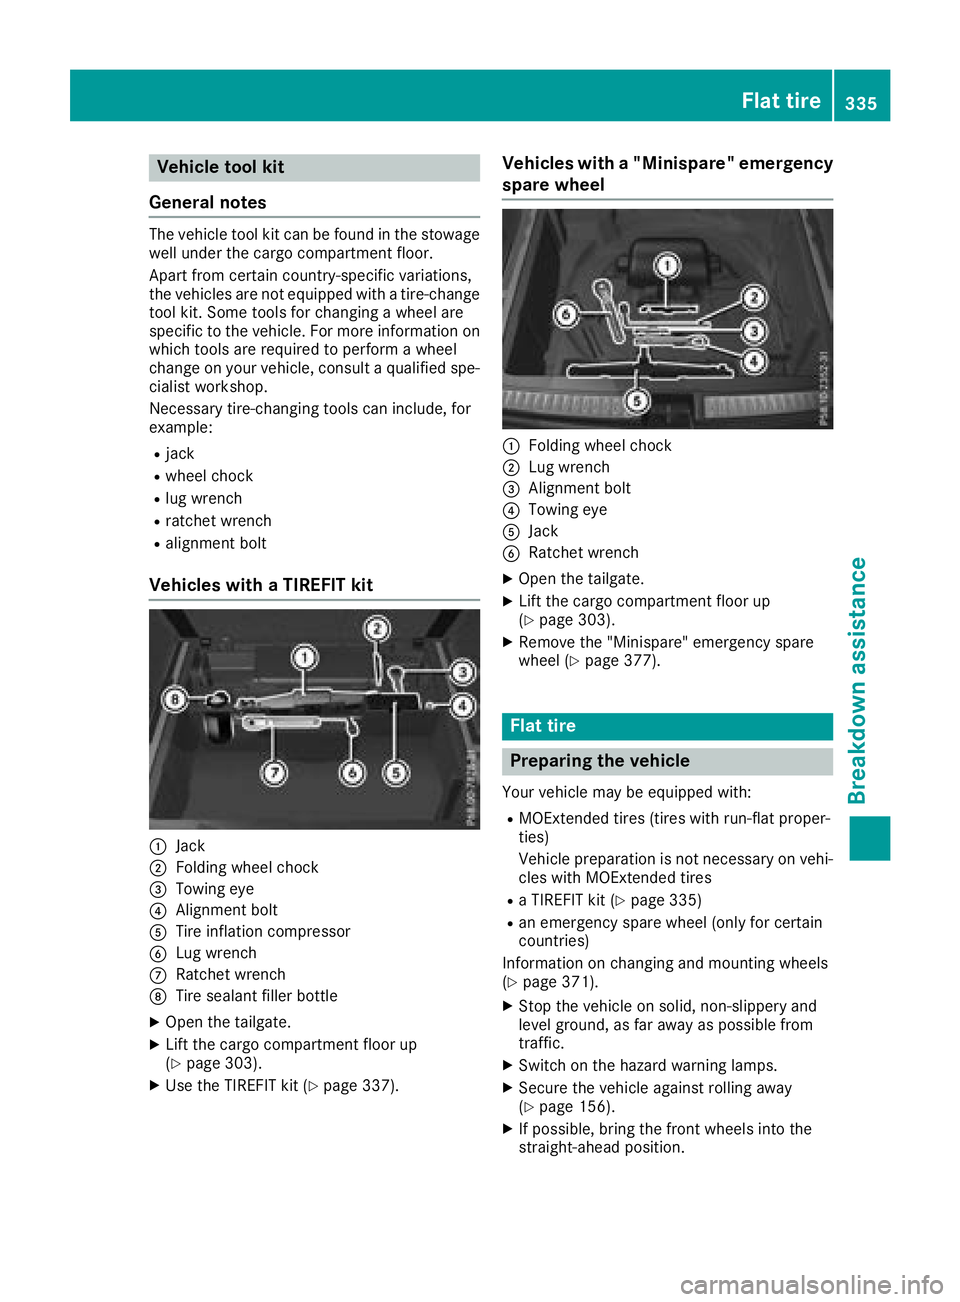
Vehicles with a TIREFIT kit
:Jack
;Folding wheel chock
=Towing eye
?Alignment bolt
ATire inflation compressor
BLug wrench
CRatchet wrench
DTire sealant filler bottle
XOpen the tailgate.
XLift the cargo compartment floor up
(Ypage 303).
XUse the TIREFIT kit (Ypage 337).
Vehicles with a "Minispare" emergency
spare wheel
:Folding wheel chock
;Lug wrench
=Alignment bolt
?Towing eye
AJack
BRatchet wrench
XOpen the tailgate.
XLift the cargo compartment floor up
(Ypage 303).
XRemove the "Minispare" emergency spare
wheel (Ypage 377).
Flat tire
Preparing the vehicle
Your vehicle may be equipped with:
RMOExtended tires (tires with run-flat proper-
ties)
Vehicle preparation is not necessary on vehi-
cles with MOExtended tires
Ra TIREFIT kit (Ypage 335)
Ran emergency spare wheel (only for certain
countries)
Information on changing and mounting wheels
(
Ypage 371).
XStop the vehicle on solid, non-slippery and
level ground, as far away as possible from
traffic.
XSwitch on the hazard warning lamps.
XSecure the vehicle against rolling away
(Ypage 156).
XIf possible, bring the front wheels into the
straight-ahead position.
Flat tire335
Breakdo wn assis tance
Page 347 of 398
iJumper cables and further information regarding jump-starting can be obtained at any qualified
specialist workshop.
Towing and tow-starting
Important safety notes
Plug-in hybrid: be sure to read the separate
Operator's Manual. You could otherwise fail to
recognize dangers, e.g. due to high voltage.
GWARNING
Functions relevant to safety are restricted or
no longer available if:
Rthe engine is not running.
Rthe brake system or the power steering is
malfunctioning.
Rthere is a malfunction in the voltage supply or the vehicle's electrical system.
If your vehicle is being towed, much more
force may be necessary to steer or brake.
There is a risk of an accident.
In such cases, use a tow bar. Before towing,
make sure that the steering moves freely.
GWARNING
When towing or tow-starting another vehicle
and its weight is greater than the permissible
gross weight of your vehicle, the:
Rthe towing eye could detach itself
Rthe vehicle/trailer combination could roll-
over.
There is a risk of an accident.
When towing or tow-starting another vehicle,
its weight should not be greater than the per- missible gross weight of your vehicle.
Details on the permissible gross vehicle weight
of your vehicle can be found on the vehicle iden-
tification plate (
Ypage 382).
!When Active Brake Assist, Distance Pilot
DISTRONIC or the HOLD function is activated,
the vehicle brakes automatically in certain
situations. To avoid damage to the vehicle, deactivate
these systems in the following or similar sit-
uations:
Rwhen towing the vehicle
Rin the car wash
!Make sure that the electric parking brake is
released. If the electric parking brake is faulty,
visit a qualified specialist workshop.
!Only secure the tow rope or tow bar at the
towing eyes, or the trailer tow hitch, if availa-
ble. You could otherwise damage the vehicle.
!Observe the following points when towing
with a tow rope:
RSecure the tow rope on the same side on
both vehicles.
RMake sure that the tow rope is not longer
than legally permitted. Mark the tow rope in
the middle, e.g. with a white c
loth
(11.8 x 11.8 in). This will make other road
users aware that a vehicle is being towed.
ROnly secure the tow cable to the towing
eyes or, if available, to the trailer tow hitch.
RObserve the brake lamps of the towing
vehicle while driving. Always maintain a dis-
tance a distance so that the tow rope does not sag.
RDo not use steel cables or chains to tow
your vehicle. You could otherwise damage
the vehicle.
!Do not use the trailer tow hitch for recovery
or towing. Do not use the towing eye for
recovery. this could damage the vehicle. If in
doubt, have the vehicle recovered using a
crane.
!When towing, pull away slowly and
smoothly. Pull the towed vehicle as straight as
possible and not at an acute angle. Excessive
tractive power could damage the vehicles.
When towing, it is preferable to use a rigid tow-
ing bar as opposed to a tow rope. A rigid towing bar helps to keep the tractive power low.
!When towing away vehicles with KEYLESS-
GO, use the key instead of the Start/Stop
button. The automatic transmission may oth-
erwise shift to position jwhen you open the
Towing and tow-starting345
Breakdown assistance
Z