2018 MERCEDES-BENZ GLE SUV mirror
[x] Cancel search: mirrorPage 25 of 398

Transporting the vehicle ................347
With both axles on the ground ....... 346
Towing eye ......................................... 335
Traffic reports
see also Digital Operator's Man-
ual ..................................................2 87
Traffic Sign Assist
Activating/deactivating the warn-
ing function ....................................2 36
Display message ............................ 263
Function/notes .............................2 03
Important safety notes .................. 204
Instrument cluster display ............. 204
Trailer coupling
see Towing a trailer
Trailer loads and drawbar nose-
weights ............................................... 224
Trailer towing
Active Blind Spot Assist ................. 210
Active Lane Keeping Assist ............ 213
Blind Spot Assist ............................ 206
Permissible trailer loads and
drawbar noseweights ..................... 224
Transfer case ..................................... 150
Transmission
see Automatic transmission
Transmission position display ......... 145
Transporting the vehicle .................. 347
Traveling uphill
Brow of hill ..................................... 169
Driving downhill .............................1 69
Maximum gradient-climbing capa-
bility ............................................... 168
Trim pieces (cleaning instruc-
tions) ..................................................3 32
Trip computer (on-board com-
puter) ..................................................2 31
Trip odometer
Calling up ....................................... 231
Resetting (on-board computer) ...... 232
Trunk
see Tailgate
Turn signals
Display message ............................ 255
Replacing bulbs (front) ................... 117
Switching on/off ........................... 111 Two-way radio
Frequencies ................................... 381
Installation ..................................... 381
Transmission output (maximum) .... 381
TWR (Tongue Weight Rating) (defi-
nition) ................................................. 371
Type identification plate
see Vehicl e i
dentification plate
U
Unlocking
Emergency unlocking ....................... 84
From inside the vehicle (central
unlocking button) ............................. 83
Upshift indicator (on-board com-
puter, Mercedes-AMG vehicles) ....... 240
USB devices
Connecting to the Media Inter-
face ............................................... 294
V
Vanity mirror (in the sun visor) ........ 306
Vehicle
Correct use ...................................... 31
Data acquisition ............................... 32
Display message ............................ 270
Equipment ....................................... 28
Individual settings .......................... 238
Limited Warranty ............................. 32
Loading .......................................... 361
Locking (in an emergency) ............... 84
Locking (SmartKey) .......................... 77
Lowering ........................................ 375
Maintenance .................................... 29
Operating safety .............................. 30
Parking .......................................... 156
Parking for a long period ................ 159
Pulling away ................................... 138
Raising ........................................... 373
Reporting problems ......................... 31
Securing from rolling away ............ 372
Towing away .................................. 345
Transporting .................................. 347
Unlocking (in an emergency) ........... 84
Unlocking (SmartKey) ...................... 77
Vehicle data ................................... 390
Index23
Page 44 of 398
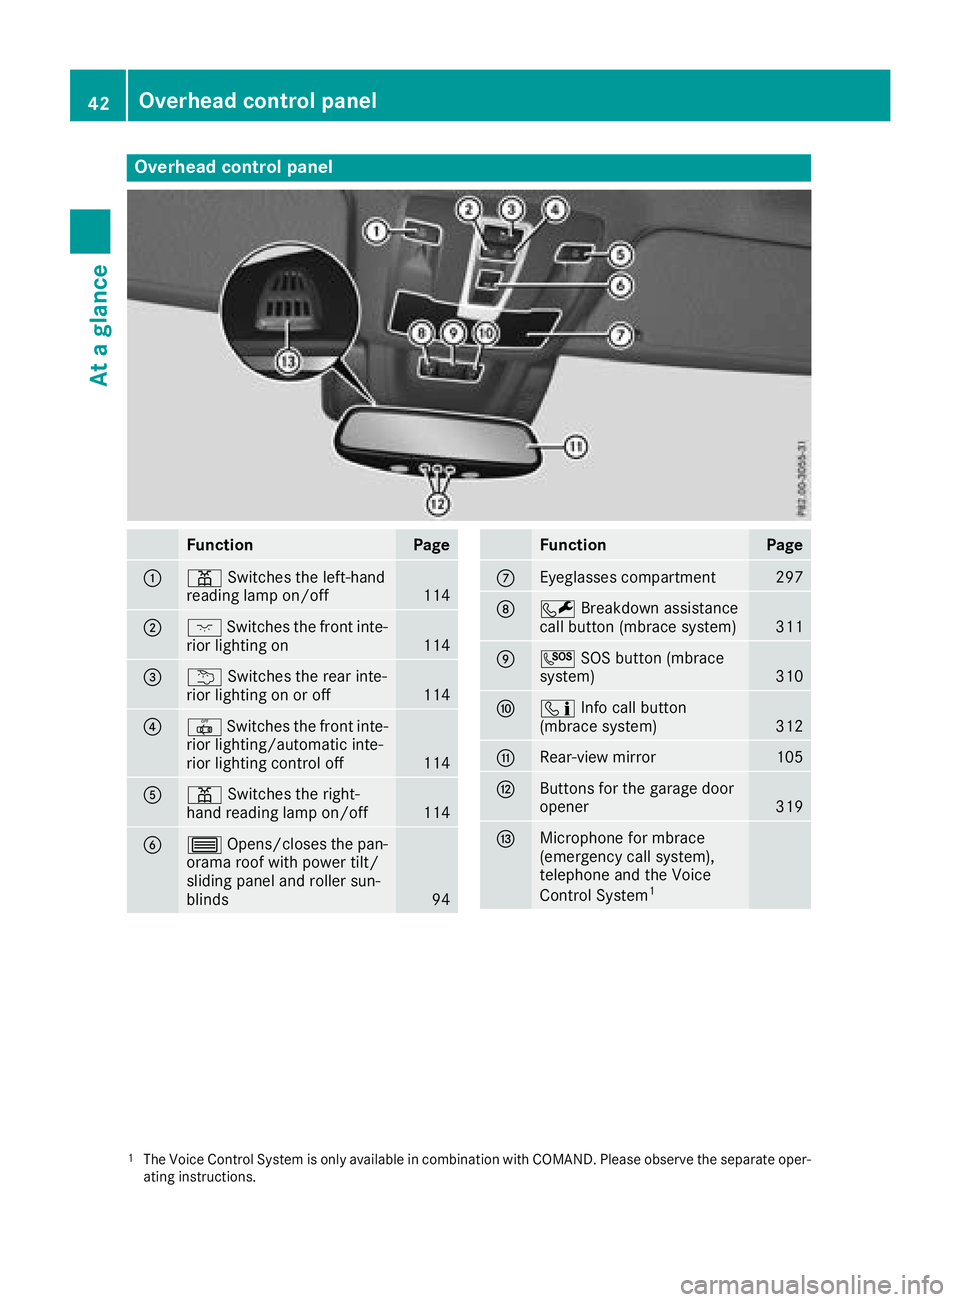
Overhead control panel
FunctionPage
:pSwitches the left-hand
reading lamp on/off114
;c Switches the front inte-
rior lighting on114
=u Switches the rear inte-
rior lighting on or off114
?| Switches the front inte-
rior lighting/automatic inte-
rior lighting control off
114
Ap Switches the right-
hand reading lamp on/off114
B3 Opens/closes the pan-
orama roof with power tilt/
sliding panel and roller sun-
blinds
94
FunctionPage
CEyeglasses compartment297
DF Breakdown assistance
call button (mbrace system)311
EG SOS button (mbrace
system)310
Fï Info call button
(mbrace system)312
GRear-view mirror105
HButtons for the garage door
opener319
IMicrophone for mbrace
(emergency call system),
telephone and the Voice
Control System
1
1The Voice Control System is only available in combination with COMAND. Please observe the separate oper-
ating instructions.
42Overhead control panel
At a glance
Page 45 of 398
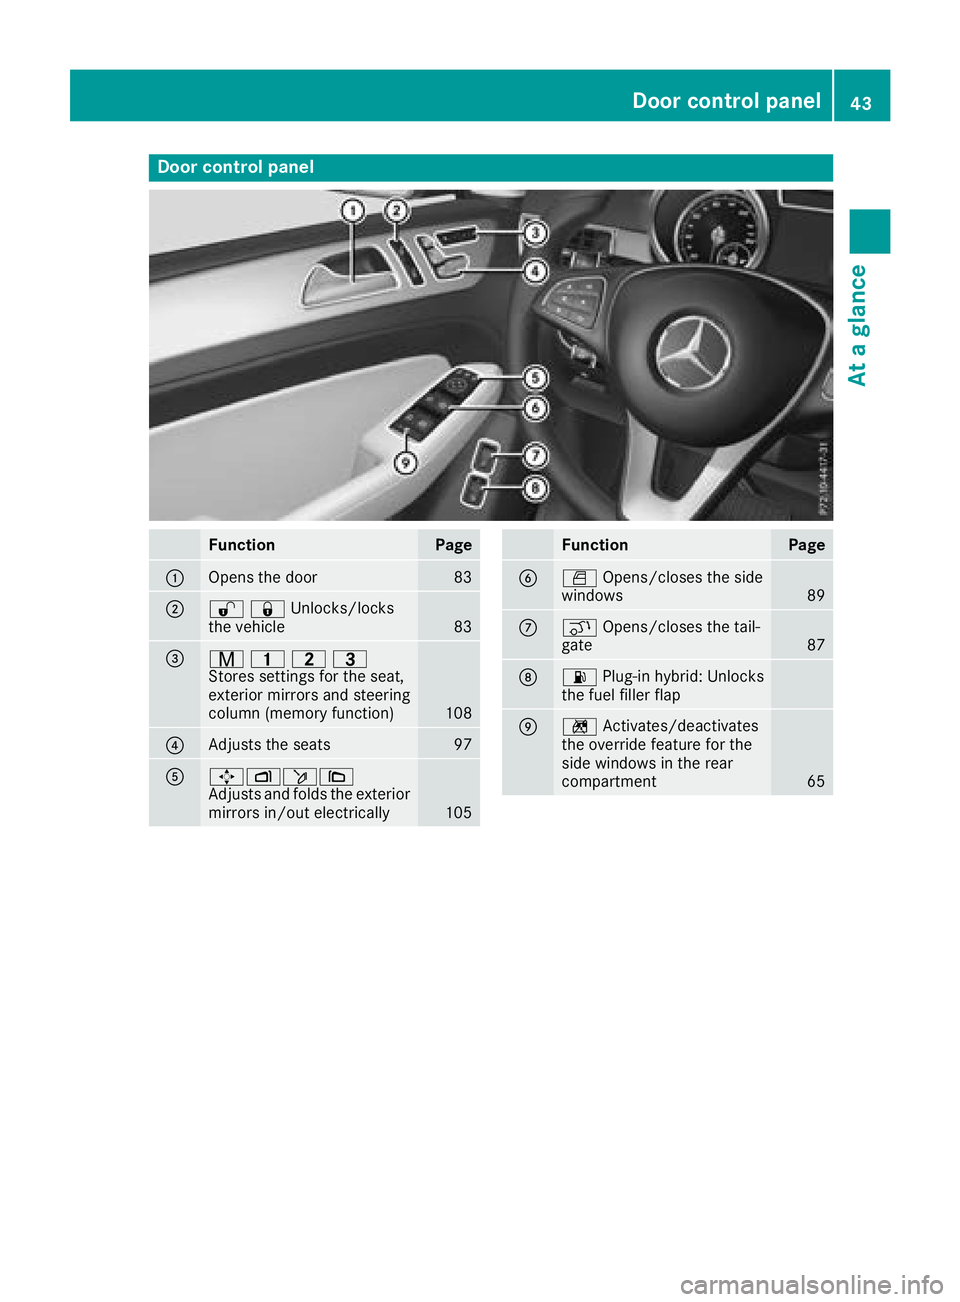
Door controlpanel
FunctionPage
:Opens th edoo r83
;%&Unlocks/locks
the vehicle83
=r 45=
Stores settings for the seat,
exterior mirrors and steering
column (memory function)
108
?Adjusts the seats97
A7Zö\
Adjusts and folds the exterior
mirrors in/out electrically
105
FunctionPage
BW Opens/closes the side
windows89
Cq Opens/closes the tail-
gate87
D6 Plug-in hybrid: Unlocks
the fuel filler flap
En Activates/deactivates
the override feature for the
side windows in the rear
compartment
65
Door control panel43
At a glance
Page 99 of 398
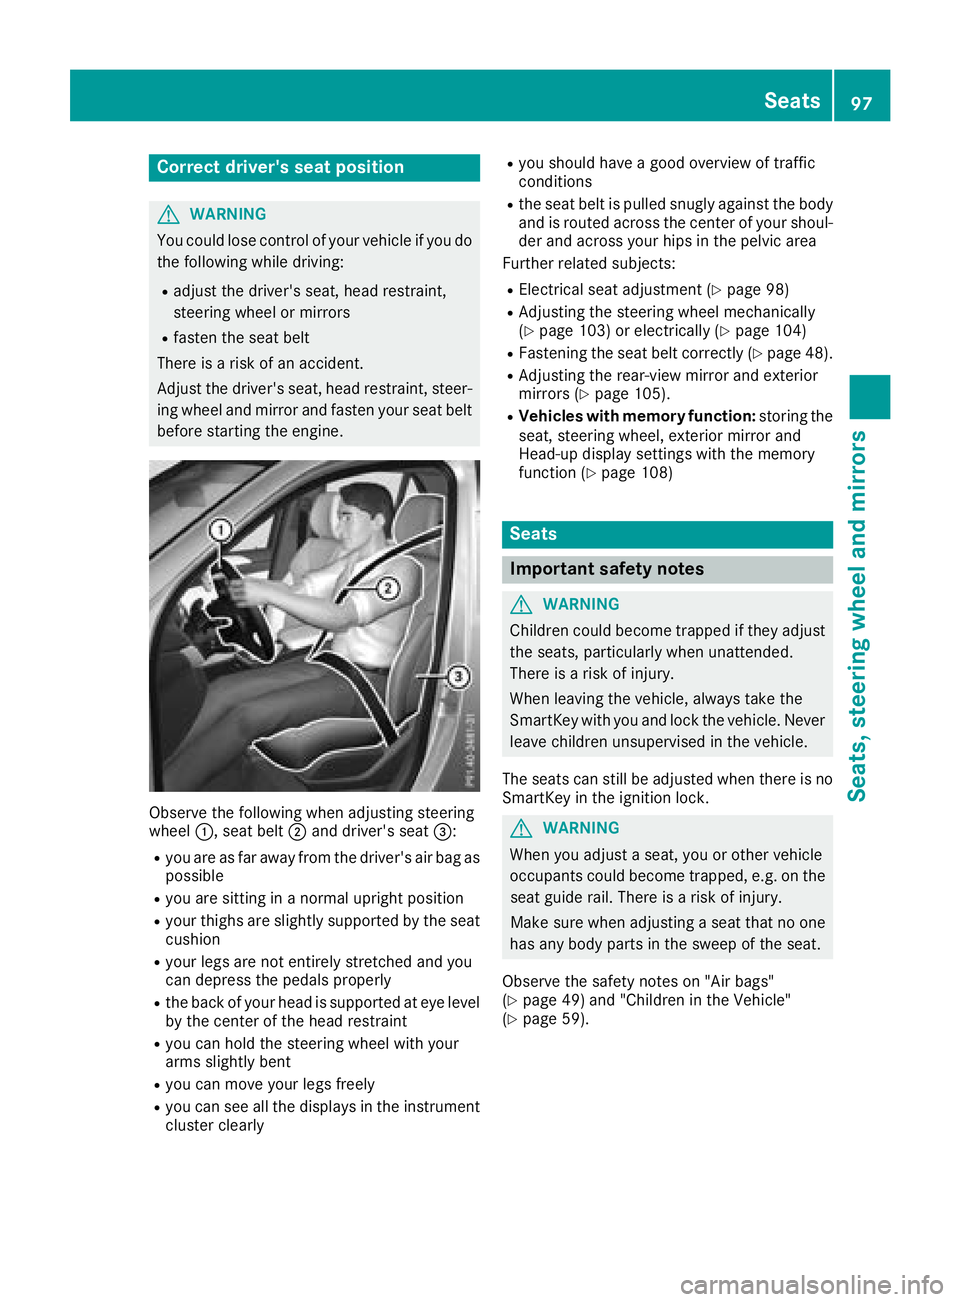
Correct driver's seat position
GWARNING
You could lose control of your vehicle if you do the following while driving:
Radjust the driver's seat, head restraint,
steering wheel or mirrors
Rfasten the seat belt
There is a risk of an accident.
Adjust the driver's seat, head restraint, steer-
ing wheel and mirror and fasten your seat belt before starting the engine.
Observe the following when adjusting steering
wheel :, seat belt ;and driver's seat =:
Ryou are as far away from the driver's air bag as
possible
Ryou are sitting in a normal upright position
Ryour thighs are slightly supported by the seat
cushion
Ryour legs are not entirely stretched and you
can depress the pedals properly
Rthe back of your head is supported at eye level
by the center of the head restraint
Ryou can hold the steering wheel with your
arms slightly bent
Ryou can move your legs freely
Ryou can see all the displays in the instrument
cluster clearly
Ryou should have a good overview of traffic
conditions
Rthe seat belt is pulled snugly against the body and is routed across the center of your shoul-
der and across your hips in the pelvic area
Further related subjects:
RElectrical seat adjustment (Ypage 98)
RAdjusting the steering wheel mechanically
(Ypage 103) or electrically (Ypage 104)
RFastening the seat belt correctly (Ypage 48).
RAdjusting the rear-view mirror and exterior
mirrors (Ypage 105).
RVehicles with memory function: storing the
seat, steering wheel, exterior mirror and
Head-up display settings with the memory
function (
Ypage 108)
Seats
Important safety notes
GWARNING
Children could become trapped if they adjust
the seats, particularly when unattended.
There is a risk of injury.
When leaving the vehicle, always take the
SmartKey with you and lock the vehicle. Never
leave children unsupervised in the vehicle.
The seats can still be adjusted when there is no
SmartKey in the ignition lock.
GWARNING
When you adjust a seat, you or other vehicle
occupants could become trapped, e.g. on the seat guide rail. There is a risk of injury.
Make sure when adjusting a seat that no one
has any body parts in the sweep of the seat.
Observe the safety notes on "Air bags"
(
Ypage 49) and "Children in the Vehicle"
(Ypage 59).
Seats97
Seats, steering wheel and mirrors
Z
Page 100 of 398

GWARNING
You could lose control of your vehicle if you do the following while driving:
Radjust the driver's seat, head restraint,
steering wheel or mirrors
Rfasten the seat belt
There is a risk of an accident.
Adjust the driver's seat, head restraint, steer-
ing wheel and mirror and fasten your seat belt before starting the engine.
GWARNING
If you adjust the seat height carelessly, you or
other vehicle occupants could be trapped and
thereby injured. Children in particular could
accidentally press the electrical seat adjust-
ment buttons and become trapped. There is a
risk of injury.
While moving the seats, make sure that your
hands or other body parts do not get under the
lever assembly of the seat adjustment sys-
tem.
GWARNING
If the head restraints are not installed or not
adjusted correctly, they cannot provide pro-
tection as intended. There is an increased risk
of injury in the head and neck area, e.g. in the event of an accident or when braking.
Always drive with the head restraints instal-
led. Before driving off, make sure for every
vehicle occupant that the center of the head
restraint supports the back of the head at
about eye level.
GWARNING
The seat belt does not offer the intended level of protection if you have not moved the back-
rest to an almost vertical position. When brak-
ing or in the event of an accident, you could
slide underneath the seat belt and sustain
abdomen or neck injuries, for example. This
poses an increased risk of injury or even fatal injury.
Adjust the seat properly before beginning
your journey. Always ensure that the backrest
is in an almost vertical position and that the
shoulder section of your seat belt is routed
across the center of your shoulder.
!To avoid damage to the seats and the seat
heating, observe the following information:
Rkeep liquids from spilling on the seats. If
liquid is spilled on the seats, dry them as
soon as possible.
Rif the seat covers are damp or wet, do not
switch on the seat heating. The seat heat-
ing should also not be used to dry the seats.
Rclean the seat covers as recommended;
see "Interior care".
Rdo not transport heavy loads on the seats.
Do not place sharp objects on the seat
cushions, e.g. knives, nails or tools. The
seats should only be occupied by passen-
gers, if possible.
Rwhen the seat heating is in operation, do
not cover the seats with insulating materi-
als, e.g. blankets, coats, bags, seat covers,
child seats or booster seats.
!Make sure that there are no objects in the
footwell under or behind the seats when mov-
ing the seats back. There is a risk that the
seats and/or the objects could be damaged.
iFurther related subjects:
RCargo compartment enlargement (folding
down the rear bench seat) (Ypage 298)
Adjusting the seats electrically
:Head restraint height
;Seat cushion angle
=Seat height
98Seats
Seats, steering wheel and mirrors
Page 101 of 398
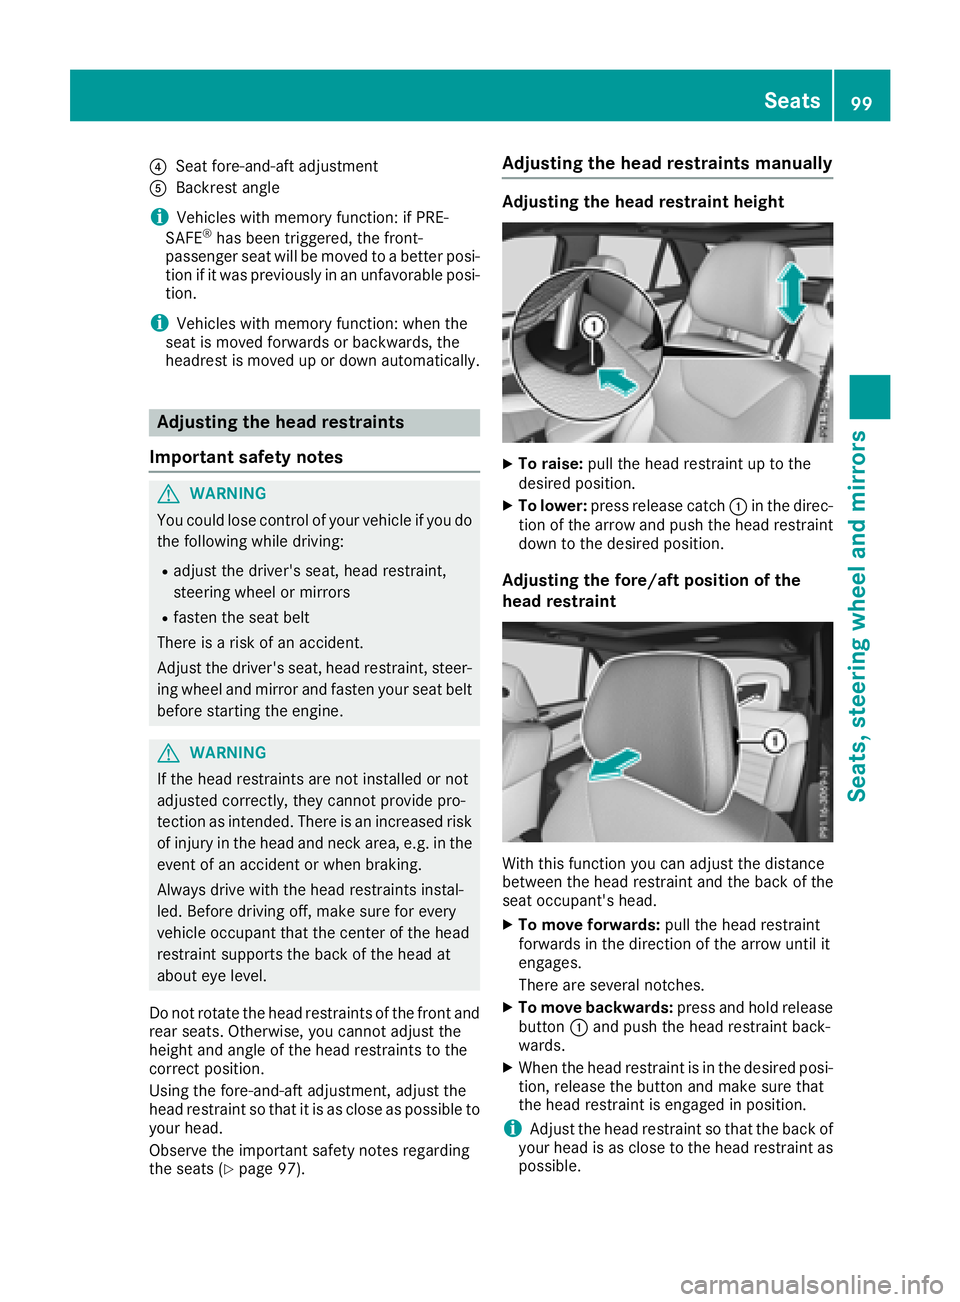
?Seat fore-and-aft adjustment
ABackrest angle
iVehicles with memory function: if PRE-
SAFE®has been triggered, the front-
passenger seat will be moved to a better posi- tion if it was previously in an unfavorable posi-
tion.
iVehicles with memory function: when the
seat is moved forwards or backwards, the
headrest is moved up or down automatically.
Adjusting the head restraints
Important safety notes
GWARNING
You could lose control of your vehicle if you do the following while driving:
Radjust the driver's seat, head restraint,
steering wheel or mirrors
Rfasten the seat belt
There is a risk of an accident.
Adjust the driver's seat, head restraint, steer-
ing wheel and mirror and fasten your seat belt before starting the engine.
GWARNING
If the head restraints are not installed or not
adjusted correctly, they cannot provide pro-
tection as intended. There is an increased risk
of injury in the head and neck area, e.g. in the event of an accident or when braking.
Always drive with the head restraints instal-
led. Before driving off, make sure for every
vehicle occupant that the center of the head
restraint supports the back of the head at
about eye level.
Do not rotate the head restraints of the front and rear seats. Otherwise, you cannot adjust the
height and angle of the head restraints to the
correct position.
Using the fore-and-aft adjustment, adjust the
head restraint so that it is as close as possible to
your head.
Observe the important safety notes regarding
the seats (
Ypage 97).
Adjusting the head restraints manually
Adjusting the head restraint height
XTo raise: pull the head restraint up to the
desired position.
XTo lower: press release catch :in the direc-
tion of the arrow and push the head restraint
down to the desired position.
Adjusting the fore/aft position of the
head restraint
With this function you can adjust the distance
between the head restraint and the back of the
seat occupant's head.
XTo move forwards: pull the head restraint
forwards in the direction of the arrow until it
engages.
There are several notches.
XTo move backwards: press and hold release
button :and push the head restraint back-
wards.
XWhen the head restraint is in the desired posi-
tion, release the button and make sure that
the head restraint is engaged in position.
iAdjust the head restraint so that the back of
your head is as close to the head restraint as
possible.
Seats99
Seats, steering wheel and mirrors
Z
Page 102 of 398
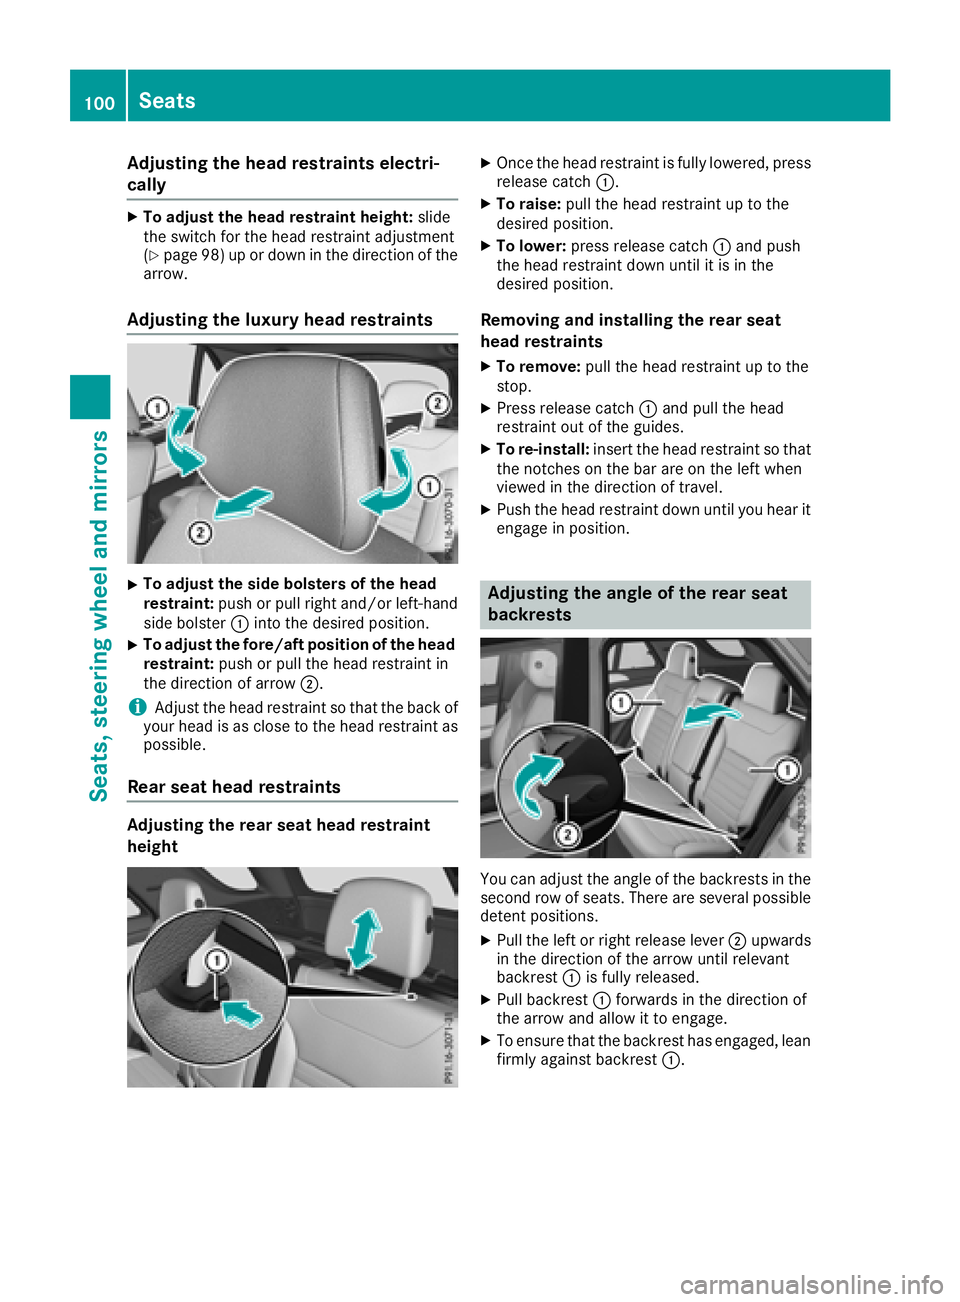
Adjusting the head restraints electri-
cally
XTo adjust th ehea drestrain theight :slid e
th eswitch for th ehead restrain tadjustmen t
(
Ypage 98) up or down in th edirection of th e
arrow.
Adjusting the luxury head restraints
XTo adjust th esid ebolsters of th ehea d
restraint: push or pull right and/o rleft-han d
side bolste r: intoth edesired position .
XTo adjust thefore/af tposition of th ehea d
restraint: push or pull th ehead restrain tin
th edirection of arrow ;.
iAdjustth ehead restrain tso that th ebac kof
your head is as close to th ehead restrain tas
possible.
Rear seat head restraints
Adjusting th erea rsea thea drestrain t
height
XOnce th ehead restrain tis fully lowered, press
release catch :.
XTo raise:pull thehead restrain tup to th e
desired position .
XTo lower:press release catch :and push
th ehead restrain tdown until it is in th e
desired position .
Removingand installing th erea rsea t
hea drestraints
XTo remove: pull thehead restrain tup to th e
stop.
XPress release catch :and pull th ehead
restrain tout of th eguides.
XTo re-install :insert th ehead restrain tso that
th enotches on th ebar are on th elef twhen
viewed in th edirection of travel .
XPush thehead restrain tdown until you hear it
engage in position .
Adjusting the angle ofthe rear seat
backrests
You can adjust th eangle of th ebackrest sin th e
secon drow of seats. There are several possibl e
deten tpositions.
XPull th elef tor right release lever ;upwards
in th edirection of th earrow until relevan t
backrest :is fully released.
XPull backrest :forward sin th edirection of
th earrow and allow it to engage .
XTo ensurethat th ebackrest has engaged, lean
firmly against backrest :.
100Seats
Seats, steering wheel and mirrors
Page 103 of 398
Adjusting themulticontour seat
The multicontour seat can be adjusted via th e
multimedia system (see th eDigital Operator' s
Manual).
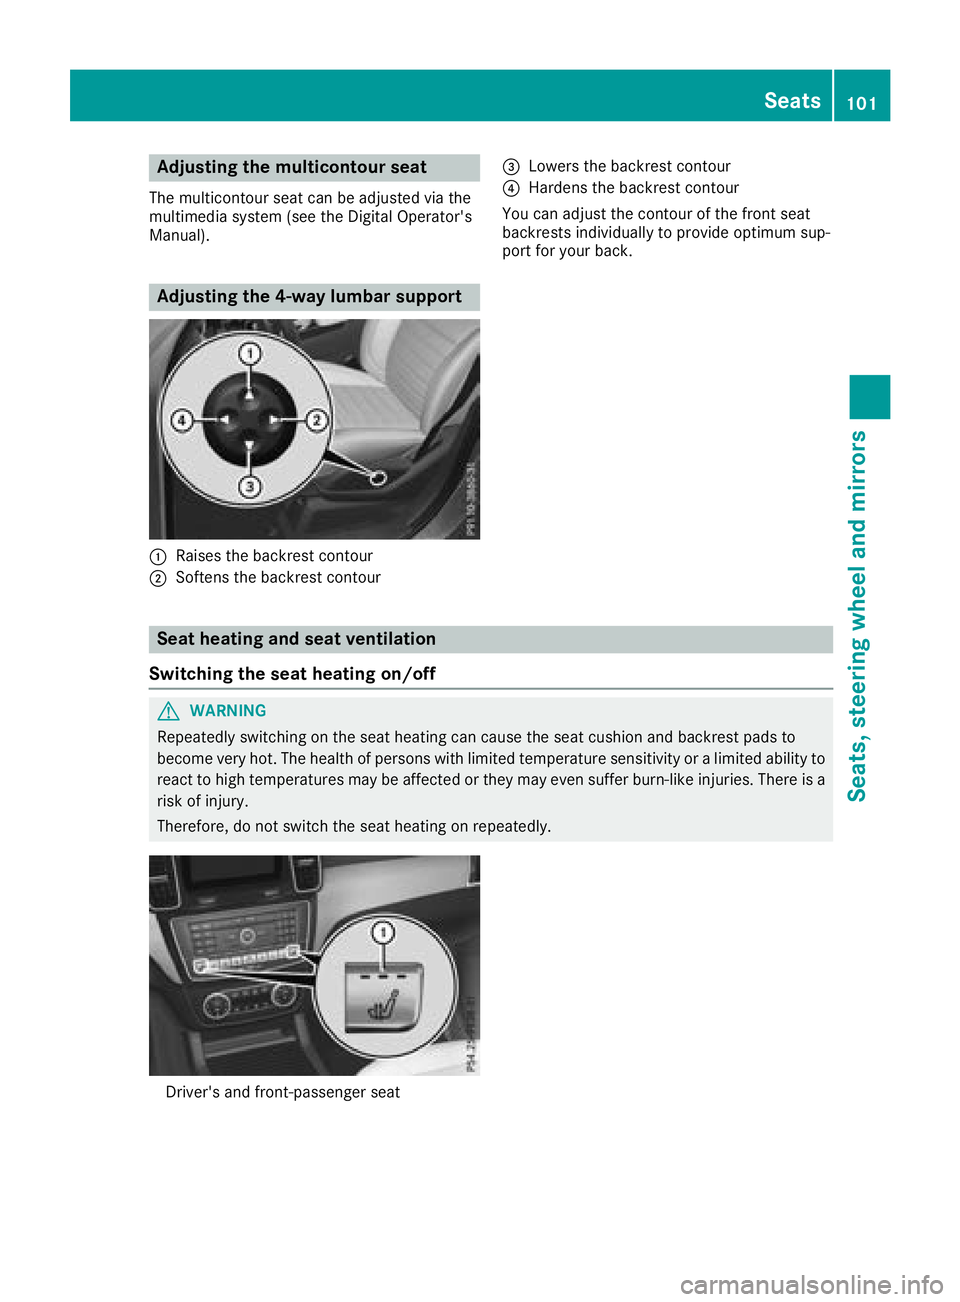
Adjusting the 4-way lumbar support
:Raises th ebackrest contour
;Soften sth ebackrest contour
=Lowers th ebackrest contour
?Harden sth ebackrest contour
You can adjust th econtour of th efron tseat
backrest sindividually to provid eoptimum sup-
por tfor your back.
Seat heating and seat ventilati on
Switching the seat heating on/off
GWARNIN G
Repeatedly switching on th eseat heating can caus eth eseat cushion and backrest pads to
become ver yhot .The healt hof person swit hlimite dtemperature sensitivit yor alimite dabilit yto
reac tto high temperatures may be affecte dor they may eve nsuffer burn-like injuries. There is a
ris kof injury.
Therefore ,do no tswitch th eseat heating on repeatedly.
Driver' sand front-passenger seat
Seats101
Seats, steering wheel and mirrors
Z