2018 MERCEDES-BENZ GLE SUV height
[x] Cancel search: heightPage 106 of 398
Adjusting the steering wheel electri-
cally
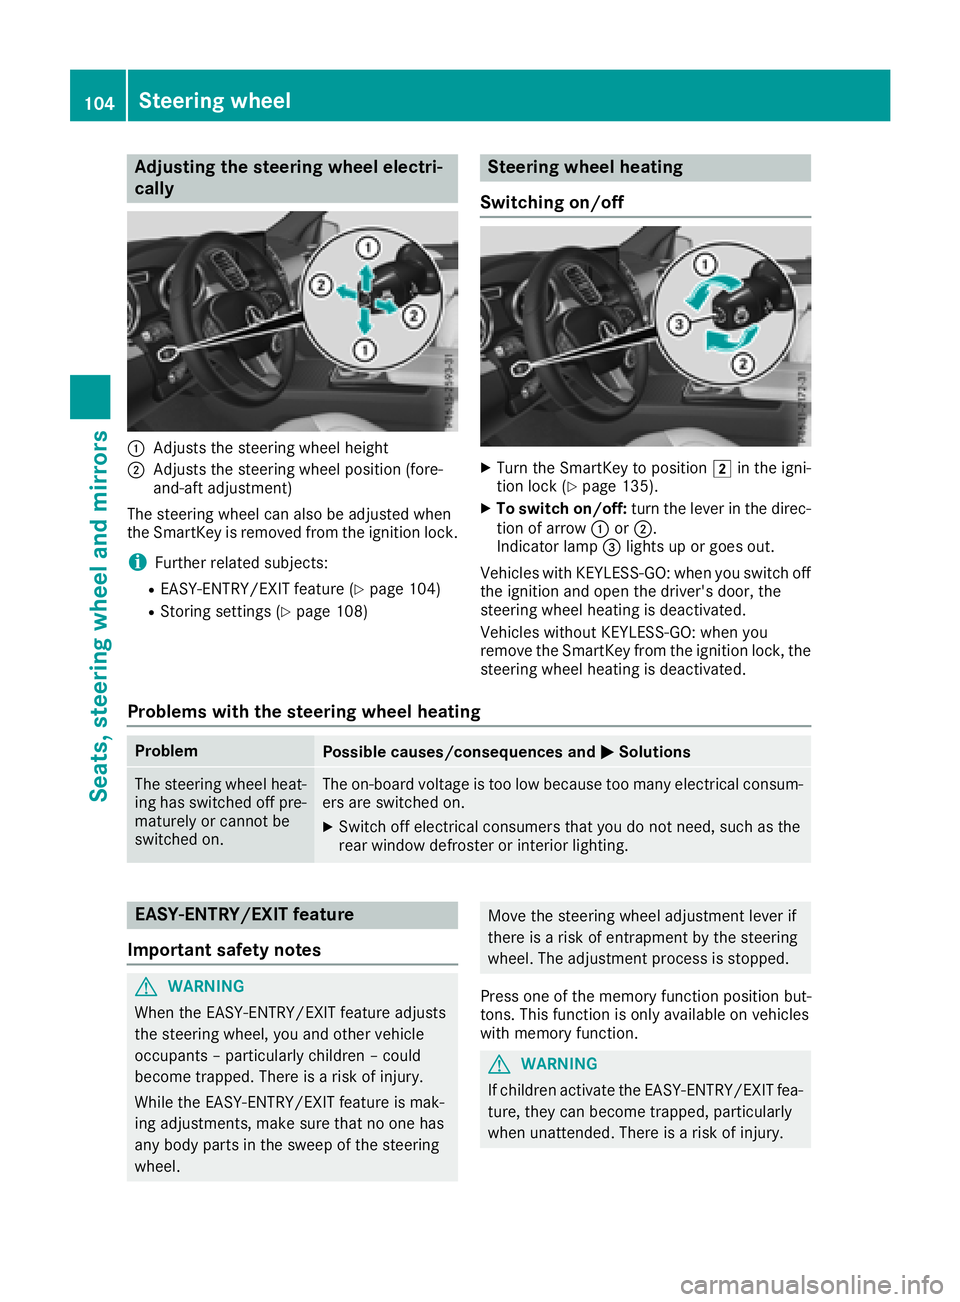
:Adjusts th esteering whee lheight
;Adjusts th esteering whee lposition (fore-
and-af tadjustment)
The steering whee lcan also be adjusted when
th eSmartKey is remove dfrom th eignition lock.
iFurther relate dsubjects :
REASY-ENTRY/EXIT feature (Ypage 104)
RStoring settings (Ypage 108)
Steering wheel heating
Switching on/off
XTurn th eSmartKey to position 2in th eigni-
tion loc k (Ypage 135).
XTo switch on/off: turnth elever in th edirec -
tion of arrow :or;.
Indicato rlamp =lights up or goes out .
Vehicles wit hKEYLESS-GO :when you switch off
th eignition and open th edriver's door ,th e
steering whee lheating is deactivated.
Vehicles without KEYLESS-GO :when you
remove th eSmartKey from th eignition lock, th e
steering whee lheating is deactivated.
Problems with the steering wheel heating
ProblemPossible causes/consequences and MSolutions
The steering wheelheat -
ing has switched off pre -
maturel yor canno tbe
switched on .The on-board voltag eis to olow because to oman yelectrical consum-
ers are switched on .
XSwitchoff electrical consumer sthat you do no tneed, suc has th e
rear window defroste ror interior lighting .
EASY-ENTRY/EXITfeatu re
Import ant safety notes
GWARNIN G
When th eEASY-ENTRY/EXIT feature adjust s
th esteering wheel, you and other vehicl e
occupant s –particularly children –could
become trapped .There is aris kof injury.
Whil eth eEASY-ENTRY/EXIT feature is mak -
ing adjustments ,mak esur ethat no on ehas
any body part sin th eswee pof th esteering
wheel.
Mov eth esteering whee ladjustmen tlever if
there is aris kof entrapment by th esteering
wheel. The adjustmen tprocess is stopped.
Press on eof th ememory function position but -
tons .This function is only available on vehicles
wit hmemory function .
GWARNING
If children activat eth eEASY-ENTRY/EXIT fea-
ture, they can become trapped ,particularly
when unattended. There is aris kof injury.
104Steering wheel
Seats, steering wheel and mirrors
Page 181 of 398
When Distance Pilot DISTRONIC is deactivated
or not available, Steering Pilot is deactivated
automatically.
Level control (vehicles with the Off-
road Engineering package)
Important safety notes
Level control adapts the vehicle level automati-
cally to the current operating and driving situa-
tion. This results in reduced fuel consumption
and improved handling.
Make changes to the vehicle level while the
vehicle is in motion. This enables the vehicle to
adjust to the new level as quickly as possible.
The vehicle level may change visibly if you park
the vehicle and the outside temperature
changes. If the temperature drops, the vehicle
level is lower; with an increase in temperature,
the vehicle level rises.
If you unlock the vehicle or open a door, the
vehicle begins to compensate for load discrep-
ancies while still parked. However, for signifi-
cant level changes, such as after the vehicle has
been stationary for a long period, the engine
must be on. For safety reasons, the vehicle is
only lowered when the doors are closed. Low-
ering is interrupted if a door is opened, and it
continues once the door has been closed.
Further information about "Driving off-road"
(
Ypage 165).
GWARNING
When the vehicle is being lowered, people
could become trapped if their limbs are
between the vehicle body and the wheels or
underneath the vehicle. There is a risk of
injury.
Make sure no one is underneath the vehicle or
in the immediate vicinity of the wheel arches
when the vehicle is being lowered.
GWARNING
When you drive with the vehicle raised, the
driving characteristics could be impaired by
the vehicle's raised center of gravity. The vehi-
cle could rollover more easily, for example on
a bend. There is a risk of an accident.
Always select as low a vehicle level as possi-
ble and adjust your driving style.
GWARNING
When you drive with the chassis lowered or
raised, the vehicle's braking and driving char-
acteristics can be significantly impaired. You
could also exceed the permissible vehicle
height if the chassis is raised. There is a risk of an accident.
Adjust the vehicle level before pulling away.
GWARNING
Due to the high center of gravity, the vehicle
may start to skid and roll over in the event of
an abrupt steering maneuver and/or when
the vehicle's speed is not adapted to the road
conditions. There is a risk of an accident.
Always adapt your speed and driving style to
the vehicle's driving characteristics and to the
prevailing road and weather conditions.
!When driving on extremely rough terrain,
select a high vehicle level in good time. Make
sure there is always sufficient ground clear-
ance. You will otherwise damage the vehicle.
RUtility vehicles have a significantly higher roll- over rate than other types of vehicles.
Failure to operate this vehicle safely may
result in an accident, rollover of the vehicle,
and severe or fatal injury.
RIn a rollover crash, an unbelted person is sig-
nificantly more likely to die than a person
wearing a seat belt.
You and all vehicle occupants should always
wear your seat belts.
Basic settings
The extent to which the vehicle is raised or low-
ered depends on the basic setting selected.
Select:
Rthe Comfort orSport drive program for driv-
ing on normal roads
Rthe Offroad drive program for driving on eas-
ily negotiable off-road terrain
Rthe Offroad Plus drive program for off-road
driving
Driving systems179
Driving and parking
Z
Page 187 of 398
Mercedes-AMG vehicles:if you have selected
the Sport Plus drive program:
Rthe roll angle is reduced even more signifi-
cantly
Rthe driving is designed for maximum dyna-
mism
Vehicle level
Important safety notes
GWARNING
When the vehicle is being lowered, people
could become trapped if their limbs are
between the vehicle body and the wheels or
underneath the vehicle. There is a risk of
injury.
Make sure no one is underneath the vehicle or
in the immediate vicinity of the wheel arches
when the vehicle is being lowered.
GWARNING
When you drive with the vehicle raised, the
driving characteristics could be impaired by
the vehicle's raised center of gravity. The vehi-
cle could rollover more easily, for example on
a bend. There is a risk of an accident.
Always select as low a vehicle level as possi-
ble and adjust your driving style.
GWARNING
When you drive with the chassis lowered or
raised, the vehicle's braking and driving char-
acteristics can be significantly impaired. You
could also exceed the permissible vehicle
height if the chassis is raised. There is a risk of an accident.
Adjust the vehicle level before pulling away.
GWARNING
Due to the high center of gravity, the vehicle
may start to skid and roll over in the event of
an abrupt steering maneuver and/or when
the vehicle's speed is not adapted to the road
conditions. There is a risk of an accident.
Always adapt your speed and driving style to
the vehicle's driving characteristics and to the
prevailing road and weather conditions.
!When driving on extremely rough terrain,
select a high vehicle level in good time. Make
sure there is always sufficient ground clear-
ance. You will otherwise damage the vehicle.
RUtility vehicles have a significantly higher roll- over rate than other types of vehicles.
Failure to operate this vehicle safely may
result in an accident, rollover of the vehicle,
and severe or fatal injury.
RIn a rollover crash, an unbelted person is sig-
nificantly more likely to die than a person
wearing a seat belt.
You and all vehicle occupants should always
wear your seat belts.
General notes
Only select raised level if this is appropriate for
the road conditions. Otherwise, fuel consump-
tion may increase and handling may be affected.
Make changes to the vehicle level while the
vehicle is in motion. This enables the vehicle to
adjust to the new level as quickly as possible.
The vehicle level may change visibly if you park
the vehicle and the outside temperature
changes. If the temperature drops, the vehicle
level is lower; with an increase in temperature,
the vehicle level rises.
If you unlock the vehicle or open a door, the
vehicle begins to compensate for load discrep-
ancies while still parked. However, for signifi-
cant level changes, such as after the vehicle has
been stationary for a long period, the engine
must be on. For safety reasons, the vehicle is
only lowered when the doors are closed. Low-
ering is interrupted if a door is opened, and it
continues once the door has been closed.
Vehicles with no trailer coupled: below a
speed of 40 mph (64 km/h) you can choose
between the normal and raised vehicle level.
Sel
ect the normal vehicle level for normal road
surfaces and the raised vehicle level for driving
with snow chains or on particularly poor road
surfaces. Your selection remains stored even if
you remove the SmartKey from the ignition lock.
If you try to select raised level at a speed above
40 mph (64 km/h), the Drive More Slowly
message appears in the multifunction display.
Driving systems185
Driving and parking
Z
Page 188 of 398
Vehicles with a trailer coupled:below a speed
of 19 mph (30 km/h), you can choose between
the normal and raised vehicle level.
Setting the raised vehicle level
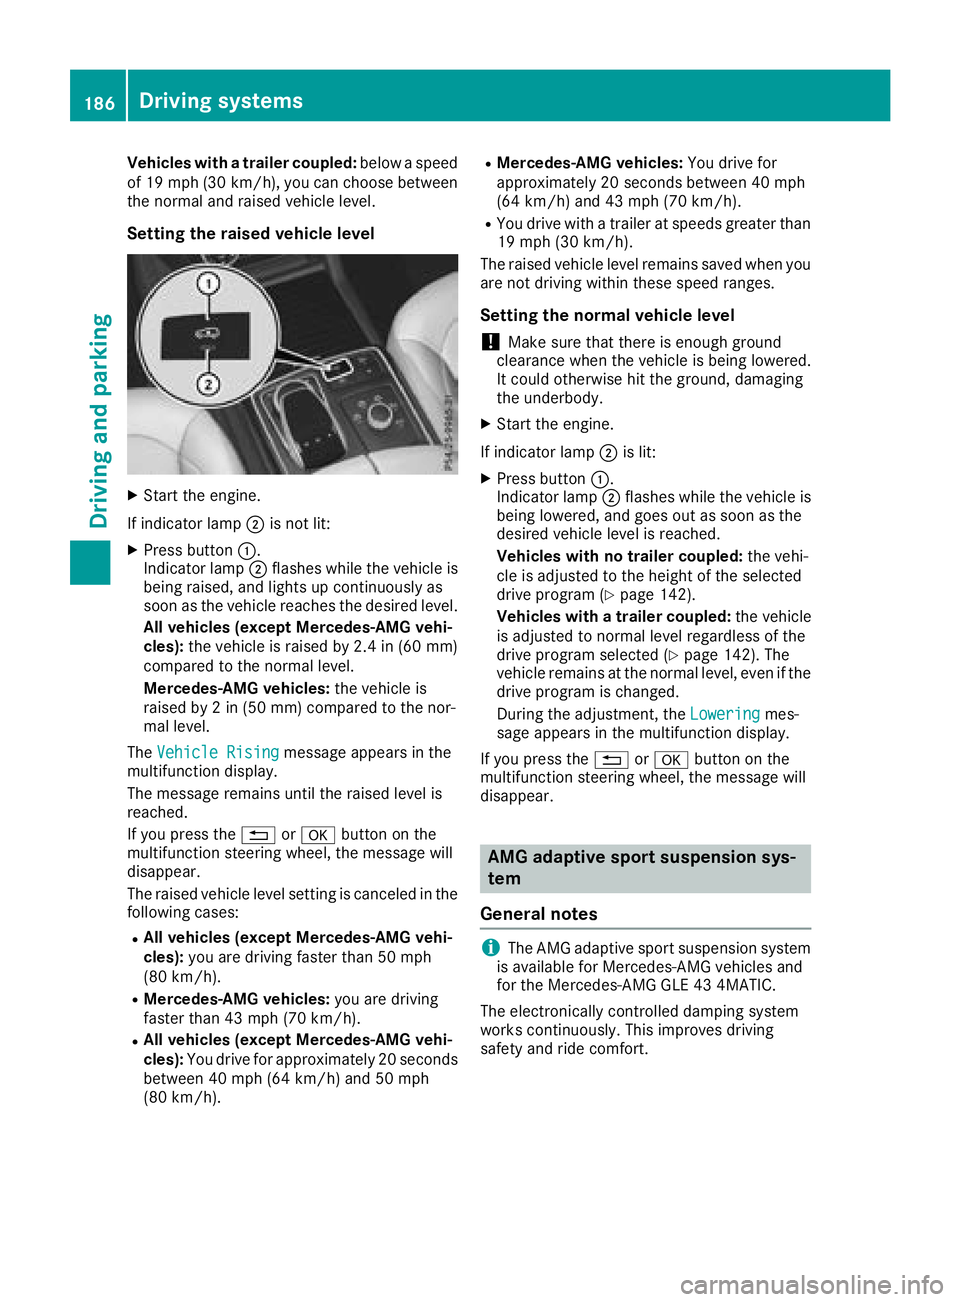
XStart the engine.
If indicator lamp ;is not lit:
XPress button :.
Indicator lamp ;flashes while the vehicle is
being raised, and lights up continuously as
soon as the vehicle reaches the desired level.
All vehicles (except Mercedes-AMG vehi-
cles): the vehicle is raised by 2.4 in (60 mm)
compared to the normal level.
Mercedes-AMG vehicles: the vehicle is
raised by 2 in (50 mm) compared to the nor-
mal level.
The Vehicle Rising
message appears in the
multifunction display.
The message remains until the raised level is
reached.
If you press the %ora button on the
multifunction steering wheel, the message will
disappear.
The raised vehicle level setting is canceled in the
following cases:
RAll vehicles (except Mercedes-AMG vehi-
cles): you are driving faster than 50 mph
(80 km/h).
RMercedes-AMG vehicles: you are driving
faster than 43 mph (70 km/h).
RAll vehicles (except Mercedes-AMG vehi-
cles): You drive for approximately 20 seconds
between 40 mph (64 km/h) and 50 mph
(80 km/h).
RMercedes-AMG vehicles: You drive for
approximately 20 seconds between 40 mph
(64 km/h) and 43 mph (70 km/h).
RYou drive with a trailer at speeds greater than
19 mph (30 km/h).
The raised vehicle level remains saved when you
are not driving within these speed ranges.
Setting the normal vehicle level
!Make sure that there is enough ground
clearance when the vehicle is being lowered.
It could otherwise hit the ground, damaging
the underbody.
XStart the engine.
If indicator lamp ;is lit:
XPress button :.
Indicator lamp ;flashes while the vehicle is
being lowered, and goes out as soon as the
desired vehicle level is reached.
Vehicles wi th n
o trailer coupled: the vehi-
cle is adjusted to the height of the selected
drive program (
Ypage 142).
Vehicles with a trailer coupled: the vehicle
is adjusted to normal level regardless of the
drive program selected (
Ypage 142). The
vehicle remains at the normal level, even if the
drive program is changed.
During the adjustment, the Lowering
mes-
sage appears in the multifunction display.
If you press the %ora button on the
multifunction steering wheel, the message will
disappear.
AMG adaptive sport suspension sys-
tem
General notes
iThe AMG adaptive sport suspension system
is available for Mercedes-AMG vehicles and
for the Mercedes-AMG GLE 43 4MATIC.
The electronically controlled damping system
works continuously. This improves driving
safety and ride comfort.
186Driving systems
Driving and parking
Page 196 of 398
Canceling Parking Pilot
XStop the movement of the multifunction
steering wheel or steer yourself.
Parking Pilot is canceled immediately. The
Parking
PilotCanceledmessage appears
in the multifunction display.
or
XPress the Parking Assist PARKTRONIC button
(Ypage 189).
Parking Assist PARKTRONIC is switched off
and Parking Pilot is immediately canceled.
The Parking Pilot Canceled
message
appears in the multifunction display.
Parking Pilot is canceled automatically when:
Rthe electric parking brake is engaged
Rtransmission position Pis selected
Rparking using Parking Pilot is no longer pos-
sible
Ryou are driving faster than 6 mph (10 km/h)
Ra wheel spins, ESP®intervenes or fails. The
÷ warning lamp lights up in the instrument
cluster
A warning tone sounds. The parking symbol dis-
appears and the multifunction display shows the
Parking Pilot Canceled
message.
When Parking Pilot is canceled, you must steer
and brake again yourself.
If a system malfunction occurs, the vehicle is
braked to a standstill. To drive on, depress the
accelerator again.
Rear view camera
General notes
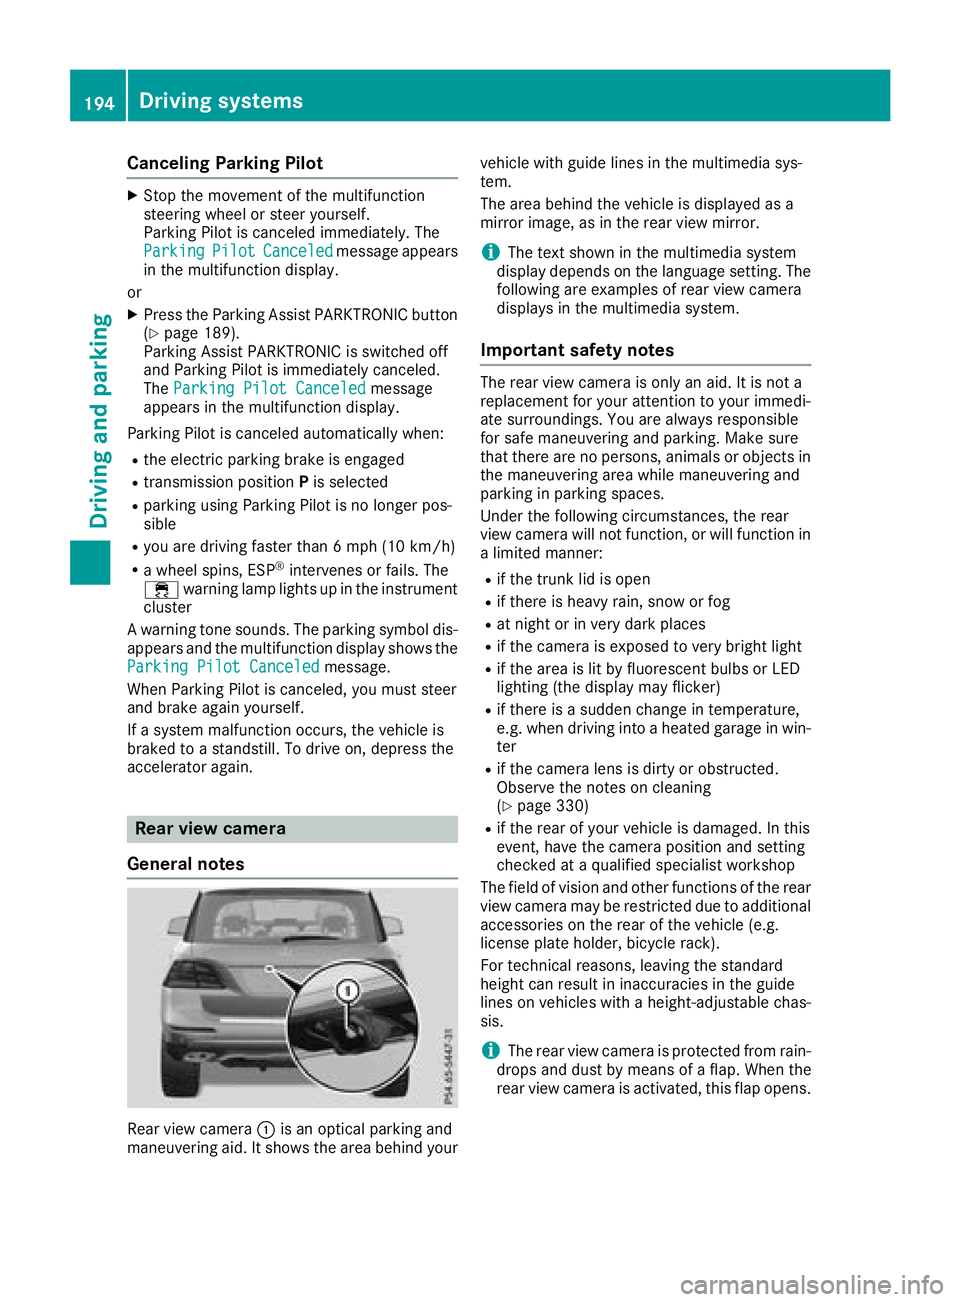
Rear view camera :is an optical parking and
maneuvering aid. It shows the area behind your vehicle with guide lines in the multimedia sys-
tem.
The area behind the vehicle is displayed as a
mirror image, as in the rear view mirror.
iThe text shown in the multimedia system
display depends on the language setting. The
following are examples of rear view camera
displays in the multimedia system.
Important safety notes
The rear view camera is only an aid. It is not a
replacement for your attention to your immedi-
ate surroundings. You are always responsible
for safe maneuvering and parking. Make sure
that there are no persons, animals or objects in
the maneuvering area while maneuvering and
parking in parking spaces.
Under the following circumstances, the rear
view camera will not function, or will function in
a limited manner:
Rif the trunk lid is open
Rif there is heavy rain, snow or fog
Rat night or in very dark places
Rif the camera is exposed to very bright light
Rif the area is lit by fluorescent bulbs or LED
lighting (the display may flicker)
Rif there is a sudden change in temperature,
e.g. when driving into a heated garage in win- ter
Rif the camera lens is dirty or obstructed.
Observe the notes on cleaning
(
Ypage 330)
Rif the rear of your vehicle is damaged. In this
event, have the camera position and setting
checked at a qualified specialist workshop
The field of vision and other functions of the rear
view camera may be restricted due to additional
accessories on the rear of the vehicle (e.g.
license plate holder, bicycle rack).
For technical reasons, leaving the standard
height can result in inaccuracies in the guide
lines on vehicles with a height
-adjustable chas-
sis.
iThe rear view camera is protected from rain-
drops and dust by means of a flap. When the
rear view camera is activated, this flap opens.
194Driving systems
Driving and parking
Page 199 of 398

:Yellow guide line for the vehicle width
including the exterior mirrors, for current
steering wheel angle (dynamic)
XStop the vehicle when it is almost exactly in
front of the parking space.
The white lane should be as close to parallel
with the parking space marking as possible.
:White guide line for current steering input
;Parking space marking
XTurn the steering wheel to the center position
while the vehicle is stationary.
:Red guide line at a distance of approximately
12 in (0.30 m) from the rear of the vehicle
;White guide line without steering input
=End of parking space
XBack up carefully until you have reached the
final position.
Red guide line:is then at end of parking
space =. The vehicle is almost parallel in the
parking space.
"Coupling up a trailer" function
:Vehicle center point on the yellow guide line
at a distance of approximately 1.0 m from
the rear of the vehicle
;Trailer drawbar
This function is only available on vehicles with a
trailer tow hitch.
XBefore coupling up a trailer, set the height of
trailer drawbar ;so that it is slightly higher
than the ball coupling.
XPosition the vehicle centrally in front of trailer
drawbar ;.
:Red guide line at a distance of approximately
0.30 m from the ball coupling
;Trailer drawbar marker assistant
=Trailer drawbar
?Symbol for the "Coupling up a trailer" func-
tion
ABall coupling
Driving systems197
Driving and parking
Z
Page 201 of 398
Ryellowbrackets wit hthin lines: Parking Assis t
PARKTRONI Cis active
Ryello wbrackets wit hnormal lines: an objec tis
presen tin close range of th evehicl e
Rred line: an objec tis presen tin th eimmediat e
close range of th evehicl e
iThe camera in th erear area is protected
from raindrops and dust by mean sof aflap .
Whe nth ecamera is activated, this flap opens.
The flap closes again in th efollowin gsitua-
tions:
Ryou hav efinished th emaneuverin gprocess
Ryou switch th eengin eoff
Ryou open th ecargo compartmen t
Observ eth enote son cleaning (
Ypage 330).
Fo rtechnical reasons, th eflap may remain
open briefl yafter th ecamera has been deac -
tivated.
Impor tant safety notes
The 360°camera is only an aid and may sho w a
distorted vie wof obstacles, sho wthem incor-
rectl yor no tat all. The 360°camera is no t a
substitut efor attentive driving.
You are always responsibl efor saf emaneuver-
in g and parking. Mak esur ethat there are no
persons, animals or objects in th emaneuverin g
area while maneuverin gand parkin gin parkin g
spaces.
You are always responsibl efor safet yand mus t
continue to pay attention to your immediat e
surroundings when parkin gand maneuvering.
This applies to th earea sbehind ,in fron tof and
beside th evehicle. You could otherwise endan -
ger yourself and others.
The 360° camera will no tfunction or will func-
tion in alimite dmanne rin th efollowin gsitua-
tions:
Rth edoors are open
Rth eexterio rmirror sare folded in
Rth etailgat eis open
Rin heav yrain ,snow or fog
Rat night or in ver ydark places
Rth ecameras are exposed to ver ybright ligh t
Rthearea is lit by fluorescent bulbs or LE D
lighting (the display may flicker)
Rthere is asudden chang ein temperature,
suc has when drivin ginto aheated garage in
winte r
Rthecamera lenses are dirty or covered
Rth evehicl ecomponent sin whic hth ecameras
are inst alled are damaged In this event ,hav e
th ecamera position and setting checke dat a
qualified specialist workshop
Do no tuse th e360° camera under suc hcir -
cumstances. You can otherwise injur eother sor
caus edamage to objects or th evehicle.
Guide lines are always shown at roa dlevel. In
trailer mode, th eguide lines are shown at th e
level of th etrailer coupling.
The field of vision and other function sof th e
camera system may be restricted due to addi-
tional accessories on th erear of th evehicl e(e.g.
license plat eholder, bicycle rack) .
On vehicles wit hheight-adjustable chassis,
dependin gon technical conditions, leavin gth e
standard height can result in :
Rinaccuracies in theguide lines
Rinaccuracies in th edisplay of generated
images (top view)
Activati onconditions
The 360° camera imag ecan be displayed in th e
followin gsituations:
Ryour vehicl eis equipped wit h a360° camera
RtheSmartKey is in ke yposition 2in th eigni-
tion loc k
Rthemultimedia system is switched on
Switching onthe 360° camera
XPress th eØ buttonin th ecenter console
for longer than tw oseconds.
Dependin gon whether transmission position
h ork is selected, th efollowin gappears :
Raspli tscree nwit hto pvie wand th eimag e
from th efron tcamera or
Ra spli tscree nwit hto pvie wand th eimag e
from th erear vie wcamera
or
XPress th eØ buttonin th ecenter console.
The vehicl emen uis displayed.
XSelec t360 °Cameraand press 7to confirm .
Dependin gon whether transmission position
h ork is selected, th efollowin gappears :
Raspli tscree nwit hto pvie wand th eimag e
from th efron tcamera or
Ra spli tscree nwit hto pvie wand th eimag e
from th erear vie wcamera
Driving systems199
Driving and parking
Z
Page 222 of 398
Ris affected more by strong crosswinds
Rdemands more sensitive steering
Rhas a larger turning circle
This could impair the handling characteristics.
When towing a trailer, always adjust your speed
to the current road and weather conditions. Do
not exceed the maximum permissible speed for
your vehicle/trailer combination.
Notes on towing a trailer
General notes
!If you have a trailer tow hitch retrofitted,
changes to the cooling system and drive train
may be necessary, depending on the vehicle
type.
If you have a trailer tow hitch retrofitted,
observe the anchorage points on the chassis
frame.
RDo not exceed the legally prescribed maxi-
mum speed for vehicle/trailer combinations
in the relevant country.
This lowers the risk of an accident.
ROnly install an approved trailer coupling on
your vehicle.
More information on availability and installa-
tion can be obtained at any qualified special-
ist workshop.
RThe bumpers of your vehicle are not suitable
for installing detachable trailer couplings.
RDo not install hired trailer couplings or other
detachable trailer couplings on the bumpers
of your vehicle.
RIf you no longer need the ball coupling,
remove it from the ball coupling recess. This
will reduce the risk of damage to the ball cou-
pling.
When towing a trailer, set the tire pressure on
the rear axle of the towing vehicle for the max-
imum load. You will find the values in the tire
pressure table in the fuel filler flap of the vehicle (
Ypage 369).
Please note that when towing a trailer, the fol-
lowing driving systems have limited availability
or are not available at all:
RParking Assist PARKTRONIC (Ypage 187)
RBlind Spot Assist (Ypage 204)
RActive Lane Keeping Assist (Ypage 210) On vehicles without level control, the height of
the ball coupling will alter according to the load
placed on the vehicle. If necessary, use a trailer
with a height-adjustable drawbar.
You will find installing dimensions and loads
under "Technical data" (
Ypage 394).
Driving tips
Also observe the notes on pulling away with a
trailer (Ypage 138).
The maximum permissible speed for vehicle/
trailer combinations depends on the type of
trailer. Before beginning the journey, check the
trailer's documents to see what the maximum
permissible speed is for your trailer. Observe the
legally permissible maximum speed in the rele-
vant country.
For certain Mercedes-Benz vehicles, the maxi-
mum permissible rear axle load is increased
when towing a trailer. See "Technical data" to
find out whether this applies to your vehicle
(
Ypage 394). If you utilize any of the added
maximum rear axle load when towing a trailer,
the vehicle/trailer combination may not exceed
a maximum speed of 60 mph (100 km/h) for
reasons concerning the operating permit. This
also applies in countries in which the maximum
permissible speed for car/trailer combinations
is greater than 60 mph (100 km/h).
When towing a trailer, your vehicle's handling
characteristics will be different in comparison
with when driving without a trailer.
Use the left-hand steering wheel paddle shifter
to shift into a lower gear in good time on long
and steep downhill gradients.
This also applies if you have activated cruise
control or Distance Pilot DISTRONIC.
This will use the braking effect of the engine, so that less braking will be required to maintain the
speed. This relieves the load on the brake sys-
tem and prevents the brakes from overheating
and wearing too quickly. If you need additional
braking, depress the brake pedal repeatedly
rather than continuously.
Driving tips
If the trailer swings from side to side:
XDo not accelerate.
XDo not counter-steer.
XBrake if necessary.
220Towing a trailer
Driving and parking