Page 107 of 398
When leaving the vehicle, always take the
SmartKey with you and lock the vehicle. Never
leave children unsupervised in the vehicle.
G WARNING
If you drive off while the EASY-ENTRY/EXIT
feature is making adjustments, you could lose
control of the vehicle. There is a risk of an
accident.
Always wait until the adjustment process is
complete before driving off.
The EASY-ENTRY/EXIT feature makes getting in
and out of your vehicle easier.
You can activate and deactivate the EASY-
ENTRY/EXIT feature in the on-board computer
( Y
page 239).
Position of the steering wheel when the
EASY-ENTRY/EXIT feature is active The steering wheel swings up when you: R
remove the SmartKey from the ignition lock. R
open the driver's door and KEYLESS-GO is in
position �G .R
open the driver's door and the SmartKey is in
position �
Page 108 of 398
G WARNING
The exterior mirror on the front-passenger
side reduces the size of the image. Visible
objects are actually closer than they appear.
This means that you could misjudge the dis-
tance from road users traveling behind, e.g.
when changing lane. There is a risk of an acci-
dent.
For this reason, always make sure of the
actual distance from the road users traveling
behind by glancing over your shoulder.
X
Turn the SmartKey to position �G or �H in the
ignition lock ( Y
page 135).X
Exterior mirror on the driver's side: press but-
ton �C .
Exterior mirror on the front-passenger side:
press button �D .
The indicator lamp in the corresponding but-
ton lights up in red.
The indicator lamp goes out again after some
time. You can adjust the selected exterior
mirror using button �
Page 111 of 398
X
Adjust the seat ( Y
page 98).X
On the driver's side, adjust the steering wheel
( Y
page 104) and the exterior mirrors
( Y
page 105). X
Press memory button M and then press mem-
ory position button 1 , 2 or 3 within three sec-
onds.
The settings are stored in the selected preset
position. A tone sounds when the settings
have been completed.
The memory function can still be used if the
SmartKey has been removed.
Calling up a stored setting X
Press and hold the relevant storage position
button 1 , 2 or 3 until the seat, steering wheel
and exterior mirrors are in the stored position.
The setting procedure is interrupted as soon as
you release the storage position buttons. Memory function 109
Seats, steering wheel an d mirrors Z
Page 113 of 398

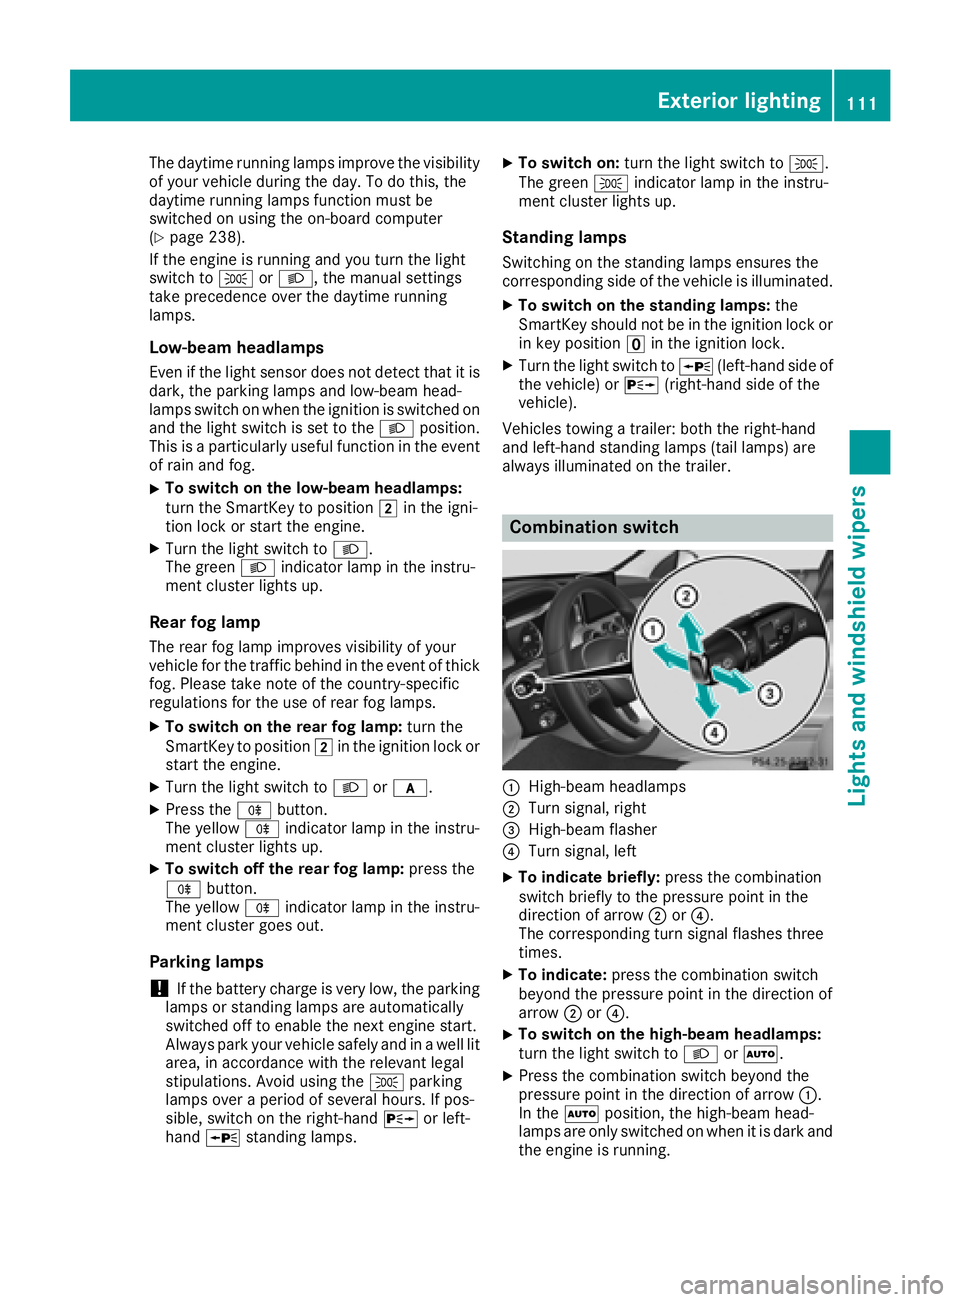
The daytime running lamps improve the visibility
of your vehicle during the day. To do this, the
daytime running lamps function must be
switched on using the on-board computer
( Y
page 238).
If the engine is running and you turn the light
switch to �` or �X , the manual settings
take precedence over the daytime running
lamps.
Low-beam headlamps Even if the light sensor does not detect that it is
dark, the parking lamps and low-beam head-
lamps switch on when the ignition is switched on
and the light switch is set to the �X position.
This is a particularly useful function in the event
of rain and fog. X
To switch on the low-beam headlamps:
turn the SmartKey to position �H in the igni-
tion lock or start the engine. X
Turn the light switch to �X .
The green �X indicator lamp in the instru-
ment cluster lights up.
Rear fog lamp The rear fog lamp improves visibility of your
vehicle for the traffic behind in the event of thick
fog. Please take note of the country-specific
regulations for the use of rear fog lamps. X
To switch on the rear fog lamp: turn the
SmartKey to position �H in the ignition lock or
start the engine. X
Turn the light switch to �X or �q .X
Press the �^ button.
The yellow �^ indicator lamp in the instru-
ment cluster lights up. X
To switch off the rear fog lamp: press the
�^ button.
The yellow �^ indicator lamp in the instru-
ment cluster goes out.
Parking lamps
! If the battery charge is very low, the parking
lamps or standing lamps are automatically
switched off to enable the next engine start.
Always park your vehicle safely and in a well lit
area, in accordance with the relevant legal
stipulations. Avoid using the �` parking
lamps over a period of several hours. If pos-
sible, switch on the right-hand �d or left-
hand �c standing lamps. X
To switch on: turn the light switch to �` .
The green �` indicator lamp in the instru-
ment cluster lights up.
Standing lamps Switching on the standing lamps ensures the
corresponding side of t he vehicle is illuminated.X
To switch on the standing lamps: the
SmartKey should not be in the ignition lock or
in key position �
Page 117 of 398

The interior lighting automatically switches on if
you: R
unlock the vehicle R
open a door R
remove the SmartKey from the ignition lock
The interior lighting is switched on for a set time
when the SmartKey is removed from the ignition
lock. This delayed switch-off can be adjusted via
the multimedia system (see Digital Operator's
Manual).
Crash-responsive emergency lighting The interior lighting is activated automatically if
the vehicle is involved in an accident. X
To switch off the crash-responsive emer-
gency lighting: press the hazard warning
lamp button.
or X
Lock and then unlock the vehicle using the
SmartKey.
Replacing bulbs (vehicles with LED
headlamps) The front and rear light clusters of your vehicle
are equipped with light-emitting diodes. Do not
replace the vehicle's bulbs yourself. Contact a
qualified specialist workshop which has the nec-
essary specialist knowledge and tools to carry
out the work required.
Lamps are an important aspect of vehicle safety.
You must therefore make sure that these func-
tion correctly at all times. Have the headlamp
setting checked regularly.
Replacing bulbs (vehicles with halo-
gen headlamps)
Important safety notes
G WARNING
Bulbs, lamps and connectors can get very hot
when operating. If you change a bulb, you
could burn yourself on these components.
There is a risk of injury. Allow these components to cool down before
changing a bulb.
Do not use a bulb if it has been dropped or if its
glass tube has been scratched.
The bulb may explode if: R
you touch it R
it is hot R
you drop it R
you scratch it
Use bulbs only in closed lamps that have been
designed for this purpose. Only install spare
bulbs of the same type and the specified volt-
age.
Marks on the glass tube reduce the service life
of the bulbs. Do not touch the glass tube with
your bare hands. If necessary, clean the glass
tube when cold with alcohol or spirit and rub it
off with a lint-free cloth.
Protect bulbs from moisture during operation.
Do not allow bulbs to come into contact with
liquids.
Replace only the bulbs listed ( Y
page 115).
Have the bulbs that you cannot replace yourself
replaced at a qualified specialist workshop.
If you require assistance replacing bulbs, con-
sult a qualified specialist workshop.
If the new bulb still does not light up, consult a
qualified specialist workshop.
Headlamps and lights are an important aspect of
vehicle safety. You must therefore make sure
that these function correctly at all times. Have
the headlamp setting checked regularly.
Overview of bulb replacement - bulb
types You can replace the following bulbs. The bulb
type can be found in the legend.Replacing bulbs (vehicles with halogen headlamps) 115
Lights and windshield wipers Z
Page 121 of 398
X
Firmly press release knob �C and pull wiper
blade �D upwards from the wiper arm in the
direction of the arrow.
Installing the wiper blades
X
Position new wiper blade �C in the retainer on
the wiper arm and slide it into place in the
direction of the arrow.
The wiper blade audibly engages. X
Make sure that the wiper blade is seated cor-
rectly. X
Fold the wiper arm back onto the windshield.
Replacing the wiper blades (MAGIC
VISION CONTROL)
Moving the wiper arms to a vertical posi-
tion
On vehicles without KEYLESS-GO: X
Turn the SmartKey to position �
Page 123 of 398
Problems with the windshield wipers Problem
Possible causes/consequences and �P Solutions
The windshield wipers
are jammed. Leaves or snow, for example, may be obstructing the windshield wiper
movement. The wiper motor has been deactivated. X
For safety reasons, you should remove the SmartKey from the igni-
tion lock.
or X
Switch off the engine using the Start/Stop button and open the
driver's door. X
Remove the cause of the obstruction. X
Switch the windshield wipers back on.
The windshield wipers
fail completely. The windshield wiper drive is malfunctioning. X
Select another wiper speed on the combination switch. X
Have the windshield wipers checked at a qualified specialist work-
shop. Windshield wipers 121
Lights and windshield wipers Z
Page 124 of 398

Overview of climate control systems
General notes Observe the settings recommended on the fol-
lowing pages. The windows could otherwise fog
up.
To prevent the windows from fogging up: R
switch off climate control only briefly R
switch on air-recirculation mode only briefly R
switch on the cooling with air dehumidifica-
tion function R
switch on the defrost windshield function
briefly, if required
Climate control regulates the temperature and
the humidity in the vehicle interior and filters
undesirable substances out of the air.
The "Cooling with air dehumidification" function
is only available when the engine is running.
Optimum climate control is only achieved with
the side windows and roof closed.
The residual heat function can only be activated
or deactivated with the ignition switched off
( Y
page 131).
i Ventilate the vehicle for a brief period during
warm weather, e.g. using the convenience
opening feature ( Y
page 89). This will speed
up the cooling process and the desired inte-
rior temperature will be reached more
quickly. If you start the engine using your smartphone,
the last selected climate control setting is reac-
tivated ( Y
page 137).
i The integrated filter filters out most parti-
cles of dust and soot and completely filters
out pollen. It also reduces gaseous pollutants
and odors. A clogged filter reduces the
amount of air supplied to the vehicle interior.
Depending on the operating conditions and
environmental influences, the interval for
replacing the filter may be shorter than speci-
fied.
i Vehicles with ionization of the interior
air and air filter: in addition to ionization, the
vehicle has an air filter with anti-allergenic
properties that contribute to improved air fil-
tration.
i It is possible that under certain circumstan-
ces the residual heat function may be activa-
ted automatically an hour after the SmartKey
has been removed in order to dry the auto-
matic climate control. The vehicle is then ven-
tilated for 30 minutes.
i Plug-in hybrid vehicles: observe the notes
on climate control in the separate Operator's
Manual.122
Overview of climate control systems
Climate control