2018 MERCEDES-BENZ GLE engine
[x] Cancel search: enginePage 347 of 398
i Jumper cables and further information regarding jump-starting can be obtained at any qualified
specialist workshop.
Towing and tow-starting
Important safety notes Plug-in hybrid: be sure to read the separate
Operator's Manual. You could otherwise fail to
recognize dangers, e.g. due to high voltage.
G WARNING
Functions relevant to safety are restricted or
no longer available if: R
the engine is not running. R
the brake system or the power steering is
malfunctioning. R
there is a malfunction in the voltage supply
or the vehicle's electrical system.
If your vehicle is being towed, much more
force may be necessary to steer or brake.
There is a risk of an accident.
In such cases, use a tow bar. Before towing,
make sure that the steering moves freely.
G WARNING
When towing or tow-starting another vehicle
and its weight is greater than the permissible
gross weight of your vehicle, the: R
the towing eye could detach itself R
the vehicle/trailer combination could roll-
over.
There is a risk of an accident.
When towing or tow-starting another vehicle,
its weight should not be greater than the per-
missible gross weight of your vehicle.
Details on the permissible gross vehicle weight
of your vehicle can be found on the vehicle iden-
tification plate ( Y
page 382).
! When Active Brake Assist, Distance Pilot
DISTRONIC or the HOLD function is activated,
the vehicle brakes automatically in certain
situations. To avoid damage to the vehicle, deactivate
these systems in the following or similar sit-
uations: R
when towing the vehicle R
in the car wash
! Make sure that the electric parking brake is
released. If the electric parking brake is faulty,
visit a qualified specialist workshop.
! Only secure the tow rope or tow bar at the
towing eyes, or the trailer tow hitch, if availa-
ble. You could otherwise damage the vehicle.
! Observe the following points when towing
with a tow rope: R
Secure the tow rope on the same side on
both vehicles. R
Make sure that the tow rope is not longer
than legally permitted. Mark the tow rope in
the middle, e.g. with a white c loth
(1
1.8 x 11.8 in). This will make other road
users aware that a vehicle is being towed. R
Only secure the tow cable to the towing
eyes or, if available, to the trailer tow hitch. R
Observe the brake lamps of the towing
vehicle while driving. Always maintain a dis-
tance a distance so that the tow rope does
not sag. R
Do not use steel cables or chains to tow
your vehicle. You could otherwise damage
the vehicle.
! Do not use the trailer tow hitch for recovery
or towing. Do not use the towing eye for
recovery. this could damage the vehicle. If in
doubt, have the vehicle recovered using a
crane.
! When towing, pull away slowly and
smoothly. Pull the towed vehicle as straight as
possible and not at an acute angle. Excessive
tractive power could damage the vehicles.
When towing, it is preferable to use a rigid tow-
ing bar as opposed to a tow rope. A rigid towing
bar helps to keep the tractive power low.
! When towing away vehicles with KEYLESS-
GO, use the key instead of the Start/Stop
button. The automatic transmission may oth-
erwise shift to position �] when you open theTowing and tow-starting 345
Breakdown assistance Z
Page 350 of 398
When transporting, make sure that: R
the vehicle is has been loaded onto the
transporter correctly R
the vehicle is secured at all four wheels with
suitable tensioning straps R
you do not exceed the maximum permissi-
ble speed of 35 mph (60 km/h)
Securing the vehicle
! After loading, the vehicle must be secured at
all four wheels. Otherwise, the vehicle could
be damaged.
A minimum distance of 8 in (20 cm) up and
4 in (10 cm) down must be maintained to the
transport platform. X
Secure all four wheels after loading the vehi-
cle.
Information on 4MATIC vehicles
! Vehicles with 4MATIC must not be towed
with either the front or the rear axle raised, as
doing so will damage the transmission.
Vehicles with 4MATIC may either be towed away
with both axles on the ground or be loaded up
and transported.
If the vehicle's transmission, front, or rear axle is
damaged, have the vehicle transported on a
truck or trailer.
In the event of damage to the electrical sys-
tem: if the battery is defective, the automatic
transmission will be locked in position P . To shift
the automatic transmission to position N , you
must provide power to the vehicle's electrical
system in the same way as when jump-starting
( Y
page 342).
Have the vehicle transported on a transporter or
trailer.
Tow-starting (emergency engine
starting)
! Vehicles with automatic transmission must
not be tow-started. You could otherwise dam-
age the automatic transmission.
You can find information on "Jump-starting"
under ( Y
page 342). Fuses
Important safety notes
G WARNING
If you manipulate or bridge a faulty fuse or if
you replace it with a fuse with a higher amper-
age, the electric cables could be overloaded.
This could result in a fire. There is a risk of an
accident and injury.
Always replace faulty fuses with the specified
new fuses having the correct amperage.
! For the fuse boxes in the engine compart-
ment and under the rear bench seat, only use
fuses with the suffix "S". Otherwise, compo-
nents or systems could be damaged.
! Make sure that no moisture can enter the
fuse box when the cover is open.
! When closing the cover, make sure that it is
lying correctly on the fuse box. Moisture seep-
ing in or dirt could otherwise impair the oper-
ation of the fuses.
The fuses in your vehicle serve to close down
faulty circuits. If a fuse blows, all the compo-
nents on the circuit and their functions stop
operating.
Blown fuses must be replaced with fuses of the
same rating, which you can recognize by the
color and value. The fuse ratings are listed in the
fuse allocation chart.
The fuse allocation chart is located in the fuse
box under the rear bench seat ( Y
page 350).
If a newly inserted fuse also blows, have the
cause traced and rectified at a qualified special-
ist workshop, e.g. an authorized Mercedes-Benz
Center.
Before changing a fuse Observe the important safety notes
( Y
page 348) X
Switch off the engine. X
Switch off all electrical consumers.348
Fuses
Breakdown assistance
Page 374 of 398
be required earlier. Do not change the direction
of wheel rotation.
Clean the contact surfaces of the wheel and the
brake disc thoroughly every time a wheel is rota-
ted. Check the tire pressure and, if necessary,
restart the tire pressure loss warning system or
the tire pressure monitor ( Y
page 358).
Direction of rotation Tires with a specified direction of rotation have
additional benefits, e.g. if there is a risk of hydro-
planing. These advantages can only be gained if
the tires are installed corresponding to the
direction of rotation.
An arrow on the sidewall of the tire indicates its
correct direction of rotation.
Storing wheels Store wheels that are not being used in a cool,
dry and preferably dark place. Protect the tires
from oil, grease, gasoline and diesel.
Mounting a wheel
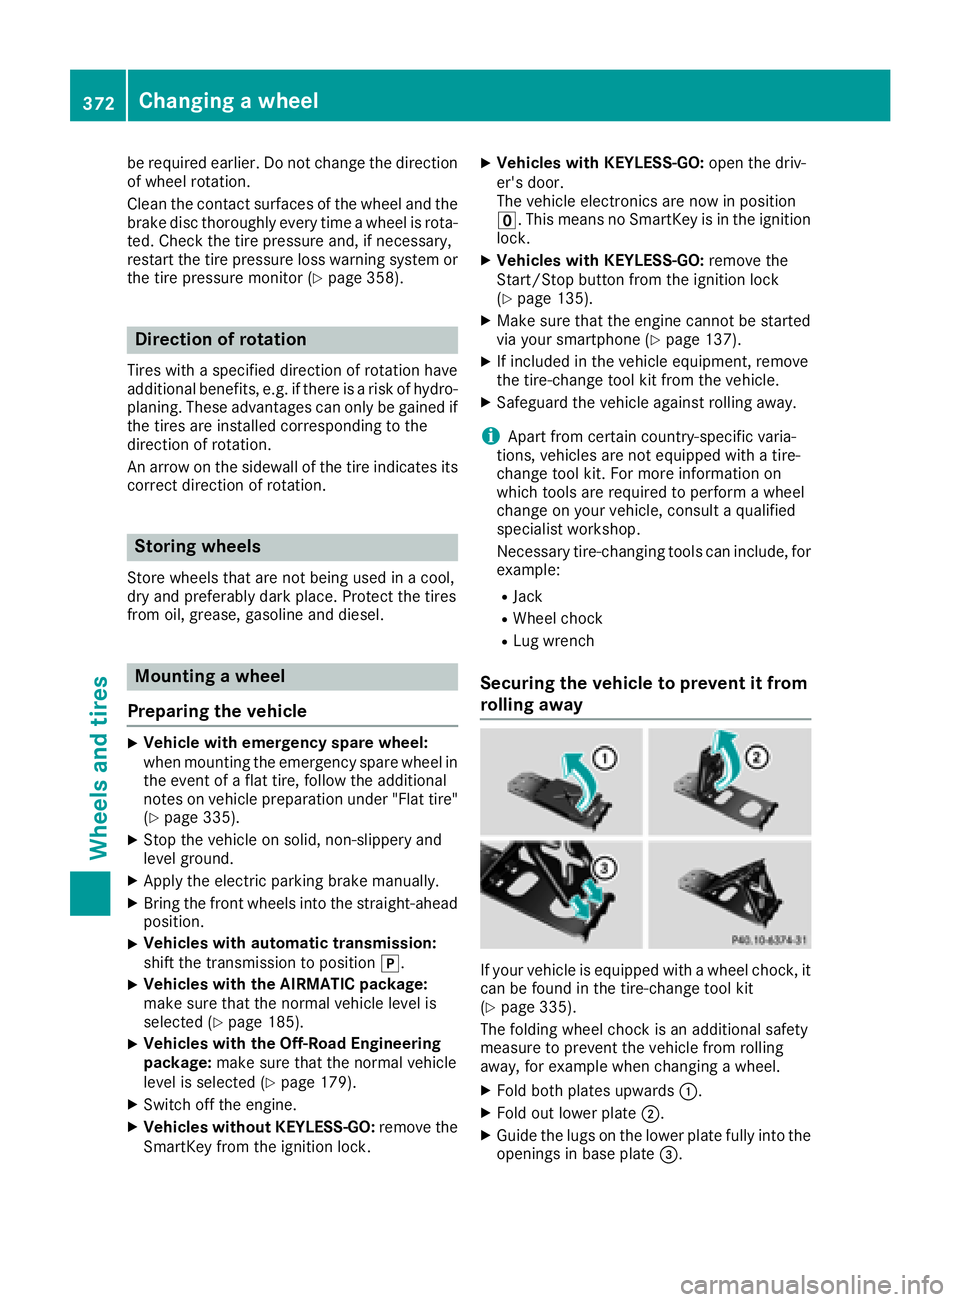
Preparing the vehicle X
Vehicle with emergency spare wheel:
when mounting the emergency spare wheel in
the event of a flat tire, follow the additional
notes on vehicle preparation under "Flat tire"
( Y
page 335).X
Stop the vehicle on solid, non-slippery and
level ground. X
Apply the electric parking brake manually. X
Bring the front wheels into the straight-ahead
position. X
Vehicles with automatic transmission:
shift the transmission to position �] .X
Vehicles with the AIRMATIC package:
make sure that the normal vehicle level is
selected ( Y
page 185).X
Vehicles with the Off-Road Engineering
package: make sure that the normal vehicle
level is selected ( Y
page 179).X
Switch off the engine. X
Vehicles without KEYLESS-GO: remove the
SmartKey from the ignition lock. X
Vehicles with KEYLESS-GO: open the driv-
er's door.
The vehicle electronics are now in position
�
Page 375 of 398
X
Place chocks or other suitable items under
the front and rear of the wheel that is diago-
nally opposite the wheel you wish to change.
Raising the vehicle
G WARNING
If you do not position the jack correctly at the
appropriate jacking point of the vehicle, the
jack could tip over with the vehicle raised.
There is a risk of injury.
Only position the jack at the appropriate jack-
ing point of the vehicle. The base of the jack
must be positioned vertically, directly under
the jacking point of the vehicle.
! Only position the jack at the appropriate
jacking point of the vehicle. Otherwise, you
could damage the vehicle.
Observe the following when raising the vehi-
cle: R
To raise the vehicle, only use the vehicle-spe-
cific jack that has been tested and approved
by Mercedes-Benz. If used incorrectly, the
jack could tip over with the vehicle raised. R
The jack is designed only to raise and hold the
vehicle for a short time while a wheel is being
changed. It must not be used for performing
maintenance work under the vehicle. R
Avoid changing the wheel on uphill and down-
hill slopes. R
Before raising the vehicle, secure it from roll-
ing away by applying the parking brake and
inserting wheel chocks. Do not disengage the
parking brake while the vehicle is raised. R
The jack must be placed on a firm, flat and
non-slip surface. On a loose surface, a large,
flat, load-bearing underlay must be used. On a slippery surface, a non-slip underlay must be
used, e.g. rubber mats. R
Do not use wooden blocks or similar objects
as a jack underlay. Otherwise, the jack will not
be able to achieve its load-bearing capacity
due to the restricted height. R
Make sure that the distance between the
underside of the tires and the ground does not
exceed 1.2 in (3 cm). R
Do not place your hands or feet under the
raised vehicle. R
Do not lie under the vehicle. R
Do not start the engine when the vehicle is
raised. R
Never open or close a door or the tailgate
when the vehicle is raised. R
Make sure that no persons are present in the
vehicle when the vehicle is raised.
X
Using lug wrench �C , loosen the bolts on the
wheel you wish to change by about one full
turn. Do not unscrew the bolts completely.
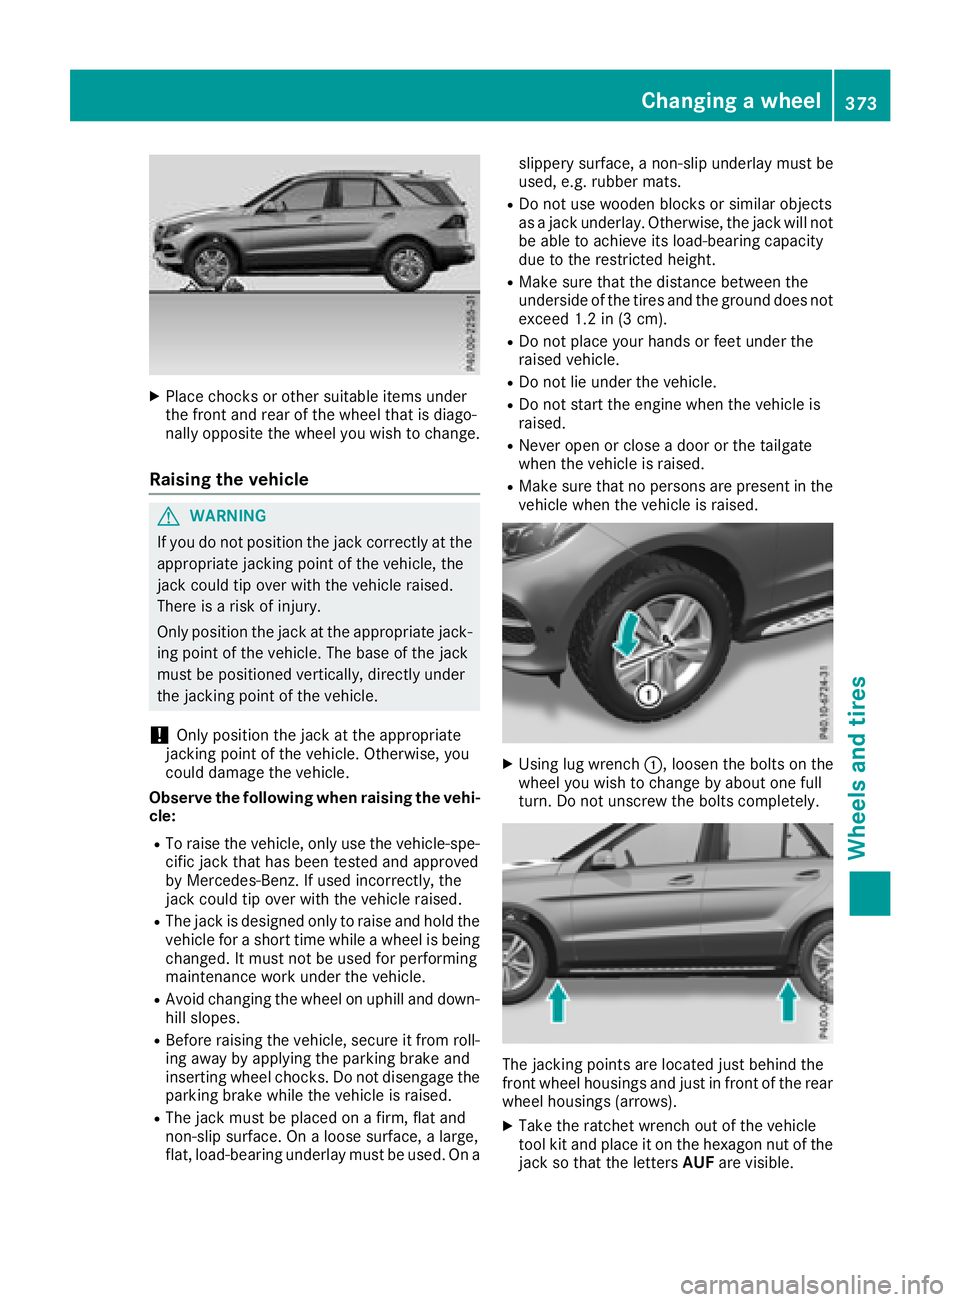
The jacking points are located just behind the
front wheel housings and just in front of the rear
wheel housings (arrows). X
Take the ratchet wrench out of the vehicle
tool kit and place it on the hexagon nut of the
jack so that the letters AUF are visible.Changing a wheel 373
Wheels and tires Z
Page 385 of 398
from the data shown here. You can find the
data applicable to your vehicle on the vehicle
identification plate.
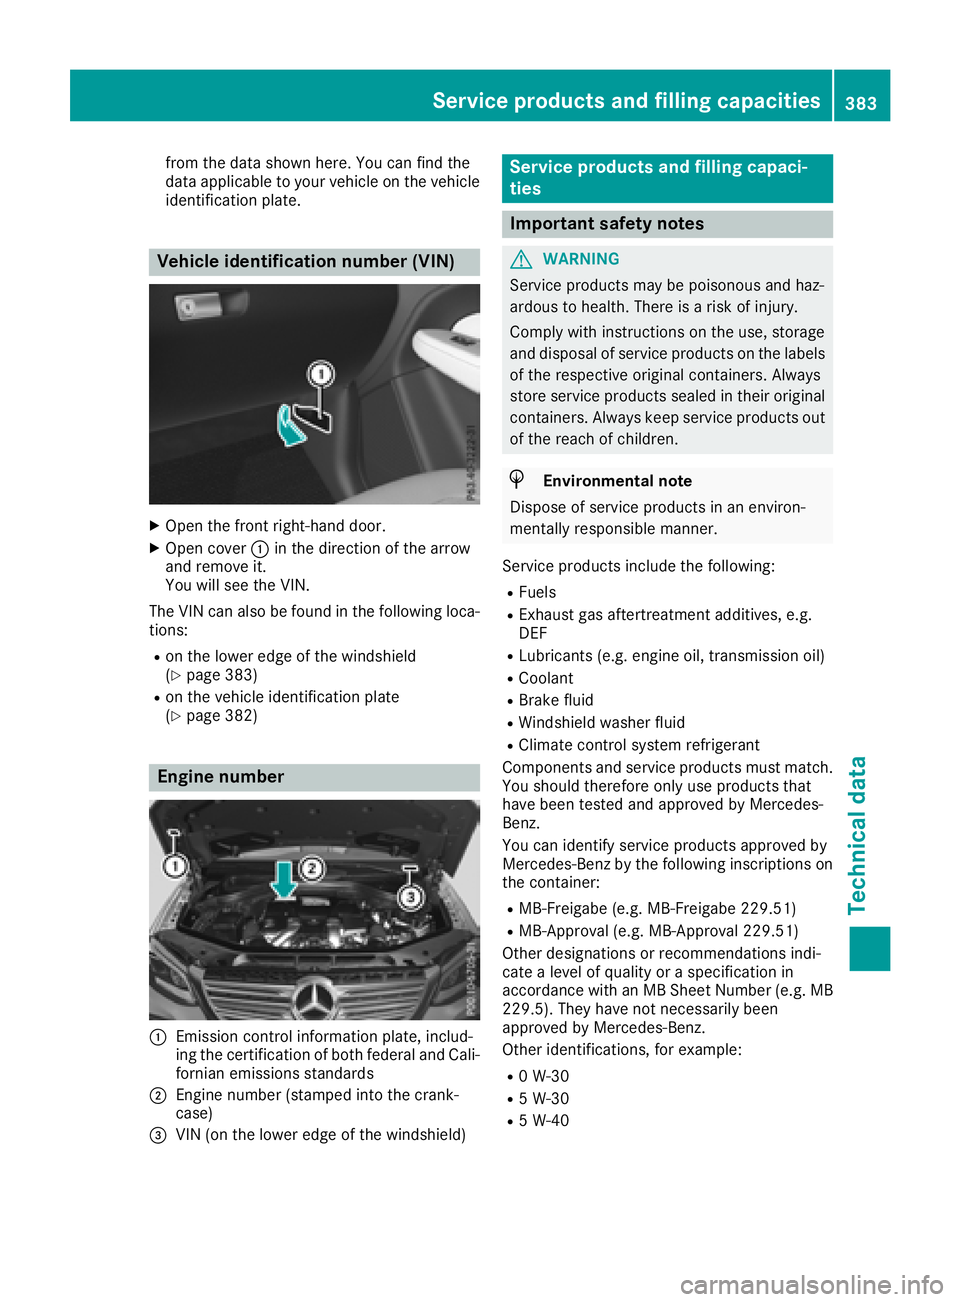
Vehicle identification number (VIN) X
Open the front right-hand door. X
Open cover �C in the direction of the arrow
and remove it.
You will see the VIN.
The VIN can also be found in the following loca-
tions: R
on the lower edge of the windshield
( Y
page 383) R
on the vehicle identification plate
( Y
page 382)
Engine number
�C
Emission control information plate, includ-
ing the certification of both federal and Cali-
fornian emissions standards
�D
Engine number (stamped into the crank-
case)
�
Page 386 of 398
Fuel
Important safety notes
G WARNIN G
Fuel is highly flammable. If you handle fuel
incorrectly, there is a ris k of fir e and explo-
sion .
You must avoi d fire, open flames, creating
sparks and smoking. Switc h off th e engin e
and , if applicable, th e auxiliary heating before
refueling.
G WARNIN G
Fuel is poisonous and hazardous to health.
Ther e is a ris k of injury.
You must mak e sure that fuel does no t come
int o contact wit h your skin, eyes or clothing
and that it is no t swallowed. Do no t inhale fuel
vapors. Kee p fuel away from children .
If you or other s come int o contact wit h fuel ,
observ e th e following:R
Wash away fuel from skin immediately
usin g soap and water.R
If fuel comes int o contact wit h your eyes,
immediately rinse them thoroughly wit h
clean water. Seek medical assistanc e with-
out delay. R
If fuel is swallowed, seek medical assis-
tance without delay. Do no t induce vomit -
ing . R
Immediately chang e out of clothing whic h
has come int o contact wit h fuel .
Tank capacity
Model Total capa-
cit y
GLE 550 e 4MATIC
21.1 US gal
(80.0 l)
Al l ot her models
24.6 US gal
(93.0 l) Model Of which
reserve
Mercedes-AMG GLE 43
4MATIC Approx.
3.2 US gal
(12.0 l)
Mercedes ‑ AMG vehicles
Approx.
3.7 US gal
(14.0 l)
Al l ot her models
Approx.
3.2 US gal
(12.0 l)
Gasoline Fuel grade
! Do not use diesel to refuel vehicles with a
gasoline engine. Do not switch on the ignition
if you accidentally refuel with the wrong fuel.
Otherwise, the fuel will enter the fuel system.
Even small amounts of the wrong fuel could
result in damage to the fuel system and the
engine. Notify a qualified specialist workshop
and have the fuel tank and fuel lines drained
completely.
! Only refuel using unleaded premium grade
gasoline with at least 91 AKI/95 RON.
i E10 fuel contains up to 10% bioethanol.
Your vehicle is E10-compatible. You can
refuel your vehicle using E10 fuel.
! Only use the fuel recommended. Operating
the vehicle with other fuels can lead to dam-
age to the fuel system, engine and exhaust
system.
! Do not use the following: R
Gasoline with more than 10% ethanol R
E100 (1 00% ethanol) R
Gasoline with methanol R
M100 (1 00% methanol) R
Gasoline with metalliferous additives R
Diesel
Do not mix such fuels with the fuel recom-
mended for your vehicle.
! To ensure the longevity and full perform-
ance of the engine, only premium-grade
unleaded gasoline must be used.384
Service products and filling capacities
Technical data
Page 387 of 398
If standard unleaded gasoline is unavailable
and you have to refuel with unleaded gasoline
of a lower grade, observe the following pre-
cautions: R
Only fill the fuel tank to half full with regular
unleaded gasoline and fill the rest with pre-
mium-grade unleaded gasoline as soon as
possible. R
Do not drive at the maximum speed. R
Avoid sudden acceleration and engine
speeds over 3,000 rpm.
You will usually find information about the fuel
grade on the fuel pump. If you cannot find the
label on the fuel pump, ask the gas station staff.
i For more information, please contact a
qualified specialist workshop or visit
http://www.mbusa.com (USA only).
As a temporary measure, if the recommended
fuel is not available, you may also use regular
unleaded gasoline with an octane rating of
87 AKI/91 RON. This may reduce engine per-
formance and increase fuel consumption. Avoid
driving at full throttle and sudden acceleration.
Never refuel using gasoline with a lower AKI.
Information on refueling ( Y
page 151).
Additives
! Operating the engine with fuel additives
added later can lead to engine failure. Do not
mix fuel additives with fuel. This does not
include additives for the removal and preven-
tion of residue buildup. gasoline must only be
mixed with additives recommended by
Mercedes-Benz. Comply with the instructions
for use on the product label. More information
about recommended additives can be
obtained from any authorized Mercedes-Benz
Center.
Mercedes-Benz recommends that you use bran-
ded fuels that have additives.
The fuel quality available in some countries may
not be sufficient. Residue could build up in the
fuel injection system as a result. In such cases,
and in consultation with an authorized
Mercedes-Benz Center, the fuel may be mixed
with the cleaning additive recommended by
Mercedes-Benz. You must observe the notes
and mixing ratios specified on the container. Diesel Fuel grade
G WARNING
If you mix diesel fuel with gasoline, the flash
point is lower than that of pure diesel fuel.
When the engine is running, exhaust system
components could overheat without being
noticed. There is a risk of fire.
Never refuel with gasoline. Never mix gasoline
with diesel fuel.
! Only use Ultra Low Sulfur Diesel (ULSD),
otherwise it may lead to increased wear and
damage to the fuel system, engine and
exhaust system.
! Do not use the following: R
gasoline R
diesel with a bio-diesel content greater
than 5% (e.g. B20) R
bio-diesel R
vegetable oil R
paraffin R
kerosene R
marine diesel R
heating oil
Do not mix such fuels with diesel fuel and do
not use any special additives. Otherwise,
engine damage may occur.
! In countries outside USA and Canada, only
use sulfur-free diesel with a sulfur content
under 50 ppm. Otherwise, the emission con-
trol system could be damaged.
You will usually find information about the fuel
grade on the pump. If you cannot find the label
on the pump, ask the staff for assistance.
Information on refueling ( Y
page 151).
Low outside temperatures
i Diesel fuel with improved cold flow proper-
ties is available during the winter months.
Further information about fuel properties can
be obtained from oil companies, e.g. at gas
stations.Service products and filling capacities 385
Technical data Z
Page 388 of 398
Flexible Fuel vehicles Import ant safety notes
G WARNIN G
Fuel is highly flammable. If you handle fuel
incorrectly, there is a ris k of fir e and explo-
sion .
You must avoi d fire, open flames, creating
sparks and smoking. Switc h off th e engin e
and , if applicable, th e auxiliary heating before
refueling.
G WARNIN G
Fuel is poisonous and hazardous to health.
Ther e is a ris k of injury.
You must mak e sure that fuel does no t come
int o contact wit h your skin, eyes or clothing
and that it is no t swallowed. Do no t inhale fuel
vapors. Kee p fuel away from children .
If you or other s come int o contact wit h fuel ,
observ e th e following:R
Wash away fuel from skin immediately
usin g soap and water.R
If fuel comes int o contact wit h your eyes,
immediately rinse them thoroughly wit h
clean water. Seek medical assistanc e with-
out delay. R
If fuel is swallowed, seek medical assis-
tance without delay. Do no t induce vomit -
ing . R
Immediately chang e out of clothing whic h
has come int o contact wit h fuel .
Flexible Fuel vehicles can be refueled wit h th e
followin g fuel types:R
premium-grade unleaded gasolin eR
E8 5 fuelR
a mixtur e of E8 5 fuel and premium-grade
unleaded gasolin e
i Flexible Fuel vehicles can be recognize d by
th e Ethanol up to E85 sticker on th e inside of
th e fuel filler flap . Fuel consu mp tionThe energ y conten t of E8 5 fuel is less than that
of th e sam e amoun t of premium-grade gasoline.
The amoun t of fuel consumed when operating
th e vehicl e wit h E8 5 fuel is therefor e higher than
wit h premium-grade gasoline.
Maintenance Infor m your authorize d Mercedes-Ben z C ente r
that you are operating or have operate d th e
vehicl e wit h E8 5 fuel .
Low outside temperatures If th e outside temperature is belo w 32 ‡( 0 †),
the starting procedure can take noticeably lon-
ger when operating with E85 fuel.
E85 fuel is not suitable for use at outside tem-
peratures under -4 ‡ (-20 †).
DEF
Important safety notes Comply with the important safety notes for ser-
vice products when handling DEF ( Y
page 383).
DEF is a water-soluble fluid for the exhaust gas
aftertreatment of diesel engines. It is: R
not poisonous R
colorless and odorless R
not flammable
When you open the DEF container, small
amounts of ammonia vapor may be released.
Ammonia vapors have a pungent odor and are
particularly irritating to the skin, to mucous
membranes and to the eyes. You may experi-
ence a burning sensation in your eyes, nose and
throat. Coughing and watering of the eyes are
possible.
Do not inhale ammonia vapors. Fill the DEF tank
only in well-ventilated areas.
Low outside temperatures
DEF freezes at a temperature of approximately
12 ‡( -11 †). The vehicle is delivere d from th e
factory equippe d wit h a DE F preheatin g system.
Winte r operation can thus be guaranteed even
at temperature s below 12 ‡ (-11 †).386
Service pr od ucts and filling capacities
Technical data