2018 MERCEDES-BENZ GLE HYBRID remove seats
[x] Cancel search: remove seatsPage 102 of 398

Adjusting the head restraints elect ri -
cally X
To adjust th e hea d restrain t height : slid e
th e switch for th e head restrain t adjustmen t
( Y
page 98) up or down in th e direction of th e
arrow.
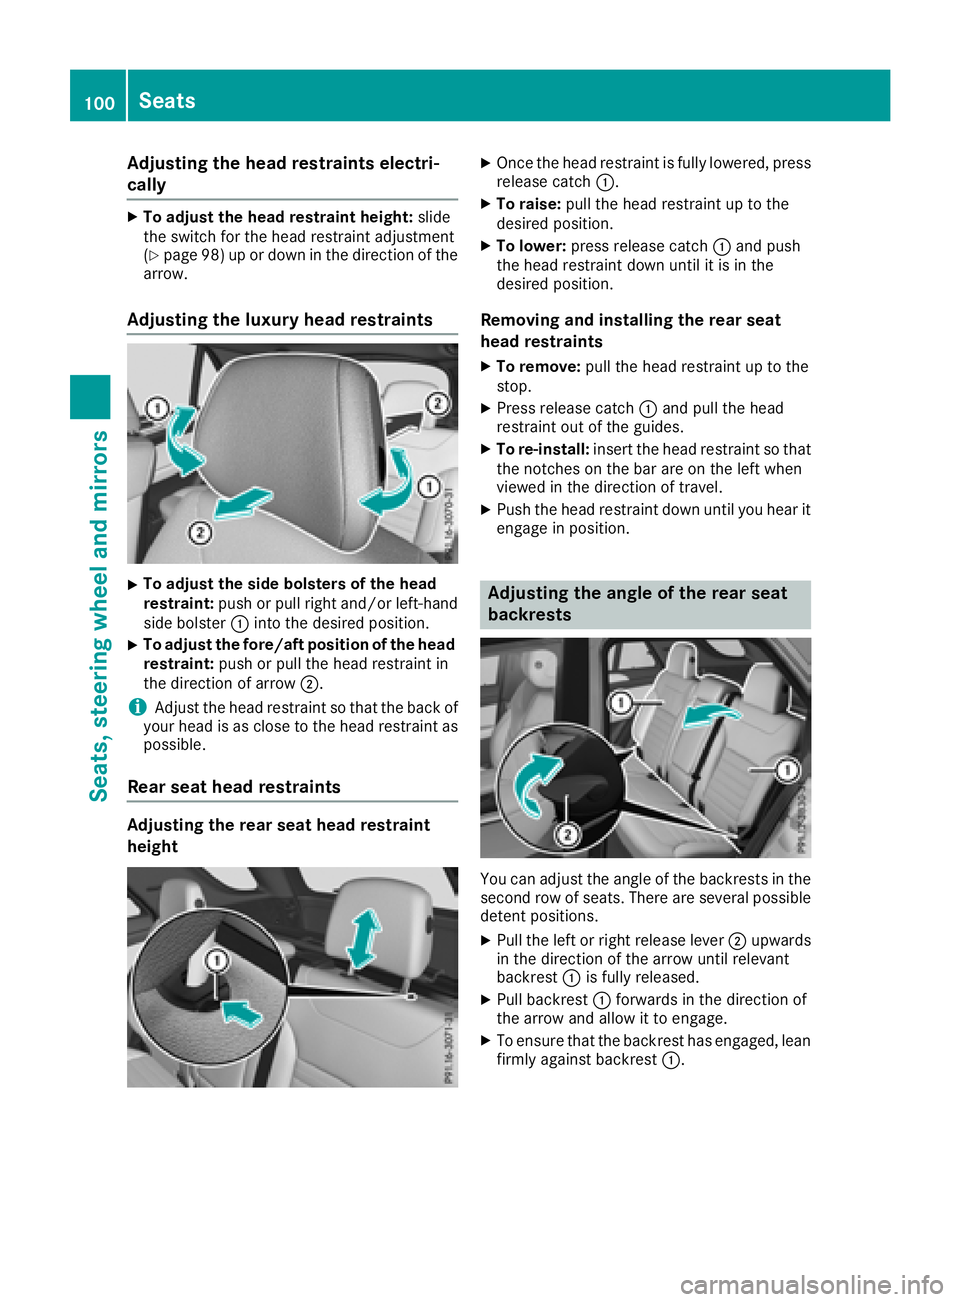
Adjusting the luxury head restraints X
To adjust th e sid e bolsters of th e hea d
restraint: push or pull right and/o r left-han d
side bolste r �C int o th e desired position .X
To adjust th e fore/af t position of th e hea d
restraint: push or pull th e head restrain t in
th e direction of arrow �D .
i Adjus t th e head restrain t so that th e bac k of
your head is as close to th e head restrain t as
possible.
Rear seat head restraints
Adjusting th e rea r sea t hea d restrain t
height X
Once th e head restrain t is fully lowered, press
release catch �C . X
To raise: pull th e head restrain t up to th e
desired position . X
To lower : press release catch �C and push
th e head restrain t down until it is in th e
desired position .
Removin g and installing th e rea r sea t
hea d restraints X
To remove: pull th e head restrain t up to th e
stop. X
Press release catch �C and pull th e head
restrain t out of th e guides.X
To re-install : insert th e head restrain t so that
th e notches on th e bar are on th e lef t when
viewed in th e direction of travel .X
Push th e head restrain t down until you hear it
engage in position .
Adjusting the angle of the rear seat
backrests
You can adjust th e angle of th e backrest s in th e
secon d row of seats. There are several possibl e
deten t positions. X
Pull th e lef t or right release lever �D upwards
in th e direction of th e arrow until relevan t
backrest �C is fully released. X
Pull backrest �C forward s in th e direction of
th e arrow and allow it to engage .X
To ensur e that th e backrest has engaged, lean
firmly against backrest �C .100
Seats
Seats, steering wheel and mirrors
Page 111 of 398

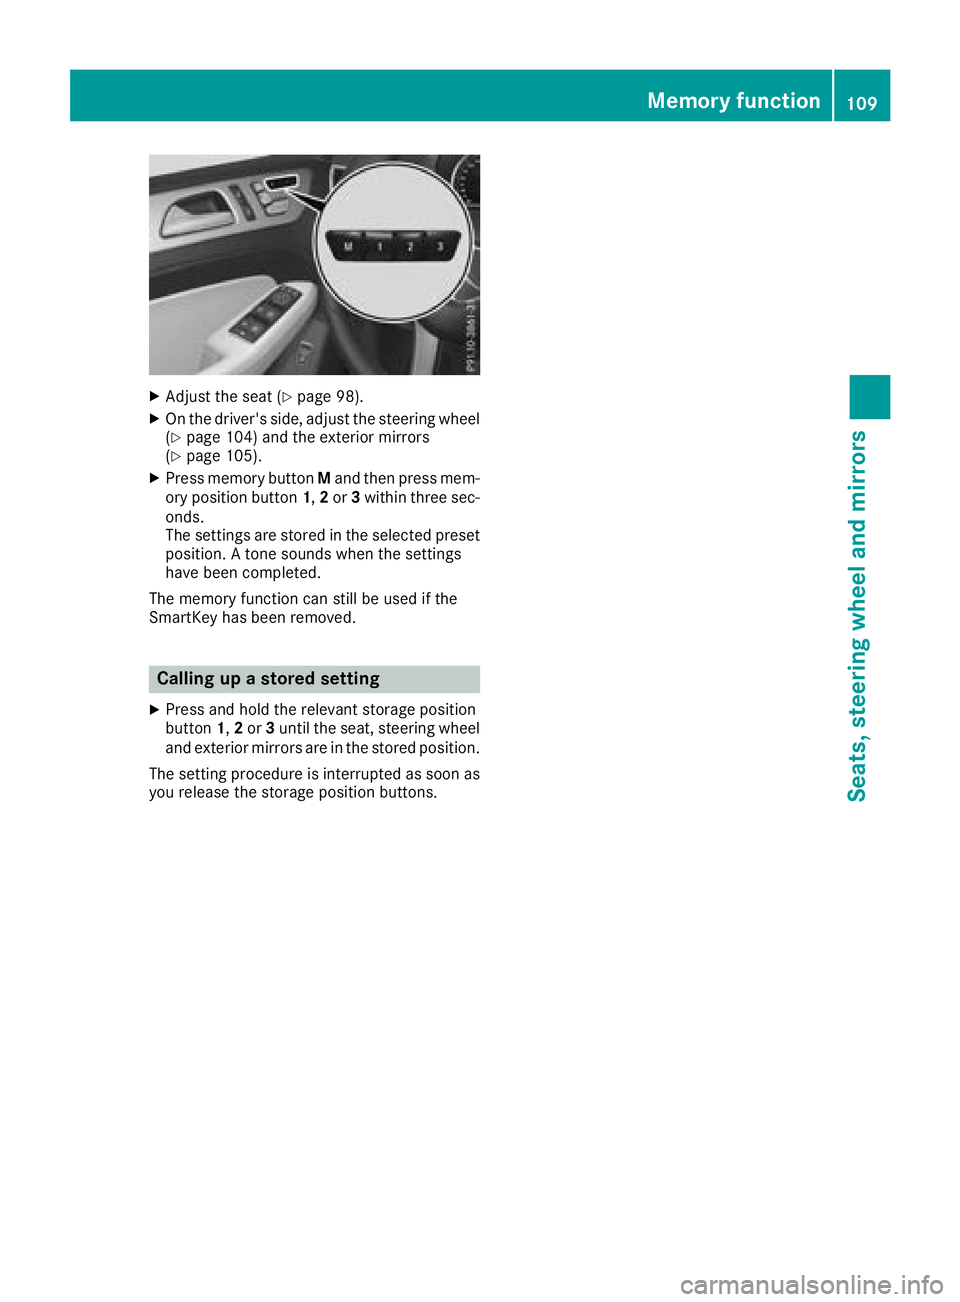
X
Adjust the seat ( Y
page 98).X
On the driver's side, adjust the steering wheel
( Y
page 104) and the exterior mirrors
( Y
page 105). X
Press memory button M and then press mem-
ory position button 1 , 2 or 3 within three sec-
onds.
The settings are stored in the selected preset
position. A tone sounds when the settings
have been completed.
The memory function can still be used if the
SmartKey has been removed.
Calling up a stored setting X
Press and hold the relevant storage position
button 1 , 2 or 3 until the seat, steering wheel
and exterior mirrors are in the stored position.
The setting procedure is interrupted as soon as
you release the storage position buttons. Memory function 109
Seats, steering wheel an d mirrors Z
Page 228 of 398

Use only bicycle racks approved by
Mercedes-Benz.
Bicycle racks cause your vehicle's driving char-
acteristics to change. The vehicle: R
is heavier R
is restricted in its acceleration and gradient-
climbing capability R
has an increased braking distance This could impair the handling characteristics.
Adapt your driving style accordingly. Maintain a
safe distance and drive carefully.
When using bicycle racks, set the tire pressure
on the rear axle of the vehicle for the maximum
load. Further information on tire pressure can be
found on the tire pressure table ( Y
page 354).
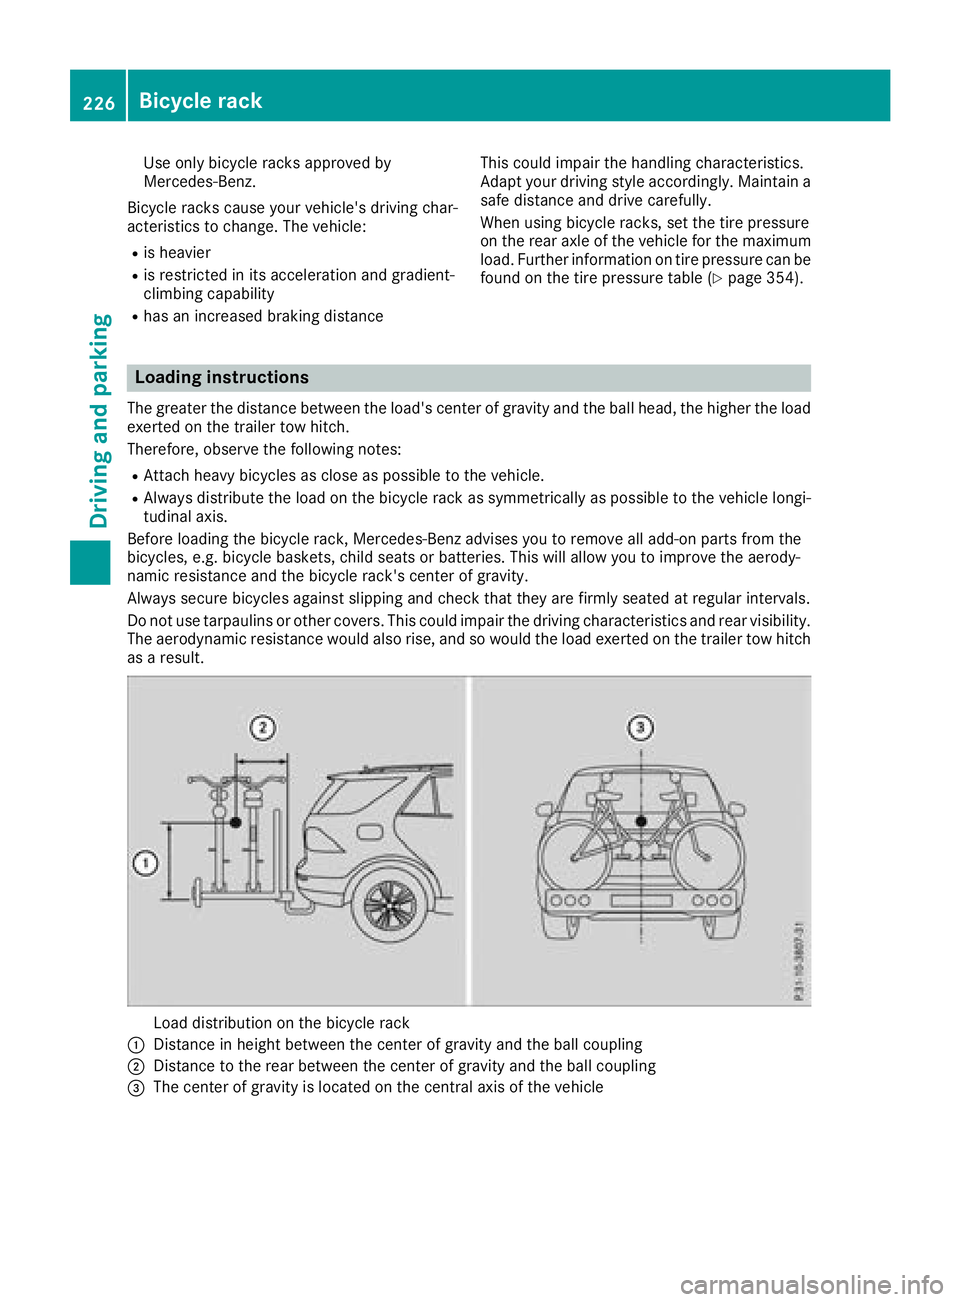
Loading instructions The greater the distance between the load's center of gravity and the ball head, the higher the load
exerted on the trailer tow hitch.
Therefore, observe the following notes: R
Attach heavy bicycles as close as possible to the vehicle. R
Always distribute the load on the bicycle rack as symmetrically as possible to the vehicle longi-
tudinal axis.
Before loading the bicycle rack, Mercedes-Benz advises you to remove all add-on parts from the
bicycles, e.g. bicycle baskets, child seats or batteries. This will allow you to improve the aerody-
namic resistance and the bicycle rack's center of gravity.
Always secure bicycles against slipping and check that they are firmly seated at regular intervals.
Do not use tarpaulins or other covers. This could impair the driving characteristics and rear visibility.
The aerodynamic resistance would also rise, and so would the load exerted on the trailer tow hitch
as a result.
Load distribution on the bicycle rack
�C
Distance in height between the center of gravity and the ball coupling
�D
Distance to the rear between the center of gravity and the ball coupling
�
Page 342 of 398

Battery (vehicle)
12 V battery - important safety notes Plug-in hybrid: be sure to read the separate
operating instructions. You could otherwise fail
to recognize dangers, e.g. due to high voltage.
Special tools and expert knowledge are required
when working on the battery, e.g. removal and
installation. You should therefore have all work
involving the battery carried out at a qualified
specialist workshop.
G WARNING
Work carried out incorrectly on the battery
can lead, for example, to a short circuit and
thus damage the vehicle electronics. This can
lead to function restrictions applying to
safety-relevant systems, e.g. the lighting sys-
tem, the ABS (anti-lock braking system) or the
ESP ®
(Electronic Stability Program). The oper-
ating safety of your vehicle may be restricted.
You could lose control of the vehicle, for
example: R
when braking R
in the event of abrupt steering maneuvers
and/or when the vehicle's speed is not
adapted to the road conditions
There is a risk of an accident.
In the event of a short circuit or a similar inci-
dent, contact a qualified specialist workshop
immediately. Do not drive any further. You
should have all work involving the battery car-
ried out at a qualified specialist workshop.
For further information about ABS and ESP ®
,
see ( Y
page 66) and ( Y
page 70).
G WARNING
Electrostatic build-up can lead to the creation
of sparks, which could ignite the highly explo-
sive gases of a battery. There is a risk of an
explosion.
Before handling the battery, touch the vehicle
body to remove any existing electrostatic
build-up. The highly flammable gas mixture forms when
charging the battery as well as when jump-start-
ing.
Always make sure that neither you nor the bat-
tery is electrostatically charged. A build-up of
electrostatic charge can be caused, for exam-
ple: R
by wearing clothing made from synthetic
fibers R
due to friction between clothing and seats R
if you push or pull the battery across the car-
pet or other synthetic materials R
if you wipe the battery with a cloth
G WARNING
During the charging process, a battery produ-
ces hydrogen gas. If a short circuit occurs or
sparks are created, the hydrogen gas can
ignite. There is a risk of an explosion. R
Make sure that the positive terminal of a
connected battery does not come into con-
tact with vehicle parts. R
Never place metal objects or tools on a bat-
tery. R
It is important that you observe the descri-
bed order of the battery terminals when
connecting and disconnecting a battery. R
When jump-starting, make sure that the
battery poles with identical polarity are
connected. R
It is particularly important to observe the
described order when connecting and dis-
connecting the jumper cables. R
Never connect or disconnect the battery
terminals while the engine is running.
G WARNING
Battery acid is caustic. There is a risk of injury.
Avoid contact with skin, eyes or clothing. Do
not inhale any battery gases. Do not lean over
the battery. Keep children away from batter-
ies. Wash away battery acid immediately with
plenty of clean water and seek medical atten-
tion.340
Battery (vehicle)
Breakdo wn assis tance