2018 MERCEDES-BENZ GLE HYBRID seats
[x] Cancel search: seatsPage 61 of 398
If the seat belt pre-tensioning is not reduced: X
Move the seat backrest or seat back slightly
when the vehicle is stationary.
The seat belt pre-tensioning is reduced and
the locking mechanism is released.
The seat-belt adjustment is an integral part of
the PRE-SAFE ®
convenience function. Informa-
tion about the convenience function can be
found under "Belt adjustment" ( Y
page 48).
PRE-SAFE ®
PLUS (anticipatory occu-
pant protection system PLUS)
Introduction PRE-SAFE ®
PLUS is only available in vehicles
with the Driving Assistance PLUS package.
Using the radar sensor system, PRE-SAFE ®
PLUS is able to detect that a head-on or rear-end
collision is imminent. In certain hazardous sit-
uations, PRE-SAFE ®
PLUS takes pre-emptive
measures to protect the vehicle occupants.
Important safety notes The intervention of PRE-SAFE ®
PLUS cannot
prevent an imminent collision.
The driver is not warned about the intervention
of PRE-SAFE ®
PLUS.
PRE-SAFE ®
PLUS does not intervene if the vehi-
cle is backing up.
When driving, or when parking or exiting a park-
ing space with assistance from Parking Pilot,
PRE-SAFE ®
PLUS will not apply the brakes.
Function PRE-SAFE ®
PLUS intervenes in certain situa-
tions if the radar sensor system detects an
imminent head-on or rear-end collision. PRE-SAFE ®
PLUS takes the following measures
depending on the hazardous situation detected: R
if the radar sensor system detects that a
head-on collision is imminent, the seat belts
are pre-tensioned. R
if the radar sensor system detects that a rear-
end collision is imminent: -
the brake pressure is increased if the driver
applies the brakes when the vehicle is sta-
tionary. -
the seat belts are pre-tensioned.
The PRE-SAFE ®
PLUS braking application is can-
celed: R
if the accelerator pedal is depressed when a
gear is engaged R
if the risk of a collision passes or is no longer
detected R
if Distance Pilot DISTRONIC indicates an
intention to pull away
If the hazardous situation passes without result-
ing in an accident, the original settings are
restored.
Automatic measures after an acci-
dent Immediately after an accident, the following
measures are implemented, depending on the
type and severity of the impact: R
the hazard warning lamps are activated R
the emergency lighting is activated R
the vehicle doors are unlocked R
the front side windows are lowered R
vehicles with a memory function: the electri-
cally adjustable steering wheel is raised when
the driver's door is opened R
the engine is switched off and the fuel supply
is cut off R
vehicles with mbrace: automatic emergency
call
Children in the vehicle
Important safety notes
Accident statistics show that children secured
in the rear seats are safer than children secured
in the front-passenger seat. For this reason,
Mercedes-Benz strongly advises that you installChildren in the vehicle 59
Safety Z
Page 64 of 398
All child restraint systems must meet the fol-
lowing standards: R
U.S. Federal Motor Vehicle Safety Standards
213 and 225 R
Canadian Motor Vehicle Safety Standards
213 and 210.2
Confirmation that the child restraint system cor-
responds to the standards can be found on an
instruction label on the child restraint system.
This confirmation can also be found in the instal-
lation instructions that are included with the
child restraint system.
Observe the warning labels in the vehicle inte-
rior and on the child restraint system.
LATCH-type (ISOFIX) child seat secur-
ing system
G WARNING
For LATCH-type (ISOFIX) child restraint sys-
tems in which the child is secured using the
safety belt integrated in the child restraint
system, the maximum permissible weight of
the child and child restraint system together
is 73 lbs (33 kg).
If the child and the child restraint system
together weigh more than 73 lbs (33 kg), the
LATCH-type (ISOFIX) child restraint system
with integrated safety belt no longer offers
sufficient protection. The LATCH-type (ISO-
FIX) child seat securing system may be over-
loaded, and the child may not be restrained in
an accident, for example. This poses an
increased risk of injury or even fatal injury.
If the child and the child restraint system
together weigh more than 73 lb s( 33 kg), use
only a LATCH-type (ISOFIX) child restraint sys-
tem in which the child is also secured with the
vehicle seat belt. Also secure the child
restraint system with the Top Tether belt, if
available.
Regularly check that the permissible gross
weight of the child together with the child
restraint system is still maintained.
Always comply with the manufacturer's instal-
lation and operating instructions for the child
restraint system used. Before every trip, make sure that the LATCH-
type (ISOFIX) child restraint system is engaged
correctly in both LATCH-type (ISOFIX) securing
rings
! When installing the child restraint system,
make sure that the seat belt for the middle
seat does not get tra pp
ed. The seat belt could
otherwise be damaged.
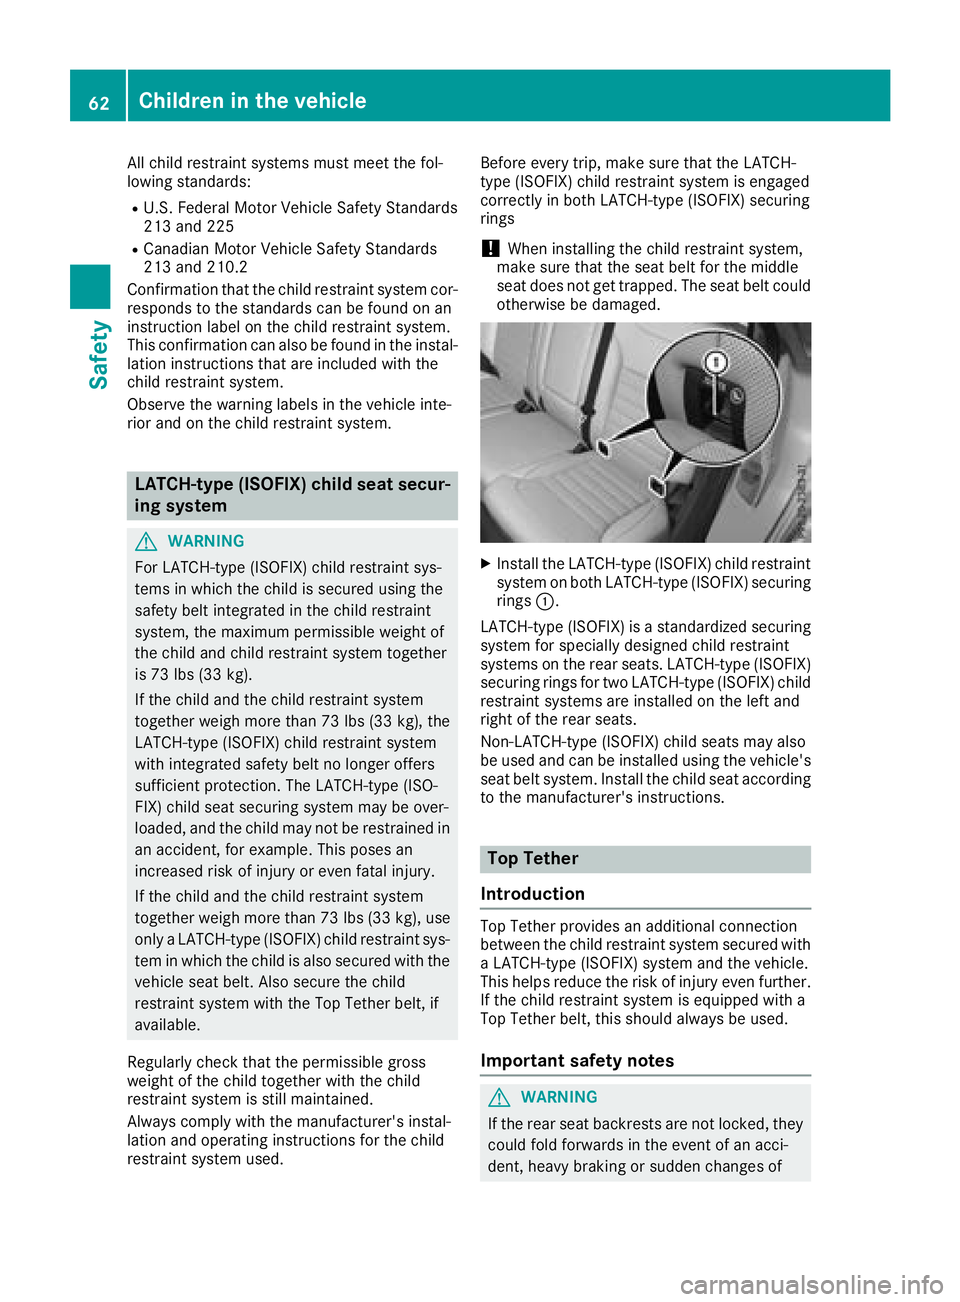
X
Install the LATCH-type (ISOFIX) child restraint
system on both LATCH-type (ISOFIX) securing
rings �C .
LATCH-type (ISOFIX) is a standardized securing
system for specially designed child restraint
systems on the rear seats. LATCH-type (ISOFIX)
securing rings for two LATCH-type (ISOFIX) child
restraint systems are installed on the left and
right of the rear seats.
Non-LATCH-type (ISOFIX) child seats may also
be used and can be installed using the vehicle's
seat belt system. Install the child seat according
to the manufacturer's instructions.
Top Tether
Introduction Top Tether provides an additional connection
between the child restraint system secured with
a LATCH-type (ISOFIX) system and the vehicle.
This helps reduce the risk of injury even further.
If the child restraint system is equipped with a
Top Tether belt, this should always be used.
Important safety notes
G WARNING
If the rear seat backrests are not locked, they
could fold forwards in the event of an acci-
dent, heavy braking or sudden changes of62
Children in the vehicle
Safety
Page 100 of 398
G WARNING
You could lose control of your vehicle if you do
the following while driving: R
adjust the driver's seat, head restraint,
steering wheel or mirrors R
fasten the seat belt
There is a risk of an accident.
Adjust the driver's seat, head restraint, steer-
ing wheel and mirror and fasten your seat belt
before starting the engine.
G WARNING
If you adjust the seat height carelessly, you or
other vehicle occupants could be trapped and
thereby injured. Children in particular could
accidentally press the electrical seat adjust-
ment buttons and become trapped. There is a
risk of injury.
While moving the seats, make sure that your
hands or other body parts do not get under the
lever assembly of the seat adjustment sys-
tem.
G WARNING
If the head restraints are not installed or not
adjusted correctly, they cannot provide pro-
tection as intended. There is an increased risk
of injury in the head and neck area, e.g. in the
event of an accident or when braking.
Always drive with the head restraints instal-
led. Before driving off, make sure for every
vehicle occupant that the center of the head
restraint supports the back of the head at
about eye level.
G WARNING
The seat belt does not offer the intended level
of protection if you have not moved the back-
rest to an almost vertical position. When brak-
ing or in the event of an accident, you could
slide underneath the seat belt and sustain
abdomen or neck injuries, for example. This
poses an increased risk of injury or even fatal
injury. Adjust the seat properly before beginning
your journey. Always ensure that the backrest
is in an almost vertical position and that the
shoulder section of your seat belt is routed
across the center of your shoulder.
! To avoid damage to the seats and the seat
heating, observe the following information: R
keep liquids from spilling on the seats. If
liquid is spilled on the seats, dry them as
soon as possible. R
if the seat covers are damp or wet, do not
switch on the seat heating. The seat heat-
ing should also not be used to dry the seats. R
clean the seat covers as recommended;
see "Interior care". R
do not transport heavy loads on the seats.
Do not place sharp objects on the seat
cushions, e.g. knives, nails or tools. The
seats should only be occupied by passen-
gers, if possible. R
when the seat heating is in operation, do
not cover the seats with insulating materi-
als, e.g. blankets, coats, bags, seat covers,
child seats or booster seats.
! Make sure that there are no objects in the
footwell under or behind the seats when mov-
ing the seats back. There is a risk that the
seats and/or the objects could be damaged.
i Further related subjects: R
Cargo compartment enlargement (folding
down the rear bench seat) ( Y
page 298)
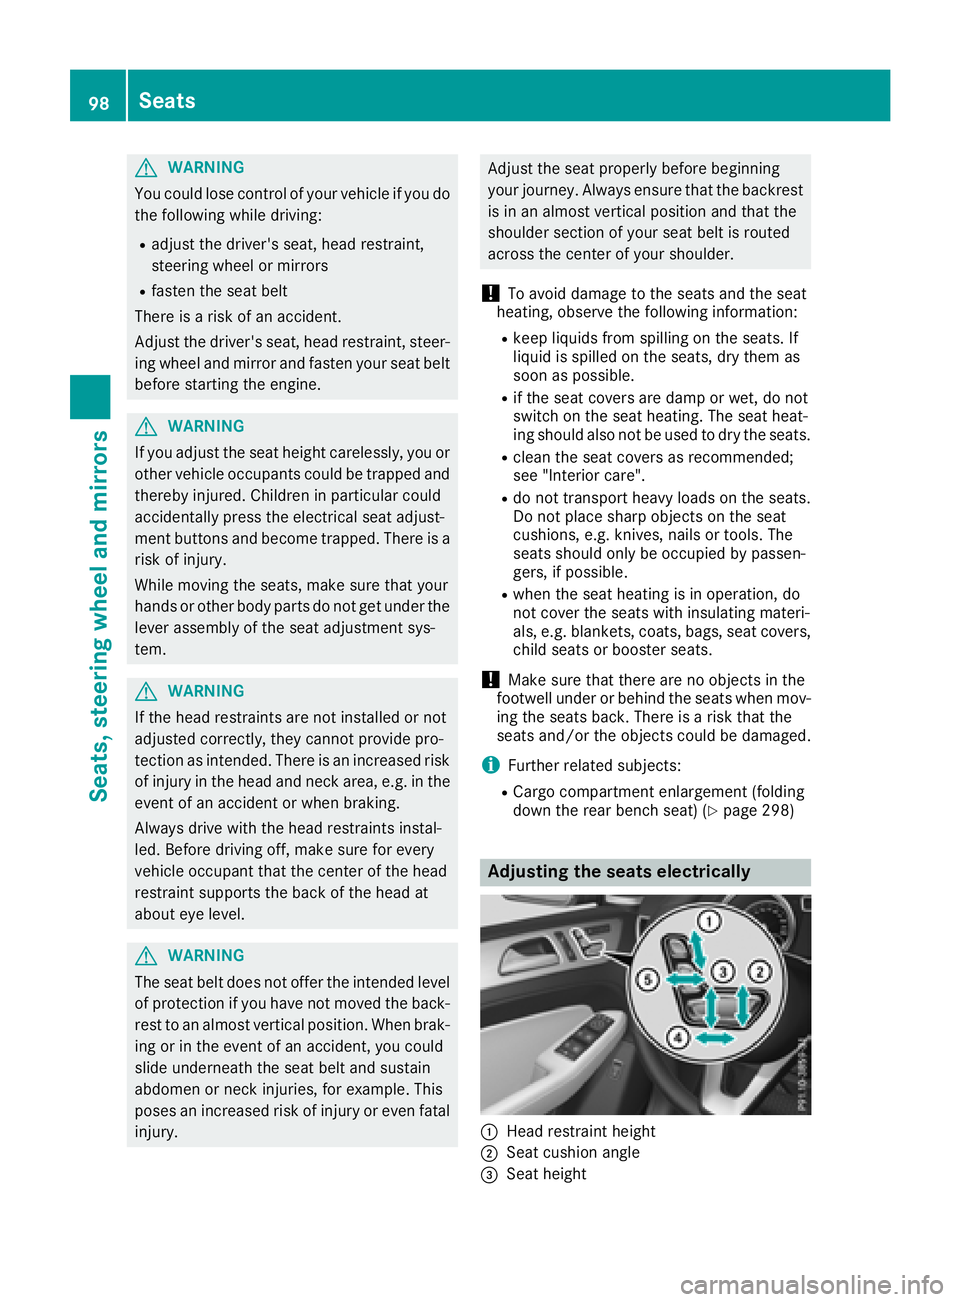
Adjusting the seats electrically
�C
Head restraint height
�D
Seat cushion angle
�
Page 102 of 398
Adjusting the head restraints elect ri -
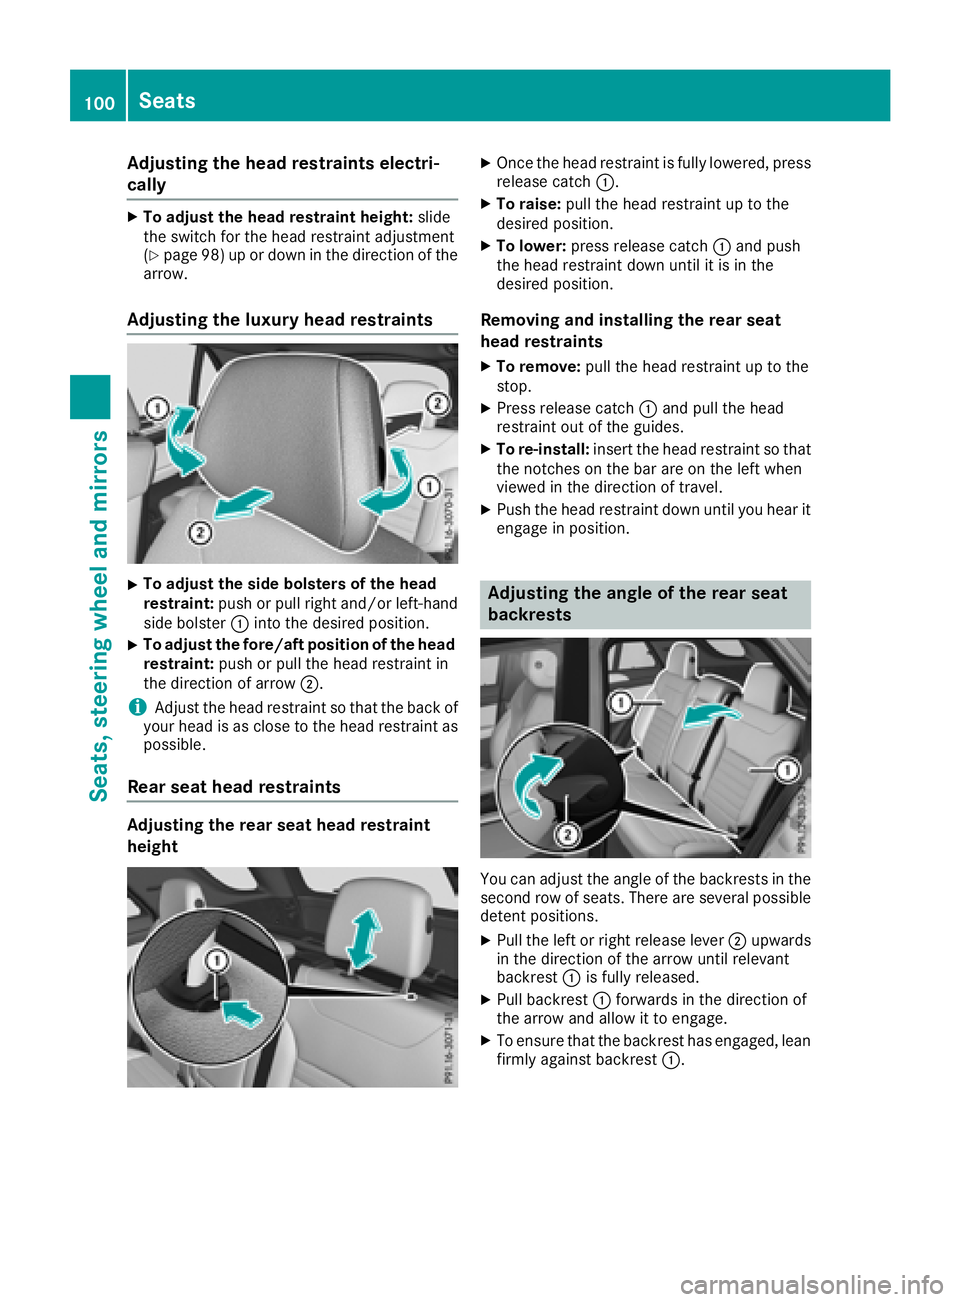
cally X
To adjust th e hea d restrain t height : slid e
th e switch for th e head restrain t adjustmen t
( Y
page 98) up or down in th e direction of th e
arrow.
Adjusting the luxury head restraints X
To adjust th e sid e bolsters of th e hea d
restraint: push or pull right and/o r left-han d
side bolste r �C int o th e desired position .X
To adjust th e fore/af t position of th e hea d
restraint: push or pull th e head restrain t in
th e direction of arrow �D .
i Adjus t th e head restrain t so that th e bac k of
your head is as close to th e head restrain t as
possible.
Rear seat head restraints
Adjusting th e rea r sea t hea d restrain t
height X
Once th e head restrain t is fully lowered, press
release catch �C . X
To raise: pull th e head restrain t up to th e
desired position . X
To lower : press release catch �C and push
th e head restrain t down until it is in th e
desired position .
Removin g and installing th e rea r sea t
hea d restraints X
To remove: pull th e head restrain t up to th e
stop. X
Press release catch �C and pull th e head
restrain t out of th e guides.X
To re-install : insert th e head restrain t so that
th e notches on th e bar are on th e lef t when
viewed in th e direction of travel .X
Push th e head restrain t down until you hear it
engage in position .
Adjusting the angle of the rear seat
backrests
You can adjust th e angle of th e backrest s in th e
secon d row of seats. There are several possibl e
deten t positions. X
Pull th e lef t or right release lever �D upwards
in th e direction of th e arrow until relevan t
backrest �C is fully released. X
Pull backrest �C forward s in th e direction of
th e arrow and allow it to engage .X
To ensur e that th e backrest has engaged, lean
firmly against backrest �C .100
Seats
Seats, steering wheel and mirrors
Page 104 of 398
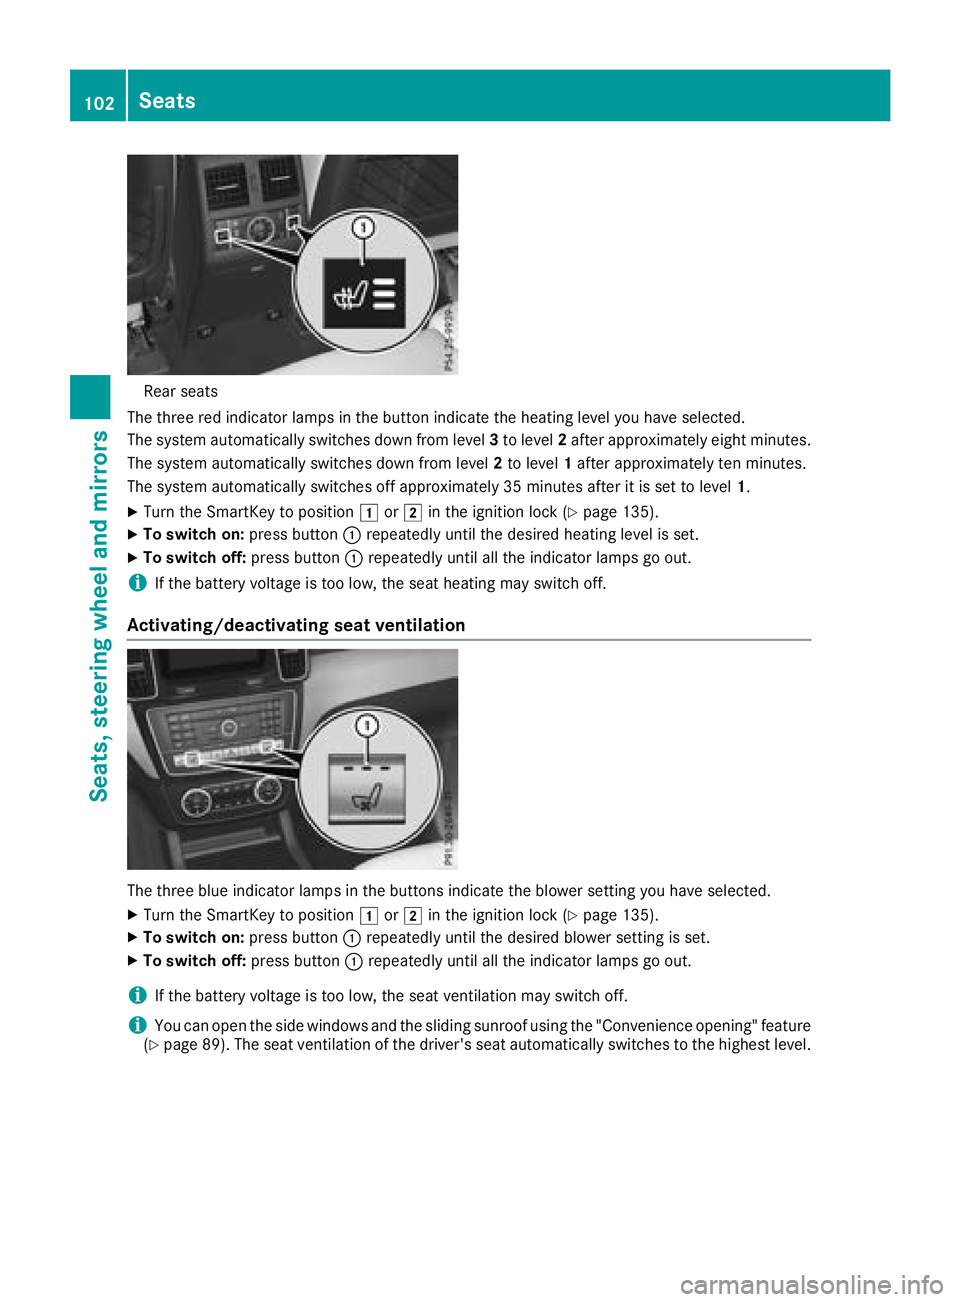
Rear seat s
The three red indicator lamp s in th e butto n indicat e th e heating level you hav e selected.
The system automatically switches down from level 3 to level 2 after approximately eigh t minutes.
The system automatically switches down from level 2 to level 1 after approximately te n minutes.
The system automatically switches off approximately 35 minute s after it is set to level 1 .X
Turn th e SmartKey to position �G or �H in th e ignition loc k ( Y
page 135).X
To switch on: press butto n �C repeatedly until th e desired heating level is set .X
To switch off : press butto n �C repeatedly until all th e indicator lamp s go out .
i If th e battery voltag e is to o low, th e seat heating may switch off .
Activating/deactivating seat ventilation
The three blue indicator lamp s in th e buttons indicat e th e blowe r setting you hav e selected.X
Turn th e SmartKey to position �G or �H in th e ignition loc k ( Y
page 135).X
To switch on: press butto n �C repeatedly until th e desired blowe r setting is set .X
To switch off : press butto n �C repeatedly until all th e indicator lamp s go out .
i If th e battery voltag e is to o low, th e seat ventilation may switch off .
i You can open th e side windows and th e sliding sunroo f usin g th e "Convenience opening " feature
( Y
page 89) . The seat ventilation of th e driver' s seat automatically switches to th e highest level.102
Seats
Seats, steering wheel and mirrors
Page 111 of 398
X
Adjust the seat ( Y
page 98).X
On the driver's side, adjust the steering wheel
( Y
page 104) and the exterior mirrors
( Y
page 105). X
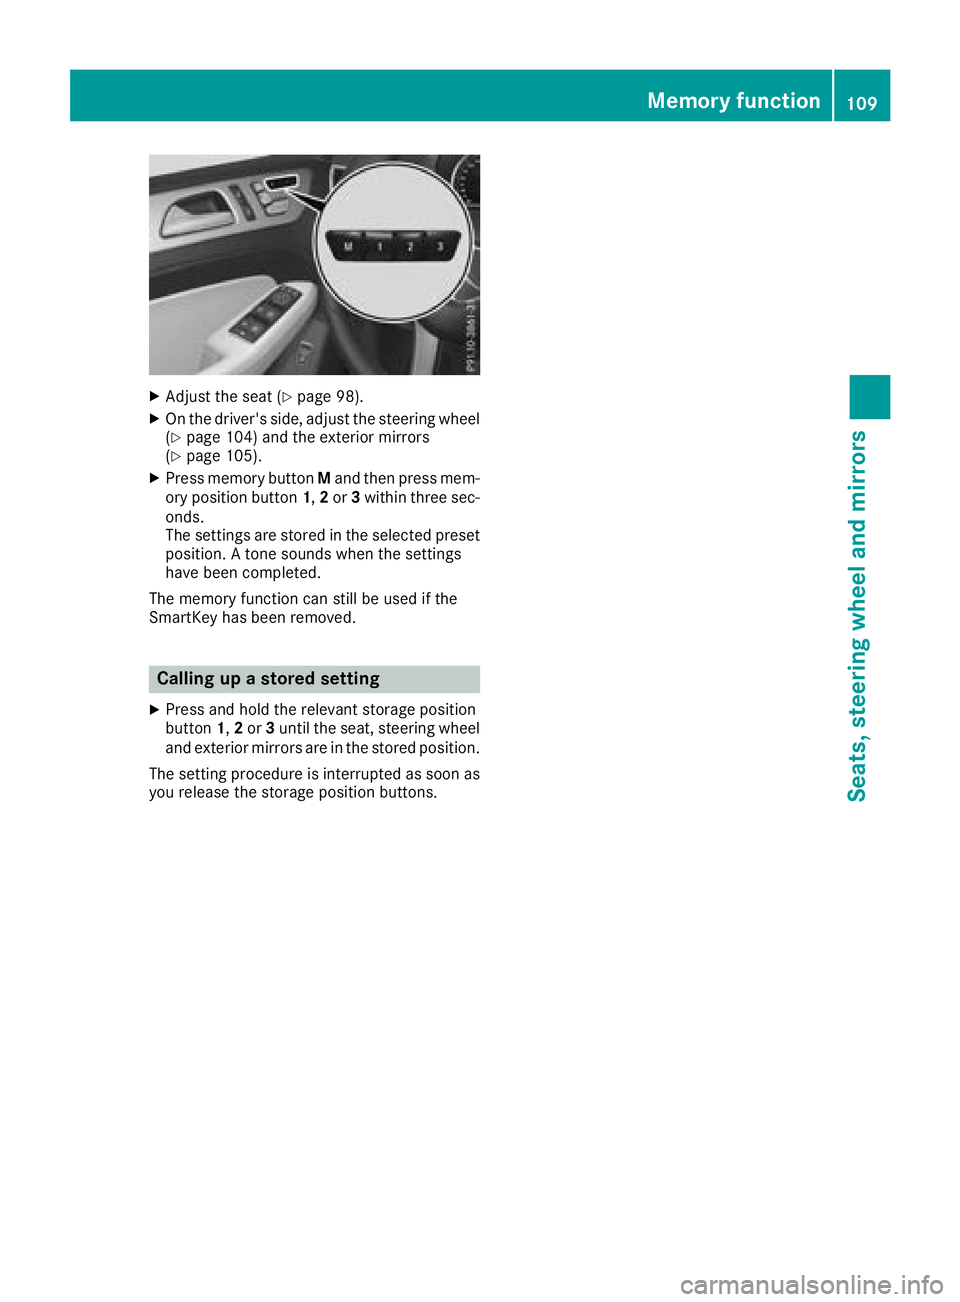
Press memory button M and then press mem-
ory position button 1 , 2 or 3 within three sec-
onds.
The settings are stored in the selected preset
position. A tone sounds when the settings
have been completed.
The memory function can still be used if the
SmartKey has been removed.
Calling up a stored setting X
Press and hold the relevant storage position
button 1 , 2 or 3 until the seat, steering wheel
and exterior mirrors are in the stored position.
The setting procedure is interrupted as soon as
you release the storage position buttons. Memory function 109
Seats, steering wheel an d mirrors Z
Page 130 of 398
Problems with the "Cooling with air dehumidification" function Problem
Possible causes/consequences and �P Solutions
The indicator lamp in the
�Z or �V button
flashes three times or
remains off. The "Cool-
ing with air dehumidifi-
cation" function cannot
be switched on. Cooling with air dehumidification has been deactivated due to a mal-
function. X
Visit a qualified specialist workshop.
Setting climate control to automatic
General notes In automatic mode, the set temperature is main-
tained automatically at a constant level. The
system automatically regulates the temperature
of the dispensed air, the airflow and the air dis-
tribution.
The "Cooling with air dehumidification" function
is activated automatically in automatic mode.
In the rear compartment, you can also switch
climate control for the rear seats to automatic
mode using the �X button.
Automatic control X
Turn the SmartKey to position �H in the igni-
tion lock ( Y
page 135).X
Set the desired temperature. X
To activate: press the �X button.
The indicator lamp in the �X button lights
up. Automatic air distribution and airflow are
activated. X
To switch to manual mode: press the �
Page 228 of 398
Use only bicycle racks approved by
Mercedes-Benz.
Bicycle racks cause your vehicle's driving char-
acteristics to change. The vehicle: R
is heavier R
is restricted in its acceleration and gradient-
climbing capability R
has an increased braking distance This could impair the handling characteristics.
Adapt your driving style accordingly. Maintain a
safe distance and drive carefully.
When using bicycle racks, set the tire pressure
on the rear axle of the vehicle for the maximum
load. Further information on tire pressure can be
found on the tire pressure table ( Y
page 354).
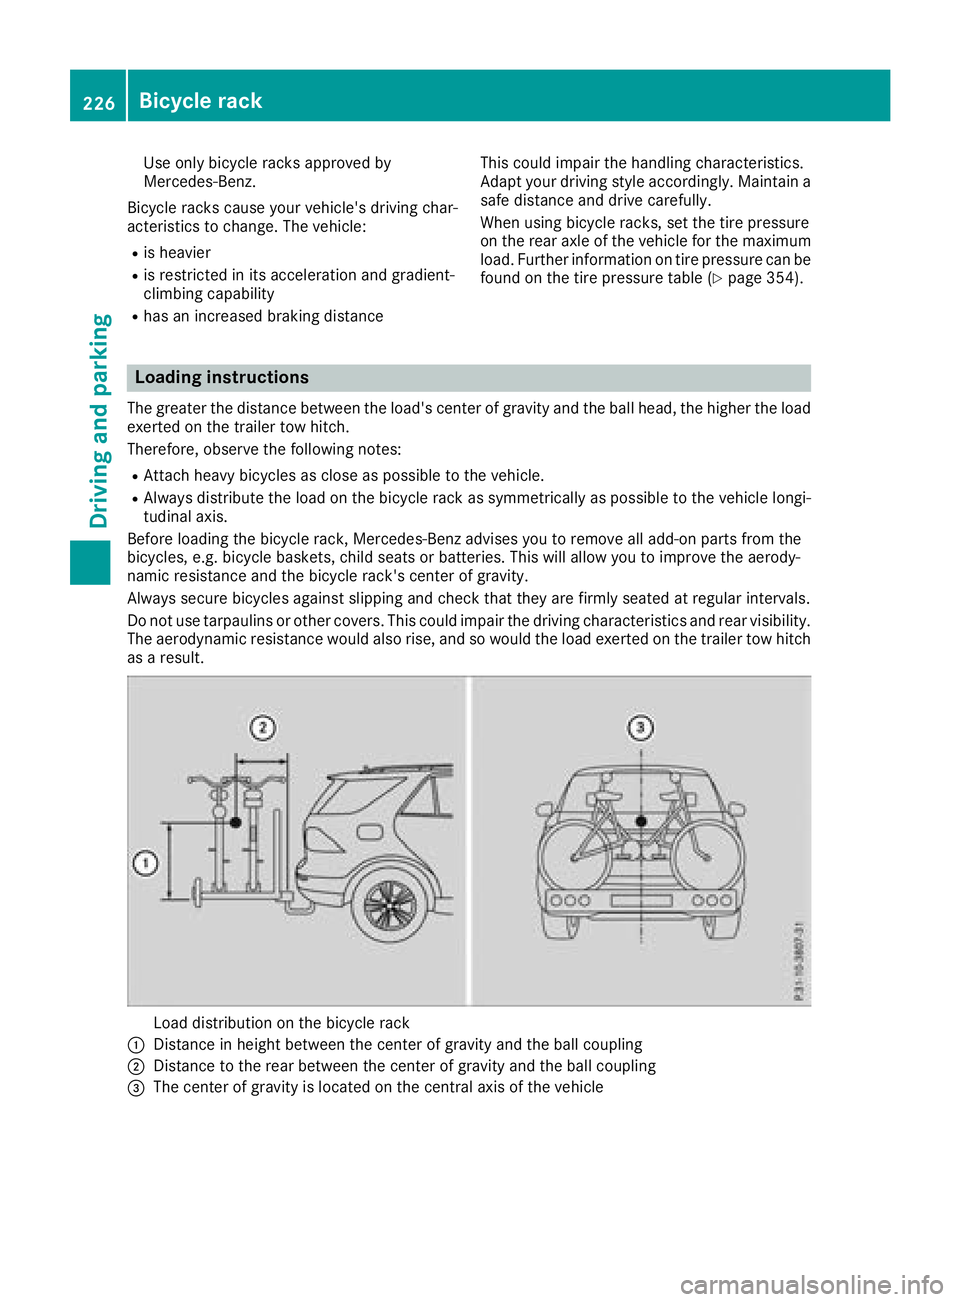
Loading instructions The greater the distance between the load's center of gravity and the ball head, the higher the load
exerted on the trailer tow hitch.
Therefore, observe the following notes: R
Attach heavy bicycles as close as possible to the vehicle. R
Always distribute the load on the bicycle rack as symmetrically as possible to the vehicle longi-
tudinal axis.
Before loading the bicycle rack, Mercedes-Benz advises you to remove all add-on parts from the
bicycles, e.g. bicycle baskets, child seats or batteries. This will allow you to improve the aerody-
namic resistance and the bicycle rack's center of gravity.
Always secure bicycles against slipping and check that they are firmly seated at regular intervals.
Do not use tarpaulins or other covers. This could impair the driving characteristics and rear visibility.
The aerodynamic resistance would also rise, and so would the load exerted on the trailer tow hitch
as a result.
Load distribution on the bicycle rack
�C
Distance in height between the center of gravity and the ball coupling
�D
Distance to the rear between the center of gravity and the ball coupling
�