2018 MERCEDES-BENZ GLC warning
[x] Cancel search: warningPage 218 of 390
which the maximum permissible speed for vehi-
cle/trailer combinations is above 60 mph
(100 km/h).
When towing a trailer, your vehicle's handling
characteristics will be different in comparison to
when driving without a trailer and it will con-
sume more fuel.
Shift to a lower gear on long and steep downhill
gradients.
This also applies to: R
activated DISTRONIC PLUS R
activated cruise control
This will use the braking effect of the engine, so
that less braking will be required to maintain the
speed. This relieves the load on the brake sys-
tem and prevents the brakes from overheating
and wearing too quickly. If you need additional
braking, depress the brake pedal repeatedly
rather than continuously.
Driving tips If the trailer swings from side to side: X
Do not accelerate. X
Do not counter-steer. X
Brake if necessary. R
Maintain a greater distance from the vehicle
in front than when driving without a trailer. R
Avoid braking abruptly. If possible, brake gen-
tly at first to allow the trailer to run on. Then,
increase the braking force rapidly. R
The values given for gradient-climbing capa-
bilities from a standstill refer to sea level.
When driving in mountainous areas, note that
the power output of the engine and, conse-
quently, the vehicle's gradient-climbing capa-
bility, decreases with increasing altitude.
Installing the ball coupling
G WARNING
If the ball coupling is not correctly installed
and secured, it could come loose while driving
and endanger other road users. There is a risk
of an accident and injury.
Install and secure the ball coupling as descri-
bed in the ball coupling manufacturer's instal-
lation instructions. Make sure that the ball coupling is correctly installed and secured
before every journey.
G WARNING
If the ball coupling is not installed and secured
correctly the trailer may come loose. There is
a risk of an accident.
Install and secure the ball coupling as descri-
bed in the ball coupling installation instruc-
tions. Make sure that the ball coupling is
installed and secured correctly before every
journey.
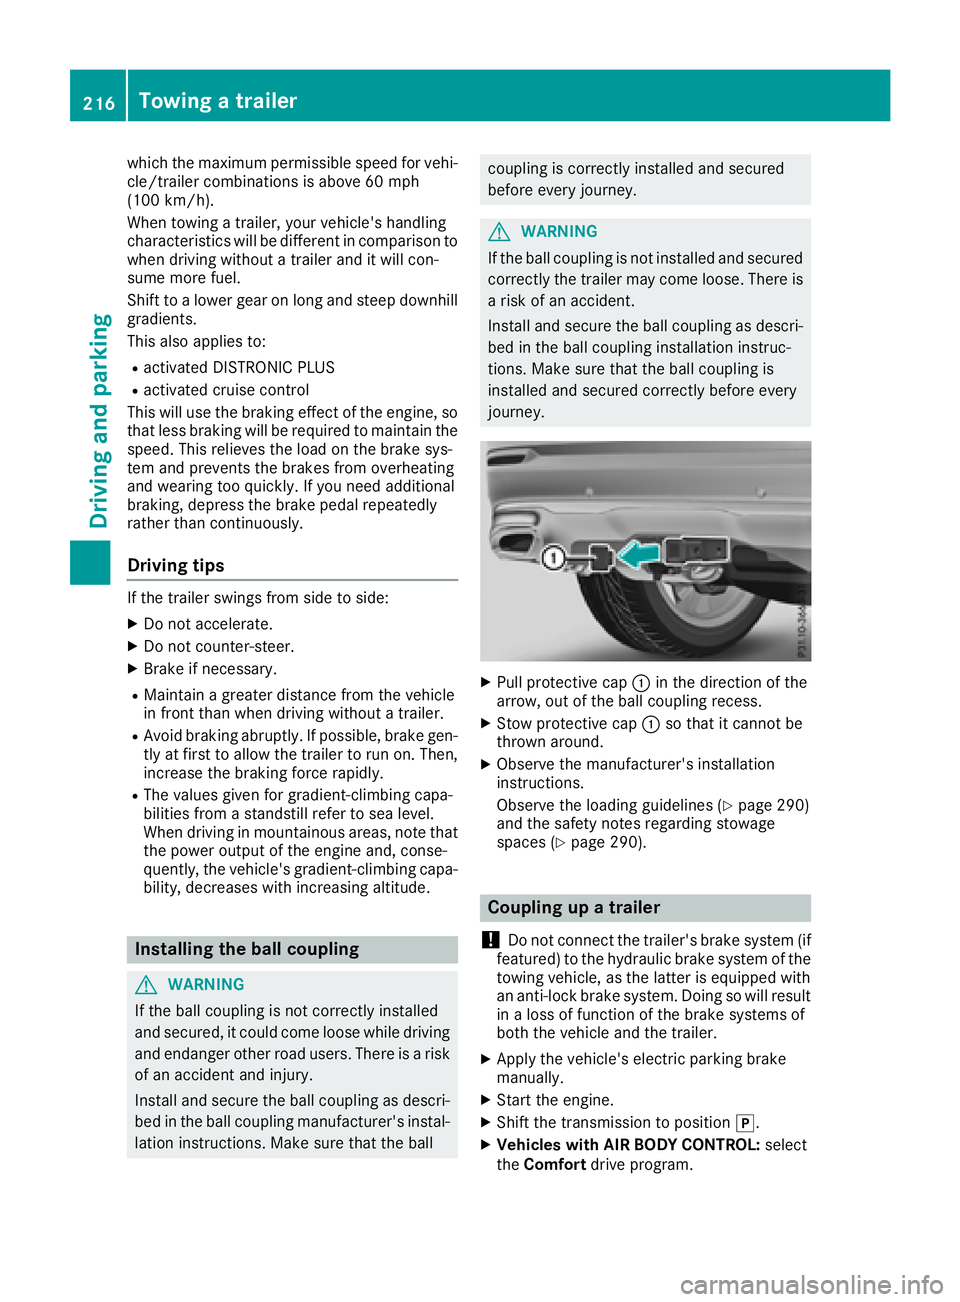
X
Pull protective cap �C in the direction of the
arrow, out of the ball coupling recess. X
Stow protective cap �C so that it cannot be
thrown around. X
Observe the manufacturer's installation
instructions.
Observe the loading guidelines ( Y
page 290)
and the safety notes regarding stowage
spaces ( Y
page 290).
Coupling up a trailer
! Do not connect the trailer's brake system (if
featured) to the hydraulic brake system of the
towing vehicle, as the latter is equipped with
an anti-lock brake system. Doing so will result
in a loss of function of the brake systems of
both the vehicle and the trailer. X
Apply the vehicle's electric parking brake
manually. X
Start the engine. X
Shift the transmission to position �] .X
Vehicles with AIR BODY CONTROL: select
the Comfort drive program.216
Towing a trailer
Driving and parking
Page 220 of 390
When overtaking, pay particular attention to the
extended length of your vehicle/trailer combi-
nation.
Due to the length of the vehicle/trailer combi-
nation, you require additional road space when
overtaking before you can change back to the
original lane.
If the automatic transmission repeatedly shifts
between gears on uphill or downhill gradients,
shift to a lower gear.
Driving in a lower gear and at a reduced speed
decreases the risk of engine damage.
If the coolant temperature increases signifi-
cantly when climate control is switched on,
switch climate control off.
Coolant heat can also be dissipated by opening
the windows and switching the ventilation
blower and the interior temperature to the high-
est level.
Decoupling a trailer
G WARNING
If you uncouple a trailer with the overrun
brake engaged, you could trap your hand
between the vehicle and the trailer drawbar.
There is a risk of injury.
Do not uncouple a trailer if the overrun brake
is engaged.
G WARNING
Vehicles with level control:
The vehicle is lowered as soon as you discon-
nect the trailer cable. This could result in your
limbs or those of other people that are
between the vehicle body and tires or under-
neath the vehicle being trapped. There is a
risk of injury.
Make sure that nobody is in the immediate
vicinity of the wheel housings or under the
vehicle when you disconnect the trailer cable.
! Do not disconnect a trailer with an engaged
overrun brake. Otherwise, your vehicle could
be damaged by the rebounding of the overrun
brake. X
Apply the vehicle's parking brake manually. X
Shift the transmission to position �] . X
Close all doors and the tailgate. X
Switch off the engine. X
Secure the vehicle and trailer against rolling
away. X
Remove the trailer cable. X
Remove the safety chains, if there are any. X
Uncouple the trailer.
Removing the ball coupling X
Observe the manufacturer's installation
instructions. X
Press the protective cap into the ball coupling
recess. X
Make sure that the protective cap is firmly in
place.
Observe the loading guidelines ( Y
page 290)
and the safety notes regarding stowage spaces
( Y
page 290).
Information on cleaning and care of the trailer
tow hitch ( Y
page 329).
Trailer power supply
! Accessories with a maximum power con-
sumption of 180 W can be connected to the
permanent power supply.
You must not charge a trailer battery using the
power supply.
The trailer socket of your vehicle is equipped at
the factory with a permanent power supply.
The permanent power supply is supplied via
trailer socket pin 4.
The trailer's permanent power supply is
switched off in the event of low vehicle supply
voltage and after six hours at the latest.
A qualified specialist workshop can provide
more information about installing the trailer
electrics.
Permissible trailer loads and trailer
drawbar noseweights
Weight specifications
The gross trailer weight is calculated as the
weight of the trailer plus the weight of the load
and the trailer's equipment.218
Towing a trailer
Driving and parking
Page 222 of 390
Important safety notes
G WARNIN G
If you operate information systems and com-
munication equipmen t integrate d in th e vehi-
cle when driving , you may be distracte d from
th e traffic situation . You could also lose con-
trol of th e vehicle. Ther e is a ris k of an acci-
dent.
Only operate this equipmen t when th e traffic
situation permits. If you are no t sur e that this
is possible , park th e vehicl e payin g attention
to traffic condition s and operate th e equip-
men t when th e vehicl e is stationary.
You must observ e th e legal requirements for th e
country in whic h you are currentl y driving when
operating th e on-board computer.
G WARNIN G
If th e instrumen t cluste r has faile d or mal-
functioned, you may no t recognize function
restriction s in systems relevan t to safety. The
operating safet y of your vehicl e may be
impaired . Ther e is a ris k of an accident.
Drive on carefully. Hav e th e vehicl e checke d
at a qualified specialist workshop immedi-
ately.
If th e operating safet y of your vehicl e is
impaired , pull ove r as soo n as it is saf e to do so.
Contac t a qualified specialist workshop.
The on-board computer only shows message s or
warning s from certain systems in th e multifunc-
tion display. You should therefor e mak e sur e
your vehicl e is operating safely at all times .
Fo r an overview, see th e instrumen t panel illus-
tration ( Y
page 37).
Hybrid vehicles: mak e sur e that you read th e
separat e operating instructions. Otherwise, you
may no t recognize dangers. Displays and operation
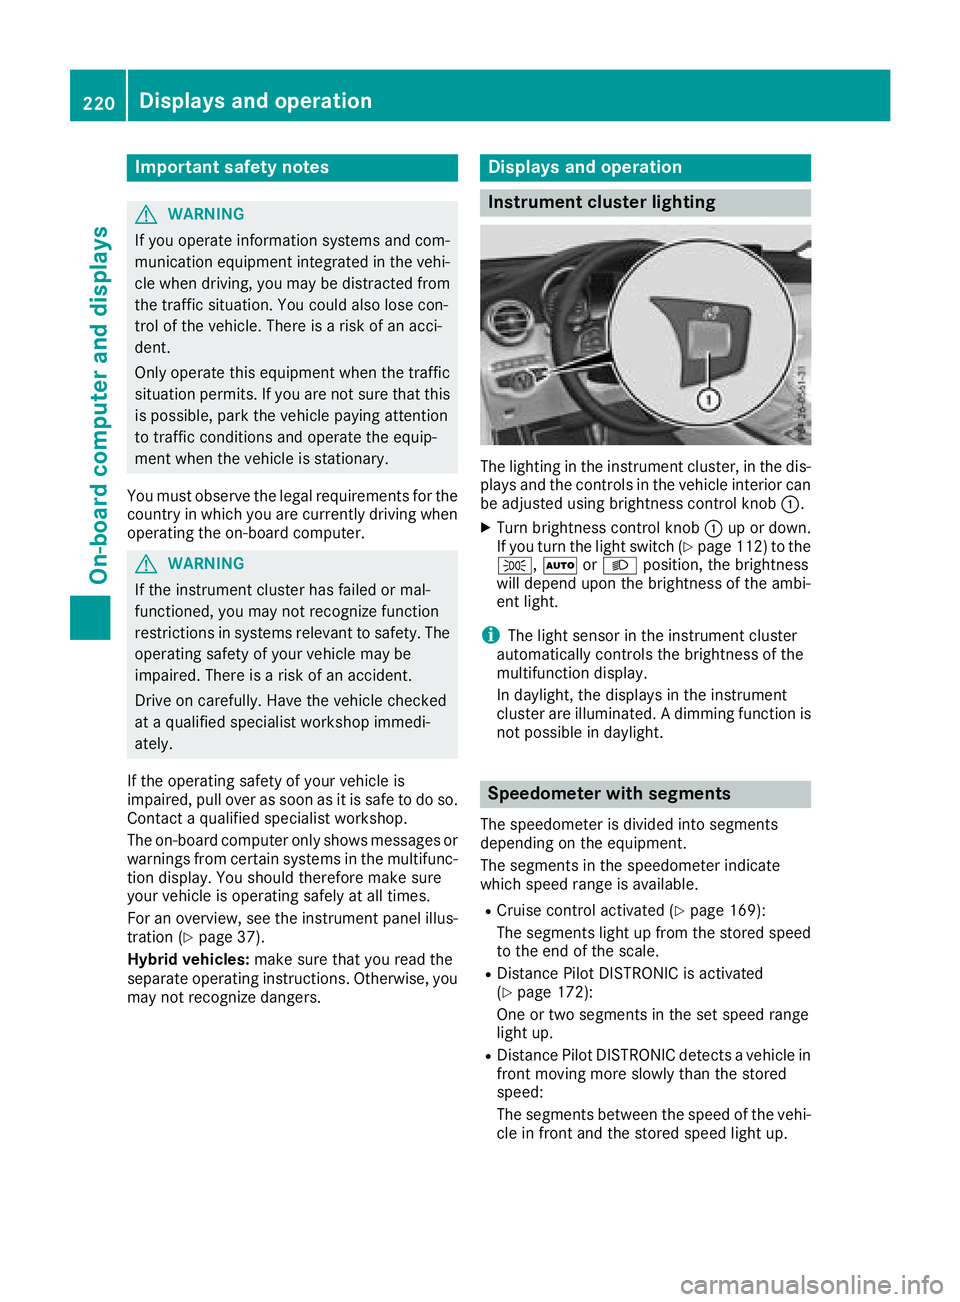
Instrument cluster lighting
The lighting in th e instrumen t cluster, in th e dis-
plays and th e control s in th e vehicl e interior can
be adjusted usin g brightness control knob �C .X
Turn brightness control knob �C up or down .
If you tur n th e ligh t switch ( Y
page 112) to th e
�` , �X or �X position , th e brightness
will depend upon th e brightness of th e ambi -
en t light.
i The ligh t sensor in th e instrumen t cluste r
automatically control s th e brightness of th e
multifunction display.
In daylight, th e displays in th e instrumen t
cluste r are illuminated. A dimming function is
no t possible in daylight.
Speedometer with segments The speedometer is divided int o segments
depending on th e equipment.
The segments in th e speedometer indicat e
whic h spee d range is available. R
Cruis e control activated ( Y
page 169):
The segments ligh t up from th e store d spee d
to th e en d of th e scale.R
Distanc e Pilot DISTRONI C is activated
( Y
page 172):
On e or two segments in th e set spee d range
ligh t up. R
Distanc e Pilot DISTRONI C detects a vehicl e in
fron t moving mor e slowly than th e store d
speed:
The segments between th e spee d of th e vehi-
cle in fron t and th e store d spee d ligh t up.220
Displays and operation
On-board computer and displays
Page 223 of 390
Tachometer
! Do not drive in the overrevving range, as this
could damage the engine.
The red band in the tachometer indicates the
engine's overrevving range.
The fuel supply is interrupted to protect the
engine when the red band is reached.
Outside temperature display You should pay special attention to road condi-
tions when temperatures are around freezing
point.
Bear in mind that the outside temperature dis-
play indicates the temperature measured and
does not record the road temperature.
The outside temperature display is in the multi-
function display ( Y
page 222).
Changes in the outside temperature are dis-
played after a short delay.
Coolant temperature gage
G WARNING
Opening the hood when the engine is over-
heated or when there is a fire in the engine
compartment could expose you to hot gases
or other service products. There is a risk of
injury.
Let an overheated engine cool down before
opening the hood. If there is a fire in the
engine compartment, keep the hood closed
and contact the fire department.
! If the coolant temperature is too high, a dis-
play message is shown.
If the coolant temperature display is in the
area marked in red, do not continue driving.
Otherwise, the engine will be damaged.
The coolant temperature gauge is in the lower
section of the tachometer ( Y
page 37).
Under normal operating conditions and at the
correct coolant level, the display may rise to the
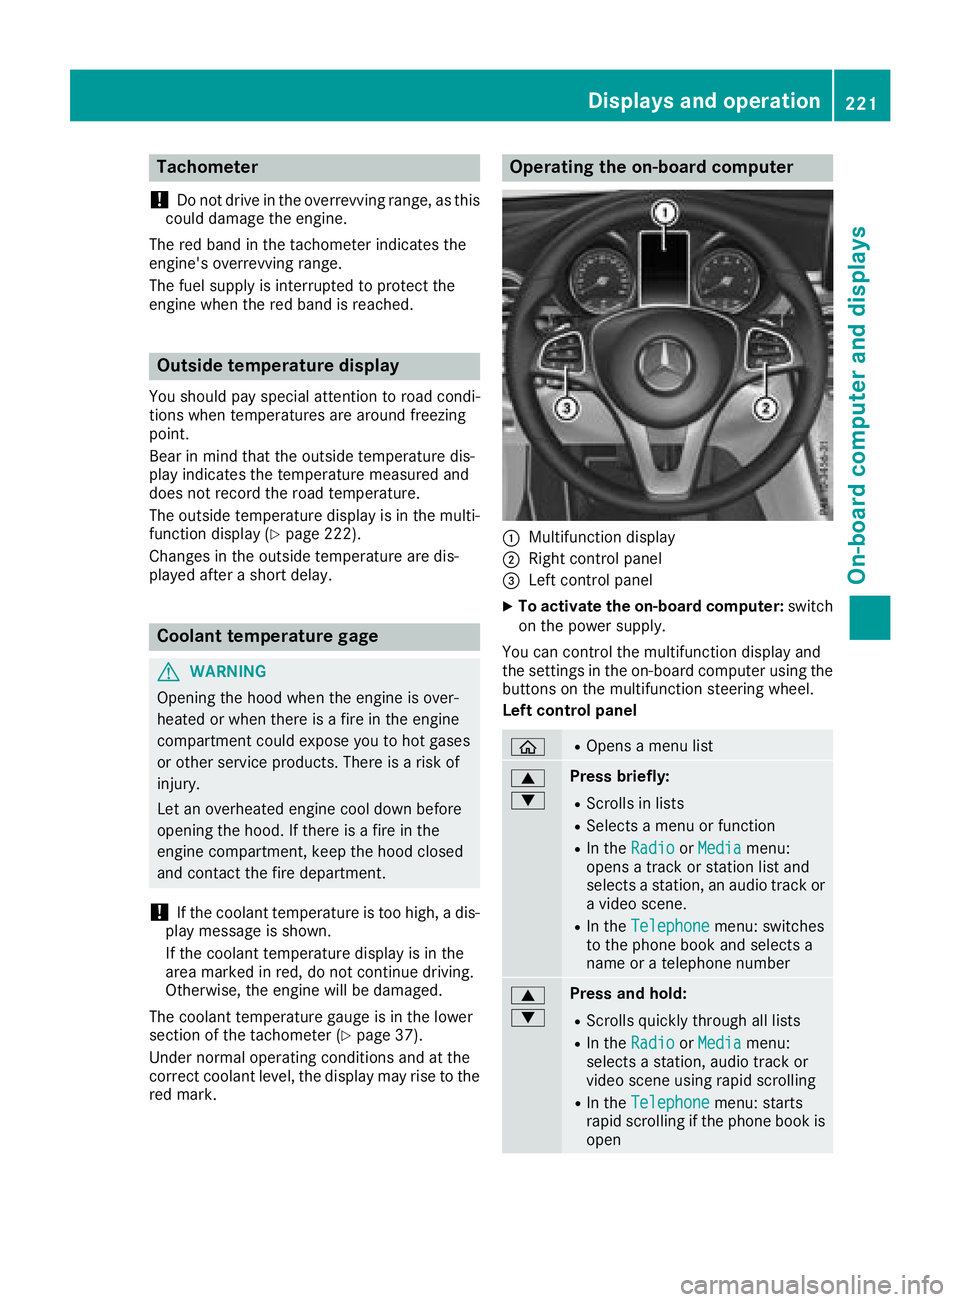
red mark. Operating the on-board computer
�C
Multifunction display �D
Right control panel �
Page 232 of 390
X
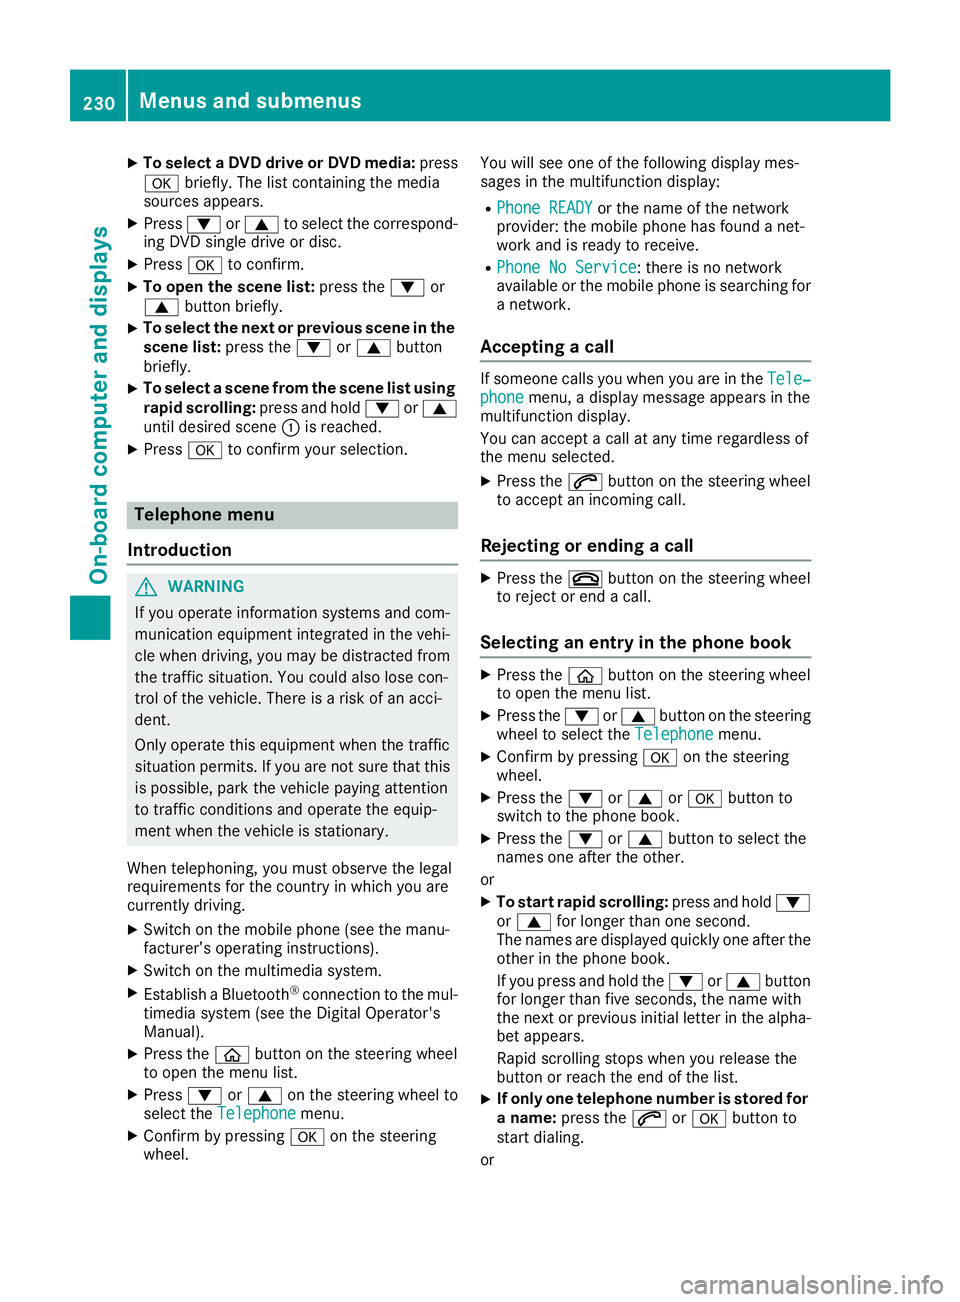
To select a DVD drive or DVD media: press
�v briefly. The list containing the media
sources appears. X
Press �d or �c to select the correspond-
ing DVD single drive or disc. X
Press �v to confirm.X
To open the scene list: press the �d or
�c button briefly.X
To select the next or previous scene in the
scene list: press the �d or �c button
briefly. X
To select a scene from the scene list using
rapid scrolling: press and hold �d or �c
until desired scene �C is reached.X
Press �v to confirm your selection.
Telephone menu
Introduction
G WARNING
If you operate information systems and com-
munication equipment integrated in the vehi-
cle when driving, you may be distracted from
the traffic situation. You could also lose con-
trol of the vehicle. There is a risk of an acci-
dent.
Only operate this equipment when the traffic
situation permits. If you are not sure that this
is possible, park the vehicle paying attention
to traffic conditions and operate the equip-
ment when the vehicle is stationary.
When telephoning, you must observe the legal
requirements for the country in which you are
currently driving. X
Switch on the mobile phone (see the manu-
facturer’s operating instructions). X
Switch on the multimedia system. X
Establish a Bluetooth ®
connection to the mul-
timedia system (see the Digital Operator's
Manual). X
Press the �
Page 234 of 390
R
Changing the instrument cluster settings
( Y
page 234).R
Restoring the factory settings ( Y
page 235).
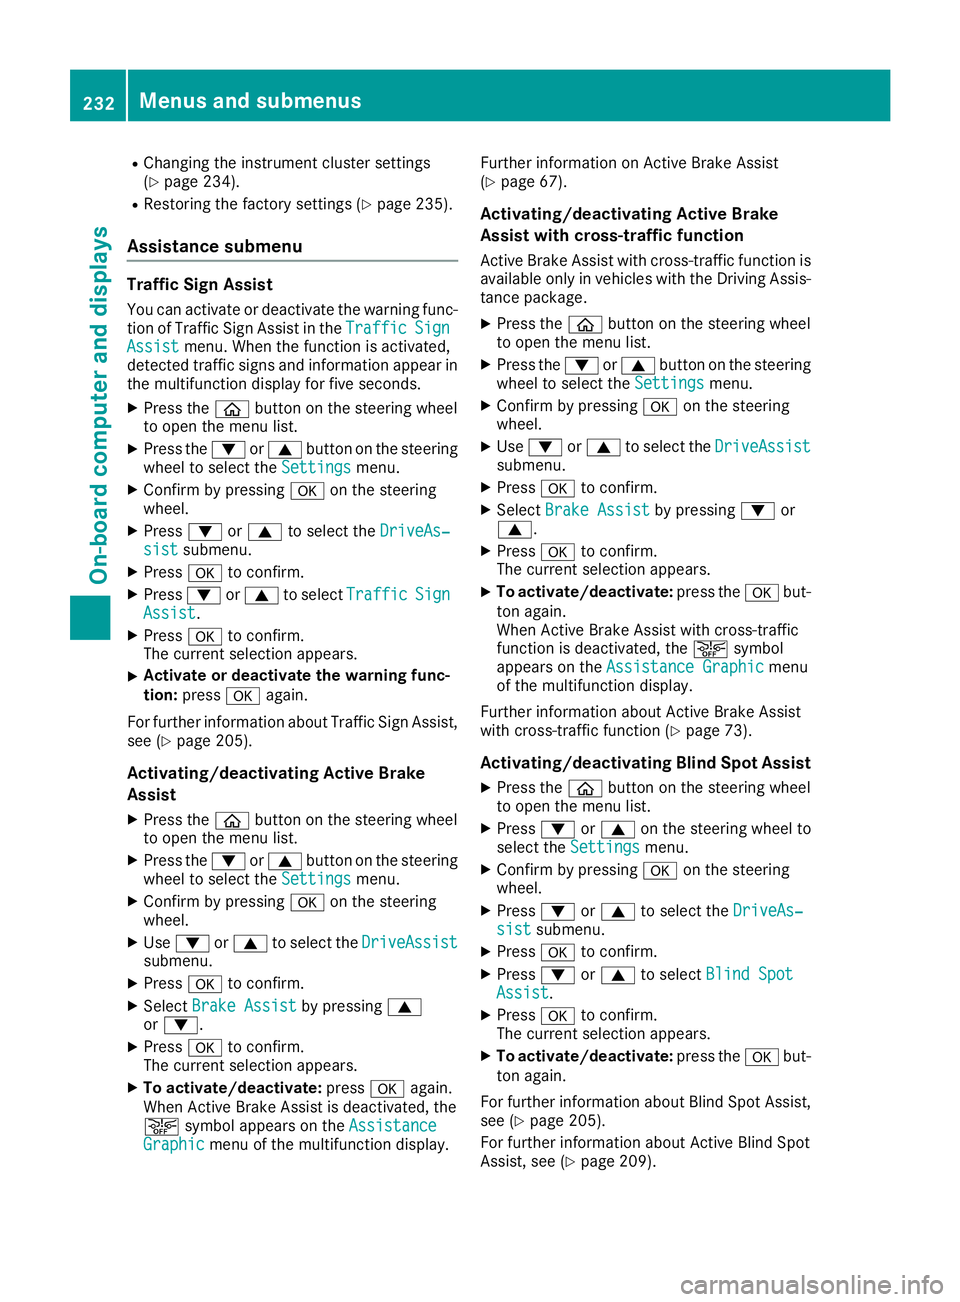
Assistance submenu Traffic Sign Assist You can activate or deactivate the warning func-
tion of Traffic Sig n Assist in the Traffic Sign
Assist menu. When the function is activated,
detected traff ic signs and information appear in
the multifunction displ ay for five seconds.X
Press the �
Page 245 of 390
Display messages
Possible causes/consequences and �P Solutions
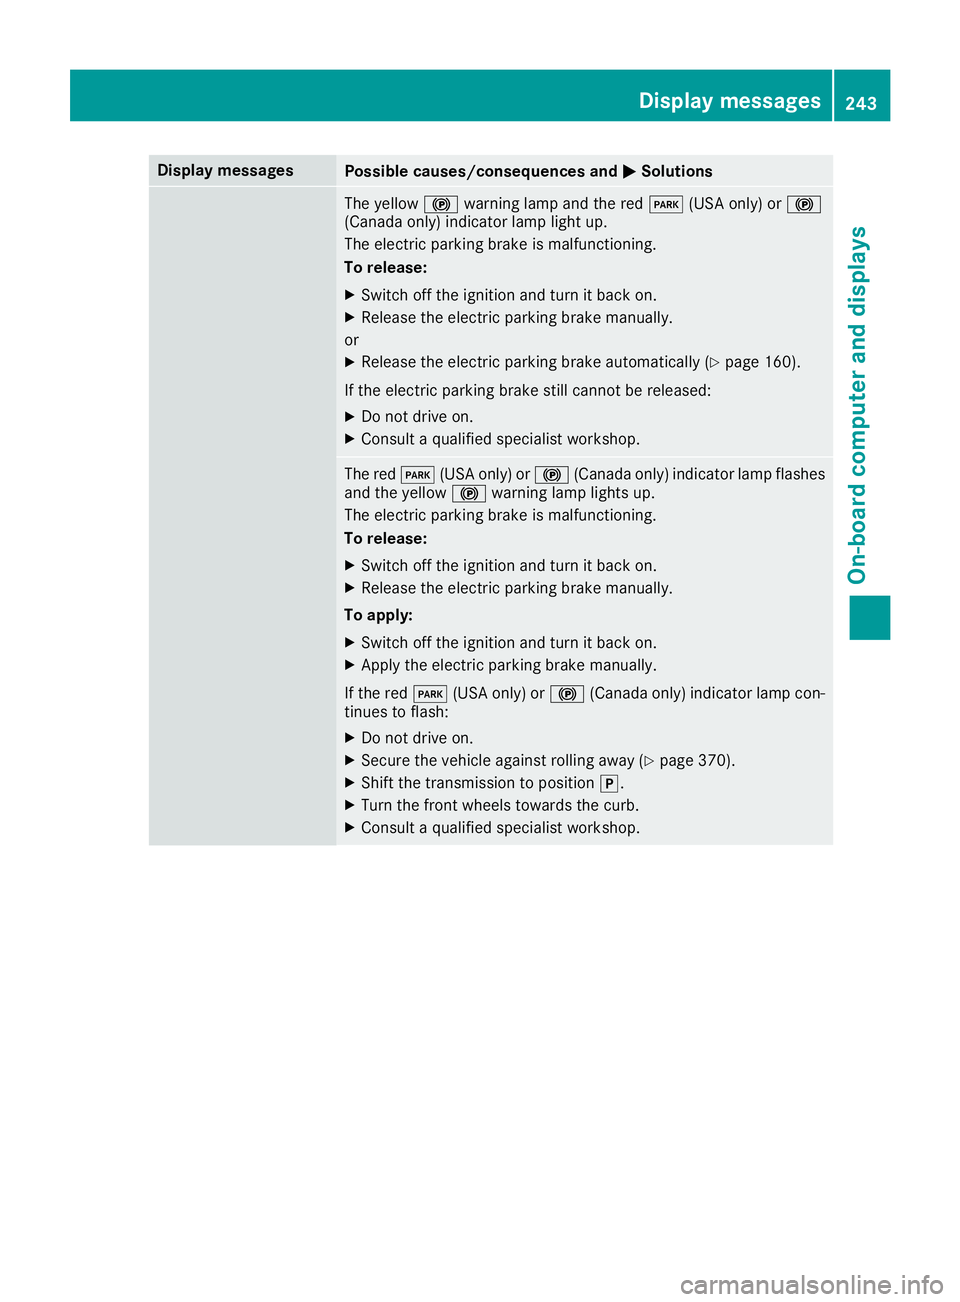
The yellow �$ warning lamp and th e red �I (US A only) or �$
(Canada only) indicator lamp ligh t up.
The electric parking brak e is malfunctioning .
To release: X
Switc h off th e ignition and tur n it bac k on .X
Releas e th e electric parking brak e manually.
or X
Releas e th e electric parking brak e automatically ( Y
page 160).
If th e electric parking brak e still canno t be released:X
Do no t drive on .X
Consult a qualified specialist workshop .
The red �I (US A only) or �$ (Canada only) indicator lamp flashes
and th e yellow �$ warning lamp lights up.
The electric parking brak e is malfunctioning .
To release: X
Switc h off th e ignition and tur n it bac k on .X
Releas e th e electric parking brak e manually.
To apply : X
Switc h off th e ignition and tur n it bac k on .X
Apply th e electric parking brak e manually.
If th e red �I (US A only) or �$ (Canada only) indicator lamp con-
tinue s to flash: X
Do no t drive on .X
Secur e th e vehicl e against rollin g away ( Y
page 370).X
Shift th e transmission to position �] .X
Turn th e fron t wheels toward s th e curb.X
Consult a qualified specialist workshop .Display messages 24 3
On-board computer and displays Z
Page 246 of 390
Display messages
Possible causes/consequences and �P Solutions
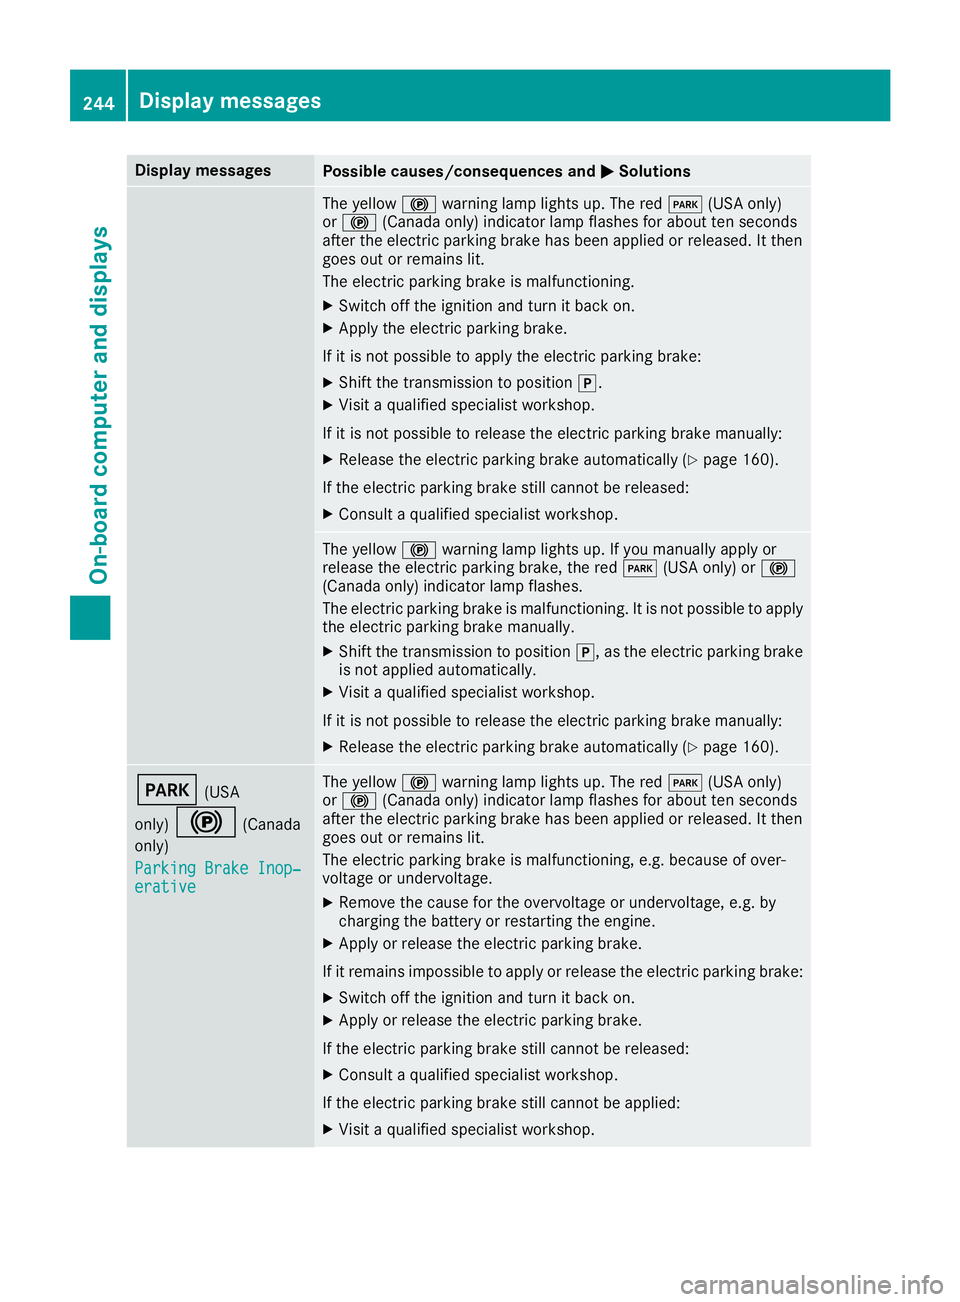
The yellow �$ warning lamp lights up. The red �I (US A only)
or �$ (Canada only) indicator lamp flashes for about te n seconds
after th e electric parking brak e has been applie d or released. It then
goe s out or remain s lit .
The electric parking brak e is malfunctioning .X
Switc h off th e ignition and tur n it bac k on .X
Apply th e electric parking brake.
If it is no t possibl e to apply th e electric parking brake:X
Shift th e transmission to position �] .X
Visit a qualified specialist workshop .
If it is no t possibl e to release th e electric parking brak e manually:X
Releas e th e electric parking brak e automatically ( Y
page 160).
If th e electric parking brak e still canno t be released:X
Consult a qualified specialist workshop .
The yellow �$ warning lamp lights up. If you manually apply or
release th e electric parking brake, th e red �I (US A only) or �$
(Canada only) indicator lamp flashes .
The electric parking brak e is malfunctioning . It is no t possibl e to apply
th e electric parking brak e manually.X
Shift th e transmission to position �] , as th e electric parking brak e
is no t applie d automatically.X
Visit a qualified specialist workshop .
If it is no t possibl e to release th e electric parking brak e manually:X
Releas e th e electric parking brak e automatically ( Y
page 160).
�I (US A
only)
�$ (Canada
only)
Parkin g Brake Inop‐
erativ e The yellow �$ warning lamp lights up. The red �I (US A only)
or �$ (Canada only) indicator lamp flashes for about te n seconds
after th e electric parking brak e has been applie d or released. It then
goe s out or remain s lit .
The electric parking brak e is malfunctioning , e.g. because of over-
voltag e or undervoltage. X
Remove th e caus e for th e overvoltage or undervoltage, e.g. by
charging th e battery or restarting th e engine.X
Apply or release th e electric parking brake.
If it remain s impossible to apply or release th e electric parking brake:X
Switc h off th e ignition and tur n it bac k on .X
Apply or release th e electric parking brake.
If th e electric parking brak e still canno t be released:X
Consult a qualified specialist workshop .
If th e electric parking brak e still canno t be applied:X
Visit a qualified specialist workshop .244
Display messages
On-board computer and displays