2018 MERCEDES-BENZ E-CLASS COUPE parking brake
[x] Cancel search: parking brakePage 259 of 593

The operation of
thefo llowing sy stems depends
on the trailer being connected cor rectly:
R Active Lane Keeping Assist
R ESP ®
R Parking Assist PARKTRONIC
R Active Parking Assist
R Blind Spot Assist or Active Blind Spot Assi st
Coupling up a trailer
* NO
TEDama getotheve hicle battery due
to full dischar ge Charging
the trailer battery using the po wer
supply of the trailer can damage theve hicle
batter y. #
Do not use theve hicle's po wer supply
to charge the trailer batter y.#
Remo vethe co ver from the ball head and
st ore it in a safe place (→ page113). #
Position the trailer on a le vel sur face behind
th eve hicle and couple it up totheve hicle. #
Open the soc ket cap. #
Inse rtthe plug with lug 1in groo ve3 on
th e soc ket. #
Turn the ba yonet coupling 2clockwise as
fa r as it will go. #
Let the cap engage. #
Secure the cable tothe trailer with cable ties
(only if you are using an adap ter cable). #
Make sure that the cable is alw ays slack for
ease of mo vement during cornering. #
Push the combination switch upwards/down‐
wa rds and check whe ther the cor responding
turn signal light on the trailer is flashing. A display message may appear on
the multifunc‐
tion display even if the trailer has been connec‐
te d cor rectly:
R LEDs ha vebeen ins talled in the trailer light‐
ing sy stem
R the cur rent has fallen below the trailer light‐
ing sy stem's minimum cur rent (50 mA)
% Accessories can be connected tothe perma‐
nent po wer supp lyup to180W, and tothe
po we r supp lythat is swit ched on via the igni‐
tion loc k.
Un coupling a trailer &
WARNING Risk of being crushed and
becoming trapped when uncoupling a
trailer
When uncoupling a trailer wi than engaged
ine rtia-activated brake, your hand may
become trapped between theve hicle and the
trailer dr awbar. #
Do not uncouple trailers with an
engaged overrun brake. 256
Driving and pa rking
Page 267 of 593

The
following display con tent can be selected in
th eClassic andSport designs:
R Rev counter
R Navigation
R ECO display
R Consu mption
R G-m eter
The following con tent can be selected in thePro-
gressive design:
R Date
R Navigation
R ECO display
R Consu mption
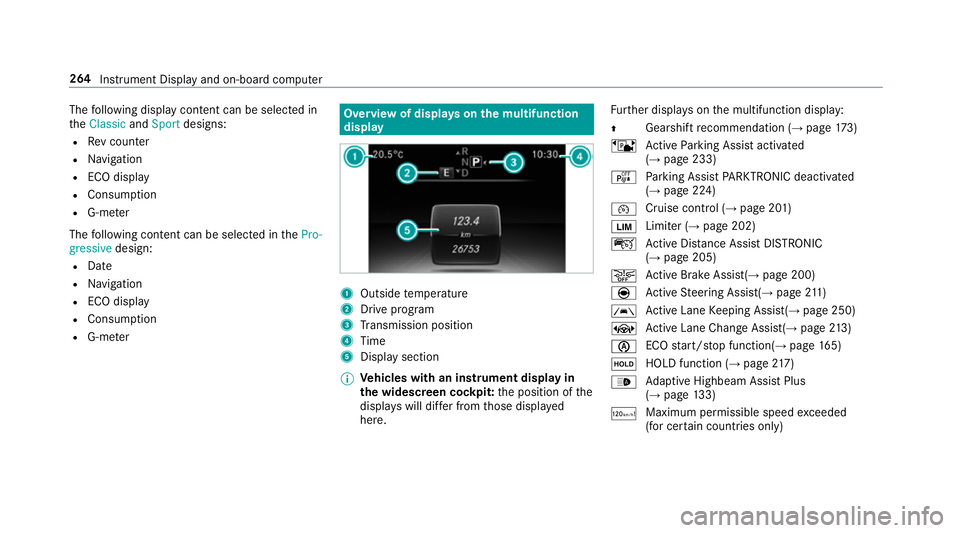
R G-m eter Overview of displa
yson the multifunction
display 1
Outside temp erature
2 Drive prog ram
3 Transmission position
4 Time
5 Display section
% Ve
hicles with an instrument display in
th e widescreen cockpit: the position of the
displa yswill dif fer from those displa yed
here. Fu
rther displa yson the multifunction display:
Z Gearshift
recommendation (→ page 173)
ë Active Parking Assist activated
(→ page 233)
é Parking Assist PARKTRONIC deacti vated
( → page 224)
¯ Cruise control (→
page 201)
È Limiter (→
page 202)
ç Active Dis tance Assi stDISTRONIC
(→ page 205)
æ Ac
tive Brake Assi st(→ page 200)
è Active Steering Assis t(→ page 211)
à Ac
tive Lane Keeping Assist(→ page 250)
± Active Lane Change Assi st(→ page 213)
è ECO
start/ stop function(→ page165)
ë HOLD fu
nction (→ page 217)
_ Ad
aptive Highbeam Assist Plus
(→ page 133)
ð Maximum permissible speed
exceeded
(for cer tain countries only) 264
Instrument Display and on-board computer
Page 312 of 593

R
Notes and warnings ha vebeen read and
accep ted.
R The parking brake is applied.
If all requirements are met, the update will be
ins talled. The multimedia sy stem cann otbe
operated while the update is being ins talled and
ve hicle functions are restricted.
If er rors should occur during the ins tallation, the
multimedia sy stem automatically attem ptsto
re store the pr evious version. If restoration of the
pr ev ious version is not possible, a symbol
appears on the cent reconsole displ ay. Please
consult a qualified specialist workshop to
re solve the problem. Re
set function Multimedia sy
stem:
System Reset
Pe rsonal data is dele ted, forex ample:
R Station presets
R Connec ted mobile phones #
Select Yes.
If PIN pr otection is activated, a prom ptappears
asking if you also wish torestore this to thefa c‐
to ry settings during a reset. #
Select Yes. #
Enter the cur rent PIN.
The PIN is reset.
or #
Select No.
The cur rent PIN stay sth e same af terre set‐
ting.
% Ifyo u ha veforg ottenyo ur PIN, a Mercedes-
Benz service centre can deactivate the PIN
pr otection foryo u.
A prom ptappears again asking whe ther you
re ally wish toreset. #
Select Yes.
The multimedia sy stem is reset tothefa ctory
settings. Fi
t & Healthy ENE
RGIZING comfort Multimedia sy
stem 309
Page 417 of 593

Note
s on care of car parts &
WARNING Risk of entrapment if the
windscreen wipers are swit ched on while
th e windscreen is being cleaned
If th e windscreen wipers are set in motion
while you are cleaning the windscreen or
wiper blades, you can be trapped bythe
wiper arm. #
Alw ays switch off the windscreen wip‐
ers and the ignition before cleaning the
windscreen or wiper blades. &
WARNING Risk of bu rning from theta il‐
pipe or tailpipe trim
The tailpipe and tailpipe trim can become
ve ry hot. If you come into contact with these
car parts, you could burn yourself. #
Alw ays be particular lycareful when in
th e vicinity of theta ilpipe and tailpipe
trims and supervise children very
closely when in this area. #
Before any con tact, allow the car parts
to cool down. Obser
vethefo llowing information: Note
s on cleaning and car eA voiding vehicle damage
Wheels/rims Usewate r and acid-free wheel cleaners. R
Do not use acidic wheel cleaners toremo vebrake dust.
This could damage wheel bolts and brake components.
R Toavoid cor rosion of the brake discs and brakepads, drive
th eve hicle for a few minutes af ter cleaning before parking
it. The brake discs and brakepads warm up and dry out.
Wi ndo ws
Cleanthe windo wsonthe inside and outside using a damp
clo thand cleaning agents recommended byMercedes-Benz. Do not use dry clo
ths or abrasive or sol vent-based cleaning
agents toclean the inside of windo ws.
Wi per blades
Fold out the wiper blades and clean them using a damp clo th.D o not clean the wiper blades too of ten. 414
Maintenance and care
Page 436 of 593

Pe
rm itted towing me thods Ve
hicle equipment/ towing
me thod Bo
th axles on thegr ound Fr
ont axle raised Re
ar axle raised
Ve hicles with automatic transmis‐
sion Ye
s, maximum 50 km at 50 km/h No Yes, if thesteering wheel is fixe d in
th e cent reposition with a steering
wheel loc k.
4MATIC vehicles Yes, maximum 50 km at 50 km/h No NoTo
wing with a raised axle: towing should be
per form ed byato wing compan y. To
wing theve hicle with bo thaxles on the
gr ound #
Obser vethe no tes on the permitted towing
me thods (→ page 432). #
Make sure that the battery is connected and
ch arge d. Obser
vethefo llowing points when the battery is
dischar ged:
R the engine cann otbe star ted
R the electric parking brake cann otbe released
or applied
R vehicles with automatic transmission: the
automatic transmission cannot be shif tedto
position iorj.
% Vehicles with automatic transmission: if
th e automatic transmission cann otbe shif‐ te
dto position i, orthe multifunction dis‐
play in the instrument clus ter does not show
anything, ha vetheve hicle transpor tedaw ay
( → page 435). A towing vehicle with lifting
equipment is requiredforve hicle transpor ta‐
tion. Breakdown assi
stance 433
Page 437 of 593

*
NO
TEDama gedue to to wing away at
exc essively high speeds or over long dis‐
ta nces The driv
etra in could be damaged when tow‐
ing at excessively high speeds or over long
dis tances. #
Atowing speed of 50 km/h must not
be exc eeded. #
Atowing dis tance of 50 km must not be
exc eeded. &
WARNING Risk of accident when towing
a ve hicle which is too heavy
If th eve hicle being tow- star ted or towed
aw ay is heavier than the permissible gross
mass, thefo llowing situations can occur:
R theto wing eye may become de tach ed.
R the car/t railer combination may swer ve
or eve nove rturn. #
If ano ther vehicle is tow- star ted or
to we daw ay, its weight must not exceed th
e permissible gross mass of your own
ve hicle. If a
vehicle must be tow star ted or towe daw ay,
its permissible gross mass must not exceed the
permissible gross mass of theto wing vehicle. #
Information on the permissible gross mass of
th eve hicle can be found on theve hicle iden‐
tification plate (→ page 463). #
Vehicles with automatic transmission: do
not open the driver's door or front passenger
door, otherwise the automatic transmission
automatically shifts toposition j. #
Fittheto wing eye (→ page 436). #
Fasten theto w bar.
* NO
TEDama gedue toincor rect connec‐
tion #
Only connect theto w rope or tow bar to
th eto wing eyes. #
Deactivate the automatic locking mechanism
(→ page 79). #
Do not activate the HOLD function. #
Deactivate tow- aw ay protection (→ page 96). #
Deactivate Active Brake Assi st (→page 200). #
Vehicles with automatic transmission:
shift the automatic transmission toposition
i. #
Release the electric parking brake. &
WARNING Risk of accident due tolimi‐
te d saf ety-re lated functions during the
to wing process
Saf ety-re lated functions are limited or no lon‐
ge rav ailable in thefo llowing situations:
R the ignition is switched off.
R the brake sy stem or po werst eering sys‐
te m is malfunctioning.
R the energy supply or the on-board electri‐
cal sy stem is malfunctioning.
When your vehicle is then towe daw ay, signif‐
icantly more ef fort may be requ ired tosteer
and brake than is no rmally requ ired. 434
Breakdown assis tance
Page 438 of 593

#
Use a tow bar. #
Make sure that thesteering wheel can
mo vefreely, before towing theve hicle
aw ay. *
NO
TEDama gedue toexcessive tracti ve
po wer If
yo u pull away sharpl y,the tractive po wer
may be too high and theve hicles could be
damaged. #
Pull away slowly and smoo thly. Loading the
vehicle for transport #
Obser vethe no tes on towing away
( → page 433). #
Connect theto w bar totheto wing eye in
order toload theve hicle.
% You can also attach theto w bar tothe trailer
hitch. #
Vehicles with automatic transmission:
shift the automatic transmission toposition
i.
% Ve
hicles with automatic transmission:
th e automatic transmission may be loc ked in
position jintheeve nt of dama getothe
electrical sy stem. Toshift toi , pr ovide the
on-board electrical sy stem with po wer
( → page 430). #
Load theve hicle onto the transpor ter. #
Vehicles with automatic transmission:
shift the automatic transmission toposition
j. #
Use the electric parking brake tosecure the
ve hicle against rolling away. #
Only secure theve hicle bythe wheels. Ve
hicles with ADS PLUS (Adaptive Damping
Sy stem PLUS) &
WARNING Risk of an accident when
transporting vehicles with Adaptive
Damping Sy stem PLUS
The reduced damping forc es on theve hicle
being transpor ted can cause theve hicle/
trailer combination tostart toswing.
As a result, when transporting vehicles with
th eAd aptive Damping Sy stem PLUS, the
ve hicle/trailer combination may start toskid.
Consequentl y,yo u could lose cont rol of your
ve hicle. #
When transporting, ensure that:
R theve hicle has been loaded onto
th e transpor ter cor rectly
R theve hicle is secured at all four
wheels with suitable tensioning
st ra ps
R the maximum permissible speed of
60 km/h is not exceeded when
transporting Breakdown assis
tance 435
Page 457 of 593

R
The vehicle is not on a slope.
R The vehicle is on solid, non-slippery and le vel
ground. #
Apply the electric parking brake manually. #
Movethe front wheels tothest ra ight-ahead
position. #
Vehicles with automatic transmission:
shift into position j.#
Vehicles with le vel control sy stem: setthe
normal vehicle le vel (→ page 220). #
Swit choff the engine. #
Make sure that the engine cann otbe star ted. #
Place choc ks orother suitable items under
th e front and rear of the wheel that is diago‐
nally opposite the wheel you wish tochange. #
Remo vethe hub caps if necessary
(→ page 454). #
Raise theve hicle (→ page 455). Re
moving and fitting hub caps Re
quirements:
R The vehicle is prepared for a wheel change
(→ page 453).
Pla stic hub cap #
Toremo ve:turn the cent recover of the hub
cap anti-clockwise and remo vethe hub cap. #
Tofit: make sure that the cent recover of the
hub cap is turned anti-clockwise. #
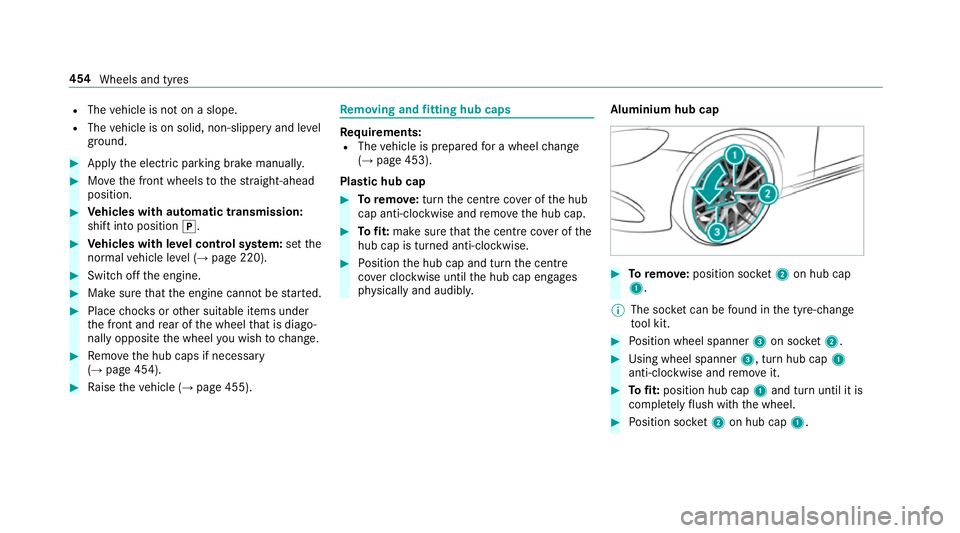
Position the hub cap and turn the cent re
co ver clockwise until the hub cap engages
ph ysically and audibly. Aluminium hub cap #
Toremo ve:position soc ket2 on hub cap
1.
% The soc ket can be found in the tyre-change
to ol kit. #
Position wheel spanner 3on soc ket2. #
Using wheel spanner 3, turn hub cap1
anti-clo ckwise and remo veit. #
Tofit: position hub cap 1and turn until it is
comple tely flush with the wheel. #
Position soc ket2 on hub cap 1. 454
Wheels and tyres