2018 MERCEDES-BENZ CLS engine
[x] Cancel search: enginePage 85 of 334
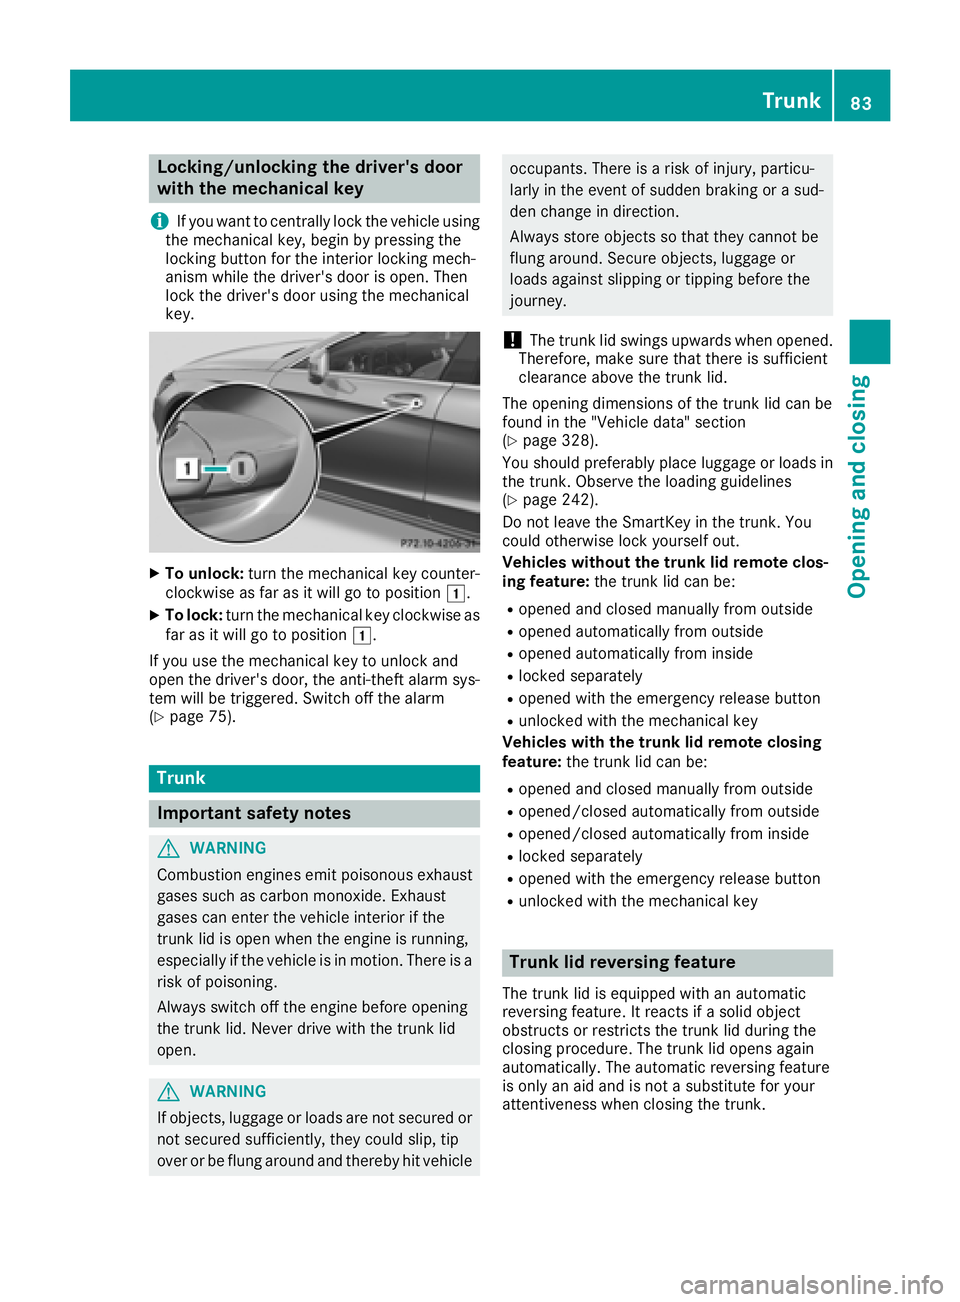
Locking/unlocking the driver's door
with the mechanical key
i If you want to centrally lock the vehicle using
the mechanical key, begin by pressing the
locking button for the interior locking mech-
anism while the driver's door is open. Then
lock the driver's door using the mechanical
key.
X
To unlock: turn the mechanical key counter-
clockwise as far as it will go to position �G .X
To lock: turn the mechanical key clockwise as
far as it will go to position �G .
If you use the mechanical key to unlock and
open the driver's door, the anti-theft alarm sys-
tem will be triggered. Switch off the alarm
( Y
page 75).
Trunk
Important safety notes
G WARNING
Combustion engines emit poisonous exhaust
gases such as carbon monoxide. Exhaust
gases can enter the vehicle interior if the
trunk lid is open when the engine is running,
especially if the vehicle is in motion. There is a
risk of poisoning.
Always switch off the engine before opening
the trunk lid. Never drive with the trunk lid
open.
G WARNING
If objects, luggage or loads are not secured or
not secured sufficiently, they could slip, tip
over or be flung around and thereby hit vehicle occupants. There is a risk of injury, particu-
larly in the event of sudden braking or a sud-
den change in direction.
Always store objects so that they cannot be
flung around. Secure objects, luggage or
loads against slipping or tipping before the
journey.
! The trunk lid swings upwards when opened.
Therefore, make sure that there is sufficient
clearance above the trunk lid.
The opening dimensions of the trunk lid can be
found in the "Vehicle data" section
( Y
page 328).
You should preferably place luggage or loads in
the trunk. Observe the loading guidelines
( Y
page 242).
Do not leave the SmartKey in the trunk. You
could otherwise lock yourself out.
Vehicles without the trunk lid remote clos-
ing feature: the trunk lid can be: R
opened and closed manually from outside R
opened automatically from outside R
opened automatically from inside R
locked separately R
opened with the emergency release button R
unlocked with the mechanical key
Vehicles with the trunk lid remote closing
feature: the trunk lid can be: R
opened and closed manually from outside R
opened/closed automatically from outside R
opened/closed automatically from inside R
locked separately R
opened with the emergency release button R
unlocked with the mechanical key
Trunk lid reversing feature The trunk lid is equipped with an automatic
reversing feature. It reacts if a solid object
obstructs or restricts the trunk lid during the
closing procedure. The trunk lid opens again
automatically. The automatic reversing feature
is only an aid and is not a substitute for your
attentiveness when closing the trunk. Trunk 83
Opening and closing Z
Page 87 of 334
G WARNING
Combustion engines emit poisonous exhaust
gases such as carbon monoxide. Exhaust
gases can enter the vehicle interior if the
trunk lid is open when the engine is running,
especially if the vehicle is in motion. There is a
risk of poisoning.
Always switch off the engine before opening
the trunk lid. Never drive with the trunk lid
open.
! The trunk lid swings upwards when opened.
Therefore, make sure that there is sufficient
clearance above the trunk lid.
The opening dimensions of the trunk lid can be
found in the "Vehicle data" section
( Y
page 328).
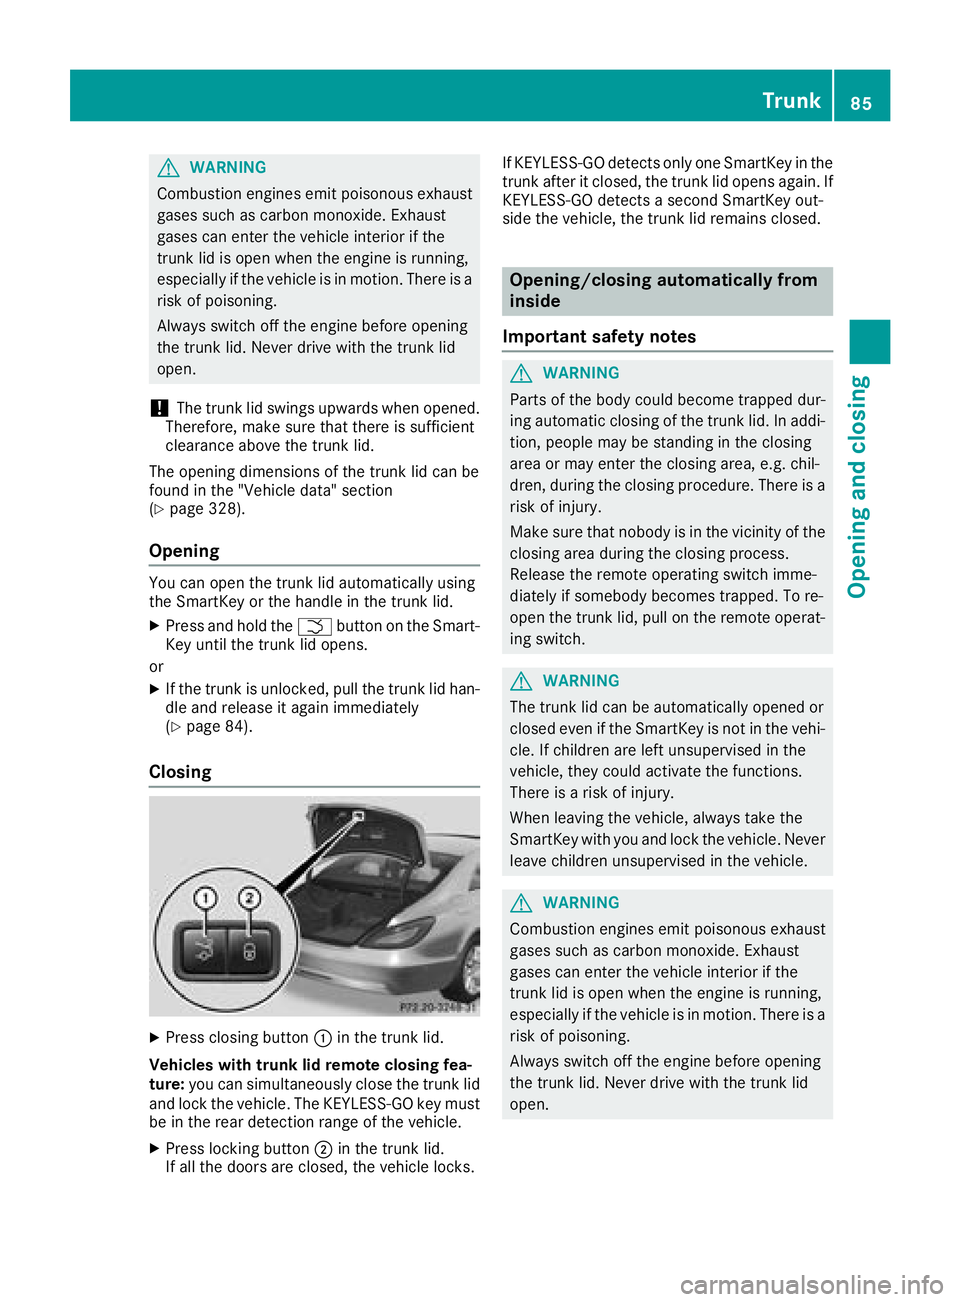
Opening You can open the trunk lid automatically using
the SmartKey or the handle in the trunk lid. X
Press and hold the �T button on the Smart-
Key until the trunk lid opens.
or X
If the trunk is unlocked, pull the trunk lid han-
dle and release it again immediately
( Y
page 84).
Closing
X
Press closing button �C in the trunk lid.
Vehicles with trunk lid remote closing fea-
ture: you can simultaneously close the trunk lid
and lock the vehicle. The KEYLESS-GO key must
be in the rear detection range of the vehicle. X
Press locking button �D in the trunk lid.
If all the doors are closed, the vehicle locks. If KEYLESS-GO detects only one SmartKey in the
trunk after it closed, the trunk lid opens again. If
KEYLESS-GO detects a second SmartKey out-
side the vehicle, the trunk lid remains closed.
Opening/closing automatically from
inside
Important safety notes
G WARNING
Parts of the body could become trapped dur-
ing automatic closing of the trunk lid. In addi-
tion, people may be standing in the closing
area or may enter the closing area, e.g. chil-
dren, during the closing procedure. There is a
risk of injury.
Make sure that nobody is in the vicinity of the
closing area during the closing process.
Release the remote operating switch imme-
diately if somebody becomes trapped. To re-
open the trunk lid, pull on the remote operat-
ing switch.
G WARNING
The trunk lid can be automatically opened or
closed even if the SmartKey is not in the vehi-
cle. If children are left unsupervised in the
vehicle, they could activate the functions.
There is a risk of injury.
When leaving the vehicle, always take the
SmartKey with you and lock the vehicle. Never
leave children unsupervised in the vehicle.
G WARNING
Combustion engines emit poisonous exhaust
gases such as carbon monoxide. Exhaust
gases can enter the vehicle interior if the
trunk lid is open when the engine is running,
especially if the vehicle is in motion. There is a
risk of poisoning.
Always switch off the engine before opening
the trunk lid. Never drive with the trunk lid
open. Trunk 85
Opening and closing Z
Page 90 of 334

X
To open fully: press the switch beyond the
point of resistance and release it.
Automatic operation is started. X
To close manually: pull and hold the corre-
sponding switch. X
To close fully: pull the corresponding switch
beyond the pressure point.
Automatic operation is started. X
To interrupt automatic operation: press/
pull the corresponding switch again.
If you press/pull the switch beyond the point of
resistance, automatic operation is started in the
corresponding direction. You can stop auto-
matic operation by pressing/pulling the switch
again.
You can continue to operate the side windows
after you switch off the engine or remove the
SmartKey. This function is available for up to five
minutes or until the driver's or front-passenger
door is opened.
When the override feature for the side windows
is activated, the side windows cannot be oper-
ated from the rear ( Y
page 63).
Convenience opening
General notes You can ventilate the vehicle before you start
driving. To do this, the SmartKey is used to carry
out the following functions simultaneously: R
unlock the vehicle R
open the side windows R
open the sliding sunroof R
switch on the seat ventilation for the driver's
seat
The convenience opening feature can only be
operated using the SmartKey. The SmartKey
must be in close proximity to the vehicle.
The "convenience opening" feature is also avail-
able when the vehicle is unlocked.
Convenience opening X
Press and hold the �6 button until the side
windows and the sliding sunroof are in the
desired position. X
To interrupt convenience opening: release
the �6 button. Convenience closing feature
Important safety notes Information on the side window reversing fea-
ture ( Y
page 87).
G WARNING
When the convenience closing feature is oper-
ating, parts of the body could become trapped
in the closing area of the side window and the
sliding sunroof. There is a risk of injury.
Observe the complete closing procedure
when the convenience closing feature is oper-
ating. Make sure that no body parts are in
close proximity during the closing procedure.
Proceed as follows if someone is trapped:
With the SmartKey: X
Release the �7 button.X
Press the �6 button until the side windows
and the sliding sunroof reopen.
With KEYLESS-GO: X
Release the sensor surface on the door han-
dle. X
Immediately pull and hold the door handle
and keep the door handle pulled.
The side windows and the sliding sunroof
open.
General notes When you lock the vehicle, you can simultane-
ously: R
close the side windows R
close the sliding sunroof
Using the SmartKey X
Vehicles without KEYLESS-GO: point the tip
of the SmartKey at the door handle on the
driver's door. X
Vehicles with KEYLESS-GO: the SmartKey
must be in close proximity to the vehicle. X
Press and hold the �7 button until the side
windows and the sliding sunroof are fully
closed. X
Press and hold the �7 button until the side
windows are fully closed.88
Side windows
Opening and closing
Page 95 of 334
Correct driver's seat position
G WARNING
You could lose control of your vehicle if you do
the following while driving: R
adjust the driver's seat, head restraint,
steering wheel or mirrors R
fasten the seat belt
There is a risk of an accident.
Adjust the driver's seat, head restraint, steer-
ing wheel and mirror and fasten your seat belt
before starting the engine.
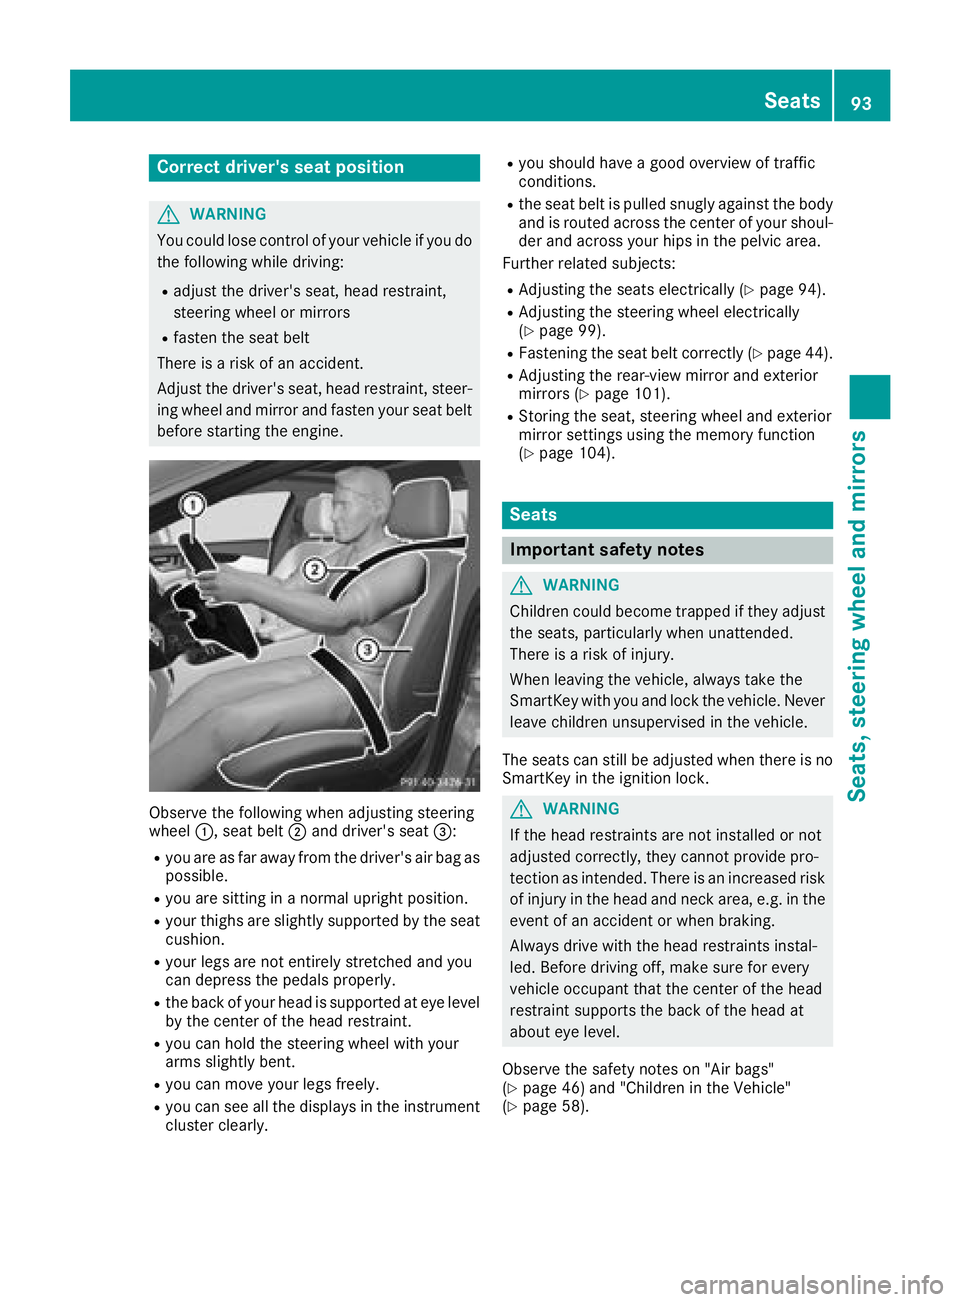
Observe the following when adjusting steering
wheel �C , seat belt �D and driver's seat �
Page 96 of 334
G WARNING
You could lose control of your vehicle if you do
the following while driving: R
adjust the driver's seat, head restraint,
steering wheel or mirrors R
fasten the seat belt
There is a risk of an accident.
Adjust the driver's seat, head restraint, steer-
ing wheel and mirror and fasten your seat belt
before starting the engine.
G WARNING
If you adjust the seat height carelessly, you or
other vehicle occupants could be trapped and
thereby injured. Children in particular could
accidentally press the electrical seat adjust-
ment buttons and become trapped. There is a
risk of injury.
While moving the seats, make sure that your
hands or other body parts do not get under the
lever assembly of the seat adjustment sys-
tem.
G WARNING
When you adjust a seat, you or other vehicle
occupants could become trapped, e.g. on the
seat guide rail. There is a risk of injury.
Make sure when adjusting a seat that no one
has any body parts in the sweep of the seat.
! To avoid damage to the seats and the seat
heating, observe the following information: R
keep liquids from spilling on the seats. If
liquid is spilled on the seats, dry them as
soon as possible. R
if the seat covers are damp or wet, do not
switch on the seat heating. The seat heat-
ing should also not be used to dry the seats. R
clean the seat covers as recommended;
see "Interior care". R
do not transport heavy loads on the seats.
Do not place sharp objects on the seat
cushions, e.g. knives, nails or tools. The
seats should only be occupied by passen-
gers, if possible. R
when the seat heating is in operation, do
not cover the seats with insulating materi- als, e.g. blankets, coats, bags, seat covers,
child seats or booster seats.
! Make sure that there are no objects in the
footwell under or behind the seats when mov-
ing the seats back. There is a risk that the
seats and/or the objects could be damaged.
i The head restraints in the front seats are
installed with the NECK-PRO system
( Y
page 55). For this reason, it is not possible
to remove the head restraints from the front
seats.
For more information, contact a qualified spe-
cialist workshop.
i Further related subjects: R
Rear bench seat through-loading feature
( Y
page 245)
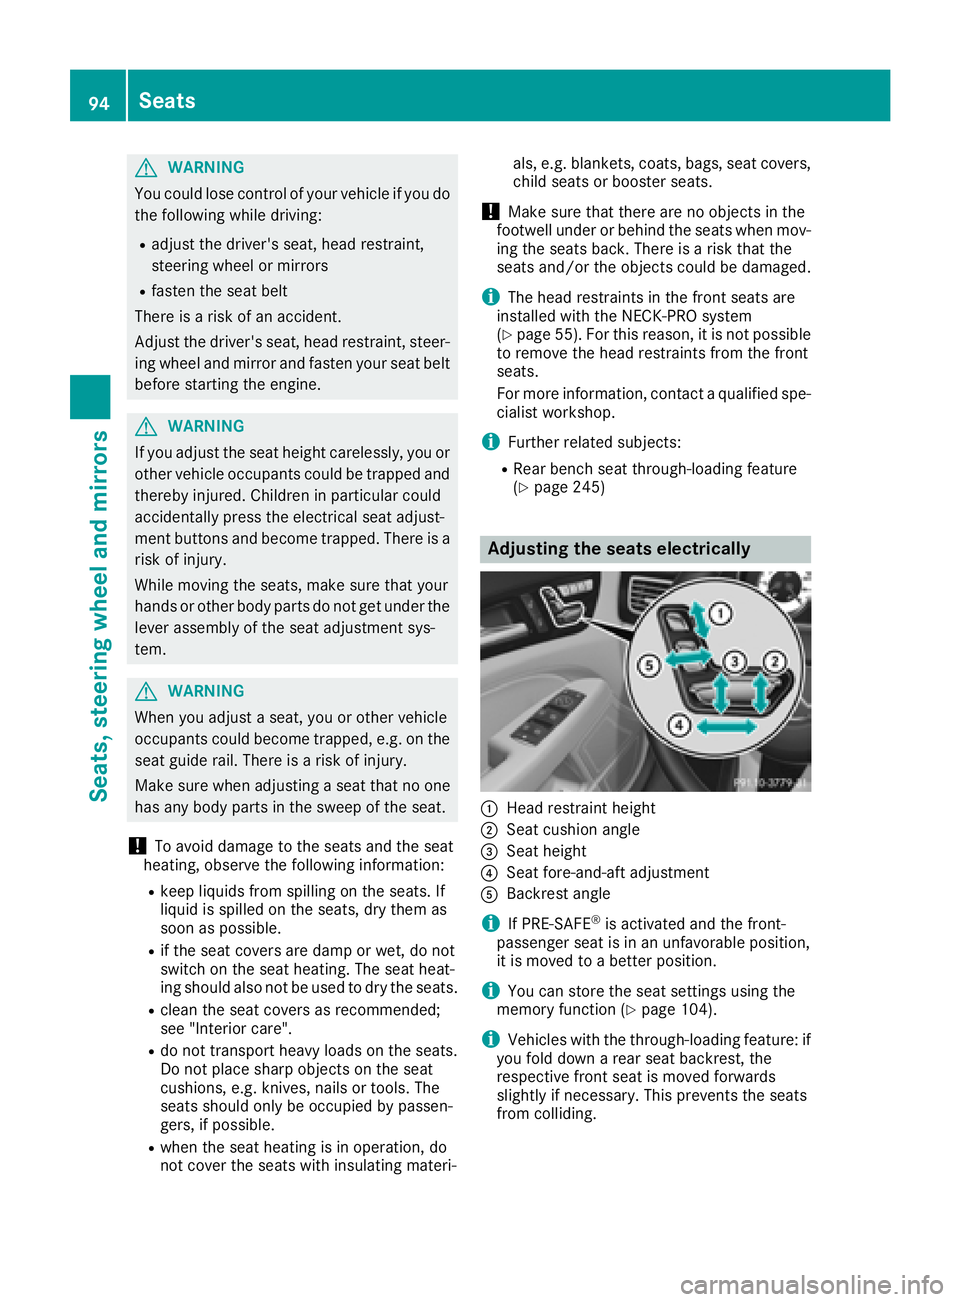
Adjusting the seats electrically
�C
Head restraint height �D
Seat cushion angle �
Page 97 of 334
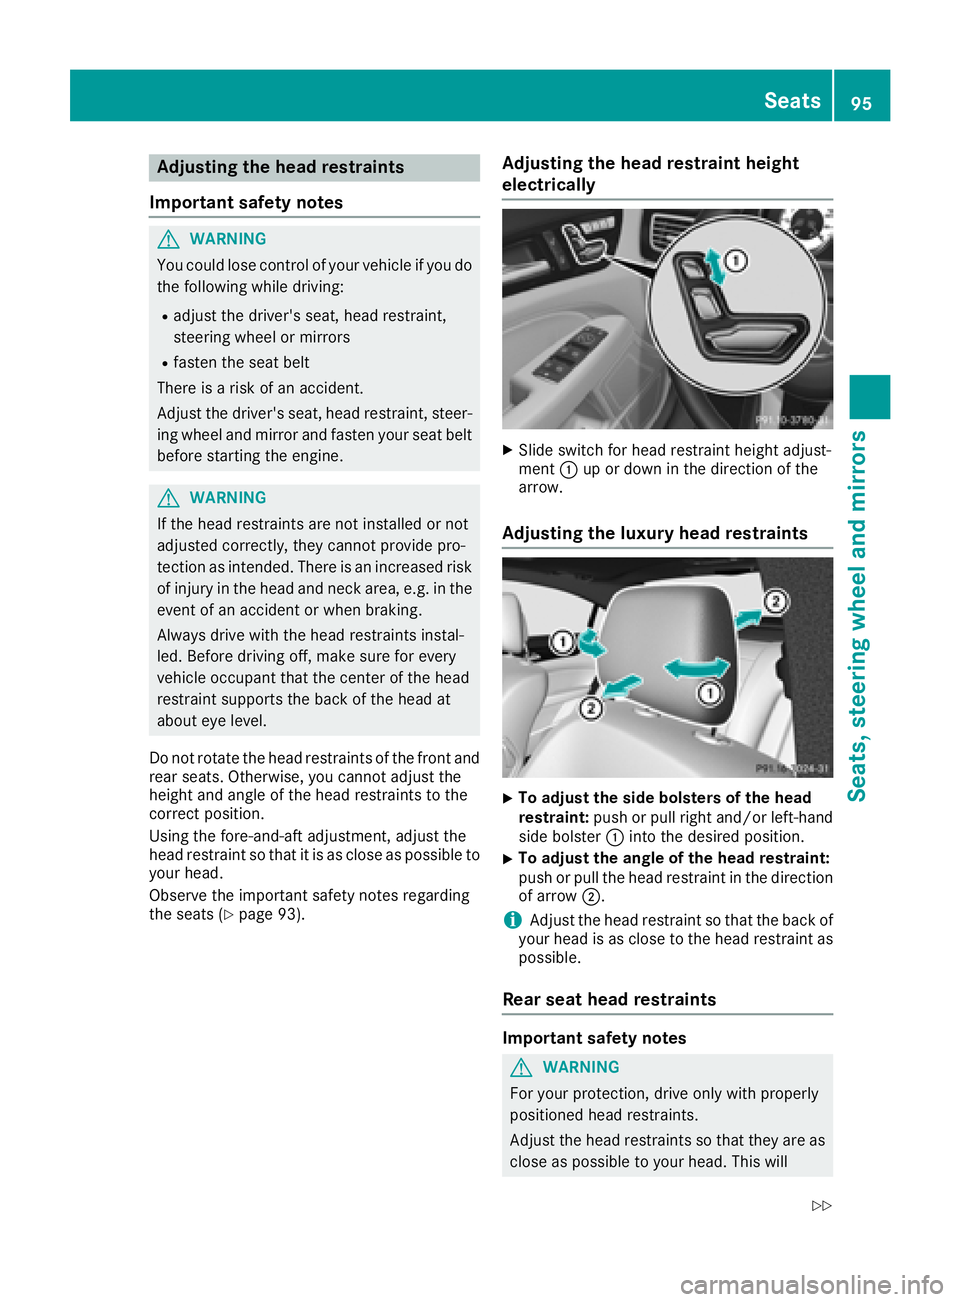
Adjusting the head restraints
Import ant safety notes
G WARNIN G
You could lose control of your vehicl e if you do
th e followin g while driving:R
adjust th e driver's seat , head restraint,
steering whee l or mirror sR
faste n th e seat belt
There is a ris k of an accident.
Adjus t th e driver's seat , head restraint, steer -
ing whee l and mirror and faste n your seat belt
before starting th e engine.
G WARNIN G
If th e head restraints are no t installed or no t
adjusted correctly, they canno t provid e pro -
tection as intended. There is an increased ris k
of injury in th e head and neck area, e.g. in th e
event of an acciden t or when braking .
Always drive wit h th e head restraints instal -
led. Befor e drivin g off , mak e sur e for every
vehicl e occupant that th e center of th e head
restrain t support s th e bac k of th e head at
about eye level.
Do no t rotate th e head restraints of th e fron t and
rear seats. Otherwise , you canno t adjust th e
height and angle of th e head restraints to th e
correc t position .
Using th e fore-and-af t adjustment, adjust th e
head restrain t so that it is as close as possibl e to
your head .
Observ e th e important safet y note s regarding
th e seat s ( Y
page 93). Adjusting the head restraint height
elect ri cally X
Slide switch for head restrain t height adjust -
men t �C up or down in th e direction of th e
arrow.
Adjusting the luxury head restraints
X
To adjust th e sid e bolsters of th e hea d
restraint: push or pull right and/o r left-han d
side bolste r �C int o th e desired position .X
To adjust th e angle of th e hea d restraint:
push or pull th e head restrain t in th e direction
of arrow �D .
i Adjus t th e head restrain t so that th e bac k of
your head is as close to th e head restrain t as
possible.
Rear seat head restraints
Important safety notes
G WARNIN G
Fo r your protection , drive only wit h properly
positioned head restraints .
Adjus t th e head restraints so that they are as
close as possibl e to your head . This willSeats 95
Seats, steering wheel and mirrors Z
Page 100 of 334
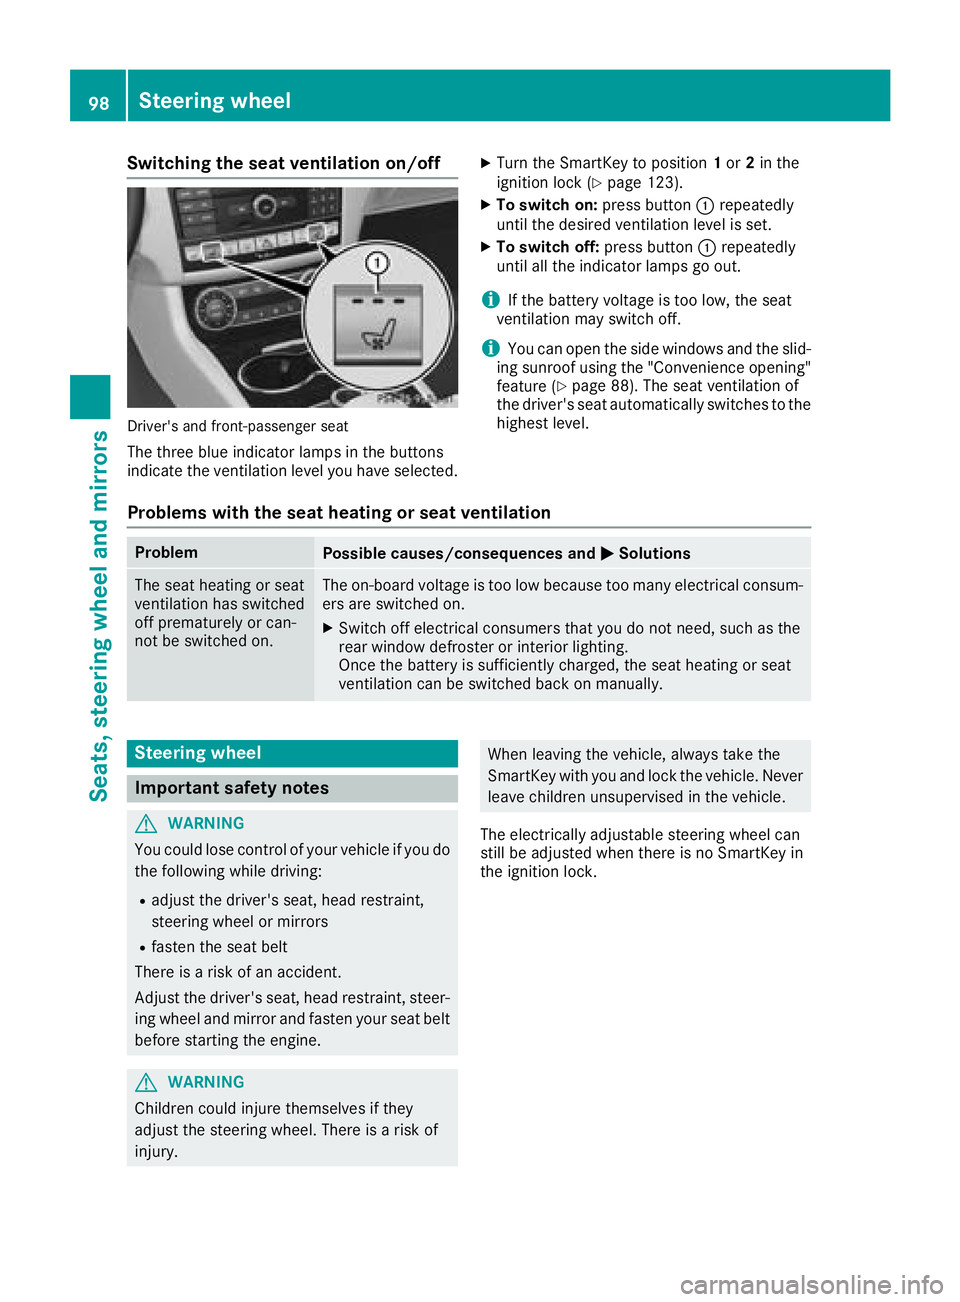
Switching the seat ventilation on/off
Driver's and front-passenger seat
The three blue indicator lamps in the buttons
indicate the ventilation level you have selected. X
Turn the SmartKey to position 1 or 2 in the
ignition lock ( Y
page 123). X
To switch on: press button �C repeatedly
until the desired ventilation level is set. X
To switch off: press button �C repeatedly
until all the indicator lamps go out.
i If the battery voltage is too low, the seat
ventilation may switch off.
i You can open the side windows and the slid-
ing sunroof using the "Convenience opening"
feature ( Y
page 88). The seat ventilation of
the driver's seat automatically switches to the
highest level.
Problems with the seat heating or seat ventilation Problem
Possible causes/consequences and �P Solutions
The seat heating or seat
ventilation has switched
off prematurely or can-
not be switched on. The on-board voltage is too low because too many electrical consum-
ers are switched on. X
Switch off electrical consumers that you do not need, such as the
rear window defroster or interior lighting.
Once the battery is sufficiently charged, the seat heating or seat
ventilation can be switched back on manually.
Steering wheel
Important safety notes
G WARNING
You could lose control of your vehicle if you do
the following while driving: R
adjust the driver's seat, head restraint,
steering wheel or mirrors R
fasten the seat belt
There is a risk of an accident.
Adjust the driver's seat, head restraint, steer-
ing wheel and mirror and fasten your seat belt
before starting the engine.
G WARNING
Children could injure themselves if they
adjust the steering wheel. There is a risk of
injury. When leaving the vehicle, always take the
SmartKey with you and lock the vehicle. Never
leave children unsupervised in the vehicle.
The electrically adjustable steering wheel can
still be adjusted when there is no SmartKey in
the ignition lock.98
Steering wheel
Seats, steering wheel and mirrors
Page 103 of 334
Mirrors
Exterior mirrors
Adjusting the exterior mirrors
G WARNING
You could lose control of your vehicle if you do
the following while driving: R
adjust the driver's seat, head restraint,
steering wheel or mirrors R
fasten the seat belt
There is a risk of an accident.
Adjust the driver's seat, head restraint, steer-
ing wheel and mirror and fasten your seat belt
before starting the engine.
G WARNING
The exterior mirror on the front-passenger
side reduces the size of the image. Visible
objects are actually closer than they appear.
This means that you could misjudge the dis-
tance from road users traveling behind, e.g.
when changing lane. There is a risk of an acci-
dent.
For this reason, always make sure of the
actual distance from the road users traveling
behind by glancing over your shoulder.
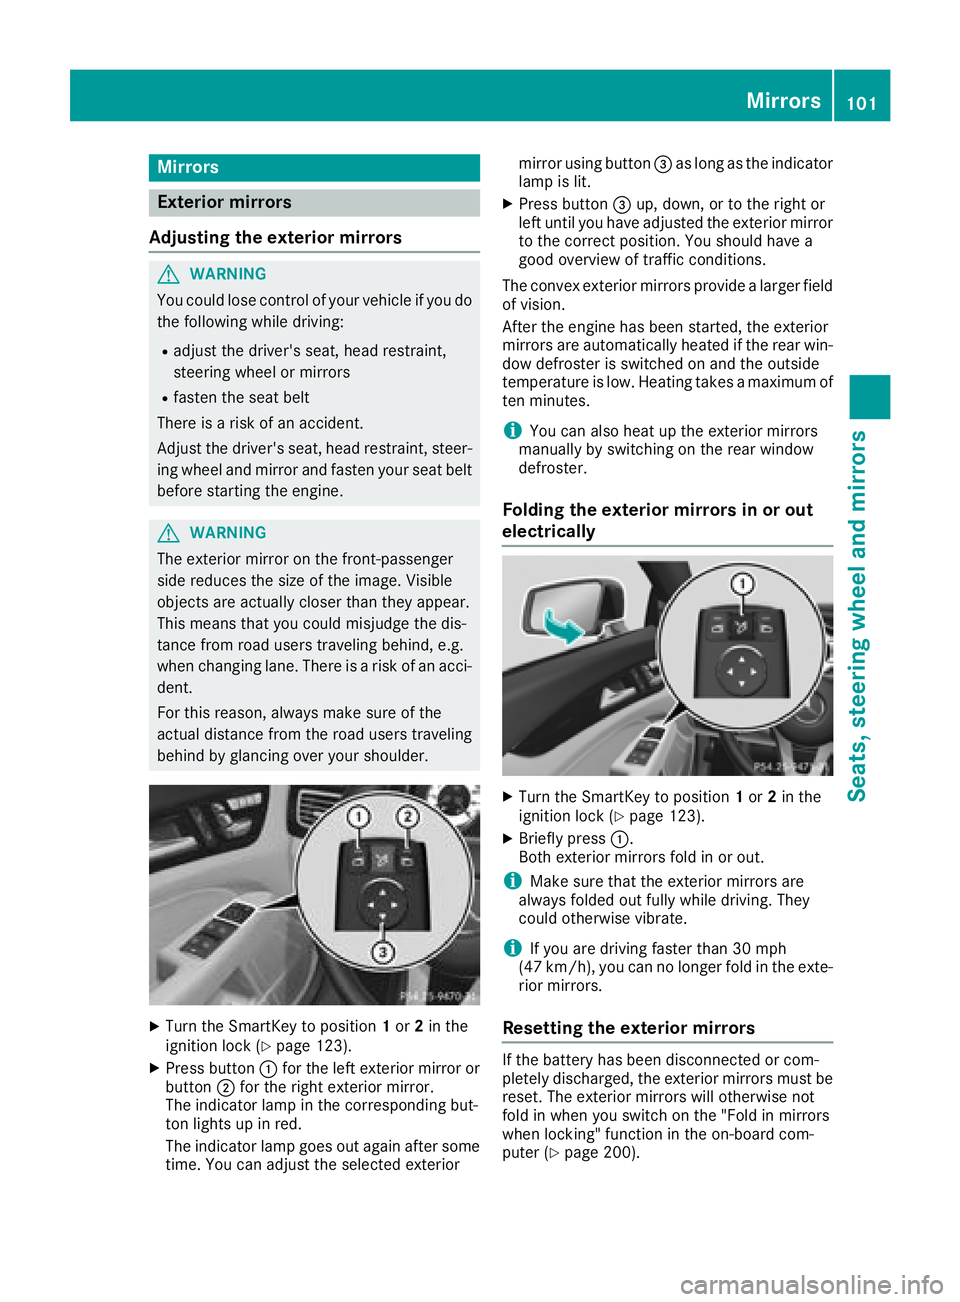
X
Turn the SmartKey to position 1 or 2 in the
ignition lock ( Y
page 123).X
Press button �C for the left exterior mirror or
button �D for the right exterior mirror.
The indicator lamp in the corresponding but-
ton lights up in red.
The indicator lamp goes out again after some
time. You can adjust the selected exterior mirror using button �