2018 MERCEDES-BENZ CLS change wheel
[x] Cancel search: change wheelPage 296 of 334
MOExtended tires (tires with run-flat
properties) With MOExtended tires (tires with run flat char-
acteristics), you can continue to drive your vehi-
cle even if there is a total loss of pressure in one
or more tires.
MOExtended tires may only be used in conjunc-
tion with an active tire pressure loss warning
system or with an active tire pressure monitor
and on wheels specifically tested by Mercedes-
Benz.
Notes on driving with MOExtended tires with a
flat tire ( Y
page 278).
Vehicles equipped with MOExtended tires are
not equipped with a TIREFIT kit at the factory. It
is therefore recommended that you additionally
equip your vehicle with a TIREFIT kit if you mount
tires that do not feature run-flat properties, e.g.
winter tires. A TIREFIT kit can be obtained from
a qualified specialist workshop.
Winter operation
General notes Have your vehicle winter-proofed at a qualified
specialist workshop at the onset of winter.
Observe the notes in the "Changing a wheel"
section ( Y
page 312).
Driving with summer tires At temperatures below 45 ‡ (+7 †), summer
tires lose elasticity and therefore traction and
braking power. Change the tires on your vehicle
to M+S tires. Using summer tires at very cold
temperatures could cause cracks to form,
thereby damaging the tires permanently.
Mercedes-Benz cannot accept responsibility for
this type of damage.
G WARNING
Damaged tires can cause tire inflation pres-
sure loss. As a result, you could lose control of
your vehicle. There is a risk of accident.
Check the tires regularly for signs of damage
and replace any damaged tires immediately. M+S tires
G WARNING
M+S tires with a tire tread depth of less than
�
Page 297 of 334
To avoid hazardous situations: R
never install snow chains to the front
wheels R
always install snow chains in pairs to the
rear wheels.
! On vehicles with AIRMATIC, you must drive
at raised vehicle level if snow chains have
been mounted. The vehicle may otherwise be
damaged.
! On some tire sizes there is not enough space
for snow chains. To avoid damage to the vehi-
cle or tires, observe the "Wheel and tire com-
binations" section under "Tires and wheels".
For safety reasons, Mercedes-Benz recom-
mends that you only use snow chains that have
been specially approved for your vehicle by
Mercedes-Benz, or are of a corresponding
standard of quality. For more information, con-
tact a qualified specialist workshop.
If you intend to mount snow chains, please bear
the following points in mind: R
Snow chains may not be mounted on all
wheel/tire combinations. Permissible
wheel/tire combinations ( Y
page 317).R
Only use snow chains when driving on roads
completely covered by snow. Remove the
snow chains as soon as possible when you
come to a road that is not snow-covered. R
Local regulations may restrict the use of snow
chains. Observe the appropriate regulations if
you wish to mount snow chains. R
Do not exceed the maximum permissible
speed of 31 mph (50 km/h).
i You may wish to deactivate ESP ®
when pull-
ing away with snow chains installed: R
All vehicles (except Mercedes ‑ AMG vehi-
cles) ( Y
page 70)R
Mercedes-AMG vehicles: ( Y
page 71)
You can thereby allow the wheels to spin in a
controlled manner, achieving an increased
driving force (cutting action).
Information about driving with an emergency
spare wheel ( Y
page 317). Tire pressure
Tire pressure specifications
Important safety notes
G WARNING
Underinflated or overinflated tires pose the
following risks: R
the tires may burst, especially as the load
and vehicle speed increase. R
the tires may wear excessively and/or
unevenly, which may greatly impair tire
traction. R
the driving characteristics, as well as steer-
ing and braking, may be greatly impaired.
There is a risk of an accident.
Follow recommended tire inflation pressures
and check the pressure of all the tires includ-
ing the spare wheel: R
monthly, at least R
if the load changes R
before beginning a long journey R
under different operating conditions, e.g.
off-road driving
If necessary, correct the tire pressure.
The data on the Tire and Loading Information
placard and tire pressure table shown here are
examples. Tire pressure specifications are vehi-
cle-specific and may deviate from the data
shown here. The tire pressure specifications
that are valid for your vehicle can be found on
the Tire and Loading Information placard and
tire pressure table on the vehicle.
General notes The recommended tire pressures for the tires
mounted at the factory can be found on the
labels described here.
Operation with an emergency spare wheel:
information on operation with an emergency
spare wheel can be found in the general notes in
the "Emergency spare wheel" section
( Y
page 318).
Further information on tire pressures can be
obtained at a qualified specialist workshop. Tire pressure 295
Wheels and tires Z
Page 299 of 334
Important notes on tire pressure
G WARNIN G
If th e tire pressur e drops repeatedly, th e
wheel, valv e or tire may be damaged. Tir e
pressur e that is to o low may result in a tire
blow-out . Ther e is a ris k of an accident.R
Chec k th e tire for foreign objects .R
Chec k whether th e whee l is losing air or th e
valv e is leaking .
If you are unable to rectify th e damage, con-
tac t a qualified specialist workshop.
G WARNIN G
If you fit unsuitable accessories onto tire
valves, th e tire valves may be overloaded and
malfunction , whic h can caus e tire pressur e
loss . Due to their design , retrofitte d tire pres-
sur e monitors keep th e tire valv e open . This
can also result in tire pressur e loss . Ther e is a
ris k of an accident.
Only screw th e standard valv e cap or other
valv e cap s approve d by Mercedes-Ben z for
your vehicl e onto th e tire valve.
Use a suitable pressur e gauge to chec k th e tire
pressure. The outer appearanc e of a tire does
no t permit any reliable conclusio n about th e tire
pressure. On vehicles equipped wit h th e elec -
tronic tire pressur e monitor, th e tire pressur e
can be checke d in th e on-board computer.
The tire temperature and pressur e increas e
when th e vehicl e is in motion . This is dependen t
on th e driving spee d and th e load.
Therefore, you should only correc t tire pres-
sures when th e tires are cold.
The tires are cold: R
if th e vehicl e has been parked wit h th e tires
out of direct sunligh t for at least three hour s
and R
if th e vehicl e has no t been driven further than
1 mile (1. 6 km)
The tire temperature changes depending on th e
outside temperature, th e vehicl e spee d and th e
tire l oad. If th e ti
re temperature changes by
18 ‡ (10 †), th e tire pressur e changes by
approximately 10 kP a (0. 1 bar/1.5 psi) . Tak e
this int o accoun t when checkin g th e pressur e of
warm tires . Only correc t th e tire pressur e if it is to o low for th e curren t operating conditions. If
you chec k th e tire pressur e when th e tires are
warm , th e resulting value will be higher than if
th e tires were cold. This is normal. Do no t
reduce th e tire pressur e to th e value specifie d
for cold tires . The tire pressur e would otherwise
be to o low.
Observ e th e recommended tire pressures for
cold tires : R
on th e Tir e and Loading Information placard
on th e B-pillar on th e driver' s sideR
in th e tire pressur e table on th e fuel filler flap
( Y
page 139)
Underinflated or overinflated tires
Underinflated tires
G WARNIN G
Tires wit h pressur e that is to o low can over-
heat and burs t as a consequence . In addition ,
they also suffer from excessiv e and/o r irreg-
ular wear , whic h can severely impair th e brak -
ing properties and th e driving characteristics .
Ther e is a ris k of an accident.
Avoid tire pressures that are to o low in all th e
tires , includin g th e spar e wheel.
Underinflated tires may: R
overheat, leadin g to tire defects R
adversely affec t handlin gR
wear excessively and/o r unevenlyR
hav e an adverse effec t on fuel consumption
Overinflated tires
G WARNIN G
Tires wit h excessively high pressur e can burs t
because they are damaged mor e easil y by
road debris, pothole s etc. In addition , they
also suffer from irregular wear , whic h can
severely impair th e braking properties and th e
driving characteristics . Ther e is a ris k of an
accident.
Avoid tire pressures that are to o high in all th e
tires , includin g th e spar e wheel.Tire pressure 297
Wheels and tires Z
Page 300 of 334
Overinflated tires may: R
increase the braking distance R
adversely affect handling R
wear excessively and/or unevenly R
have an adverse effect on ride comfort R
be more susceptible to damage
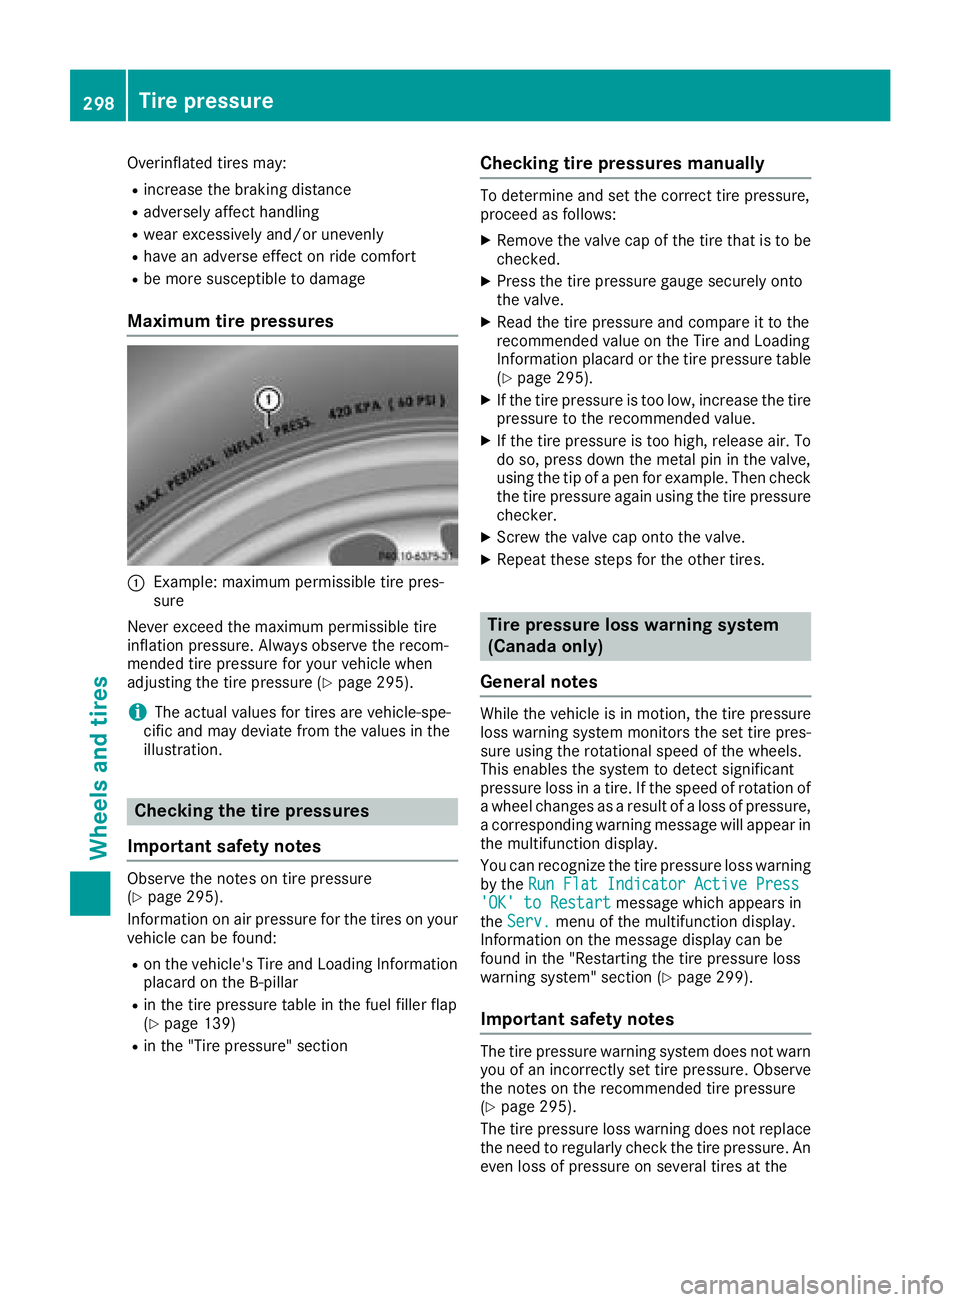
Maximum tire pressures
�C
Example: maximum permissible tire pres-
sure
Never exceed the maximum permissible tire
inflation pressure. Always observe the recom-
mended tire pressure for your vehicle when
adjusting the tire pressure ( Y
page 295).
i The actual values for tires are vehicle-spe-
cific and may deviate from the values in the
illustration.
Checking the tire pressures
Important safety notes Observe the notes on tire pressure
( Y
page 295).
Information on air pressure for the tires on your
vehicle can be found: R
on the vehicle's Tire and Loading Information
placard on the B-pillar R
in the tire pressure table in the fuel filler flap
( Y
page 139)R
in the "Tire pressure" section Checking tire pressures manually To determine and set the correct tire pressure,
proceed as follows: X
Remove the valve cap of the tire that is to be
checked. X
Press the tire pressure gauge securely onto
the valve. X
Read the tire pressure and compare it to the
recommended value on the Tire and Loading
Information placard or the tire pressure table
( Y
page 295). X
If the tire pressure is too low, increase the tire
pressure to the recommended value. X
If the tire pressure is too high, release air. To
do so, press down the metal pin in the valve,
using the tip of a pen for example. Then check
the tire pressure again using the tire pressure
checker. X
Screw the valve cap onto the valve. X
Repeat these steps for the other tires.
Tire pressure loss warning system
(Canada only)
General notes While the vehicle is in motion, the tire pressure
loss warning system monitors the set tire pres-
sure using the rotational speed of the wheels.
This enables the system to detect significant
pressure loss in a tire. If the speed of rotation of
a wheel changes as a result of a loss of pressure,
a corresponding warning message will appear in
the multifunction display.
You can recognize the tire pressure loss warning
by the Run Flat Indicator Active Press
'OK' to Restart message which appears in
the Serv. menu of the multifunction display.
Information on the message display can be
found in the "Restarting the tire pressure loss
warning system" section ( Y
page 299).
Important safety notes
The tire pressure warning system does not warn
you of an incorrectly set tire pressure. Observe
the notes on the recommended tire pressure
( Y
page 295).
The tire pressure loss warning does not replace
the need to regularly check the tire pressure. An
even loss of pressure on several tires at the298
Tire pressure
Wheels and tires
Page 301 of 334

same time cannot be detected by the tire pres-
sure loss warning system.
The tire pressure monitor is not able to warn you
of a sudden loss of pressure, e.g. if the tire is
penetrated by a foreign object. In the event of a
sudden loss of pressure, bring the vehicle to a
halt by braking carefully. Avoid abrupt steering
movements.
The function of the tire pressure loss warning
system is limited or delayed if: R
snow chains are mounted on your vehicle's
tires. R
road conditions are wintry. R
you are driving on sand or gravel. R
you adopt a very sporty driving style (corner-
ing at high speeds or driving with high rates of
acceleration). R
you are driving with a heavy load (in the vehi-
cle or on the roof).
Restarting the tire pressure loss warn-
ing system Restart the tire pressure loss warning system if
you have: R
changed the tire pressure R
changed the wheels or tires R
mounted new wheels or tires X
Before restarting, make sure that the tire
pressures are set properly on all four tires for
the respective operating conditions.
The recommended tire pressure can be found
on the Tire and Loading Information placard
on the B-pillar on the driver's side. Addition-
ally, a tire pressure table is attached to the
fuel filler flap. The tire pressure loss warning
system can only give reliable warnings if you
have set the correct tire pressure. If an incor-
rect tire pressure is set, these incorrect val-
ues will be monitored. X
Also observe the notes in the section on tire
pressures ( Y
page 295).X
Make sure that the SmartKey is in position 2
in the ignition lock ( Y
page 123).X
Press the �Y or �e button on the steering
wheel to select the Serv. menu. X
Press the �c or �d button on the steering
wheel to select the Tire Pressure menu.X
Press the �v button.
The Run Flat Indicator Active Press
'OK' to Restart message appears in the
multifunction display.
If you wish to confirm the restart: X
Press the �v button.
The Tire Pressure Now OK? message
appears in the multifunction display. X
Press the �c or �d button to select Yes .X
Press the �v button.
The Run Flat Indicator Restarted mes-
sage appears in the multifunction display.
After a teach-in period, the tire pressure loss
warning system will monitor the set tire pres-
sures of all four tires.
If you wish to cancel the restart: X
Press the �8 button.
or X
When the Tire Pressure Now OK? message
appears, press the �c or �d button to
select Cancel . X
Press the �v button.
The tire pressure values stored at the last
restart will continue to be monitored.
Tire pressure monitor
General notes If a tire pressure monitor is installed, the vehi-
cle's wheels have sensors that monitor the tire
pressures in all four tires. The tire pressure mon-
itor warns you if the pressure drops in one or
more of the tires. The tire pressure monitor only
functions if the corresponding sensors are
installed in all wheels.
Information on tire pressures is displayed in the
multifunction display. After a few minutes of
driving, the current tire pressure of each tire is
shown in the Service menu of the multifunction
display, see illustration (example). Tire pressure 299
Wheels and tires Z
Page 304 of 334
Restarting the tire pressure monitor When you restart the tire pressure monitor, all
existing warning messages are deleted and the
warning lamps go out. The monitor uses the cur-
rently set tire pressures as the reference values
for monitoring. In most cases, the tire pressure
monitor will automatically detect the new refer-
ence values after you have changed the tire
pressure. However, you can also define refer-
ence values manually as described here. The tire
pressure monitor then monitors the new tire
pressure values. X
Set the tire pressure to the value recommen-
ded for the corresponding driving situation on
the Tire and Loading Information placard on
the driver's side B-pillar ( Y
page 295).
You can find more tire pressure values for
various operating conditions in the tire pres-
sure table inside the fuel filler flap
( Y
page 295).X
Make sure that the tire pressure is correct on
all four wheels. X
Make sure that the SmartKey is in position 2
in the ignition lock. X
Press the �Y or �e button on the steering
wheel to select the Service menu.X
Press the �c or �d button to select
Tire Pressure .X
Press the �v button.
The multifunction display shows the current
tire pressure for the individual tires or the
Tire pressures will be displayed
after driving a few minutes message.X
Press the �d button.
The Use Current Pressures as New Ref‐
erence Values message appears in the mul-
tifunction display.
If you wish to confirm the restart: X
Press the �v button.
The Tire Press. Monitor Restarted mes-
sage appears in the multifunction display.
After driving for a few minutes, the system
checks whether the current tire pressures are
within the specified range. The new tire pres-
sures are then accepted as reference values
and monitored.
If you wish to cancel the restart: X
Press the �8 button.
The tire pressure values stored at the last
restart will continue to be monitored. Radio type approval for the tire pres-
sure monitor Country Radio type approval number
USA FCC ID: MRXMW2433A
FCC ID: MRXGG4
FCC ID: MRXMC34MA4
Canada IC: 2546A-MW2433A
IC: 2546A-GG4
IC: 2546A-MC34MA4
Loading the vehicle
Instruction labels for tires and loads
G WARNING
Overloaded tires can overheat, causing a
blowout. Overloaded tires can also impair the
steering and driving characteristics and lead
to brake failure. There is a risk of accident.
Observe the load rating of the tires. The load
rating must be at least half of the GAWR of
your vehicle. Never overload the tires by
exceeding the maximum load.
Two instruction labels on your vehicle show the
maximum possible load.
(1) The Tire and Loading Information placard is
on the B-pillar on the driver's side. The Tire
and Loading Information placard shows the
maximum permissible number of occu-
pants and the maximum permissible vehicle
load. It also contains details of the tire sizes
and corresponding pressures for tires
mounted at the factory.
(2) The vehicle identification plate is on the B-
pillar on the driver's side. The vehicle iden-
tification plate informs you of the gross
vehicle weight rating. It is made up of the
vehicle weight, all vehicle occupants, the
fuel and the cargo. You can also find infor-
mation about the maximum gross axle
weight rating on the front and rear axle.
The maximum gross axle weight rating is
the maximum weight that can be carried by
one axle (front or rear axle). Never exceed
the maximum load or the maxi mum g ross
a
xle weight rating for the front or rear axle.302
Loading the vehicle
Wheels and tires
Page 316 of 334
must be positioned vertically, directly under
the jacking point of the vehicle.
! The jack is designed exclusively for jacking
up the vehicle at the jacking points. Other-
wise, your vehicle could be damaged.
Observe the following when raising the vehicle: R
To raise the vehicle, only use the vehicle-spe-
cific jack that has been tested and approved
by Mercedes-Benz. If used incorrectly, the
jack could tip over with the vehicle raised. R
The jack is designed only to raise and hold the
vehicle for a short time while a wheel is being
changed. It must not be used for performing
maintenance work under the vehicle. R
Avoid changing the wheel on uphill and down-
hill slopes. R
Before raising the vehicle, secure it from roll-
ing away by applying the parking brake and
inserting wheel chocks. Do not disengage the
parking brake while the vehicle is raised. R
The jack must be placed on a firm, flat and
non-slip surface. On a loose surface, a large,
flat, load-bearing underlay must be used. On a
slippery surface, a non-slip underlay must be
used, e.g. rubber mats. R
Do not use wooden blocks or similar objects
as a jack underlay. Otherwise, the jack will not
be able to achieve its load-bearing capacity
due to the restricted height. R
Make sure that the distance between the
underside of the tires and the ground does not
exceed 1.2 in (3 cm). R
Never place your hands and feet under the
raised vehicle. R
Do not lie under the vehicle. R
Do not start the engine when the vehicle is
raised. R
Do not open or close a door or the trunk lid
when the vehicle is raised. R
Make sure that no persons are present in the
vehicle when the vehicle is raised.
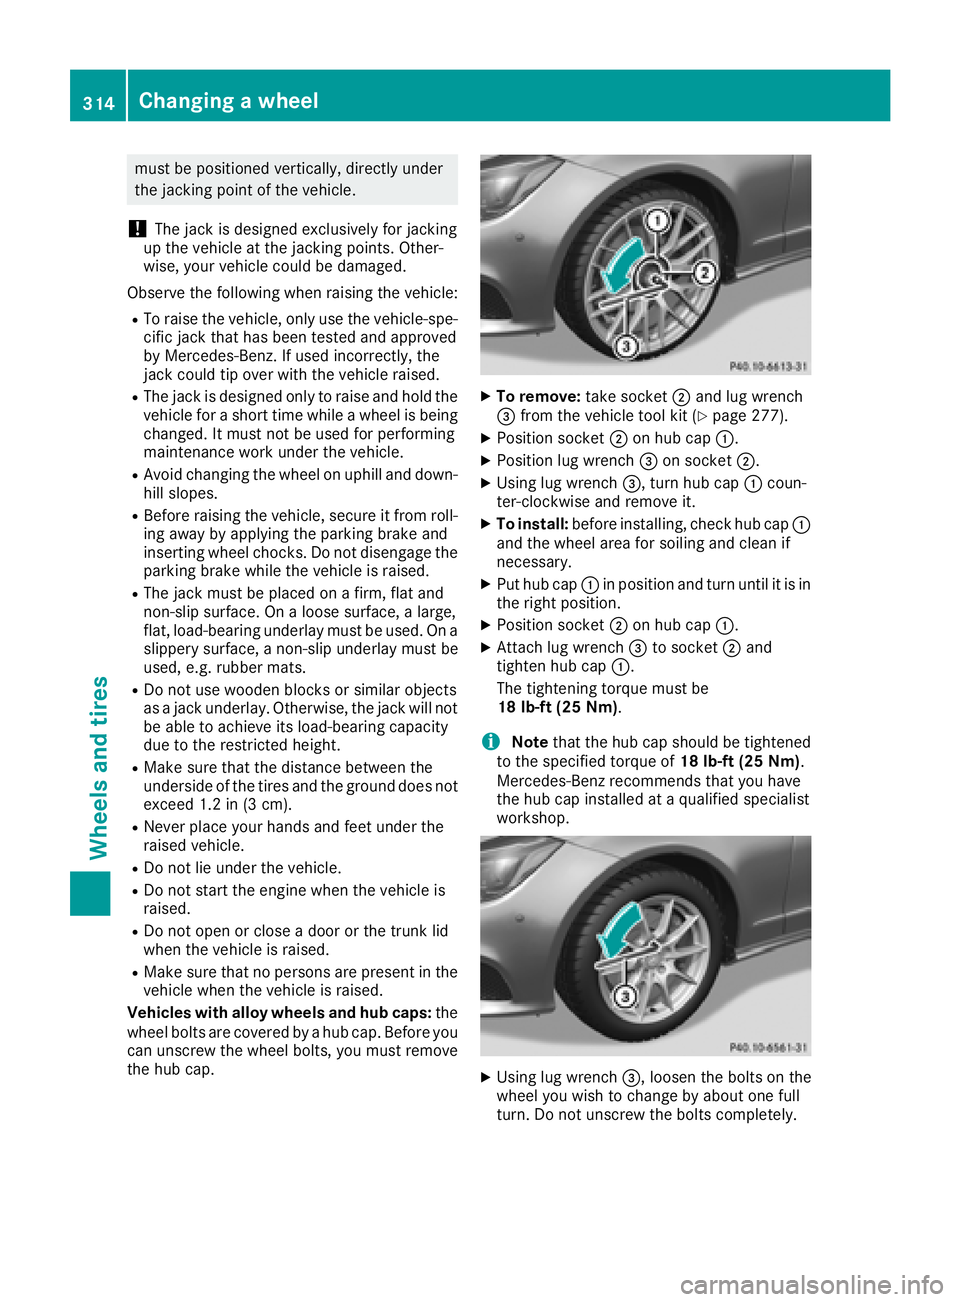
Vehicles with alloy wheels and hub caps: the
wheel bolts are covered by a hub cap. Before y ou
ca n unscrew the wheel bolts, you must remove
the hub cap. X
To remove: take socket �D and lug wrench
�
Page 318 of 334

Always pay attention to the instructions and
safety notes in the "Changing a wheel" section
( Y
page 312).
Only use wheel bolts that have been designed
for the wheel and the vehicle. For safety rea-
sons, Mercedes-Benz recommends that you
only use wheel bolts which have been approved
for Mercedes-Benz vehicles and the respective
wheel.
! Mercedes-AMG vehicles with ceramic-
brake disc: during removal and repositioning
of the wheel, the wheel rim can strike the
ceramic-brake disc and damage it. Therefore,
you should proceed carefully and get a sec-
ond person assist to you. Alternatively, you
can use a second alignment bolt.
! To prevent damage to the paintwork, hold
the wheel securely against the wheel hub
while screwing in the first wheel bolt.
X
Clean the wheel and wheel hub contact sur-
faces. X
Slide the wheel to be mounted onto the align-
ment bolt and push it on. X
Tighten the wheel bolts until they are finger-
tight. X
Unscrew the alignment bolt. X
Tighten the last wheel bolt until it is finger-
tight. X
Vehicles with a collapsible spare wheel:
inflate the collapsible spare wheel
( Y
page 319).
Only then lower the vehicle. Lowering the vehicle
G WARNING
The wheels could work loose if the wheel nuts
and bolts are not tightened to the specified
tightening torque. There is a risk of accident.
Have the tightening torque immediately
checked at a qualified specialist workshop
after a wheel is changed.
! Vehicles with a collapsible spare wheel:
before lowering the vehicle, inflate the col-
lapsible spare wheel with the tire inflation
compressor. The wheel rim could otherwise
be damaged. X
Turn the crank of the jack counter-clockwise
until the vehicle is once again standing firmly
on the ground. X
Place the jack to one side.
X
Tighten the wheel bolts evenly in a crosswise
pattern in the sequence indicated ( �C to �