2018 MERCEDES-BENZ CLS run flat
[x] Cancel search: run flatPage 293 of 334

The fuses are located in various fuse boxes: R
Fuse box in the engine compartment on the
left-hand side of the vehicle, when viewed in
the direction of travel R
Fuse box in the trunk on the right-hand side of
the vehicle, when viewed in the direction of
travel
Fuse box in the engine compartment Pay attention to the important safety notes
( Y
page 290).
G WARNING
When the hood is open and the windshield
wipers are set in motion, you can be injured by
the wiper linkage. There is a risk of injury.
Always switch off the windshield wipers and
the ignition before opening the hood.
X
Make sure that the windshield wipers are
turned off. X
Open the hood ( Y
page 265).X
Use a dry cloth to remove any moisture from
the fuse box. X
To open: take lines �C out of the guides.X
Move lines �C to one side.X
Open retaining clamps �D .X
Remove the fuse box cover forwards. X
To close: check whether the seal is lying cor-
rectly in the cover. X
Insert the cover at the rear of the fuse box into
the retainer. X
Fold down the cover and close clamps �D .X
Secure lines �C in the guides.X
Close the hood. Fuse box in the trunk Pay attention to the important safety notes
( Y
page 290).
X
Open the trunk lid. X
To open: release cover �C at the top right and
left-hand sides with a flat object. X
Open cover �C downwards in the direction of
the arrow. Fuses 291
Breakdown assistance Z
Page 294 of 334
Important safety notes
G WARNIN G
If wheels and tires of th e wrong siz e are used,
th e whee l brakes or suspension component s
may be damaged. Ther e is a ris k of an acci-
dent.
Always replace wheels and tires wit h those
that fulfill th e specification s of th e original
part .
When replacing wheels, mak e sur e to use th e
correct: R
designation R
model
When replacing tires , mak e sur e to use th e
correct: R
designation R
manufacturer R
model
G WARNIN G
A flat tire severely impairs th e driving , steer -
ing and braking characteristics of th e vehicle.
Ther e is a ris k of accident.
Tires without run-flat characteristics :R
do no t driv e wit h a flat tire.R
immediately replace th e flat tire wit h your
emergenc y spar e whee l or spar e wheel, or
consult a qualified specialist workshop.
Tires wit h run-flat characteristics :R
pay attention to th e information and warn -
ing notice s on MOExtended tires (tire s wit h
run-flat characteristics).
Accessories that are no t approve d for your vehi-
cle by Mercedes-Ben z or are no t bein g used cor-
rectl y can impair th e operating safety.
Before purchasing and usin g non-approve d
accessories, visit a qualified specialist work-
sho p and ask about :R
suitabilit yR
legal stipulation sR
factory recommendation s Further information regarding wheels and tires
can be foun d under "Wheel/tire combinations"
( Y
page 317).
You can ask for information regarding permitte d
wheel-tire combination s at an authorize d
Mercedes-Ben z Center.
Information on tire pressur e can be found:R
on th e Tir e and Loading Information placard
on th e B-pillar on th e driver' s side
( Y
page 302) R
in th e tire pressur e table in th e fuel filler flap
( Y
page 139) R
under "Tir e pressure" ( Y
page 295)
Operation
Information on driving Chec k th e tire pressur e when th e vehicl e is
heavily laden and adjust prio r to a trip.
While driving , pay attention to vibrations, noises
and unusual handlin g characteristics , e.g. pull-
ing to on e side . This may indicat e that th e
wheels or tires are damaged. If you suspec t that
a tire is defective, reduce your spee d immedi-
ately. Stop th e vehicl e as soo n as possible to
chec k th e wheels and tires for damage. Hidden
tire damag e could also be causing th e unusual
handlin g characteristics . If you fin d no sign s of
damage, hav e th e tires and wheels checke d at a
qualified specialist workshop.
When parking your vehicle, mak e sur e that th e
tires do no t get deformed by th e cur b or other
obstacles. If they canno t be avoided, driv e ove r
obstacles suc h as curbs slowly and at an obtuse
angle. Otherwise, you may damag e th e wheels
or tires .
Regular checking of wheels and tires
G WARNIN G
Damaged tires can caus e tire inflation pres-
sur e loss . As a result , you could lose control of
your vehicle. Ther e is a ris k of accident.
Chec k th e tires regularly for sign s of damag e
and replace any damaged tires immediately.
Chec k wheels and tires for damag e at least once
a month . Chec k wheels and tires after driving292
Operation
Wheels and tires
Page 296 of 334
MOExtended tires (tires with run-flat
properties) With MOExtended tires (tires with run flat char-
acteristics), you can continue to drive your vehi-
cle even if there is a total loss of pressure in one
or more tires.
MOExtended tires may only be used in conjunc-
tion with an active tire pressure loss warning
system or with an active tire pressure monitor
and on wheels specifically tested by Mercedes-
Benz.
Notes on driving with MOExtended tires with a
flat tire ( Y
page 278).
Vehicles equipped with MOExtended tires are
not equipped with a TIREFIT kit at the factory. It
is therefore recommended that you additionally
equip your vehicle with a TIREFIT kit if you mount
tires that do not feature run-flat properties, e.g.
winter tires. A TIREFIT kit can be obtained from
a qualified specialist workshop.
Winter operation
General notes Have your vehicle winter-proofed at a qualified
specialist workshop at the onset of winter.
Observe the notes in the "Changing a wheel"
section ( Y
page 312).
Driving with summer tires At temperatures below 45 ‡ (+7 †), summer
tires lose elasticity and therefore traction and
braking power. Change the tires on your vehicle
to M+S tires. Using summer tires at very cold
temperatures could cause cracks to form,
thereby damaging the tires permanently.
Mercedes-Benz cannot accept responsibility for
this type of damage.
G WARNING
Damaged tires can cause tire inflation pres-
sure loss. As a result, you could lose control of
your vehicle. There is a risk of accident.
Check the tires regularly for signs of damage
and replace any damaged tires immediately. M+S tires
G WARNING
M+S tires with a tire tread depth of less than
�
Page 300 of 334
Overinflated tires may: R
increase the braking distance R
adversely affect handling R
wear excessively and/or unevenly R
have an adverse effect on ride comfort R
be more susceptible to damage
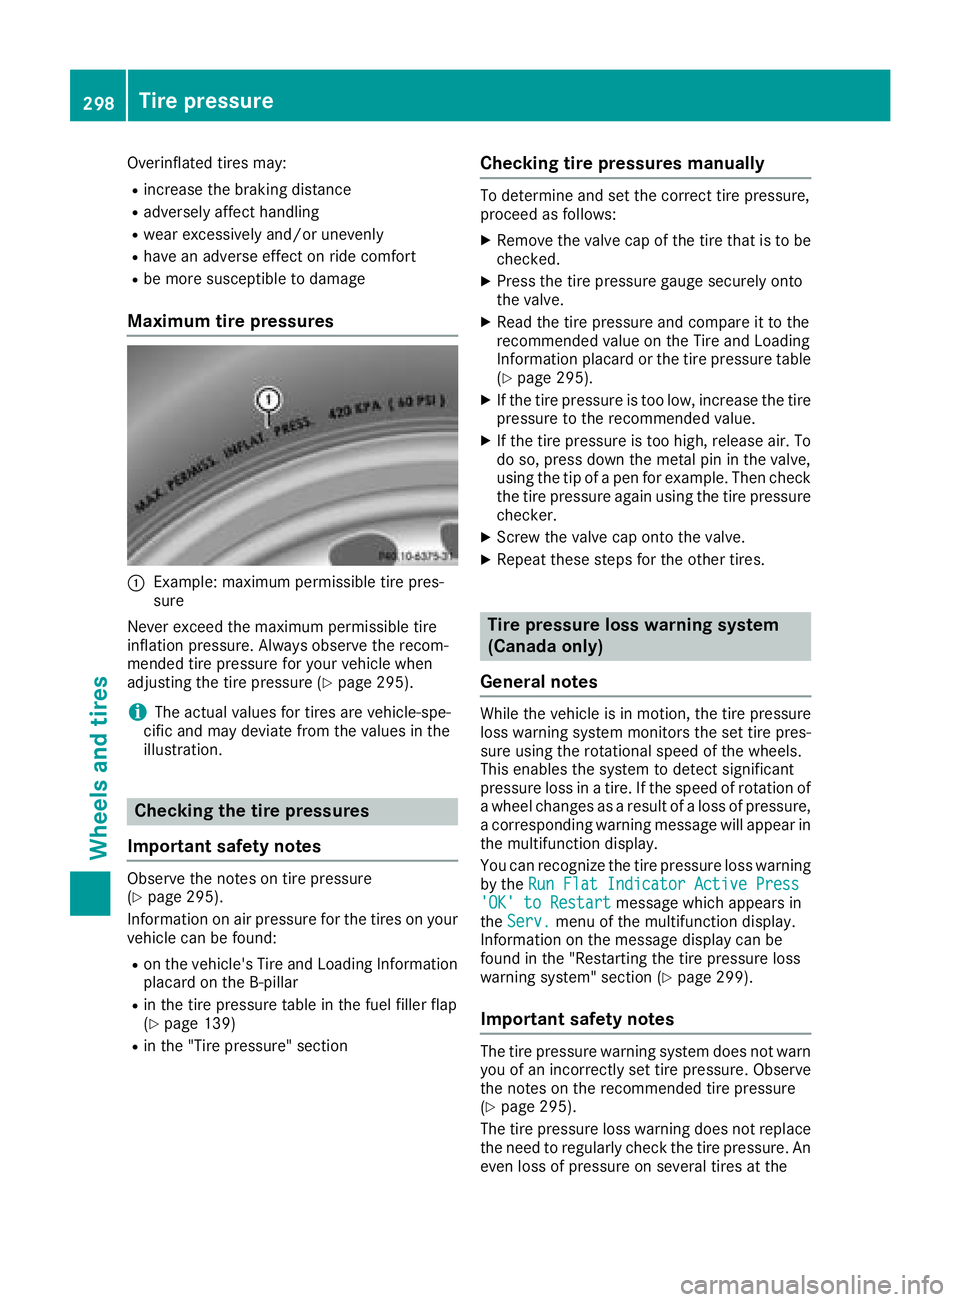
Maximum tire pressures
�C
Example: maximum permissible tire pres-
sure
Never exceed the maximum permissible tire
inflation pressure. Always observe the recom-
mended tire pressure for your vehicle when
adjusting the tire pressure ( Y
page 295).
i The actual values for tires are vehicle-spe-
cific and may deviate from the values in the
illustration.
Checking the tire pressures
Important safety notes Observe the notes on tire pressure
( Y
page 295).
Information on air pressure for the tires on your
vehicle can be found: R
on the vehicle's Tire and Loading Information
placard on the B-pillar R
in the tire pressure table in the fuel filler flap
( Y
page 139)R
in the "Tire pressure" section Checking tire pressures manually To determine and set the correct tire pressure,
proceed as follows: X
Remove the valve cap of the tire that is to be
checked. X
Press the tire pressure gauge securely onto
the valve. X
Read the tire pressure and compare it to the
recommended value on the Tire and Loading
Information placard or the tire pressure table
( Y
page 295). X
If the tire pressure is too low, increase the tire
pressure to the recommended value. X
If the tire pressure is too high, release air. To
do so, press down the metal pin in the valve,
using the tip of a pen for example. Then check
the tire pressure again using the tire pressure
checker. X
Screw the valve cap onto the valve. X
Repeat these steps for the other tires.
Tire pressure loss warning system
(Canada only)
General notes While the vehicle is in motion, the tire pressure
loss warning system monitors the set tire pres-
sure using the rotational speed of the wheels.
This enables the system to detect significant
pressure loss in a tire. If the speed of rotation of
a wheel changes as a result of a loss of pressure,
a corresponding warning message will appear in
the multifunction display.
You can recognize the tire pressure loss warning
by the Run Flat Indicator Active Press
'OK' to Restart message which appears in
the Serv. menu of the multifunction display.
Information on the message display can be
found in the "Restarting the tire pressure loss
warning system" section ( Y
page 299).
Important safety notes
The tire pressure warning system does not warn
you of an incorrectly set tire pressure. Observe
the notes on the recommended tire pressure
( Y
page 295).
The tire pressure loss warning does not replace
the need to regularly check the tire pressure. An
even loss of pressure on several tires at the298
Tire pressure
Wheels and tires
Page 301 of 334

same time cannot be detected by the tire pres-
sure loss warning system.
The tire pressure monitor is not able to warn you
of a sudden loss of pressure, e.g. if the tire is
penetrated by a foreign object. In the event of a
sudden loss of pressure, bring the vehicle to a
halt by braking carefully. Avoid abrupt steering
movements.
The function of the tire pressure loss warning
system is limited or delayed if: R
snow chains are mounted on your vehicle's
tires. R
road conditions are wintry. R
you are driving on sand or gravel. R
you adopt a very sporty driving style (corner-
ing at high speeds or driving with high rates of
acceleration). R
you are driving with a heavy load (in the vehi-
cle or on the roof).
Restarting the tire pressure loss warn-
ing system Restart the tire pressure loss warning system if
you have: R
changed the tire pressure R
changed the wheels or tires R
mounted new wheels or tires X
Before restarting, make sure that the tire
pressures are set properly on all four tires for
the respective operating conditions.
The recommended tire pressure can be found
on the Tire and Loading Information placard
on the B-pillar on the driver's side. Addition-
ally, a tire pressure table is attached to the
fuel filler flap. The tire pressure loss warning
system can only give reliable warnings if you
have set the correct tire pressure. If an incor-
rect tire pressure is set, these incorrect val-
ues will be monitored. X
Also observe the notes in the section on tire
pressures ( Y
page 295).X
Make sure that the SmartKey is in position 2
in the ignition lock ( Y
page 123).X
Press the �Y or �e button on the steering
wheel to select the Serv. menu. X
Press the �c or �d button on the steering
wheel to select the Tire Pressure menu.X
Press the �v button.
The Run Flat Indicator Active Press
'OK' to Restart message appears in the
multifunction display.
If you wish to confirm the restart: X
Press the �v button.
The Tire Pressure Now OK? message
appears in the multifunction display. X
Press the �c or �d button to select Yes .X
Press the �v button.
The Run Flat Indicator Restarted mes-
sage appears in the multifunction display.
After a teach-in period, the tire pressure loss
warning system will monitor the set tire pres-
sures of all four tires.
If you wish to cancel the restart: X
Press the �8 button.
or X
When the Tire Pressure Now OK? message
appears, press the �c or �d button to
select Cancel . X
Press the �v button.
The tire pressure values stored at the last
restart will continue to be monitored.
Tire pressure monitor
General notes If a tire pressure monitor is installed, the vehi-
cle's wheels have sensors that monitor the tire
pressures in all four tires. The tire pressure mon-
itor warns you if the pressure drops in one or
more of the tires. The tire pressure monitor only
functions if the corresponding sensors are
installed in all wheels.
Information on tire pressures is displayed in the
multifunction display. After a few minutes of
driving, the current tire pressure of each tire is
shown in the Service menu of the multifunction
display, see illustration (example). Tire pressure 299
Wheels and tires Z
Page 316 of 334
must be positioned vertically, directly under
the jacking point of the vehicle.
! The jack is designed exclusively for jacking
up the vehicle at the jacking points. Other-
wise, your vehicle could be damaged.
Observe the following when raising the vehicle: R
To raise the vehicle, only use the vehicle-spe-
cific jack that has been tested and approved
by Mercedes-Benz. If used incorrectly, the
jack could tip over with the vehicle raised. R
The jack is designed only to raise and hold the
vehicle for a short time while a wheel is being
changed. It must not be used for performing
maintenance work under the vehicle. R
Avoid changing the wheel on uphill and down-
hill slopes. R
Before raising the vehicle, secure it from roll-
ing away by applying the parking brake and
inserting wheel chocks. Do not disengage the
parking brake while the vehicle is raised. R
The jack must be placed on a firm, flat and
non-slip surface. On a loose surface, a large,
flat, load-bearing underlay must be used. On a
slippery surface, a non-slip underlay must be
used, e.g. rubber mats. R
Do not use wooden blocks or similar objects
as a jack underlay. Otherwise, the jack will not
be able to achieve its load-bearing capacity
due to the restricted height. R
Make sure that the distance between the
underside of the tires and the ground does not
exceed 1.2 in (3 cm). R
Never place your hands and feet under the
raised vehicle. R
Do not lie under the vehicle. R
Do not start the engine when the vehicle is
raised. R
Do not open or close a door or the trunk lid
when the vehicle is raised. R
Make sure that no persons are present in the
vehicle when the vehicle is raised.
Vehicles with alloy wheels and hub caps: the
wheel bolts are covered by a hub cap. Before y ou
ca n unscrew the wheel bolts, you must remove
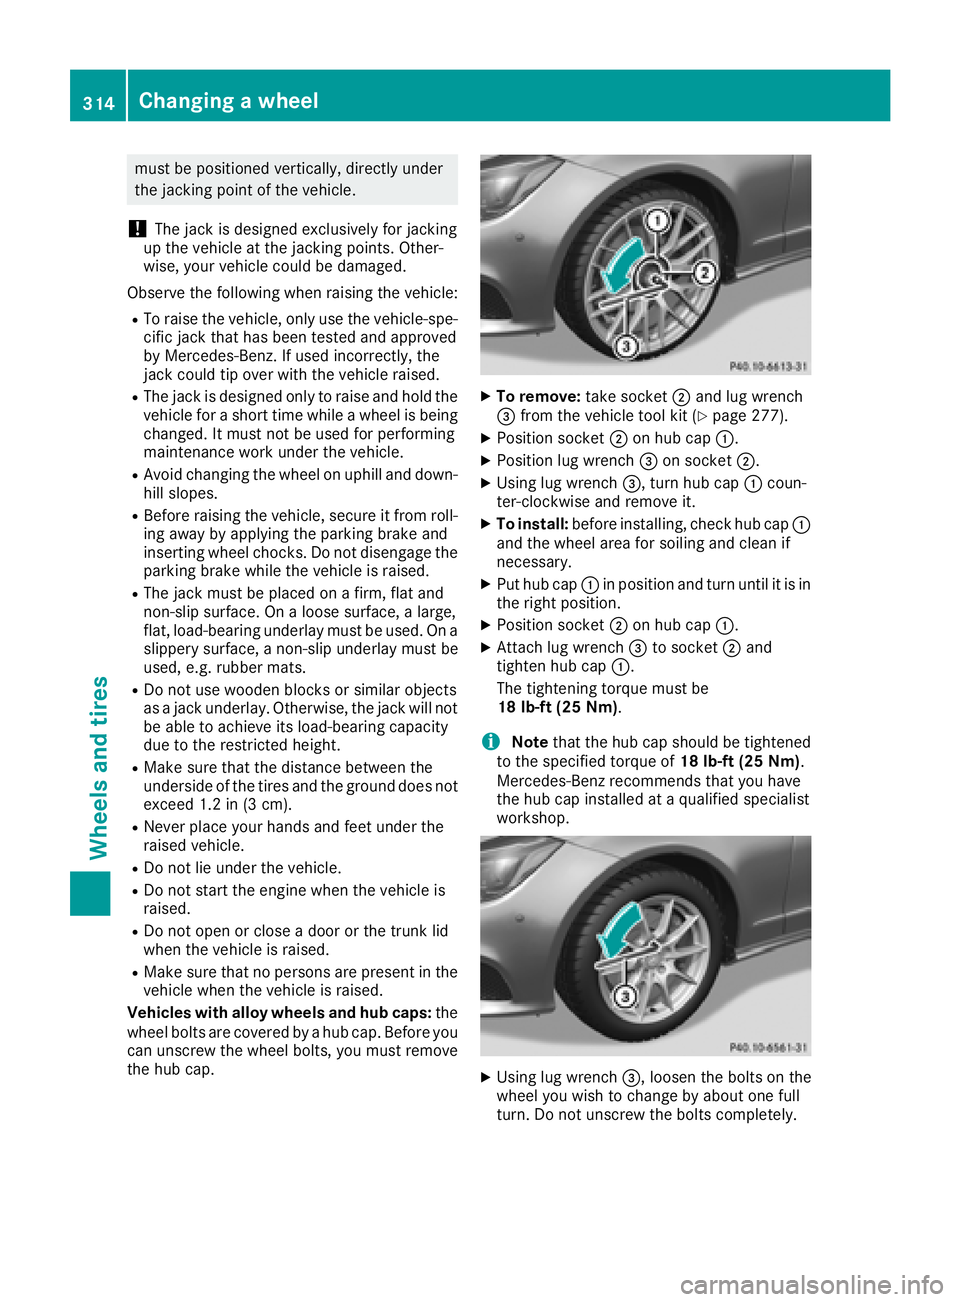
the hub cap. X
To remove: take socket �D and lug wrench
�
Page 319 of 334

Vehicles with a tire pressure control sys-
tem: all installed wheels must be equipped with
functioning sensors.
Wheel and tire combinations You can ask for information regarding permitted
wheel-tire combinations at an authorized
Mercedes-Benz Center.
! For safety reasons, Mercedes-Benz recom-
mends that you only use tires and wheels
which have been approved by Mercedes-Benz
specifically for your vehicle.
These tires have been specially adapted for
use with the control systems, such as ABS or
ESP ®
, and are marked as follows: R
MO = Mercedes-Benz Original R
MOE = Mercedes-Benz Original Extended
(tires featuring run-flat characteristics) R
MO1 = Mercedes-Benz Original (only cer-
tain AMG tires)
Mercedes-Benz Original Extended tires may
only be used on wheels that have been spe-
cifically approved by Mercedes-Benz.
Only use tires, wheels or accessories tested
and approved by Mercedes-Benz. Certain
characteristics, e.g. handling, vehicle noise
emissions or fuel consumption, may other-
wise be adversely affected. In addition, when
driving with a load, tire dimension variations
could cause the tires to come into contact
with the bodywork and axle components. This
could result in damage to the tires or the vehi-
cle.
Mercedes-Benz accepts no liability for dam-
age resulting from the use of tires, wheels or
accessories other than those tested and
approved.
Informati on o n tires, wheels and approved
combi
nations can be obtained from any quali-
fied specialist workshop.
! Retreaded tires are neither tested nor rec-
ommended by Mercedes-Benz, since previ-
ous damage cannot always be detected on
retreaded tires. As a result, Mercedes-Benz
cannot guarantee vehicle safety if retreaded
tires are mounted. Do not mount used tires if
you have no information about their previous
usage. The recommended pressures for various oper-
ating conditions can be found: R
on the Tire and Loading Information placard
on the B-pillar on the driver's side R
in the tire pressure table in the fuel filler flap
Observe the notes on recommended tire pres-
sures under various operating conditions
( Y
page 295).
Check tire pressures regularly, and only when
the tires are cold. Comply with the maintenance
recommendations of the tire manufacturer in
the vehicle document wallet.
Notes on the vehicle equipment – always equip
the vehicle with: R
with tires of the same size on a given axle (left
and right) R
the same type of tires at a given time (summer
tires, winter tires, MOExtended tires)
Exception: it is permissible to install a differ-
ent type or make in the event of a flat tire.
Observe the "MOExtended tires (tires with
run-flat characteristics" section ( Y
page 278).
Vehi cles equipped with MOExtended tires are
not equipped with a TIREFIT kit at the factory. It
is therefore recommended that you additionally
equip your vehicle with a TIREFIT kit if you mount
tires that do not feature run-flat properties, e.g.
winter tires. A TIREFIT kit may be obtained from
a qualified specialist workshop.
Emergency spare wheel
Important safety notes
G WARNING
The wheel or tire size as well as the tire type of
the spare wheel or emergency spare wheel
and the wheel to be replaced may differ.
Mounting an emergency spare wheel may
severely impair the driving characteristics.
There is a risk of an accident.
To avoid hazardous situations: R
adapt your driving style accordingly and
drive carefully. R
never mount more than one spare wheel or
emergency spare wheel that differs in size. R
only use a spare wheel or emergency spare
wheel of a different size briefly.Emergency spare wheel 317
Wheels and tires Z
Page 321 of 334
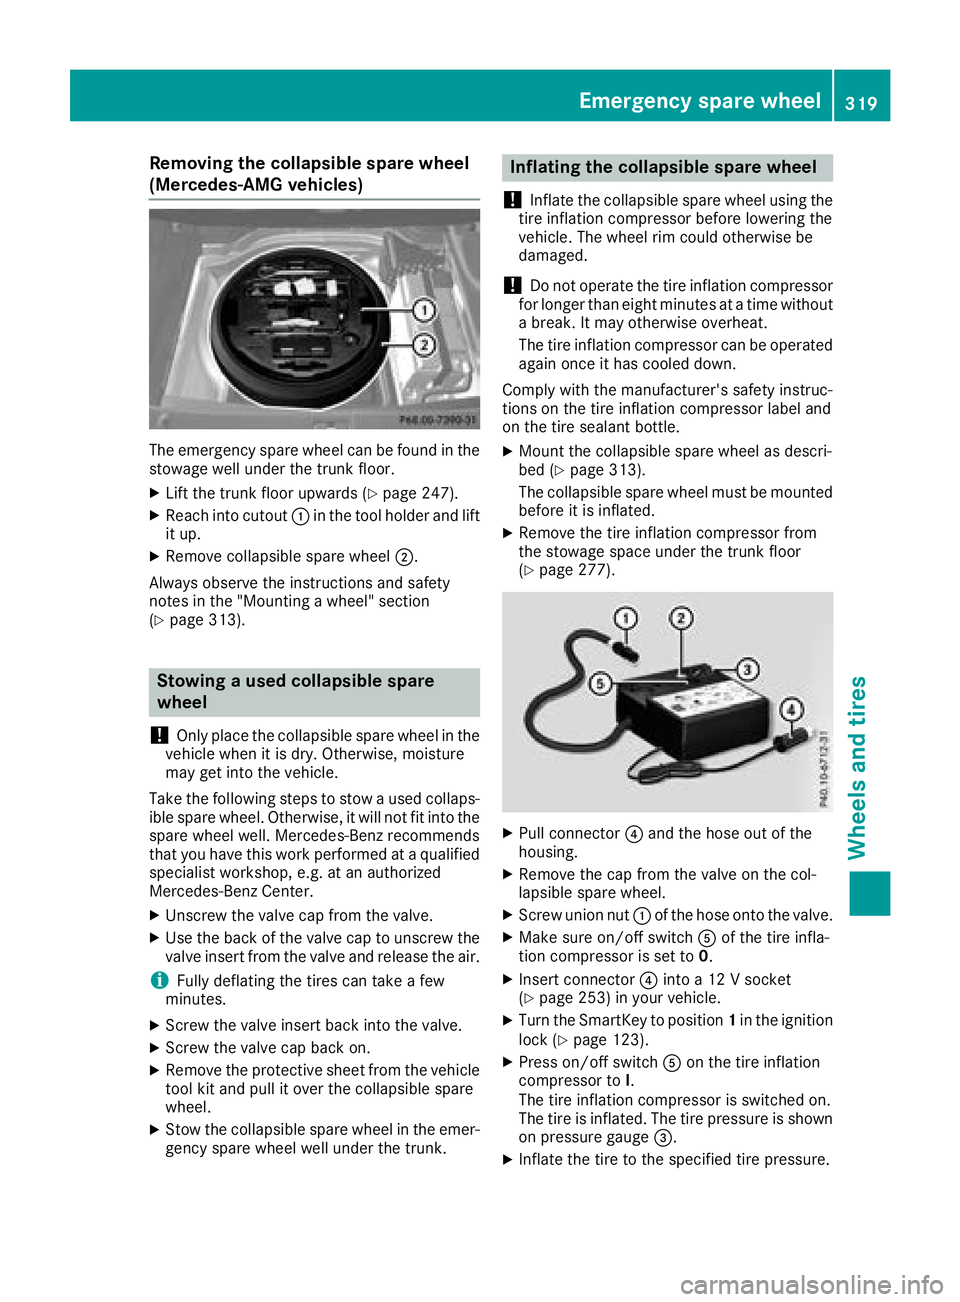
Removing the collapsible spare wheel
(Mercedes-AMG vehicles)
The emergency spare wheel can be found in the
stowage well under the trunk floor. X
Lift the trunk floor upwards ( Y
page 247).X
Reach into cutout �C in the tool holder and lift
it up. X
Remove collapsible spare wheel �D .
Always observe the instructions and safety
notes in the "Mounting a wheel" section
( Y
page 313).
Stowing a used collapsible spare
wheel
! Only place the collapsible spare wheel in the
vehicle when it is dry. Otherwise, moisture
may get into the vehicle.
Take the following steps to stow a used collaps-
ible spare wheel. Otherwise, it will not fit into the
spare wheel well. Mercedes-Benz recommends
that you have this work performed at a qualified
specialist workshop, e.g. at an authorized
Mercedes-Benz Center. X
Unscrew the valve cap from the valve. X
Use the back of the valve cap to unscrew the
valve insert from the valve and release the air.
i Fully deflating the tires can take a few
minutes. X
Screw the valve insert back into the valve. X
Screw the valve cap back on. X
Remove the protective sheet from the vehicle
tool kit and pull it over the collapsible spare
wheel. X
Stow the collapsible spare wheel in the emer-
gency spare wheel well under the trunk. Inflating the collapsible spare wheel
! Inflate the collapsible spare wheel using the
tire inflation compressor before lowering the
vehicle. The wheel rim could otherwise be
damaged.
! Do not operate the tire inflation compressor
for longer than eight minutes at a time without
a break. It may otherwise overheat.
The tire inflation compressor can be operated
again once it has cooled down.
Comply with the manufacturer's safety instruc-
tions on the tire inflation compressor label and
on the tire sealant bottle. X
Mount the collapsible spare wheel as descri-
bed ( Y
page 313).
The collapsible spare wheel must be mounted
before it is inflated. X
Remove the tire inflation compressor from
the stowage space under the trunk floor
( Y
page 277).
X
Pull connector �